Remove drivers from the Windows 7 system. Removing all USB device drivers
Free utility Driver Sweeper will help you completely remove unnecessary drivers or their remnants from the Windows operating system. Moreover, in case of system failures due to the removal of any driver, it will help restore it in a matter of seconds.
It often happens that after installing new drivers on the system, it stops working normally. This happens especially often among beginners who are just beginning to learn the basics. computer literacy. The reason for system failure is most often the remaining traces after removing the drivers, or a conflict between the new version and the old one.
It is not at all easy to correct this situation by removing the remnants of drivers, especially if unofficial or very “ancient” versions of specialized software were installed. In addition, when changing a video card, for example, from NVIDIA to ATI, incompatibility problems may also arise; not only can they, but they will arise in 90% of cases. When replacing a graphics video adapter, you must install the appropriate drivers for it. If you do not remove drivers, they will clog Windows, possibly conflict with it and slow down its operation. Decide this problem will help free program to delete drivers Sweeper. Today we will talk about no, and how to remove Windows drivers using it.
Completely remove drivers using Driver Sweeper
The Driver Sweeper program is distributed by the developer completely free of charge. You can download the driver removal program from our website using the link above, or from the official website of the utility, the address of which is indicated in the table. When installing the utility, please note that along with it you are asked to download and install another program; it is paid, so if you do not need it, then do not download it. This is done like this: In the program installation wizard, carefully review each step and, where necessary, uncheck the “I accept” checkbox License agreement With end user and Privacy Policy and want to install Mobogenie for free.”

After you download and install the program, you can begin removing drivers from the system. By default, Driver Sweeper has an English interface language; to make it more convenient to work with it, it needs to be changed to Russian. To do this, click in the “Options” section of the “Navigation” menu on the “Language” item and then select Russian from the drop-down list (see the figure below). Click the “Apply” button to localize the program interface.

To detect all remnants of previously installed Windows drivers, click on the “Analysis and Cleaning” link, tick the driver checkboxes according to their developers. We recommend checking all checkboxes. Click the “Analyze” button.

The utility will find all specials. programs and their traces, and displays them as a list in the next window. Mark the ones you don't need. If the program has found a lot of garbage and you decide to delete everything, then for easier selection, click on the button with an asterisk located at the very bottom of the list and select “All”. To begin the driver removal procedure in Window, click on the “Cleanup” button.
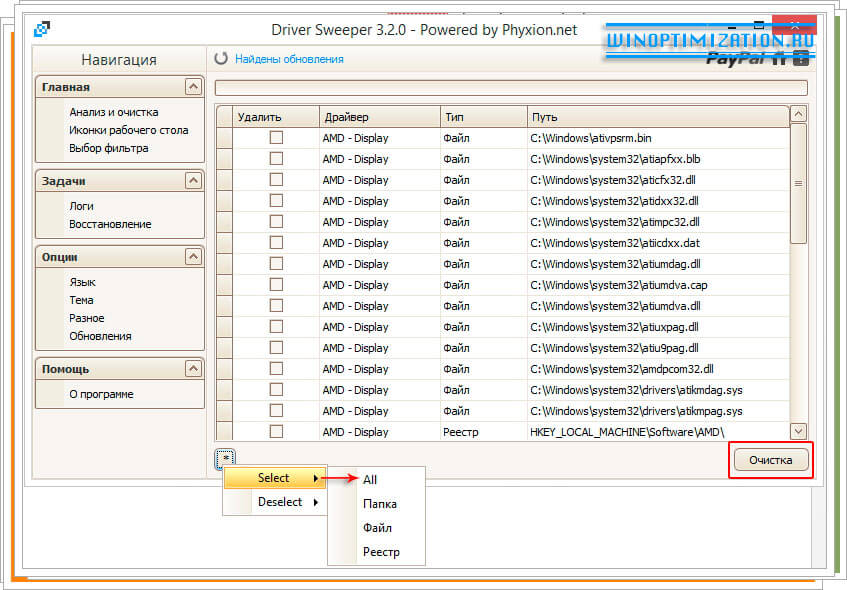
The program will ask you Security Question– “Are you sure you want to continue?” click “Ok” in the dialog box that opens to confirm your intentions. After the utility completes the process of removing drivers from the system, you will need to restart the computer.
If after uninstalling the drivers and rebooting Windows computer will malfunction, then you will be able to recover all deleted files. This is done simply. Launch the Driver Sweeper program again and in the “Navigation” menu, click on the “Recovery” item in the “Tasks” section. On the list deleted files, which the utility will display, select the ones you need and click on “Restore”.
That's all. Good luck!
Similar materials


Hello friends. Today you will find out how to remove driver from your long-suffering computer. We will completely remove only unnecessary drivers that you do not need. This may be necessary if you got rid of some equipment or are going to install the newest version of the “firewood” completely.
The fact is that there are many computer cleaning programs and we have already discussed some in detail (such as CCleaner , FreeSpacer...). They are excellent workers and get the job done, but they are not designed to remove drivers. They simply do not have this function.
You changed your video card or something, installed new drivers from the disk, but what about the old ones? But these old, redundant, unused drivers lie on the sofa in the depths of the system, smoke your cigarettes, drink tea with your own cookies and, scoundrels, they feel completely safe.
Not only do they lie like dead weight, but they also steal computer resources. After all, when connecting any equipment, a search takes place across the entire driver database, without discerning whether it’s old or young. An entire service is involved, the registry is looked through...
So let's come visit these radishes along with free, safe program Driver Sweeper. It is intended precisely for this noble purpose.
Find out how to remove the driver - in detail, thoroughly, step by step and in pictures...
First, let's define what a driver is. In a nutshell, this is a mini-program that helps the system interact and control equipment, be it a mouse, keyboard, monitor, printer or video card.
Drivers are desirable, which is what the system does by default, thereby speeding up and making life easier for itself and its users. But with this update, automatic or manual, broken drivers are not always removed by the system. This is what we will do.
How to remove a driver - download Driver Sweeper

I’ll honestly admit to you that I was worried when I launched the program for the first time, what if the driver was removed incorrectly or crookedly and then I wouldn’t be able to connect to the printer, for example, or the sound would disappear. But my worries were in vain. Driver Sweeper delicately threw out the old and extra drivers, without touching the relevant and involved ones.
Tested on very rarely used equipment. I connected a scanner, which sits idle for a year, mice from my other computers, a monitor... everything flies! Beauty! True, I forgot to note how much space would be freed up on the hard drive, but that’s not the point. Not very much, because a driver is a mini-program. The main thing is to get rid of the ballast.
Still, you will use the program at your own peril and risk!(read the comments to this article). Some other antiviruses are activated by Driver Sweeper, but I checked it personally - so far everything is in order with the computer and system.
Let's get started with installation and cleaning...


Now, if you haven’t checked the box, creating a shortcut on the desktop, go to the Start menu, find our program and run it...

We are met with a problem - a program on English. With a slight movement of the hand we switch the interface to our native and powerful Russian language...

...don't forget to click below...


Here it is, the reward for killing several thousand nerve cells and burning kilocalories with three clicks.
Now you can adjust the program a little to suit you. Even appearance change by looking at "Miscellaneous" and "Theme"...


Now, finally, we press “Analysis and Cleaning”...

Here is a list of the main equipment manufacturers. Check the boxes next to the manufacturer whose driver you want to completely remove. By the way, I was very surprised when Driver Sweeper found and removed the drivers Nvidia video cards with my integrated Intel. I have no idea where they came from.

Now “Analysis” is on the right, below and then “Cleaning”...

Each device, when connected to a computer under Windows control is identified using drivers - software, without which its operation is impossible. During "life" desktop computer or a laptop, dozens, if not hundreds of devices are connected to it. External hard drives, flash drives, scanners, printers, gamepads, keyboards, mice - these are just some of the accessories that automatically install their drivers on the computer or the user does it manually. This applies not only to devices that are connected externally to the computer, but also to internal components - video cards, hard drives, etc.
If the operating system is not reinstalled on your computer for several years, hard formatting disk, hundreds of drivers are stored in the computer's memory, which are unlikely to be useful to the user. Delete unused drivers easy, and in this article we will tell you how to do it. Before proceeding with the steps described below, create a file so that you can return to it if problems arise due to deleting unnecessary files.
How to remove unused drivers
The privilege to remove drivers from a computer is only available to an administrator, so before you begin the steps below, make sure you have sufficient rights to do so. To clean your computer of unused drivers, do the following:

Please note: In some versions of the operating system, the display of hidden devices is disabled on program level. If you encounter a situation where, after checking the specified checkbox hidden devices did not appear, you need to follow the steps described below in the article in a separate paragraph.

Interesting fact: On your computer, drivers for even one device are stored in several folders. It is quite easy to verify this; you need to unused device press right click mouse and select “Properties”. Next, go to the “Driver” tab and select “Information”. The “Driver Files” column will display dozens of files that are software for just one device. 
What to do if hidden devices do not appear in Device Manager
As we noted above, there are situations when hidden devices are not displayed in the “Device Manager” even after checking the box (or of this paragraph not on the menu at all). In such a situation, you need to do the following to make them appear:
- Launch the “Run” line using the Windows + R key combination and enter the following command in it:
 devmgr_show_nonpresent_devices
 For it to be active by default, in the “Variable value” column you should put the number 1, then click “OK”. 
New variable environment will be created and will appear in the Device Manager list. hidden options, drivers for which can be removed following the instructions described above.
– Igor (Administrator)From time to time it may be necessary to remove the driver from the system. And there are many reasons, starting from errors in the system and ending with the fact that you are simply cleaning up some programs that you left behind in the system excess garbage. Therefore, in this article I will tell how to remove driver in Windows 7. By the way, I would like to immediately warn you not to try to remove “simply unknown” drivers. Such rash actions can lead to quite serious consequences, including the need to reinstall Windows.
Also, before describing the method, I want to tell you that some device drivers are removed along with the programs. For example, sound and video card manufacturers often provide special managers for their devices, including Realtek and NVidia. And to remove the corresponding drivers, it is enough to remove the managers themselves. I’ve already talked about how to remove a program from a computer, so I won’t repeat it.
Now that I’ve scared you and told you about a couple of nuances, you can move on to the method itself:
1. The method is the most reliable, as it is provided by Windows 7 itself. And here's what you need to do. Open the "Start" menu and type the phrase "Device Manager" in the search bar and click on the corresponding item. After this, a window will open where you need to find the device you need on the left side. Right-click on it and select "Properties".

2. A window with settings and information about the driver will open. You need to go to the "Driver" tab, and then click on the "Delete" button. The system may ask you to confirm the action. Then the driver uninstallation will start. In some cases, you may need to restart your computer, so I recommend closing all other programs and saving your data. Windows in terms of forced reboot It’s quite shameless and sometimes closes programs without saving.

3. Driver removed from computer
As you can see, there is nothing complicated. However, keep in mind that some drivers are not easy to find online, especially for older devices. Therefore, if you are not sure that you will no longer need the drivers being removed, I advise you to create a backup copy of the drivers. Quite a useful thing. For example, many scanners and printers easily last 10 years, but finding drivers for them is not so easy.
Now, you know how to remove a driver in Windows 7, and you also know some of the nuances of this process. I hope my article helped you solve your problems.
You probably know that the components of all modern computers need so-called “drivers”. This software, which kind of explains to the operating system the operation of the connected device (video card, for example) and ensures its full and stable work. Without the required driver the component either does not work correctly or does not work at all. Installing the driver is quite simple. Modern Windows versions 10 are able to download drivers automatically from the update center, relieving the user of the need to download something manually. Others prefer to install them themselves, but this also does not require special skills or knowledge. Problems may begin when it becomes necessary to reinstall or remove the driver. This guide will tell you how to remove a driver in Windows 10 and then get it back.
Why reinstall the driver?
Reinstalling drivers (rolling them back or complete removal) often decides large number potential problems. A software failure, incorrect driver, buggy version, or other driver problems are almost 100% likely to cause problems with the operation of the device for which this driver was created. For example, the video card may not produce its maximum capabilities, the network card stops working, the card reader turns off, or the computer completely reboots or crashes into the blue screen of death. It is precisely at such moments that the need arises to remove the driver in Windows 10 and reinstall it.
How to remove a driver in Windows 10
There are several ways to perform this procedure. The first is done through the Device Manager - a special section of the operating system that contains a list of all connected devices to your computer.
FYI: To remove a driver in Windows 10, you need account Administrator or password for it.
For reference: Removing drivers automatically disables the device. If you uninstall the video card driver, the screen resolution will automatically drop to a very low resolution. When deleting Bluetooth drivers, all connected peripherals will automatically turn off, and uninstalling the driver network card will cause the Internet connection to disappear and so on. Keep this in mind.
The second method for removing drivers is through the Applications and Features interface in Settings or Control Panel. This method is not suitable for all devices, since not all drivers are displayed in the list installed applications. If you cannot find the driver you need in the Applications and Features section, use the first method.

Optionally, you can use the classic Control Panel interface. The essence is the same, it’s just that the interfaces are a little more familiar for those who have only recently switched to Windows 10, and were previously on Windows 8.1 / 7 and older.

There is also a third way to remove and reinstall drivers. It involves the use of so-called “driver managers”. These are applications that scan the system and its drivers, check for new versions and offer you to update them. There are paid and free analogues, but the quality and reliability of their work is endless source disputes between Windows enthusiasts. In our instructions, we talk about methods built into the system and rarely touch upon third party applications. Of course, driver managers can make life easier for the user in some sense, but we recommend learning to understand the process of installing or uninstalling drivers yourself.
How to reinstall driver in Windows 10
After removing the driver, there is a logical need to reinstall it. Again, there are several ways to do this.
The first and most reliable is to download the driver from the manufacturer’s website. There you can always find the latest and greatest current versions drivers for supported operating systems. Manufacturers also often offer previous versions of the software. This is necessary so that if a buggy update is released, users can download the previous one. stable version and wait for the release of the corrected driver. Go to the official website of the manufacturer, find your device, download installation file driver and install it. The matter is very simple and not as scary as it might seem to a novice user.
The second method is for the lazy. You can let the system do everything for you. After removing the driver, go to Windows Update and check for updates. Windows must find the driver it is missing, download it and install it.
Here you need to keep in mind that not all manufacturers publish their software in the center Windows updates. Also, the latest driver version is not always available there. This method is well suited for those who do not have the time or desire to surf the Internet in search of the required driver. If the search through the update center does not produce results, go to the manufacturer’s website and manually download the driver you need.
The third method is the same driver managers. They can scan the system for driver updates or devices for which the software is not installed. There's no shame in using it similar software no, but labor users always do everything manually.
How to update driver on Windows 10
Modern computer components are designed in such a way that their drivers come with utilities that can automatically update drivers. These utilities can download updates without any user intervention at all. If you want to check for driver updates, turn to these utilities first. You can also download and install latest versions drivers from the manufacturer's official website. When installed, the driver will do all the updating work for the user.
You can also update the driver the old fashioned way from Device Manager.
FYI: sometimes when manual installation drivers may experience a driver signature error. In this case, you need to and then install the driver again.
How to roll back to a previous driver version in Windows 10
Driver rollback is needed in order to diagnose problems in your equipment or work around a bug in new version drivers. For example, you notice problems with your hardware and are trying to find their source, or immediately after updating a driver, you have problems with stability or performance. The process of rolling back a driver is similar to the procedure for removing it.
After the rollback is complete, restart your computer.