Is it possible to recover a deleted file? Recovering Deleted Files for Beginners
Today you can very often meet users who, either out of ignorance or carelessness, accidentally delete files and programs without the possibility of restoring them, and then, as they say, they start Let's figure out how critical this situation is and find out what can happen represent a program that restores remote programs and files.
Basic principles of data recovery
Let's start with the fact that in operating rooms Windows systems There are at least two ways to delete information:
- placing in the “Trash” and then emptying it;
- deletion bypassing the Recycle Bin.
In addition, formatting completely erases information from the hard drive.
In the first two cases, if the deletion was made without using the Recycle Bin or emptying it, data recovery is not such a complicated procedure. The fact is that when you delete a file from the OS environment on your hard drive, it is not erased. It’s just that at the beginning of the name the first letter is changed to an unreadable symbol “$” (or another). Therefore, the system in the usual sense does not see the object. Almost any program is based on this. It searches for objects on the hard drive precisely by name with the “$” symbol at the beginning of the name.
However, this technique only works if the area or sector in which it is located deleted file, was not overwritten. In other words, the maximum possible restoration can only be achieved immediately after accidentally deleting an object. If, after deletion, copying (moving) or saving processes were carried out open documents, there is absolutely no guarantee of the safety of information to be restored.

The easiest way to recover data
So, let's continue to look at the example of a girl who deleted a program on her computer. How to restore its integrity in the simplest way? The answer is simple: use the system recovery tool, which is available in any modern operating system.

You just need to go to the appropriate section of the “Control Panel”, and after starting, specify the restore point that preceded the deletion software product. If there is none, you can expand the list and select the one that suits best.
But there are some disadvantages here. The fact is that after restoring the system itself, applications that were installed later than the specified point will simply be deleted. This procedure will not affect user files. But this method is also suitable for cases when the application was uninstalled in the programs and components section. A program that restores deleted programs will not work here - only a “native” system utility.

But most the best option can be called the presence of a previously created backup copy or image of the system (hard drive). Recover all content even using built-in Windows tools it will be possible in just a couple of minutes. Unfortunately, most users do not create such copies, believing that they take up too much space on the hard drive. But in vain.
Programs for working with hard drives and logical partitions
Now there is another option: the same girl accidentally deleted the program. How to restore it if the deletion was carried out not through the corresponding section of the control panel, but by hard formatting disk? Let's discuss it now.

The situation is, of course, unpleasant, but there is a way out. Today you can find enough a large number of applications called something like Unformat. Data Recovery or, as previously stated, Uneraser.
Let's say the user deleted the program. How to restore it after formatting a disk or partition using the appropriate application? Yes, very simple. We launch any utility, specify the formatted partition and perform analysis. Upon completion of the process, the program will offer to save the data to another partition. Accordingly, select another volume and save the information there. The entire process is automated, and the user only needs to confirm operations and select a place to move information.
Which program recovers deleted files?
Regarding working with deleted files, special utilities enough today. The simplest free program, which recovers deleted files, is called Recuva.

True, it is designed to work with multimedia content (photos, graphics, video, audio), but if you specify other content in the search conditions, the application will scan absolutely all the data and produce the corresponding list. In it, everything that can be restored without problems is marked green, yellow indicates files that you can try to recover, but there is no full guarantee, and red corresponds to objects that cannot be recovered.
Now it's a matter of small things. We mark the necessary files and start the recovery process. Objects will be restored to the locations or folders in which they were located before deletion. Almost all utilities of this type work approximately the same. The main disadvantage is that they do not allow you to restore deleted folders.
Data recovery in mobile systems
Because the Android mobile systems are the most common today, let's see how to recover deleted programs on Android.
In principle, the ideal option, as for desktop PCs, is to create a backup copy. This can be done simply in the settings menu by selecting the appropriate section. After this, you can restore all deleted data by clicking on the button in the same menu.
There is a remarkable auto-recovery feature that allows you to reinstallation application to apply to it all the settings and parameters that were there before. Very comfortably.

Alternatively, you can return the device to its factory state. After the reboot, the system will offer to configure a new device or restore data when logging into an existing account. The only thing that is required here is an active Internet connection, since the process will be carried out not from the device, but from remote server, on which all user data is stored, including previously installed programs, contact lists, etc. With all this, even a program that restores programs or files is not required. But really, why? All operations can be performed directly on the device without any connection to a computer and use specialized applications. This option is only suitable for working with memory cards (and even then not always).
Conclusion
That's all about the data recovery procedure in brief. However, I think the understanding of what any program that restores deleted programs and files is is also understandable. There is only one final piece of advice left to give: do not confuse work with separate files and whole software packages. These are completely different things. Accordingly, the methods for their restoration also differ. But, in principle, in all cases there is nothing complicated even for an untrained user.
Often, many users have a question about how they can recover files deleted from their hard drive on their computer. It happens that some important information is deleted accidentally, or the user changes his mind about deleting it. Happens and emergency situations, after which various data disappears from the disk. This article describes how you can find and restore information after it has been deleted.
Possible causes of data loss
There are several common reasons why files disappear from a hard drive:

Basket
When you manually delete any object using context menu or Delete keys, it is not erased from the hard drive, but is placed in a special directory called “Trash”.
Typically, a shortcut to this directory is present on your desktop by default from the moment you install Windows. 
If you go to the Recycle Bin, you can see all the deleted files placed in it. If you change your mind about deleting something and want to return the data back, right-click on the desired object and select “Restore” from the drop-down list. You can also select several elements and click on the “Restore selected objects” button at the top of the program window. 
If you are sure that you will never need the files in the Recycle Bin, you can erase them from your computer forever using the “Empty Recycle Bin” button.
Recuva program
If necessary information was in the trash when you emptied it, or disappeared due to crashes and viruses - you should be prepared for the fact that you won’t be able to restore it. However, you can try to save some of the data using specialized programs. One of the easiest applications for untrained users is the Recuva utility. Its main advantages are that it is completely free and has a clear graphical interface.
Important! If you are going to restore any files, try to make as few changes to the hard drive as possible. Do not copy, delete or create new folders or documents, do not install programs (except Recuva, of course). The fewer actions you take after losing information, the greater the chance of success.
Download this application available on the developer’s official website - https://www.piriform.com/recuva. Available for download as free version, and paid, with a wide range of functions.

How to recover files using Recuva
After installation, launch the Rekuva program and follow further instructions.
Let's look at how to quickly recover a deleted file in Windows, Mac OS, Android and iOS.
There is always a danger of accidentally deleting an important file on your computer or smartphone.
Thanks to proven recovery methods, you can get your lost data back.
Method 1 – Built-in FunctionsWindows
When you delete a file in any operating system, it may disappear from Explorer, but you can restore it from memory.
If you start attempting to return a document before turning off the device, there is a high chance of recovery without errors.
Once your session ends, bits of previously deleted information may be lost, and even if you manage to recover the document, it may not display correctly or may not open at all.
In any case, it’s worth trying to get the information back.
Windows has two built-in features that can help you recover a file:
- Basket;
- Service Reserve copy.
You will need any Windows version and knowing the approximate time the file will be deleted.
Let's look at how each method works.
Basket
By default, in Windows OS all deleted objects are placed in Cart– a system folder containing files that you no longer need.
For permanent removal the user needs to empty the trash. A similar feature is available on Mac and Linux.
Open Cart on your desktop or use the search. View the contents of the folder.
It can be sorted by date added. This makes it much more convenient to find deleted elements if Cart there are too many objects.
View content in a window Baskets it is forbidden.
You only have access to the file name, path to the source folder and properties.
To return an object, click on it right key mouse and select the “Restore” field. The file will return to the folder from which it was deleted.
Please note that the system allocates limited space to the Recycle Bin and its contents will disappear automatically over time.
So that in the future they will not encounter automatic deletion, necessary expand the space allocated for the Trash:
- Click right click on the icon Baskets and go to the properties window;
- Check the “Set size” checkbox and manually enter maximum amount megabyte. It is advisable that system folder occupied no more than 25% of the total volume hard memory drive C;
- Save your changes.
Backup
Often users try to restore a file after cleaning it Baskets.
You have a chance to get your important document back with the help of a backup service Windows copy, which works on all versions of the OS.
If backups are enabled on your computer, you can restore previous state An OS in which an important file has not yet been deleted.
Try to remember when you were last time used the object.
Then follow these steps:
- Open the search box and enter “Backup Options”;
- Open the found service;
- In the new window, go to the “Backup Service” tab, and then go to the “Backup and Restore” section;
- A Control Panel window will open showing all available backups, indicating exact date their creation.
If the option to create a backup is disabled or you did not find copies for the required time period, you will not be able to restore files using this method.
It is necessary to install third-party programs to return deleted objects.
Method 2 – Third party programs forWindows
By using third party software there is a high probability of recovering documents, photos, videos, music and other files.
Below is a selection of work programs with user-friendly interface, which can be downloaded for free.
Hetman Partition Recovery
Hetman Recovery is software that can recover data from hard drives, as well as from various flash drives, drives and other types of storage devices.
Open programs and select required hard the drive from which the file was deleted.
If you are recovering data from external devices, first connect the drive to your computer, and then restart the program. It will appear in the list of available devices.
After selecting the drive, you need to press the “Recovery” button.
The advantage of the program is the opportunity preview content.
Even if the utility found required file, its final appearance may not meet your expectations. This is especially true for multimedia.
Ontrack Pro
For those who need professional program category Recovery, we recommend working with Ontrack Pro.
It is paid, but users can work with trial period absolutely free.
A special feature of the application is the presence of a built-in assistant and recovery wizard. Also, during the scanning process, the utility looks for all compressed, encrypted or damaged objects. If the resulting file is not displayed, Ontrack Pro will begin the content correction process.
EaseUS Data Recovery
EaseUS Recovery is a program that will be useful when you need to recover information on a computer, tablet or phone.
In the main window, the function of quick or full system scanning is available, as well as the LastChance mode - for data recovery with a probability of 98%.
EaseUS works well with the Windows file system.
To get started, just select the disk and click on scan mode in the menu area.
After the process is completed, a list of files available for recovery will appear.
Card Recovery
With app Card Recovery can work in all types file systems, but the program is more effective at recovering data from flash drives and SD cards that are connected to the computer.
Working with Card Recovery consists of following the instructions that are displayed in the main window.
Among the advantages of the software are free distribution and a small amount of memory required.
Tenashare Recovery
Tenashare allows you to recover multimedia information from your computer or external media.
If you were unable to return deleted photos by using above programs, download Tenashare and start the scanning process.
Method 3 – Solution forMAC OS
There are also several for Mac OS effective programs, which will help you recover deleted content.
As you know, in this operating system it is much easier to uninstall files and applications, and at the same time, cases of objects being deleted due to negligence are becoming more frequent.
Disk Drill
Disk Drill - this is the most popular program to recover files on Mac OS.
Advantages:
- Works with all file formats;
- Supports recovery from external devices and media;
- Russified interface;
- Ease of use.
To start scanning, find the disk from which the object was deleted. Then click on the Recover button.
Also, with using Disk Drill can monitor the disk status, clear memory from temporary files and other “garbage”, searching for duplicate files, setting up deletion protection.
Method 4 – Recovering files fromAndroid
This way you have a greater chance of successful recovery.
If you don't have superuser rights, try working with software that doesn't require special settings phone.
Dr. Fone
Dr. Fone is a desktop program that is designed to recover information from Android devices.
The software is paid, but you can work with the program for free for 30 days.
This time is enough to scan and return the files.
Follow the instructions:
- Install Dr. Fone to computer;
- Connect mobile gadget to the PC and open the program;
- Wait until Dr. Fone will detect your device;
- Check the box next to the information you want to restore and click “Next”;
- Follow the instructions of the program and save in the final window available files to the phone memory or to HDD computer.
“I deleted an important file!” Stories with this beginning happen to users quite often. It is possible that some of our readers have already met similar problem. Such stories always begin the same, but end differently. In this article I will tell you how to make the ending of this story happy. Or by at least do everything to make the likelihood of a happy outcome higher.
1. What to do if an important file or folder is deleted?
Well first of all, don't panic. When you throw out garbage, you don’t immediately send it to a landfill. First a trash can, then a container, and only then a landfill. This happens in Windows too. Using the Del key, you first send the file to the Trash. Then, after emptying the recycle bin, the file can be found on disk in unused clusters for some time (this is an analogue of our container from the example). And only after the area on the disk in which there were still traces of the file is occupied by other data, then the file is hopelessly lost (this is already a landfill).
1.1 Search in the Cart
It may sound trivial, but the Recycle Bin is the first means of protecting data from accidental deletion. At the same time, many Windows users automatically clear it immediately after placing files in it. Although, by and large, the Recycle Bin does not need to be emptied at all, because it does it automatically.
Searching for files in it is not at all difficult. Find its icon on your desktop and open it. If the file name is known, then simply write it in the search box. You can also sort files in the Recycle Bin by deletion date and immediately find the file you need that was just deleted.
The next time you think about using some utility that background cleans the Recycle Bin to free up disk space, think carefully about whether you should trust this important process to an automatic machine. It may be easier to do it yourself and at a time when you are sure that there is nothing valuable in it.
1.2 Searching among shadow copies
It is not necessary to use any paid programs. The standard backup tool in Windows 7 is quite suitable and this system is turned on automatically during installation operating system.
If “System Protection” is not disabled manually (which is often recommended by would-be optimizers), then restore the deleted file from shadow copy in Windows 7 it's quite simple.
- In Explorer, find the folder where the deleted file was (not the Recycle Bin).
- Click on the name of this folder right mouse button and select " Properties»
- Go to the " Previous versions"(see picture below).
It contains information about all versions of files that were in this folder at different times.

We select the closest one by date and try to search for our file in it. If it is not there, we turn to an earlier version. And so on until you find the desired file.
This way you can not only recover an accidentally deleted file, but also return to one of the previous versions a document that was modified and saved to disk, and then its previous version was needed.
Shadow copies of user files are created automatically by the operating system during reboots and installations various programs at system restore points. Therefore, you don’t need to do anything separately to create them. The main thing is not to disable “System Protection,” since some “experts” recommend disabling it to save resources, keeping silent about the fact that the security of the system as a whole will decrease.
2. If standard remedies did not help
2.1 Use a third-party file recovery utility
You can use a specialized data recovery utility, which, after analyzing the disk, will display a list of files and folders that you can try to recover. One of these programs can be kept on disk in case of fire.
The chances that the file will be recovered without loss are not so great, but there can be luck. It's very important point, influencing the “success of the concession” is the minimum number of disk operations since the file is deleted. Some sources even tell us to urgently turn off the computer and boot from a flash drive or disk. To me, this is pure paranoia. Much easier to comply simple rules, which I will give below, and do not risk your nerves in vain.

I will immediately upset the happy owners of SSD drives - they do not have this chance of salvation! The fact is that the system regularly performs TRIM function, which resets sectors with deleted files.
2.2 Don't forget about the professionals
There are people who can help with recovering deleted files on a disk. There is a chance of running into a charlatan or an inexperienced specialist, as in any other type of service. But if the file is really valuable, then it may make sense to pay professionals.
3. What can I do to prevent files from disappearing without a trace?
3.1 Do not disable standard protection measures - they are very effective
The operating system developers came up with a multi-level protection system against problems associated with accidental deletion data. Do not neglect them and disable them, as well as empty the Recycle Bin every time immediately after deleting a document. Make sure that “System Protection” is activated and that the Recycle Bin is working properly. With these system components, it is possible to lose a file irretrievably unless on purpose. To prevent data loss due to disk failure, use the recommendations in the following paragraphs.
3.2 Use cloud storage
Despite the chance of information disclosure, synchronize your folder of important documents with cloud storage. I haven’t seen a user whose documents would take up 10 GB, which is exactly how much they are willing to offer cloud drives for free. They also offer their own applications that will synchronize your document folder with the cloud. For example, I use . But there are also products such as Google Drive, Yandex.Disk and of course the famous one.
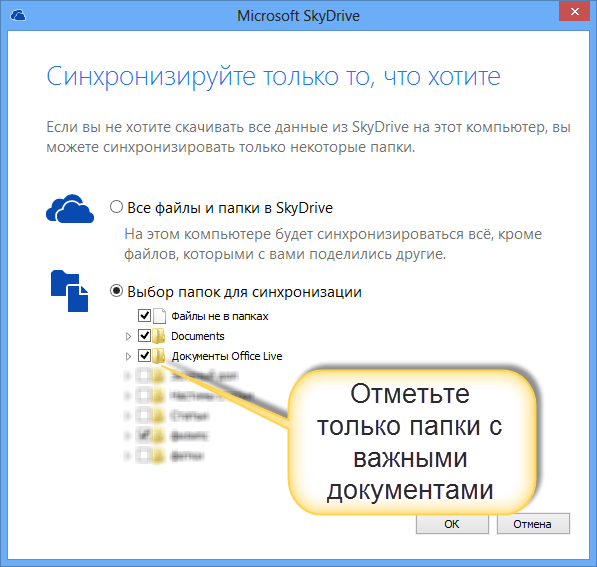
Yes, it is very important that you cloud storage It also has its own basket! Don't forget to look there too if your local copy of the file is irretrievably lost.

3.3 Make regular backups
If you have an operating system other than Windows 7, 8 or 10 installed, we advise you to make backup copies using a special utility.
Windows 7
Windows 7 has its own version backup utility important files“Backup or Restore”, which is located in the “Control Panel”.

To create backup copies, you will need a separate hard drive (external or internal) that has sufficient capacity. free space to place an image of everything system disk, as well as to create backup copies of user files.
Windows 8/10
This version of the operating system has a more advanced feature called File History, which is turned off by default. If you have really important documents, take the trouble to enable version control for them. Just type “res” in the control panel search box, as shown in the picture.

Then in the File History window do necessary settings. By default, the system suggests storing versions of all documents and drawings. If you have large folders with home photos in your documents, then it is better to make backup copies of them yourself, as I described in. And in “File History” it is better to place these folders in “excluded” folders.

Now you will have copies of the document for each change option. Your dissertation or graduate work will be safe. Even if you deleted an entire chapter by mistake and wrote down the document.
File History requires the use of a removable storage device. This is in case the main hard drive fails. So don’t spare money and buy a flash drive for a hundred or two rubles (for example, 8 GB), so that you don’t have to shell out a thousand or two later to restore files bit by bit from the body of a dead hard drive.
Recovery remote folder produced using special programs, scanning the surface hard drive. Unlike files, folder names are lost forever when deleted. The desired directory in the list of available for recovery can be found by the names of the files stored in it.
Installing Ontrack EasyRecovery
Run the installer and confirm that you agree to the terms license agreement. Like the entire application interface, the license text is published on English language. Select “I accept the agreement” and click “Next >” to proceed to the next step.
Specify the path on your hard drive where EasyRecovery will be installed. It is advisable to install the program on a different partition of the hard drive from which you want to recover a deleted folder. Otherwise, the data being recovered may be lost. The unpacked copy takes up 51.4 MB disk space.
The next step is to edit the application directory name in the Start menu. The default value can be left unchanged. You can then choose whether to create a shortcut on your desktop. If necessary, before clicking “Next >”, check the “Create desktop shortcut” section.

Important! Do not install the application on a drive from which data has been deleted. If there is only one partition, write the program to a flash drive or external HDD.
Before starting data copying, a window will open with the installation parameters selected in the previous steps. To change them, go back using the "< Back». Если опции указаны правильно, кликните «Install».

Wait until the program is unpacked and copied to your computer or laptop. This process is quite fast, modern devices it takes no more than 20 seconds. In the case when the progress bar has stopped in one place and does not change for a long time, cancel the installation using the “Cancel” button. After that, start it over again.

To launch the utility and begin restoring a deleted folder, select the checkbox in last window. Click the “Finish” button to close the installer.

Launching and activating the application
The first program load takes longer than subsequent ones. Wait while the required data is downloaded. At this time it will be displayed start screen, indicating that the license permits use of the product for non-commercial purposes only.

An activation window will open, offering you to choose one of two options for using the program:
- Start trial version.
- Purchase a license and receive an activation code using the link.
Select "Run as Evaluation" to run a demo version with a limit on the number of folders and files that can be recovered. If you purchased a paid version of the utility, enter the code in the lower text field and click “Activate Now”.

Note! The access key is valid for one year from the date of purchase. Price paid version: from $79 for Home version to $499 for Enterprise.
On the first screen of the recovery wizard deleted folders posted brief information about the application and a link to the developer's website. Click "Continue" to move to the next step.

Tutorial video: Recovering deleted files on your computer
Recovering deleted folders
Select the type of media on which the information was stored before it was deleted:
- HDD
- External storage
- Optical disc (CD or DVD)
- Multimedia or mobile device
- RAID system
Click “Continue” to proceed to section selection.

The central table in the second step contains a list of all devices connected to the computer. If there are several partitions, they are displayed separately, indicating the type and amount of memory. Check required disk and its section.

Select the recovery scenario (program operating mode). Suggested options:
- View section
- Recovering deleted files
- Recovering Formatted Data
- Deleting data
- Disk diagnostics
- Disc Tools

At the fourth step of the wizard, the items selected earlier will be displayed. Check that your selection is correct, and if you need to make changes, go back using the “Go back” button. If the settings are correct, proceed to restoring deleted folders.

The duration of the analysis depends on the amount of free space on the selected volume and its reading speed. An estimate of the remaining time is displayed below the progress bar, labeled “Estimated remaining time.” The number of files and folders found is displayed below. To temporarily stop scanning, click “Pause”. You can cancel the process using the “Cancel” option.
