WebMoney - registration and login methods, receiving WMID. Webmoney payment system: Step-by-step registration and wallet creation
- Go to the registration page webmoney
- Enter your phone number. The phone must be real! An activation code will be sent to it. And in the future the phone will be needed to increase security.

- On next page fill in all fields with real data. Real data must be entered if you plan to receive a formal or personal certificate in the future, as well as attach a bank card to withdraw money to it. If the data entered during registration differs from your actual data, then you will not be able to do any of the above actions.
Advice: don’t be lazy and create a separate email for payment systems, don’t use this email anywhere, and this will protect you from hacking your WebMoney wallet and stealing your money.

Write down the answer to Secret Question or remember! - On this page, carefully check the entered data and click continue

- Check your mailbox. You should receive an email with a WebMoney registration confirmation code. Enter the received code in the field and click continue.

- At the next step of registering a WebMoney wallet, you need to confirm your phone number. An SMS with a code arrives a couple of seconds after the request.

- The final step of registering a WebMoney wallet is entering a password to access the WebMoney wallet. Write down this password!

- Congratulations! You have registered WebMoney wallet! In the mail you will find your WMID number, write it down, you will need it to enter the wallet control panel.
- Now go to webmoney.ru, enter your details and log into your WebMoney account. Create wallets for the currency you need.
Now your WebMoney wallet is managed with using Webmoney Keeper Mini. This is not the most reliable type of management, since to enter the wallet you only need to know the password and WMID number. If scammers break your mailbox and find a WebMoney letter with a password there, they can easily steal all the money from your wallet.
If something doesn’t work out, you can look at this detailed video instructions
Connecting Webmoney Keeper Classic
To increase the security of your WebMoney wallet, I advise you to install Webmoney Keeper Classic management. To do this, you need to install the Webmoney Keeper Classic program on your computer. Activate it by phone, so webmoney keeper classic will be tied specifically to your computer. If you try to log into your WebMoney account through Webmoney Keeper Classic from another computer, you will receive an SMS with an activation code for the new equipment on your phone.
Also, to log into Webmoney Keeper Classic you need to have a special key file and know the password for it. After installing Webmoney Keeper Classic, request key recovery by email. Do not store this key on your computer, as your computer may get a virus that can steal this key. Write the Webmoney Keeper Classic key to a disk or flash drive. If you lose this key, it will be difficult to recover it. Also remember the password for this key!
How to change the way you manage your wallet on Keeper Classic is shown in this video:
WebMoney certificates
Types WebMoney certificates: pseudonym certificate, formal certificate, initial certificate, personal certificate, seller certificate, Capitaller certificate, developer certificate, registrar certificate, WMT service certificate, WMT guarantor certificate, WMT operator certificate.
As you can see, there are many WebMoney certificates and they serve different purposes.
If in the future you plan to work on the Internet and earn substantial money, then take the trouble to obtain a personal certificate. The cost of obtaining a personal certificate is about $30; to obtain it you need to contact the official certificate registrar in your city. If there is no registrar in your city, then send necessary documents by mail to the Moscow representative office. Personal certificate gives you more freedom actions. You can find out more about each of the certificates on the WebMoney website.
This video tells about their certificates and how to get them
Anyone who is going to work via the Internet simply must have WebMoney wallet. I will show you why and how to do this in this post.
WebMoney is a payment system, the largest and most popular among all similar systems in Russia and the CIS. There are others, but they are not so popular, although in some of them you will also need to register, if only because some customers find it more convenient to pay in these systems.
So, WebMoney- this is something like Sberbank, only on the Internet, and the wallet is your personal account in this bank. You need to create a wallet; you will then give its number to the customer so that he can transfer payment to it. Then you can spend money from your wallet in online stores, top up your balance on your mobile phone, withdraw to plastic card and so on.
I’ll say right away that upon registration WebMoney wallet You will need to enter a lot of personal information. So, enter it correctly and carefully, as in a real bank, because later, when you are going to link your bank account or plastic card to your wallet to withdraw cash, you will not be able to do this due to errors. I remember how I suffered, sending scans of my passport for verification and was refused every time, but the only problem was that I incorrectly indicated the date of issue of the passport. One number – and a lot of wasted nerves! Of course, you can fix everything later, but it’s better to do everything right right away than to look for mistakes later.
So, let's begin registration in WebMoney. Let's go to . Here we are asked to enter a phone number or log in with some social network. We will do everything right, because in social media. networks, even the names often do not correspond to reality. Why you need to indicate your phone number is written on this page. In short, you need to enter it, so write with confidence, here you will not be deceived and your money will not be withdrawn. Have you written? Press the button " Continue».
On the next page you enter your personal information. You can come up with a nickname, write the rest exactly as in your passport. Residence address - according to registration in the passport. You should already have an email address. If you don’t have it, read how to register it in the “” post. We fill out the form, everything is clear there, and again click “ Continue».

The next page will show all your entered data so you can check it again. Especially the phone number. After this, a letter will be sent to the e-mail you specified, which will contain a link to continue registration. When you go through it, an SMS will be sent to the number you specified with digital code, which must be entered on the page that opens. This verifies the seriousness of your intentions to register, as well as the accuracy of the entered numbers and e-mail.
The last step is to complete the registration. You will need to come up with and enter a password twice, the numbers from the picture in a separate field, and click the " OK" This completes the registration of the WebMoney wallet. And in fact, it goes faster than it seems.

It's your WMID, or personal identifier in the system WebMoney. Some people confuse it with a wallet, but it is not. Number WMID you have one - this is your account, and in this WMID you can create many different wallets.

We will be taken to a page where you need to select the type of wallet from the list. Choose to get started WMR- ruble wallet. Check the box below and click the " Create»

After successful creation wallet WMR you will end up again personal page. There you can see a long number with a letter R at first. This is your wallet-account number in WebMoney. You will give it to transfer money to it. But that’s not all - in addition to the ruble one, you also need to have a dollar wallet - WMZ. Some people just prefer to pay in dollars. Of course, they can transfer you dollars to a ruble wallet - they will be exchanged at the current rate, but it’s better to still have such a wallet, you never know why it will come in handy. When registering on some exchanges and websites, somewhere you need to indicate a ruble wallet, and somewhere a dollar wallet - each has its own rules. Click on the plus sign to add another wallet.

There will be the same wallet creation page again, just now select WMZ, check the box below and click the “Create” button again
As you can see, there are now two wallets:
You can also create a wallet in euros - WME, but I don’t know why it might be needed at all. There are other strange currencies, but two wallets will be enough for you - WMR And WMZ. If you ever need others, you can always go to the site and create them, so you don’t have to worry about that.
Webmoney wallet registration was successful, we created not one, but two wallets, and now we can receive money from them. But this is not all you need to know about the WebMoney system. So far you have the so-called formal certificate in this system – that is, the lowest. You are limited in your capabilities. To attach a bank account to your wallet, you need to confirm certificate documents. In addition, you need to install the program on your computer WebMoney Keeper Classic, with which you will accept money, pay for something on the Internet, withdraw it to the bank, etc. This will be your personal wallet on your computer.
I will describe how to do all this in future posts and, so as not to miss anything, I advise you subscribe to new articles by simply entering your e-mail in the form at the bottom of the page or in the sidebar of the site.
And one more thing - I recommend all passwords, logins, WMIDs and wallet numbers write it down in a safe place. If you forget, it will be no easier to access wallets than to access someone else's bank account.
Hello, dear readers!
We are returning to a series of articles about electronic wallets. In the last part we talked about Yandex.Money. If you registered in this system, received a personalized status, ordered a card and carried out several operations for replenishment, transfer, payment and withdrawal, then this is very good.
This means that you already, in principle, understand the essence of the work and organization of the exchange function of money on the Internet (and if you have already studied the basics of economics, then you understand perfectly well what the exchange function of money is). Shine!
WebMoney is more a complex system electronic wallets.
Why complicated? Not because she is difficult to work with. No, a properly organized system will allow you to replenish, transfer, pay and withdraw even easier than on Yandex. But setting it up is another task. I’ll tell you for myself, once 3 years ago, it took me a week to top up my wallet and pay for one service! Just a week of studying this system using the “scientific poke” method.
And this is all because the system is literally obsessed with security. You cannot take a step in it without confirmation. And until you clearly and clearly make it clear to her that you are you, and not your child, cat, neighbor or intruder, she will not let you go anywhere.
But I set out to show you how to properly register and verify in this system, and with my experience it will take you no more than an hour.
I’ll tell you right away: for normal operation with Webmoney you need a smartphone or tablet! Not a simple dialer, but a device on Android, Windows Phone or iOS. This can be just one smartphone, or a tablet with 3G (or better), or a dialer + tablet with Wi-Fi.
This is needed in order to receive SMS with confirmation codes and install several applications that make life easier. Not that this is directly critical, but very desirable, since a smartphone/tablet is your personal item that verifies your identity online. Something like a passport. You can send a code to your phone, by entering which you confirm that you are the one who logged into your account.
Okay, now I’ll show you everything, and it will become clear to you. Go to webmoney.ru. We click “Registration” in the corner, and there you go – we are immediately politely asked to indicate our number. Enter, let's move on.
We fill out the form, preferably with reliable data, don’t be afraid, no one will interfere with your personal life and no one will take a loan for you, this is a serious and authoritative system. IMPORTANT: write it down Security Question and the answer to it, because if you forget your password, you’ll say goodbye to the money in your wallets, I’m not kidding, there are no other ways to recover your password yet!

Confirm your email, copy the long code from the message and paste it into the field. Then do the same with the phone number. Next is the password. Think password complex, with numbers and letters, large and small, use underscore(“_”) will only benefit you.
That’s it, we’ve registered, everything seems simple and intuitive, but it’s just the beginning. We are not in a hurry to get wallets. First, let's get a formal certificate. Let's go to "Settings".

We see the line “Certificate” and click on the pencil on the right. We read what they offer us, continue and enter the data. Some of the data may already be available after registration, fill it out empty fields. You don’t have to fill out the TIN, but I recommend doing so. We continue further.
We get to our “Control Panel”

We see that we have a Formal Certificate, this is what we need, now you can confirm the site that you specified (if specified), to do this, click on the green checkmark next to the site line; you can go to “Registrations in other systems” and add your Skype, steam and anything else there, you can add bank cards.
I recommend that in the “Uploading documents to the server” block, add scans of the documents that you indicated (the first and second pages of the passport and TIN, if indicated). Scans can be made using a scanner (color!) or a digital camera. The main thing is that the data you provided is clearly visible, people will check it, and after checking the scans will be marked like this:

Let's move on to working with wallets. First, I'll tell you about the keeper. Keeper is a program (service) that manages wallets in the Webmoney system. There are 3 of them in total: Standard (Mini) – the keeper we were in until now; WinPro (Classic) – a program installed on a computer; and WebPro (Light) – an online service that is an online analogue of WinPro.
The first one has the minimum functions for working with wallets and is the most unreliable; in addition, it comes as a basic one and is compatible with any of the other two.
The second is a classic - a program that was written by the devil himself! 3 years ago from that very week I spent 5 days installing it, but my computer clearly didn’t want it and I gave up on it and never returned to it. You can read on the Internet about how good and safe it is, but, alas, not from me.
My choice is light. In all the 3 years that I have been using Web Money, I have not found a single complaint about this service, and therefore I recommend it to you. And yet, read about both of these control options, weigh everything and choose which one you like, because having chosen one, the second will forever be offended by you and go into the sunset.
So, if you chose light (WebPro) - read on.
To work with this wonderful service you need 2 things - E-NUM and a personal certificate. Let's start with the first one. Let's go to "Settings". On the left is the “Security” tab. The E-NUM line is “create an account.”

Then click there “go to Personal Area" Enter your email. We don’t have a mobile client yet, so click “SMS authentication”.

Let's go in. We receive an SMS, enter the answer, and log in. If you don't have a smartphone/tablet, you can leave it like that. We have an e-num account and every time we log in through it, we receive an SMS and enter a number, it’s simple.
If you - happy owner achievements information age, you can make this process even easier. To do this, in the e-num page that opens, go to the menu on the left “ mobile client" Select your system and download the application to your device.

We enter our e-mail and click “forgot your activation code?”. You will receive an SMS about resetting the code, and an email will be sent to you asking for confirmation. We follow the link there and receive a code on the phone, which we enter into the second field (for me personally, after receiving an SMS with the code, it inserted it into this field and logged in, it’s a miracle, isn’t it?). Next we get to work area applications

The application is simple and straightforward and does not require any learning in itself. Just every time you log in using the mobile client:

The application itself will show the following:

And after clicking “Yes”:

And voila, login is complete.
Now WebPro itself. We return to the web money site. Go back to “settings” and turn on WebPro.
See this:

Click on “Setup”. Enter the code from SMS. Then we enter the answer number from e-num. From now on, only the answer number will be asked.
We begin the process of obtaining a certificate. Enter the password and click next. Follow the link light.webmoney.ru

If the same thing happens to you, then log in using your login and password; no, log in via e-num).
So, login and password:

We look for WMID in “settings” (you can log in from another browser or tab), and in general it’s better to write down this WMID somewhere and save it, in the same place as the password.
Enter WMID and password, select e-num and click “login”. Again, the number is the answer and we go into WebPro itself.
Here you will immediately be prompted to create a wallet. Select a currency (WMZ - dollars, WME - euros, WMR - rubles, WMU - hryvnias). Well, let it be WMZ. Give the wallet a name you like and click create.
You can create a few more as needed. Please note: to create a ruble wallet, you must have confirmed scans of documents (I don’t know why, this never happened before), but with us everything is in order, so feel free to create it.
Pay attention to the “Number” column in the table of your wallets. It is the wallet number that is its requisite for replenishment, transfer, etc. The first letter coincides with the currency of the wallet, and then there are 12 digits - this is what must be entered in terminals, exchangers, etc.
Let's go further - a personal certificate. And again, a disclaimer: what we did before, you can do in any browser. Further all actions must be performed ONLY IN INTERNET EXPLORER. Whether you like it or not, the process of obtaining a certificate only works correctly in this browser.
Then, when everything is ready, other browsers will also see it (Chrome for sure, Opera and Mozilla do not see it at point-blank range).
So, go to webmoney.ru via IE. Below we select e-num.


Here they should no longer tell us that we do not have an e-num. We receive a question number, enter the answer number, and go in.
Again wmid, password, e-num, answer number - and we are in our wallets.

Click on the gear (underlined in the picture). Security tab. And here is “request a certificate”. Then the same button.
After this, 2 letters arrive by email. The first one with the link that we follow. The second is with a password, which we enter where we went.

Click “Restore” and go here:

If you see exactly this, you are on the right track and everything is great! Click “Yes”, enter your e-mail and click “extend registration”.

WebMoney Transfer is an international electronic payment system. Through it, Internet users have the opportunity to pay for their purchases in online stores, mobile communications and also send Money transfers each other. To gain access to the system's functions, you must create an account in it. In this article you will learn how to register a WebMoney wallet for free on the official website of the service.
Registration of user WMID
To use all WM functions there is no need to enter into any contracts. Relationships with the company's clients are built on the basis of a public offer. This means that the user registered on WebMoney, accepts the terms of the agreement published on the page and undertakes to comply with them. In case of gross violation of these conditions, the service administration reserves the right to block the client’s wallets.
Before registering for WebMoney, you need to acquire an electronic by mailbox and mobile phone that were not previously used when opening a WM account. Email is needed to receive reports and restore forgotten password access, and a cell phone - to receive confirmation codes for your financial transactions.
Let's take a closer look at how to create a WebMoney account on the website www.webmoney.ru:
- On home page website, click the “Registration” button.

- Enter your number cell phone V international format– for residents of Russia it should start with +7 and then 10 digits.

- Enter your date of birth, email, select a security question and come up with an answer to it. You may need it when recovering a lost password.

- You should receive a message with a confirmation code on your mobile phone, enter it in the special field.

- Come up with strong password to log into your WMID.

- WebMoney is a multi-currency system, so during registration you must select the currency of your first wallet. The equivalents of real currencies in the system are title units, and . To create a ruble wallet, install WMR in the “Currency” column and accept the terms of the agreement.

For confirmation purposes email addresses on email address the user receives a message with a special code.
- Copy the code, follow the link and paste the code into the input field.

Once your email is confirmed, the registration process is completed.

A new user automatically receives an alias certificate, which allows him to top up his wallet balance and make online payments. The limits available with this status can be found on the page.
Creating electronic wallets inside your WMID
Registration of a WebMoney wallet in Russia, as well as throughout the world, implies the creation of a WMID, which is virtual storage for several electronic wallets in different currencies. A client with an alias certificate can use only one wallet, the currency of which he selects when opening an account. To create wallets in other title units of the system, you must connect one of following methods manage your WMID:
- KeeperWinPro - special program for installation on a PC with operating system Windows system, which allows secure access to wallets without using browsers.
- KeeperWebPro is a browser-based wallet management option that is suitable for PCs with other operating systems and for users who prefer to carry out their transactions via a browser.
Let's look at how to make a WebMoney wallet using the WinPro program. The application itself must be downloaded from the page and installed on your computer. After logging into the program, open the “Wallets” tab and click “Create”. A special window will open in which you need to select the title character for the wallet and set its name.

To complete the operation, you must check the box to accept the terms of the agreement and click “Next”.

After accepting the agreement, the new wallet appears in the general list, you can already top it up and make transactions.
Next, we'll figure out how to create online wallet WebMoney when using WebPro. Log in to your account and inside the “Wallets” tab, click “Create”, where you need to select a currency from the drop-down list and come up with a wallet name.

Accept the terms of the user agreement by clicking the “I agree” button.

Your new wallet is created and ready to use. You can create as many wallets as you like in the WebMoney system, but they cannot be deleted in the future. Do not create extra wallets unnecessarily, so as not to get confused in them.
Registering and creating a wallet: Video
Today I will tell you how to create your own wallet in the WebMoney system. We will go with you full procedure WebMoney registration, which will allow you to fully use Internet money (receive, transfer, exchange, withdraw, pay for goods and services with it, etc.). What will be especially useful to you if you decide to create an online store for free.
In this article you will learn:
Preparation and important points
I would like to immediately draw your attention to the fact that it is better to immediately indicate your real data, so that later there will be no problems with confirming the authenticity of the entered information. You don’t have to worry about confidentiality, this system is quite safe, for example, I myself have been using WebMoney for more than four years.
But let's start registering with WebMoney. To do this, it is advisable to prepare your passport, an identification number, number mobile phone, and, of course, keep the phone itself nearby.
To access your wallets in Webmoney, there are 4 different clients:
- WM Keeper Light;
- WM Keeper Mobile.
To help you understand which client is best to choose, check out this article.
WebMoney registration Mini
First we need to register WebMoney Mini, it couldn't be easier to do. To do this, open any browser (in my case it is Inernet Explorer, since it is installed by default on all computers with operating system Windows). It is launched using a shortcut on the desktop or from the Start menu, as shown in the screenshot:
A browser window will open in front of you, address bar where enter the WebMoney system address: https://webmoney.ru and click the button Enter" on keyboard. The following window will open in front of you: 
On the left side of the site, you will see two big buttons: “Registration” and “Login”. We will need the first of them only now, when we are going to create a WebMoney wallet. We will now click on the second button, “Login,” whenever we want to log into the WebMoney system. So, let's register in WebMoney, to do this, click the "Registration" button: 
Now you will see a page with a choice of registration method. There are two methods: 1) using your social network account; 2)or using your personal mobile number. In principle, it makes no difference whether you register via a social network or via a mobile phone, however I would still recommend that you register through mobile number (You will still have to enter it to remove restrictions), and subsequently registration will be simplified.
However, I am not looking for easy ways and, despite everything, I chose to register through social networks (which I later regretted a little). If you want to repeat this, please note that only your real first and last name should be indicated on your social network. If there are nicknames there, then they will be used to create a WebMoney wallet, which means that in order to attach a card for withdrawing money from WebMoney you will have to change your first and last name (to real ones), and for confirmation you will need to send a scan of your passport, and for Russians also scanned identification number. In general, trouble for one or two weeks for sure! It’s better to register immediately via mobile phone
But, I choose to register with WebMoney through a social network: 
My choice fell on registration through Twitter account, however, regardless of the selected social network, you will still be shown a somewhat similar window in which you will be asked to enter your username and password. Don't be afraid to inject, this procedure is absolutely safe. Many sites practice this procedure, and logins and passwords will still not be known to WebMoney, since the procedure goes through the server of the selected social network (in my case, through Twitter).
So, in the selected window, enter your login, password and click on the “Authorize” or “OK” button, as shown in the picture below: 
After the login and password have been entered and you click “OK”, a window will appear in front of you for a few seconds informing you that the authorization was successful and you will be redirected back to the application (in our case, to WebMoney): 
As soon as the WebMoney system receives your data from social networks. A window will open in front of you, in which it will be written “Welcome, your name! Your personal data obtained from...” And under this message you will see your nickname, name, language, time zone. If the data is correct, check the appropriate box and click the “Next” button. In general, do everything as shown in our screenshot: 
Next, you will see a page through which you can invite your other friends on social networks who do not yet have WebMoney. To do this, you need to tick the people you want to invite. In my case, I will not do this, since most of my friends already have wallets in WebMoney, and there is no desire to send spam letters to others.
If you don’t want to send invitations to anyone, then make sure that there are no checkboxes anywhere, or first check everyone’s boxes and then uncheck them, as shown in the screenshot below. Then click the button at the bottom of the “Next” page: 
And now the solemn moment has come: you have registered with WebMoney! Congratulations!!! Those who registered via phone saw this window shown in the screenshot below a little earlier than me.
So, what do we see on the screen:
- We are congratulated on successful registration in the WebMoney Transfer system! (this window can be safely closed by clicking on the red cross in the corner of the green message)
- We are advised to enter a mobile phone number, since now the limit on the wallet is set at 5,000 Russian rubles, and by entering our number, we immediately increase the limit to 15,000 Russian rubles, which in Webmoney is more often called WMR.
- However, we are short of wallets. They need to be created. To do this, click on the “can be created” link in the “Wallets” field. As shown in the picture below.

Creating a wallet is pretty simple task, to do this, first select the desired currency (WMR - Russian rubles, WMZ - dollars, WME - euros, WMU - Ukrainian hryvnia, etc.). Then read the agreement (to be honest, I didn’t read it, because I don’t understand anything about legal intricacies). Next, check the box next to the text indicating that you accept the terms of the agreement. Finally, click the save button.
You can see it more clearly in the screenshot: 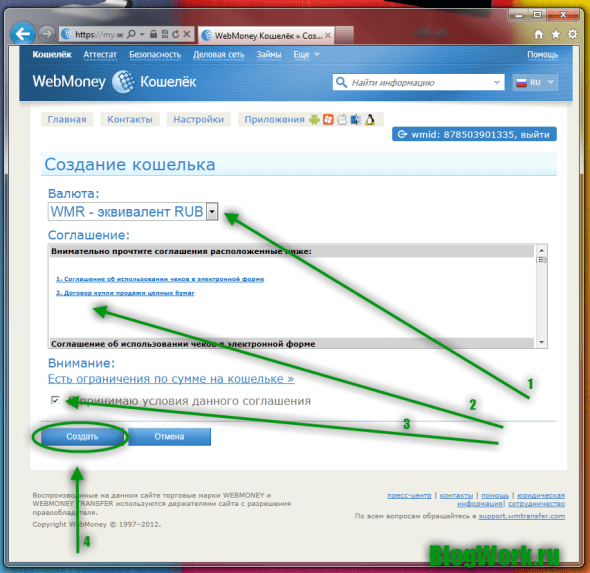
- At number one, we are shown a notification stating that a WMR wallet has been created (if you chose a different currency, then another wallet will be created accordingly).
- Our wallet number is shown under the second arrow. This is exactly what we will give to those from whom we want to receive the specified currency.
- If you want to add a new wallet, then click on the corresponding button, which looks like “[+]”. After which you will be transferred to the previous window, in which you will also need to select a currency, accept the agreement and click the “Create” button.
- Under the fourth arrow we see your balance. IN this moment it is 0.00 WMR. You can click on these numbers to get a more detailed report.
- Well, in fact, the fifth arrow points us to the long “Update” button, by clicking which we will update the system and get more accurate information about the state of our wallet.
Here is the actual picture with the arrows: 
How to use WebMoney
This is actually the first part of registering wallets in WebMoney. For those for whom this minimum is enough (receiving small amounts, paying for services, goods, withdrawing money, etc.), they can stop reading this article. Those who have decided to get the most out of WebMoney and not feel limited, I recommend that you continue to follow our recommendations.
First, let's review how to log into the WebMoney system. To do this, as usual, enter in the address bar of your browser https://webmoney.ru and click on the “Login” button, which is located on the left side of the site. Here is a screenshot for clarity: 
Next, you will see a page called the WebMoney system, like “WebMoney Enter”. Scroll your mouse down and you will see not only the fields for entering WMID and password, but also WM Keeper different versions. We are interested in WM Keeper Mini, and that is what we choose.
For more details, see the figure: 
Next, we will be asked to introduce ourselves; to do this, we will need to enter our username (phone number) and password, or use social networks if you registered through them. I registered via Twitter, and I select it (I hope you did this via phone): 
I can’t show how this happens when you enter your login and password, so I’ll show you how this happens: when you click on your social network. First, a window pops up asking you to log in, you click on this button: 
After which it happens automatic login into your wallet. The advantage of such a login is that you do not need to enter logins and passwords into the system.
Now let's expand the capabilities of our wallet by increasing the limit: enter your phone number. To do this, we will use the advice that hangs in the yellow frame. And let’s follow the link “Enter your phone number”, as shown in our screenshot (if you have already entered your phone number, just skip this point). 
In the next window we need to assign a phone number. We enter it in a special field, but keep in mind that it must be mobile and it must be entered in full, but only without the “+” sign at the beginning. After that, click the “OK” button and wait for an SMS message on your mobile phone (it arrives within the first few seconds). 
As soon as I received the code via SMS, I entered it into a special field and successfully updated my phone number. Now my limit has been changed to 15,000 Russian rubles.
How to get a formal certificate in WebMoney
If you want to expand your capabilities even further using WebMoney. We recommend that you obtain at least a formal certificate, which will also help you when using the WebMoney wallet during transactions with other participants in the system. In short, you need to provide your passport information to the system, that is, indicate where you live, and also enter your passport information. It's a matter of three minutes. Again, you don’t have to worry about safety at all!
To receive a certificate, go to the “Certificate” tab and click on the “Get Certificate” button, which is located on the left side of the site. However, if you don’t see such a link, just follow this link: https://passport.webmoney.ru/asp/aProcess.asp
Most likely, you will again be asked to log in either through your phone or through a social network. So log in. Next, follow the link “Your personal data”, the link can be found in the left sidebar of the site. If you're too lazy to look, here it is: https://passport.webmoney.ru/asp/aUserInfo.asp
A page like this will open in front of you, where you will need to enter all your personal data: 
Please note that it is better to immediately indicate your real passport details, otherwise you will have to change them to real ones if you have to confirm the specified passport details. In addition, you will not be able to attach a bank plastic card to your WebMoney wallet, if the data differs from what you indicated in the bank. In general, believe me, it is better to indicate your real data! After all the data has been specified, click the “Save” button.
The city cannot be entered, it can only be indicated, to do this, click on the link indicated opposite the city, a new window will open in front of you, in which check the box which city you will indicate (City permanent registration, City of passport issue, City of birth). In my case, there was one city, so I immediately checked all the boxes with three checkboxes, then clicked on the “Select city” button. As shown in the picture: 
Once you have entered all the data and clicked the save button, you will be redirected to the passport control panel page, where you will see that You now have a formal certificate. Congratulations! 
I also recommend that you go through E-Num authorization for greater security and greater opportunities. This is quite easy to do, just follow the link: https://security.webmoney.ru/asp/setenum.asp
I won’t describe it, since there is nothing complicated, but it all comes down to the fact that you need to enter your mobile phone number, and then confirm it by e-mail. And not everyone will want to install this function.
How to change WebMoney Keeper Mini to WebMoney Keeper Classic
Now it’s the turn to finally remove all restrictions from your wallet! Change WM Keeper Mini to WM Keeper Classic. This is quite simple to do, you can do it through the wallet settings, or go to the “Security” tab on the WebMoney website, then select the “Management Methods” item in the left column. Or just follow the link: https://security.webmoney.ru/asp/controllist2.asp
As always, you will have to confirm the reality of your identity using a social network or mobile phone. I have an E-Num security system connected, so logging in is somewhat complicated. Specifically, I'm first asked to log in using a social network: 
And then they send you a code that you will need to enter in a special field. 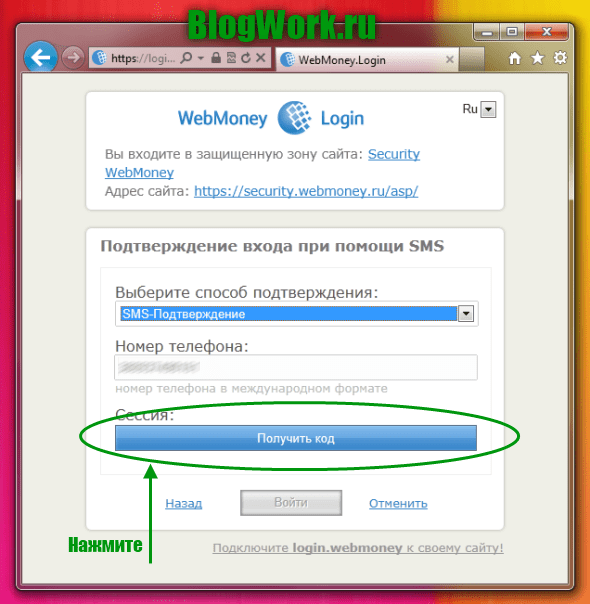
However, I eventually get into the account management methods. At the moment green light lights up near WM Keeper Mini. Therefore, we click on the “Disconnect” button, after which we click on the “Connect” button, but already in the WM Keeper Classic box, as shown in the screenshot published below. 
Of course, you can choose another control method, for example WM Keeper Light or WM Keeper Mobile. However, you cannot switch to WM Keeper Light from WM Keeper Mini (the system has not yet implemented this function), and WM Keeper Mobile is even more limited in its functions than Mini. Therefore, there is only one solution - WM Keeper Classic! Moreover, for many this is the most ideal option, as it provides maximum opportunities and is very easy to use.
After you click this button, you will be prompted to download the generated key, which you will subsequently need to log into the WebMoney program. To do this, click right click click on the “Download keys” link. In the opened context menu, select “Save target as...”. You will be prompted to save the file, just indicate where to save the file and that’s it. Then click on the continue button: 
WebMoney registration Keeper Classic
In this part we will tell you how to register WM Keeper Classic and how to use it. First you need to download it, it’s better to do this from the official website, latest version You can find it at the link: https://wiki.webmoney.ru/projects/webmoney/wiki/WM_Keeper_Classic
Follow the link, select the “Russian version” (you can have the English version if you want), after which the download occurs installation file:
The downloaded file looks something like this: 
Click on the file double click left mouse button and the application will launch. Most likely, the security system will ask you whether it is really worth running this application, answer “Yes, run” (if you downloaded it from the official website): 
Next, the WM Keeper Classic program will greet you and tell you which version you are installing and ask you to close the rest Windows applications(so that the installation goes smoothly), and will also inform you that the program is protected by copyright. In general, nothing particularly important, so feel free to click “Next”: 
The next window will be an agreement, which, as a rule, is in any program or computer game. Of course, you can read this agreement carefully and then accept or not accept it. However, the majority (I must admit, I am among them) do not read such agreements at all, since if you are not going to do anything illegal with the program, then you are unlikely to find anything very interesting or important in this agreement.
Therefore, you can simply check the box next to the message that you agree with the agreement and accept it. Then click on the “Next” button. 
In the next window you need to indicate where you want to install the program (you can leave it unchanged and the program will install its files, at the root of others Windows programs). At the end, click “Next” again. 
The next window informs us that a root certificate from WebMoney Transfer Root Authority will be installed on the computer. Therefore, you should click the “Yes” button. In general, nothing serious again, just click the “Next” button. 
Upon completion, you are offered to additionally install a browser plugin, which will increase your security when visiting sites. You can bet, you can - no. The main thing is to click “Done” at the end. 
So, the program is installed on your computer, now launch the shortcut, which should already be on your desktop. After which the following small window will open in front of you, in which you need to click on the “Recovery” link: 
In this window, enter your WMID number, which can be seen in WM Keeper Mini in the right top corner(small blue line with numbers written on it). Then enter your password. Now specify the path to the file that we saved when registering WM Keeper Classic. It will have a name - your WMID number, and the extension will be “.kwn”. For example, my file is called “878503901335.kwm”. When everything is entered, click the “OK” button: 
Next you will be asked about the wallet file, which you most likely do not have, so feel free to allow the program to create new file wallets and click the “OK” button. 
And, Voila! We createdWebMoney! And note, they did it completely free of charge! Congratulations!

If you have any questions, ask them in the comments! And if you want to start earning a lot of WMR, WMZ or WME, subscribe to our blog and read new articles about how you can make money on the Internet! Good luck to all!
Published by author