How to bring an unnamed Chinese tablet back to life. Disabling loops and wires
We all use a tablet for a variety of purposes. Usually there are no problems with it. But in some cases it may be required. IN service center It can be very expensive and inconvenient, especially if you live in a small town. In this case, it would be much more advisable to learn how to disassemble the tablet yourself. In this guide we will provide general scheme, since each model may have its own characteristics. In any case, after reading this manual, you will have at least, general idea, how to disassemble the tablet, and if something doesn’t work out, you can additionally search for the necessary information.
What you can fix yourself
If you are reading this guide, then most likely you are not very knowledgeable about electronics. If this is the case, then do not try to be a hero and try to fix the problem yourself. electronic components. But there are some things you can fix yourself. What exactly?
- Change connectors and individual components. For example, your tablet has stopped charging and you need to replace the power socket. Or the headphones are acting up and you need to replace the audio input. If the battery starts to last very little time, you can try replacing it.
- The most popular reason why regular users If they want to disassemble the tablet, the solution is to replace the entire sensor or display. Most often this is caused by careless handling, when the tablet falls on the floor and the sensor cracks, or someone sits on the device lying on the sofa.
So, if you are sure that you really need this, let’s proceed to the guide on how to disassemble the tablet yourself. Reserve a few minutes of time and carefully read all the points.
Required set of tools
The first thing you need to do is stock up on the necessary set of tools. Without them, you will not be able to completely disassemble the device. Although some of the tools can be replaced with improvised materials, some are completely irreplaceable, since without them you will simply damage the device. So what will you need?
- Screwdrivers are one of the indispensable tools. You can, of course, try to open the screws with a knife or a single screwdriver, but depending on what screws the manufacturer of your tablet uses, you may need a Phillips, flat, multi-faceted or star screwdriver. Screwdrivers can be purchased as a set or one universal one with a set of interchangeable heads. Such a universal tool can be useful not only for disassembling tablets.
 Screwdrivers are an indispensable tool
 - Plastic spatula. It is necessary to detach the back cover of the case or other parts. Also, using a plastic spatula, you can disconnect cables and connectors inside the case. If you don't have a plastic spatula, you can use another thin object, for example, by bank card or a guitar pick. The main condition is the presence of a pointed end, so that it is convenient to insert into a narrow slot.

- Thin knife. Its role is approximately the same as that of a plastic spatula - you will use it to pry off those components that the spatula could not handle. Its advantage is a narrow blade with a relatively long length.

- Soldering kit, hair dryer. Some manufacturers attach components of their devices using soldering or bond them at elevated temperatures. In order to remove them, you will need to unsolder the connector or heat the surface with a soldering hair dryer.

- Tweezers. An almost irreplaceable thing when you need to unhook a small part. It will be very difficult to do this with your fingers, no matter how thin they are. You will have to use them already at the stage of disabling various components.

- Wire cutters. In very rare cases, when the manufacturer tightly fastens some elements of the tablet, you will have to cut them with wire cutters. But at the same time, be sure to think about whether you will be able to restore the device’s functionality later.

- Scotch tape, glue. They will be needed when assembling the tablet after replacing the necessary modules. Most often, various loops and small parts attached with glue or double-sided tape. Accordingly, you will also have to use them so that the parts sit firmly in place.

Disassembling the tablet
Component Mounting Options
Before proceeding directly to disassembling the tablet, it would not hurt to remind you what types of mounts are used various manufacturers mobile devices:
- Screws. The best option, making your tablet highly repairable. You just need to have the appropriate set of screwdrivers and a little attention so as not to mix up the screws during assembly;
- Latches and cables. Very often used for fastening the case and some elements inside. The latches can be very tricky, and in some cases you won't be able to disassemble the device without breaking them. A cable is a flat ribbon of wires fastened together, through which a signal is transmitted to a controller or microcircuit. Usually it is enough to unfasten the cable fastener from the socket using a knife or plastic spatula;
- Adhesive backing or double-sided tape. Some inexpensive devices are held in place primarily by tape or an adhesive backing. In this case, to disassemble the tablet, you will have to make some effort, and in some cases even heat the case elements using a soldering hair dryer;
- Soldering. The most inconvenient type of fastening for repair. It’s okay if a small connector is soldered, but some manufacturers manage to solder entire large chips. In this case, we can sympathize with you. If you manage to cope on your own, it will be at the cost of great effort.
Removing the top plate
Many tablets have a small plate on the back surface near the top edge. Usually it hides connectors for a SIM card or flash drive. If your model has this cover, then first you need to remove it. To do this, you need to insert a plastic spatula or an object that replaces it into the narrow gap between the plate and the body and move it around the perimeter. Usually it gives in quite easily and special effort you don't have to apply it. In some cases, the manufacturer stipulates that the lid opens even without foreign objects.
After this, be sure to remove the memory card and SIM card from the connectors, as certain difficulties may arise if they are present. Also check if there are any screws under the cover. Unscrew them, otherwise further procedure will be impossible.

Removing the cover
After removing the top plate and unscrewing the screws underneath, check to see if there are any screws around the perimeter of the case. Usually there can be from 4 to 8, and they are located along the edges. If you do not have a top removable plate, check for screws under the slots for the SIM card flash drive, which are usually located on one of the side faces in this case.
Next, using a flat object - a plastic spatula, a pick, a card or a thin knife - you need to disconnect all the latches around the perimeter of the case. In very rare cases back cover can only be held in place by screws. Be careful, in some places you need to apply great effort, be careful not to break anything. Unfortunately, in some cases it is impossible to remove the cover without breaking the latch.
In some cases, in order to disassemble the case, you will need to unfasten the latches located under the front glass. Suffering from this Apple company; Many experts are recognized as leaders in the complexity of repairs. Also, some Chinese companies, in order to save money, can place screws on the front panel and seal them with transparent plastic on top. In this case, you will need to immediately peel off the plastic, and only then unscrew the screws.
 Carefully remove the cover, if necessary, unfasten the latches located under the front glass
 Disabling loops and wires
After disconnecting the cover, do not rush to remove it. First of all, check whether various cables and wiring are attached to it. If so, the first thing you should do is disable them. To do this, you will need a plastic spatula or knife, and in some cases, perhaps a soldering iron.
Next, one by one, unhook all the cables and wires attached to the case and motherboard of the tablet. Usually, the vibration motor, SIM card and flash drive slot, camera, docking station and headphone connectors, micro-USB, microphone, and speakers can be disconnected without any problems.
In each tablet, the layout of the components may vary slightly, and they may also be attached differently, but the principle will be the same for each model. Be sure to take a close look at each component and how it is attached before removing it. This is simply necessary to ensure that disassembling the tablet does not cause damage.
Disconnecting the battery
Unlike phones, the battery on a tablet is non-removable and cannot be changed. It is usually attached to the body and connected to motherboard through wiring or cable. It can be attached to the body either with screws, double-sided tape or an adhesive base. In rare cases it may be soldered. Study carefully how it is attached, as well as where the wires go from it, and, having disconnected the necessary connectors, remove the battery.
 Disconnect the device's battery after learning how it is attached first.
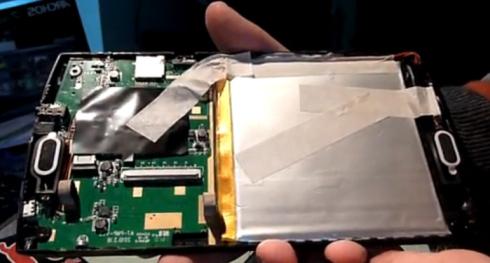
After disconnecting all wiring and connectors, it’s the motherboard’s turn. This is the main component of the tablet, since the processor, RAM, graphics accelerator and other equally important chips are attached to the motherboard. Most important details protected using special electromagnetic plates designed to protect them from the effects of electromagnetic waves, and given the presence of small holes and applied to inner part thermal protective layer - also from overheating. Very often, manufacturers glue or solder these plates, making repairs extremely difficult. The situation is much simpler when using screws. So if you don't need to change RAM or some kind of microcircuit on the motherboard, it’s better not to touch these plates in vain.
 The motherboard is the main component of the device, all the microcircuits are attached to it
 Detaching the display matrix from the sensor and protective glass
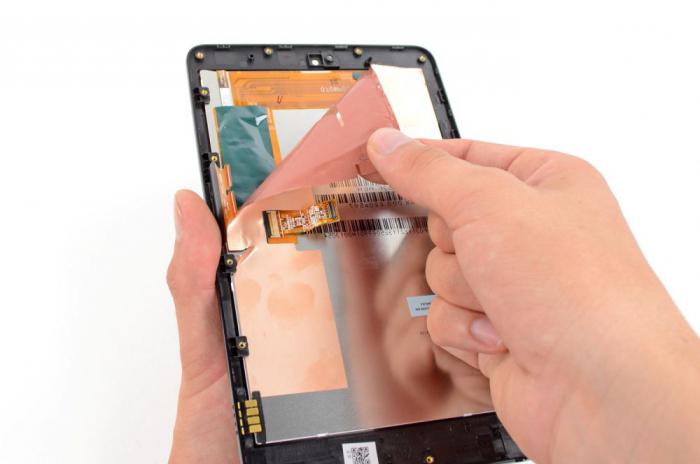
Since most users want to disassemble the tablet in order to replace the display sensor, let's take a closer look at this process. The sensor itself, thanks to which the tablet can be controlled with your fingers, as well as protective glass. It is best when this entire structure can be disassembled and then, in case of damage to the protective glass or sensor, you will not need to change the entire module. This significantly reduces repair costs.

Disconnect the sensor cable from the tablet's motherboard. After this, try to disconnect it from the display matrix; to do this, use a soldering hair dryer to heat it around the perimeter at a temperature of about 100 degrees. This is necessary so that the adhesive base melts a little, and it is easier to separate them. After this, carefully wipe the surface from any glue residue, then apply a new sensor and connect its cable to the appropriate connector on the motherboard.
Removing the protective glass from the housing frame
If the tablet was broken when dropped, it can also be replaced. To do this, the first step is to detach it from the frame of the case. It can be attached to it using latches or adhesive tape, or both. Twist the glass in your hands and carefully examine the design so that you don’t break anything when you try to disassemble it. You may have to apply some physical effort, but do not overdo it so that the frame does not become deformed. Use a knife or plastic spatula to pry the protective glass along the entire perimeter, then carefully remove it and install a new one. You may have to break off some of the latches, in which case compensate for their absence with double-sided tape or a drop of glue.

- Record each stage. This is important so that when assembling the tablet you assemble everything in the correct sequence. You can photograph each step, make schematic drawings, or even film your actions.
- Sign each item removed. In order not to forget which removed module is responsible for what, put it on a small piece of paper and be sure to sign it. Then you definitely won't forget.
- Install components only for your device model. Many online stores sell components for various models tablets. Install only those that are designed specifically for your tablet, or are fully compatible with it.
- Find the module layout on your device. If you have never exercised before, this step is mandatory. It will greatly simplify your task, since you will not have to guess what each of the modules looks like. Search on special forums; usually specialists post photographs of the insides of the tablet, signing the name of the components.
Conclusion
Did you manage to disassemble the tablet following our instructions? Write to us about it in the comments.
Before you disassemble the tablet, be sure to decide why you are doing this and whether you have enough knowledge and skills. Tablet PC– the device is quite complex and fragile, and, in addition, expensive, so if you are not at all familiar with modern technology, we advise you not to try to disassemble and repair the gadget yourself, but to take it to a service center or specialists. But if you still decide to do it this action then this material will help you.
Preparing to disassemble the tablet
Before you disassemble the tablet yourself, carefully study the theoretical material, watch the video, or consult a familiar specialist. In addition, you will need to purchase a set of tools and accessories for easy disassembly and assembly of your device.
Choosing tools
In order to open the gadget, we need:
- Set of small size screwdrivers such as Torx, Straight and Phillips. You can also use watch screwdrivers, but be careful about the quality of the product, as a bad tool can easily damage a fragile device.
- Special blades for disassembling gadgets, which are necessary to open the back cover. You can buy them at the radio equipment market or in stores cellular communication. If you couldn’t find them in your city, don’t worry - as a replacement, you can carefully disassemble the device with any thin plastic object, such as an old credit card or a guitar pick.
- A suction cup necessary for removing the protective glass and touchscreen in some models.
- Also, in order to disassemble the device you may need additional tools: small wire cutters, sharp knife with a thin blade, tweezers, hair dryer, double-sided tape. Some actions can be carried out using a soldering iron.
We disassemble the Samsung tablet

Now you will learn by example how to disassemble a Samsung tablet yourself at home, using our instructions:
- Turn off your device.
- First of all, remove the silver insert using a spatula. We insert the tool into the cavity between the device body and the socket and remove this part with careful movements. Then take a screwdriver and unscrew all visible screws. This procedure is carried out before removing the cover.
- Using the same spatula, remove the back cover. To do this, you need to move the tool around the perimeter of the cavity.
- After removing the cover, you will see a huge number of different cables. Carefully remove the connected elements. Some parts may also have fastenings in the form of screws, so before disassembling them, carefully inspect the element.
Tip: in order not to forget what is connected where, record the process on video or take photos.
- After all the elements have been disconnected, we move on to working with the battery. Using a screwdriver, unscrew all the screws securing the battery, sign them and put them in a container.
- After this you can easily disassemble motherboard: the manufacturer did not provide additional fasteners for it.
- We begin to disconnect the matrix by unscrewing the elements holding it. Then very carefully lift the matrix over the glass and remove it.
- In order to remove the frame from the glass, it is necessary to break the fasteners in the form of rings. But don't worry, the frame stays on perfectly with the adhesive tape.
So we've sorted it out samsung tablet and now we know how it works. If you did everything exactly according to the instructions, there will be no problems with subsequent assembly.
We disassemble a Chinese tablet

Everyone knows that most tablets are modern market– made in China. These are the well-known Prestigio (Prestigio), Lenovo (Lenovo) and other similar brands. Only a small proportion of devices, such as Samsung and Oysters, are manufactured in other countries.
You must understand what to disassemble Chinese tablet It’s quite easy even for not a professional, since most Chinese tablets are analogues of already well-known brands and their structure is similar. Given detailed instructions to help you:
- First you need to turn off the device.
- Using a small screwdriver, unscrew the bolts securing the cover to the device itself (not on all models), mark it and put it in a box. As a rule, the cover of Chinese gadgets is secured either with latches or with screws. Therefore, you will have to work hard to open the tablet cover without damaging it.
- Next, all cables, wiring and other elements are disconnected. This is done very carefully. Take photographs of the location of the parts before disassembling.
- The battery is disconnected and the battery cables are pulled out.
- Parts such as speakers and camera are disconnected and disassembled.
- Then the system board is taken out, which is securely bolted around the perimeter.
- By prying the board off with a spatula, the glass part of the device is disassembled along with the screen and touchscreen.
Disassemble the gadget following the instructions, and then reassembly it won't be difficult.
Conclusion
You must understand that a tablet computer is an expensive and fragile thing, all actions must be carried out carefully, and by reading our instructions you will easily understand how to disassemble the tablet yourself without prior theoretical training and without any special skills or knowledge in electrical engineering. If you are not confident in your abilities, it is better to leave the disassembly and repair of the device to a specialist. And if you still decide to risk your device, then carefully read our instructions and get to work.
![]()
Naturally, we will spin up the tablet when it is turned off. Usually, it is impossible to find any bolts or latches on the outer casing of a tablet from branded manufacturers, and therefore people fall into a stupor: how can they disassemble it?
It turns out that the latches are located along the perimeter of the sides of the device. To separate them, you need to find a “weak spot” on the case, i.e. a space into which a flat object, such as the pointed tip of a plastic card, can be inserted. Typically, such a place is located at the junction of two parts of the case near the volume control or power button. Then you will need to gradually, one by one, open the latches, pushing a plastic object around the perimeter of the joint on the case. The video shows the process of how a man disassembles his Samsung Tab to clean the buttons that are stuck.
How to completely disassemble a tablet
In the previous video, you actually looked at how to remove the tablet case. What if you need to take it apart down to the last detail? By the way, this time you will see how to remove the case, on which the screws are hidden under the protective covers. After we remove the case, you will need to carefully disconnect the cables from the system board. Watch the video:
How to disassemble a Chinese tablet
At first glance, it is generally not clear how it can be unscrewed - no bolts for you, no slots where parts of the body connect, where you can pry it off with something. It's actually that simple! Do you think the Chinese would make monolithic devices? They can be disassembled and assembled like a children's construction set.
And this is how the cheapest Chinese tablets are disassembled. Do not confuse with the previous version!
And further. To avoid having to look for information on “how to put the tablet back together,” do not disassemble it completely unless you are going to repair it and are not sure that you will remember where to put everything back.
If the question has occurred to you about how to disassemble a tablet, but you are almost unfamiliar with modern technology and have never seen its insides before, you should not do this on a fully working device. Even if something doesn’t work, or you become very interested, but you have almost no idea about it, then it would be more correct to take the device to specialists. The fact is that modern electronics have a very complex structure, and at the same time it itself is quite fragile. That is why sometimes it happens that as a result of unprofessional and unsuccessful disassembly, even specialists fail to bring the gadget back to life.
How to disassemble a tablet: general instructions
It is worth noting that to carry out such an operation you will need to arm yourself with special tools. They are quite easy to find in any electronics store or even in the market. Before disassembling the tablet, you need to prepare a set of thin screwdrivers, which includes a straight and Phillips screwdriver, as well as tweezers and a metal spatula. In some cases, it may also be necessary, and although such screws are not very often found on tablets, it is worth preparing it so that there is no need to look for it when the device is already at the disassembly stage.

Main stages of work
It is clear that it is difficult to describe in detail in one article how all tablet computers are disassembled, but there are several main stages of work.
Start
The first stage of work with almost any tablet model requires you to disconnect the display panel itself from the back cover. Depending on the manufacturer and brand, screws or special fasteners may be used to connect them. Most often there are no screws, but before disassembling you will have to not only unscrew several screws, but also unclip special fasteners. And after that, you can walk around the perimeter of the display, prying it up with a metal spatula. This must be done carefully at small intervals so as not to damage the display, and also to carefully remove it from the back cover.
Next step
If we talk about how to disassemble the tablet, then we should continue. The second stage for most models involves disconnecting the cables, after which you can remove battery. You must perform all these manipulations with the utmost care. If you do everything correctly, then all fasteners and parts should come off as easily as possible. Be careful not to accidentally leave any loose screws, which are sometimes hidden, for example, under sealing gaskets or protective films.
Once it is disconnected, you can proceed with subsequent disassembly. This stage requires you next steps: remove the speakers, disconnect the camera, if possible, and also disconnect all existing cables from the system board of the device. Now you can unscrew system board, which is usually attached around the perimeter using special screws.

We disassemble a Chinese-made tablet
It's no secret that most tablets are produced in China. It is clear that such products fail quite often, and tablet computers can hardly be called an exception in this regard. There can be a huge number of problems: the screen is broken and needs to be replaced, the touchscreen refuses to work, the sound disappears, etc. And the question immediately arises: how to disassemble the tablet? Not all owners of such devices agree to take them for repairs, but decide to repair them themselves.

Subtleties of the process
Typically, the process of disassembling such devices is not particularly difficult. You should arm yourself with a small screwdriver, find the bolts and get to work. Typically, a tablet consists of a cover and the tablet itself. After unscrewing the bolts, the cover is removed. Usually the clasps hold well enough that you have to work hard to get the cover off. You can use a plastic card that you insert into the slot and then slide it around the device, which will allow you to separate the cover quite easily.
You should be extremely careful, because the speaker may be attached to the cover, which can cause the wire to be torn off. In addition to the speaker, you should see a board in front of you, as well as a battery, which is traditionally mounted on the screen.

Screen replacement
If we talk about how to disassemble a DNS tablet or some other one, then first you need to disconnect the screen cable, which is done with a screwdriver, carefully prying it off, then you need to find the bolts holding the board in order to unscrew them. The board should be carefully disconnected and then set aside. As a result, only the screen and battery will remain in front of you. Now it's time to detach the screen that you have decided to replace. You should carefully separate its corners from the tape, if any, or from the glue. The tape is removed and then set aside, it will need to be used again. It is designed to more securely fix the screen so that dust does not get under it.
Removing the screen
This procedure will cause the screen to separate from the plastic very easily. Next, you will need to separate the battery from it, which can be held on with glue or double-sided tape. Therefore, all work should be carried out very carefully so that the battery packaging is not damaged. You can disassemble the screen, and to do this you just need to pry it off and remove it from the latches.
Now that you understand how to disassemble the DNS tablet, you can take new screen to perform all the operations described earlier in reverse order. The screen is installed on rubber seals, the board is screwed on and the cable is inserted. After all the described manipulations, it is worth checking whether your gadget is working or not, for which the charger is connected and the device is turned on. If everything works, you can secure the battery with double-sided tape. Now you just need to put the lid on and screw it on.
Can I give one important advice. So that you do not forget how the screen, cables, etc. were located, it is worth photographing everything before disassembling the device, as well as during operation. This must be done, especially if you are doing it for the first time. We can also note the fact that Chinese tablets can have a lot of screen models, but you shouldn’t despair in looking for just such a model, because some other one may be suitable.
Causes of problems
Analysts say that this year tablets should be sold more than laptops, but while most users already know how to use the latter, not everyone can use tablets without problems and successfully. Why do tablet screens suffer and break? Due to the fact that they are very thin, fragile, and also due to careless handling. Even the most careful owners can become victims of improper handling of the tablet by children, guests, animals, and under other circumstances. To avoid the need for repairs, it is important to keep the screen of your gadget intact.
How to save your tablet screen?
So that you don’t have questions about, for example, how to disassemble it to replace the screen, you should adhere to several rules. First of all, careful handling is important. The tablet should not be dropped, left on sofas or chairs, given to inappropriate people, children must be instructed, etc. You need to get a case, preferably one with a hard surface that protects the screen. This allows you to save the device in good condition, protecting it from some causes of screen damage. Cover the screen with protective film. It usually costs very little, but gives the glass a fairly high degree of strength. Protective film It’s worth sticking it on the new device before the glass gets dirty. It is best to choose a film to suit your specific model tablet, since all devices are equipped different screens. Usually a good film can last at least a year.
Question about how to disassemble the tablet Prestigio Multipad or another manufacturer, most often occurs when the screen is broken. Typically the screen consists of two layers: a glass touchscreen and a matrix. Usually the matrix remains intact, but the touchscreen breaks. Even in a broken state, it can still work for some time, but you should not delay repairs, since in this case the likelihood of damage to the matrix increases significantly. In addition, the sensor decoder may be blocked, which is why it may not work even after replacement.
Tablets such as the Prestigio Multipad allow you to replace the touchscreen without changing the matrix. But if your screen is cracked from a fall or impact, or you have been using a device with a cracked screen for a long time, then it is likely that the matrix has also been damaged, but hidden damage often comes to light only during the process of replacing the glass or during further use. IN in this case you will be required to make a replacement and touch glass, and matrices.
If we talk about how to disassemble Prestigio tablet, then the process here is similar to the previous description. You can consider options for working with devices from other manufacturers.
Acer tablets
If we talk about how to disassemble Acer tablet, then it’s worth paying attention to certain moments. The device is equipped with a metal back cover and plastic side inserts. This is done so that the antennas are not covered with metal. The lid is held in place by special latches. It is worth opening from the USB or HDMI side. Then, when you reach the other corner, you can pull the lid in the middle to open one edge completely. The second edge is also disconnected in the same way. Top part it simply pulls out from the latches if you pull the entire cover down. Under the cover where the memory card is usually inserted, there is a warranty sticker from the manufacturer.
We disassemble the Explay tablet
Explay is young enough Russian manufacturer, which managed to win the love of connoisseurs of excellent gadgets. But even in this case, sometimes there is a need to repair the device, which means the question arises of how to disassemble Explay tablet. Usually this is not particularly difficult. You will need a small screwdriver. You should find the bolts on the device, and then get to work. The cover can then be removed very easily. You need to remove it carefully, because sometimes a speaker is attached to it, but there is no need to tear it off. In addition to the speaker, you will see a board, as well as a battery, which is usually attached to the screen. Then you can do with the disassembled tablet what you did all this for.
If we talk about how to disassemble the Oysters tablet, then the sequence of actions has much in common with those that have already been described above. You can make only a few adjustments to the gadget model.
In conclusion, it is worth saying that it is best to contact qualified specialists if you need to carry out repairs.
How to remove the tablet cover without damaging it? Let's figure it out and find out how to open the tablet. Before you open the lid of the tablet, you need to ask yourself about two things. The first is why this is needed, and the second is whether there are enough skills and knowledge to do everything correctly. You need to remove the cover if you need to, etc. A tablet computer is a delicate and fragile device, but most often it is also an expensive piece of equipment. That is why, conducting this kind of experiments, outside the walls of a specialized workshop, is relevant only when a person is confident in his abilities.
How to open the tablet and what tools are required?
To open the device, you should acquire the following tools: a set of small screwdrivers (Phillips screwdriver, straight screwdriver, Torx).
You can also use watch screwdrivers, but the choice must be made on the product High Quality, because the bad inventory can cause irreparable damage to the tablet. In the process of opening the tablet, special plastic spatulas, designed for disassembling electronics gadgets, help. All of them will be needed to open the back panel of the device. They can be bought at the radio market or in special departments of stores.
If suddenly the tool could not be obtained, how to open the tablet cover?
How to open a tablet without a tool?
The main thing is not to despair, they use it as a replacement plastic card, pre-sharpened - an old credit card or discount card. Any thin plastic object will also work.
How to open a tablet using the display suction cup?
A suction cup helps separate the touchscreen from the protective glass in some models. You will also need a sharp thin knife, a soldering kit, tweezers, double-sided tape, and small wire cutters. And sometimes you should have a hair dryer at hand.
Remove the tablet cover using a special set of tools
Decision is made. The whole set is available necessary tools. But taking a closer look at the device, the question arises: which side is best to approach it, how to open the tablet and not harm the device? Many devices, at first glance, do not have removable panels, and there are no screws on the case. Typically, in such cases, the back cover is connected to the front using latches. And in order to open the cover of the device, you need to find thin slit at the point where the body parts connect, and insert a plastic spatula into it. Very carefully move around the perimeter of the device, while unlatching all the latches.
All models have a different arrangement of such latches, so you need to pay special attention during disassembly. Then, very carefully, the tablet is opened. You must be extremely careful, since there are various parts attached to the back panel - antennas, various cables or.
Ready. Now the tablet is open, the goal has been achieved. Then you can continue the disassembly process or do what the gadget was disassembled for.
How to open a tablet. Video