Burning a Windows 7 installation disc to disk. Before we finish: the new WTG technology in action
In order to install an operating room Windows system Today, disks are most often used on a computer or laptop. I bought a disk with Windows, or burned it myself onto an empty disc, as we will learn to do in this lesson. And only then installed or reinstalled the system. Also, today it is not uncommon for users to install a system from a simple USB flash drive. Although, frankly speaking, it is worth saying that even from a memory card you can safely install Windows.
Why in Lately Is there an option to install the system from a flash drive? And this is due to the fact that modern laptops, which are thin and light, also called ultrabooks, do not have a built-in disk drive. So we have to somehow get out of the memory cards. But today we are not talking about that. In this article I want to tell you how very simply you can write downWindows to disk so that in the future you can install this system on any computer that has a disk drive.
And to burn Windows to disk you need to follow a few simple steps.
1. Buy a blank.
2. Get it Windows image.
3. Burn the image in Discs Studio.
These simple steps I will describe in more detail for those who like to analyze everything to the smallest detail.
1. Go to any computer store and buy empty disk(blank) 4.7 gigabytes. I mostly buy blanks from Verbatim. They have average price. But I wouldn’t recommend taking the cheapest ones; very often they turn out to be defective.
2. Usually a Windows image is written to the disk. Your task is to acquire this image. Most often, such an image is in ISO format. It doesn’t matter whether you download Windows from the Internet or a friend brings it to you on a flash drive, the main thing is that you have a Windows image in ISO or another format, for example MDF or MDS.
3. Now we need to burn the Windows image to a blank disk. This is not for you regular files, which are thrown onto a disc and simply “stupidly” written to the disk after pressing the “Record” button in Nero program and the like.
Here the approach is a little different. We need to write the image correctly using special software. There are a great variety of programs for recording images, one of them is called Discs Studio, which is what we will use.
Download this program and install. Then we will need to launch it and do a few things simple steps to burn a Windows image to disk. But before that, do not forget to insert a blank (blank disk) into the drive.
This is how the Discs Studio program will look after the first launch.

We need to go to the “Action” menu and select “Burn image”.

In the window that opens, click the ellipsis button.

And indicate the location on the computer where the Windows image file is located.

Then specify the recording speed, preferably the minimum one, and click the “Record” button.

At the bottom of the program we can observe the process of recording the image. Upon completion of the operation, we will receive a corresponding notification in the program, and the drive will be automatically removed from the computer.
That's it for my instructions Windows entries the disk is coming to an end, I hope my lesson was useful to you.
See you in other lessons and articles.
That's what he told how to create a bootable USB flash drive with Windows 7 V Windows program 7 USB/DVD Download Tool. This official program from Microsoft and it seems to work not bad. But a comment appeared that it was impossible to create a bootable USB flash drive with this program. Maybe so, anything can happen, so I’ll write another way in which you can create a bootable USB flash drive with Windows 7. And this time we will use good program Ultra ISO, I have already written about her more than once on the blog, in various articles.
I think that there is no need to tell us why such a bootable flash drive will be useful to us; if you are reading this article, then most likely you are interested in the question of how to create it, and not why it is needed.
In this way you can create a flash drive not only with Windows 7, but also Windows XP and Windows 8. What’s up, you can burn any image, any boot disk, for example Dr.Web LiveCD. Well, if you have already changed your mind about creating such a flash drive, then the image can be written to disk without any problems, I wrote about this in the article.
How to create a bootable USB flash drive with Windows 7?
We will need:
- UltraISO program. You can download it on the Internet in a couple of minutes, just type in search engine request “Download UltraISO”. After downloading, you need to install it. Installation is the most common, but if you don’t know how, then read the article. The program is paid, but when starting just select “Trial mode”. And if you want, you can buy it.
- A disk image with Windows 7, or any other image that you want to burn to a flash drive. This image must be in the format .iso, I hope you have already downloaded it.
- Flash drive size minimum 4 GB(this is for Windows 7, if you want to burn a small image, then 1 GB is enough). The flash drive will have to be formatted, and this will destroy all the files on it, so you need either a clean flash drive, or copy all the information from it to your computer in advance.
If everything is ready, then let's begin.
Launch the program Ultra ISO(there should be a shortcut on the desktop and in the start menu). I will show the example of the English version, since I had a problem with the Russian one, all menu items are displayed in an incomprehensible font. But there’s nothing wrong with that, everything is clear and so.
The program has opened, now we need to select the .iso image of the boot disk, in our case with Windows 7. Click “File” and select “Open”.

Find our image, select it and click “Open”.

Now our image is open in the UltraISO program, all that remains is to write it to a flash drive. Click and select “Write Disk Image…” (Burn hard disk image…).

A window will open in which we need to specify some settings. Look what's opposite “Write Method:”, the value was set to “USB-HDD+”. And on the contrary “ Disk Drive” the flash drive we needed was selected.
Now we still need to format the flash drive and we can start recording. Click the button “Format”. Don’t look at the fact that I have a 1 GB flash drive, I just don’t have a larger capacity at hand. You must have a flash drive of at least 4 GB.

A small window will appear in which we will format our flash drive.
Formatting a flash drive will destroy all files on it. So save them to your computer in advance.
Only needed at point “File system” select NTFS, and click “Start”.
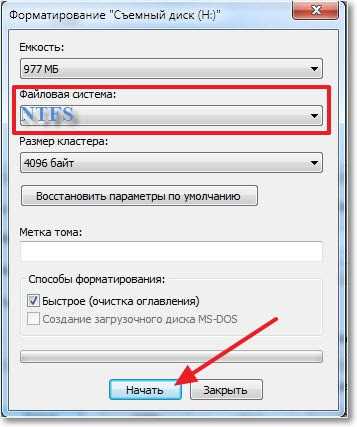
A warning will appear, click “Ok”.

 That's it, the flash drive is formatted. Closing the window “Format” by clicking on “Close”.
Installation operating system- a matter that any user has to resort to periodically. Updates, hardware failures, equipment changes - there are many reasons. The most ordinary way Windows installations– using standard installation DVD. However, some have lost it, others are not going to purchase a licensed version and have downloaded everything they need from the network. Next you need to burn the Windows 7 image to a USB flash drive. This article provides a guide on how to create a bootable USB flash drive, or as it is also called - live usb, using the UltraISO utility.
More information about bootable USB flash drive
When there is no installation disk, you need to burn a bootable USB flash drive to install the system. How is it different from the usual one? It's all about special files, which the BIOS can recognize and with which it can work. It has its own boot sector, like a hard drive and operating system; some live usbs have their own own systems, from which you can boot and work with files. Such devices are called multiboot devices.
In technical terms, it is no different from the usual usb media. It's all about the data. It turns out that to make a bootable USB flash drive, you just need to write it there correct files and create a boot sector. Previously, this was done manually using command line. In fact, some still work this way - the flexibility of settings in this case is very high.
However, today there are a huge number of programs with which even a person far from computers can create a bootable flash drive. For example, in Ultraiso you can do this in just a couple of clicks. Programs differ in functionality and complexity: some are applicable in a wide range of applications, while other utilities are only suitable for producing live USB for a specific operating system.
UltraISO - Utility for working with ISO images
UltraISO is a paid utility, but is completely free to download. During installation, the user activates the trial demo mode, after which the program is blocked and requires the purchase of a license with unlimited access to all functions.
Using this utility you can edit directly in ISO format and write it to a ready-made blank or bootable USB flash drive. The program will create everything itself necessary files, will prescribe boot sectors and will place the operating system image in the required directory. 
To get started, you need to install it. To do this, follow the instructions:
Now that UltraISO utility installed, you can start.
Create a bootable USB flash drive
The first step is to obtain an ISO image of Windows 7. You can download it on the Internet or copy it from the installation disk (this can be done using UltraISO). When the image is available, you can proceed:
We invite you to find out about how to record bootloader Windows flash drive 7 so that it can later be used to install Windows 7 or, if necessary, restore Win systems 7.
In fact, the creation process bootable flash drive It’s not complicated, and what’s more, it won’t take up much of your time, so you should resort to it if you have an unused USB drive that can save the situation at critical moments.
1. First, you need to download a licensed image of Win 7. We suggest downloading the iso image from our server, since this is where all versions of the “seven” are collected and you can choose for yourself exactly what you really need.
2. Now, you need to download the Ultraiso program and install it. The biggest advantage of this program is that it can be used completely free of charge!
If the operating system image has already been downloaded and the program is installed, then you need to proceed to the main process of creating the image.
3. To begin, you need to “run Ultraiso as administrator.” This is done with a click right button mouse over the program icon and selecting the appropriate item in context menu.
You can try to use the program in our situation without “administrator rights,” but in this case, there is a high chance that the operation may fail.
4. Open the Windows 7 iso image, which we are going to burn to a USB drive. To do this, in the Ultraiso program, click on: “File” -> “Open” -> in a new window, select the image that we are going to record, select it and click on “Open”:


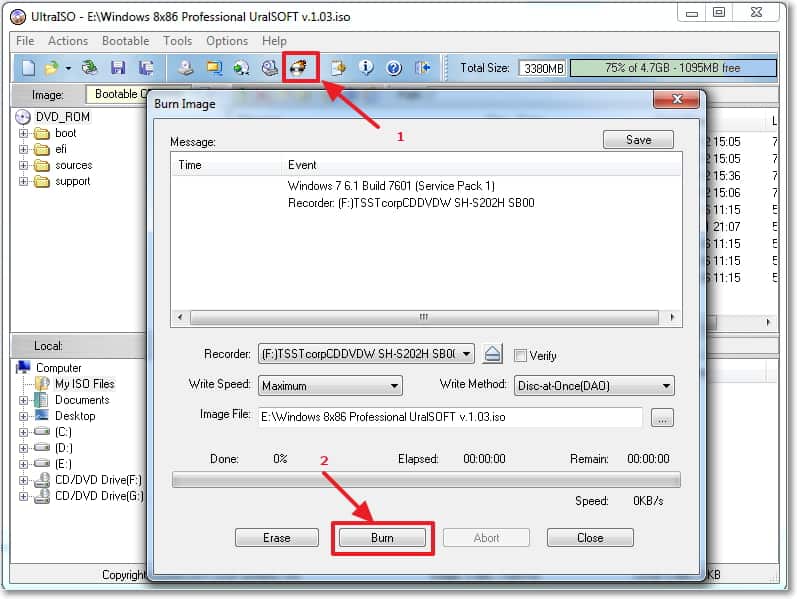
5. Now, since the image to be recorded is open in the program, click on the “Boot” button -> “Burn image Hard drive»:

6. All that remains is to select the USB drive on which we will burn the image. We immediately select the recording method, in our case (for our flash drive) the “USB-HDD+ recording method” is suitable. If you have selected everything, then it’s time to click on “Record”:

7. In a new window, you need to confirm the deletion of all existing information on the flash drive by clicking on the “Yes” button:

8. We are waiting for the process of writing data to the USB drive to complete. This process, often takes about 5-20 minutes.

9. Last step, which will confirm to you that the download was successful, will look like the message “Recording complete!”. Now, all you have to do is click on the “Back” button, and then close the program.

In this way, you can do it yourself burn bootable USB flash drive Windows 7, which you can always carry with your laptop and, if necessary, in a matter of minutes you can revive not only your PC or laptop, but also easily help a friend who finds himself in a very sensitive situation.
Hello. I decided to write some more useful text today, before I lose my inspiration :). I'll tell you now about how to burn a Windows image to disk, this can be done in many ways and programs, but I will write how to burn an image with the UltraISO program, this is the coolest and easy programs I always use it for recording discs. Well, if you don’t want to install additional programs, then burn the image to disk, you can standard means Windows 7 (in Windows Vista There seems to be such a feature too).
I looked at the instructions that I wrote on and, and realized that in them, I gave a link to an article about that. This article describes a way to simply burn files to disk. Music, movies, etc., but we need to create a boot disk for further installation of Windows. And the process of recording an image is slightly different from simply writing files.
When we download an operating system image from the Internet, it looks like a single file with the extension .iso. For some reason, it seems to me that many people simply took and wrote this file to disk, and then complained why not loading from the boot disk when Windows installation, after all, it’s set up.
And to avoid such problems with installing the operating system, I will write about how to correctly burn an .iso Windows image to disk. And then install Windows from this disk; there is a link to detailed installation articles above.
I also forgot to write about the size of Windows images and the disks that will be needed for recording. Suitable for Windows XP CD-R disc, or RW it doesn't matter. The Windows XP image takes up approximately 700 MB and fits on a CD. Of course, if this is not an assembly with many programs and additional utilities, in this case it may not fit on a CD. For Windows Vista, Windows 7 and Eight you already need DVD disc. There are larger images, the seven takes about 3 GB.
Burning an .iso Windows image to disk using UltraISO
After installing the program, it is associated with the .iso extension and all files in this format will be opened through UltraISO.
In order to burn an .iso image, just open the image with Windows double by clicking if.iso looks like this:
 Will start UltraISO program, which will already have a bootable disk ready for recording. Paste required disk into the drive, press the burn button and then confirm the burn by pressing “Burn”. You just need to wait until the program burns the disc, and you can start installing the Windows operating system.
And one more thing, in the speed settings it is best to choose a lower speed, the recording quality will be better. If you burn a disc to high speed, then problems may occur during the installation of the operating system.
We create an installation disk with Windows using a standard tool
You can also burn an image of the installation disk using a standard tool. Such a utility seems to have appeared in Windows Vista, well, it definitely exists in Windows 7. With its help you can special problems burn .iso image. And the resulting disk will be bootable, from which you can install the operating system.
In Windows 7. iso file looks like this:
