Customize the Windows 7 theme. How to return the default theme to Windows? Detailed instructions
Many personal computer users want to give the Windows operating system a more interesting and attractive appearance by personalizing it.
Therefore, the question of how to install a theme on Windows 7 is relevant.
Let's look at the entire process of installing a theme for different versions of this popular operating system.
The easiest way to install a theme on Windows 7
For novice users, the simplest and most accessible method of changing the appearance of the Windows 7 operating system is to install one of the certified themes downloaded from the official Microsoft website on a personal computer.
In this case, you need to perform a number of simple steps:
- on a free space on the desktop, right-click to open the context menu;
- Select “Personalization” in the menu;
Selecting the “personalization” item
- To select one of the themes pre-installed on your computer, simply left-click on the option you like.
Advice! If none of the existing options suits you, you can install another theme by downloading it to your personal computer. This is done very simply and quickly.
- When you left-click on the “Other topics on the Internet” link, a page of the official Microsoft website will open, where a wide selection of various topics is presented.
- Having chosen the option that is most attractive to you, click on the “Download” button located directly below the corresponding image.
Download the selected theme
- Next, you should run the downloaded file to install the theme - after which it will immediately be displayed in the “Personalization” panel.
- If you want to change the image, you need to select the “Desktop Background” item in the “Personalization” panel and select the desired picture option.
- In order to install several images on your desktop at once, you should select them and configure the slide show mode.
- After all the settings have been made, do not forget to save the result.
Installing a theme on Windows 7 Home Basic and Windows 7 Starter
Many people use versions of this popular operating system such as Windows 7 Home Basic and Windows 7 Starter on their computers. In these cases, there are some nuances and features of installing themes.
Let's consider where and how to install the theme if the personalization function is disabled here by default.
Before you begin installing themes on the Starter or Home Basic version of Windows 7, you must enable the personalization feature. You can do this by installing a special patch on your computer called Aero Patch.
Downloading the patch
You can download it from winaero.com in the Unsupported software section. Next, you need to unpack the downloaded file and run it as a computer administrator.
Run as administrator
After this procedure, you must reboot. As a result, the operating system personalization feature will be activated. This method works equally well for both Windows 7 Starter and Windows 7 Home Basic.
Installing a non-certified theme
Quite often, users of personal computers need to install uncertified themes on Windows 7. Therefore, it would be advisable to consider how third-party themes are installed without any threats to the operating system.
This process is not particularly complicated, so on average it will take no more than ten minutes. The main thing is to perform preliminary preparation of the operating system, strictly following the instructions and rules.
In order for the installation process to be as successful as possible, you must first download and install two patches - Theme resource changer and Universal Theme Patcher, and then run each of them in turn as an administrator.
After both necessary patches have been installed, you need to restart your computer. Thus, the operating system will be completely ready to install the third-party themes you choose on it.
This process consists of several successive stages:
- we open a site that presents a wide selection of interesting topics for Windows 7;
- choose the option you like best and download it to your computer;
- Typically, such topics are offered in an archive format, so the contents of the archive must be extracted;
- the extracted folder should be moved to the C:/Windows/Resources/Themes directory.
- Once the theme appears in the Personalization panel, you can apply it and see the results.
Change the Start button and navigation buttons
After the new theme for Windows 7 is installed on your personal computer, you need to give a corresponding updated look to such important components as the Start button, as well as the navigation buttons that are present in Explorer.
We start by replacing the Start button. To do this you need to do the following:
- pre-prepare the system for further changes - obtain access rights to the explorer.exe file using a special program, for example, such as Takeownershipex;

It is best to download Windows 7 themes from the official website. Why here? Yes, because on the Microsoft website you are guaranteed not to pick up any infection on your computer. Moreover, all themes are adapted for Windows, and some also replace standard system sounds with more interesting ones.
How to install a Windows 7 theme
Go to the folder with the downloaded themes and double-click to start the installation. That's it, the theme is installed, and for Windows 7 starter and home users additional instructions: We need to install the personalization panel, since this function is blocked by default in the initial versions of Windows 7. You can download it or. After installing Personalization Panel, you will take full advantage of all desktop customization options.
How to customize the Windows 7 theme
Right-click on the screen and select Personalization. Poke at the bottom of the window Desktop background, check and uncheck the required images, now step by step:
Image Position - Tile
Change images every time - select the right time
In random order - for variety, put a tick 🙂 and save the changes.
How to create your own Windows 7 theme
Now let's go back a little, where we selected Desktop Background and click on the Sounds button to the right. Here you can choose a sound scheme for your PC from those offered by Microsoft.
But that's not all. Now we will need several large images (by the way, beautiful abstract packs of pictures can be easily found on the Internet) or photographs. Now, in any graphics editor (I like the picture manager - Microsoft Office Picture Manager, which is part of the Microsoft Office package), crop and resize the pictures to the resolution of your monitor.
To find out the monitor resolution, right-click on the screen and select Screen Resolution. This is the size (in pixels) that your images should be. This condition, of course, is not mandatory, but desirable. This way you will make life a little easier for your video card; it will not need to stretch and adjust images to fit your screen, which means you save computer resources.
Now we repeat the procedure: right button on the screen, desktop background, image location: here with the browse button, select the prepared images one by one, tick them, set them up as described above and save the changes.
Now you know how to create your own Windows 7 theme from your favorite images with the sound design you like best.
http://site/wp-content/uploads/tema_windows7.pnghttp://site/wp-content/uploads/tema_windows7-150x150.png 2018-04-17T15:20:57+00:00 Lessons Where to download a theme for Windows 7 It is best to download Windows 7 themes from the official Microsoft website. Why here? Yes, because on the Microsoft website you are guaranteed not to pick up any infection on your computer. Moreover, all themes are adapted for Windows, and some also replace standard system sounds with more interesting ones. I recommend...Today we'll figure it out how to install a theme on Windows 7, and complete personal customization. Compared to previous versions of operating systems, in Windows 7 you can easily configure many aspects, such as:
- Background used by the theme
- Sound signals
- Window color
- Transparency
- Screensavers and more
You will be able to create your own themes or install downloaded ones, without any technical knowledge in this area. The recommendations are not suitable for previous editions.
Where are the installed Windows 7 themes located?
You need to open the “personalization” item located on the control panel. Right-click on an empty space (where there are no objects) on the desktop and select “personalization” from the drop-down menu.
After which you will see a window with 3 sections:
1. My themes - contains designs created or modified by you.
2. Aero themes – used by default. Aero are characterized by improved appearance, aesthetics and efficiency of the user interface. The most obvious difference between the main themes and Aero is the transparency of windows.

Other interesting features are app thumbnail previews and some additional features that are available when working with and.
3. Basic (simplified) themes - a set of objects that do not contain special Aero features. They are similar to the themes from Windows XP or Windows 2000 in terms of appearance.

Before install theme on Windows 7, it is advisable to consolidate your knowledge in the field of personalization.
How to install and customize a theme on Windows 7

2. Window color– used for the standard theme. Here you are given a choice of one of the prepared colors. In addition, it is possible to enable or disable the transparency of windows, as well as set the color intensity by moving the slider.

If you don’t like the preset colors, click on “show color settings” and adjust 3 color properties: hue, saturation, brightness. Play with the 3 sliders and see what colors you get.

You can make finer adjustments to your windows. You will need to click on “advanced design options”. As a result, the “color and appearance of the window” will open. Here you can set the size, color, borders and much more. After making changes, click on the apply and ok buttons. This separate topic will be discussed in more detail in another article.

3. Sounds– in this section, sound signals for certain actions are selected. Setting them up takes quite a lot of time, depending on what you want to do: change an existing scheme or create a new one.
How to save or delete topics
After completing the settings, be sure to save the changes by clicking on “save theme”.

If you want delete topic, keep in mind that you cannot delete an active theme. So you'll have to apply another one, then right-click on the one you want to delete and select "Delete topic".

As you can see, it's not difficult configure and install install theme on Windows 7, changing many aspects. You can create your own color and sound combinations. Practice more and success is guaranteed.
Probably every computer user wants to make it something special. Currently, it is possible to significantly modify the interface of not only the desktop, but the entire system. It will be difficult for an inexperienced person to do this, but with the right information, you can achieve success.
Microsoft actively warns that the use of pirated software products can lead to system failures. There is not a drop of lies in this judgment. However, some people want to create an individual style for their interface. The reason for this is the fact that the official products are quite monotonous.
What is it
The theme is a complex of images, colors and computer sounds. As a rule, it includes a screensaver, a desktop screensaver and sound design (on/off, information signals, etc.). Folder icons and cursor can also be changed.
You can install a theme on your Windows 7 computer from those suggested by the developer. Thus, the Aero extension is very popular, which allows you to make your own customization. They are built into the operating system. If they were not enough, you can download additional options on the official Microsoft website.
There is also the possibility of installing non-certified products. You can find countless of them on the Internet. They are able to highlight the individuality of each user. However, there are certain risks, as various malicious utilities are often embedded in downloads.
How to install
You don't have to use themes offered by Microsoft. It is possible to use products from third party sources. It is very important to install them correctly, otherwise critical errors may occur.
In order to do this, the first step is to find a topic you like. They are presented in huge numbers on the Internet. At the same time, do not forget about the bit size of your system (32 or 64 bits). You can view this parameter by clicking on the “my computer” icon and calling up the context menu.
Important! Do not download archives from unverified resources. There is a high probability of getting a Trojan or virus software.
Before starting the installation, create a restore point. If something goes wrong, you can return everything back.
Video: new design for Windows
Let's patch system files

Tip: By default, Windows hides access to system folders. Therefore, you will have to open it for a while by clicking on the corresponding tab (most likely, it will appear when you open the system directive).
- Now you will need to go to the personalization tab (it can be found in the toolbar). In it we select the theme we just installed from the archive. If you did everything correctly, the appearance of the interface will change.
Changing explorer elements
This is not all that can be done. It is possible to modify the elements of the conductor.
We do it this way:

Changing the Start button
Installing most themes does not change the START button. Many would like to modify this element in the form of a ball with colored squares. To do this you will need to use special software. Let's look at the example of Start Orb Changer.

This utility is distributed free of charge. You can download it on the resource of the same name. It works with all bit depths.
Important! When installing, uncheck unnecessary boxes so as not to acquire unnecessary toolbars.
So, we do the following:

There may be cases when, after such an operation, the entire desktop and taskbar disappear. This occurs due to incompatibility of files with a specific system.
To get everything back, do the following:

How to install a standard theme on Windows 7
Sometimes users get too carried away with modifying their operating system. This can lead to many problems: performance degradation, virus infection, loss of control over certain elements, etc. As a result, there is a need to return everything to standard settings. There may be several solutions.
In the simplest case, we do the following:

The method described above only helps if the system files have not been edited. In other situations, the fix will be a little more difficult.
If you once created a backup system restore point (it was discussed at the beginning of the article), then everything will be as simple as possible.

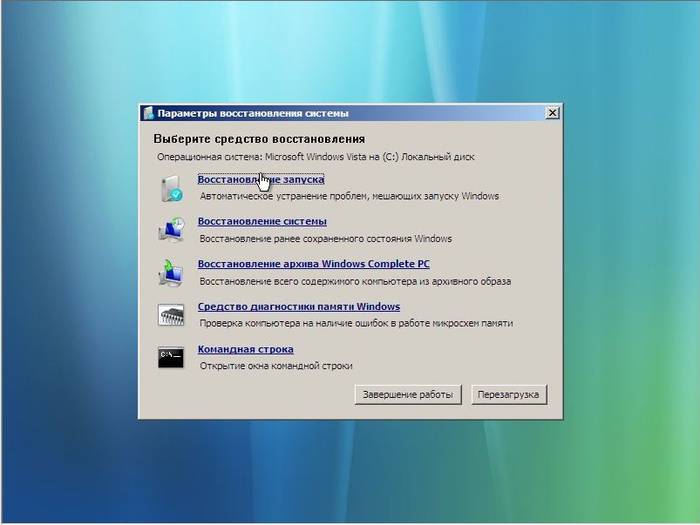
If you did not show foresight, you will have to use another method. To do this, you will need a disk (or flash drive) with Windows. Paste it in and select “System Restore”. Next we follow the instructions.
As a rule, the described methods help in these situations. If they also turn out to be powerless (which happens extremely rarely), then there is only one way out - reinstalling the operating system. In Windows seventh generation, this operation does not cause difficulties, even for inexperienced users.
Well, that's all, as you can see, editing the interface in Windows OS is not such a difficult task. However, you shouldn't get too carried away with it. Many extensions can slow down your computer's performance. Therefore, it is best to use verified files (built into the OS, or downloaded from the official website).
>Despite a lot of text and pictures included below, installing third-party themes for Windows 7 is actually a very simple operation that will take you no more than 10 minutes the first time. And after that, if you follow the instructions correctly, it will take you about 2 minutes to install a new theme.
Keep in mind that all your further actions you do at your own risk, no one except you is responsible for the possible crash of the OS. Before installing patches and replacing system files, we recommend making a restore point or backup of the OS.
Preparing the system to support third-party themes
1.
Download and install the patch (run the program as administrator and follow further prompts).
2.
Download and run the second patch as administrator, press 3 buttons in the window that opens Patch(see screenshot).
After completing the above operations, reboot your computer, your system is ready to install third-party themes.
Setting the visual style (theme)
Replacing system files
In our case, we will change the file ExplorerFrame.dll, which comes in the archive with the theme (if there is none, read the notes at the end of the article).