Transferring the system to a flash drive. How to transfer the necessary information from a CD or DVD to a flash drive
Greetings, dear readers! When installing a new operating system on a computer, it will be enough to open the DVD drive, then install the installation distribution and after performing some operations in the BIOS (you can read about what a BIOS is here), you can begin to complete the task.
However, what to do if the operating system needs to be installed on so-called portable netbooks or laptops, which, as you probably know, do not have a disk reader. In this case, the operating system is installed from a USB drive.
Installing Windows from a flash drive itself is no different from installing from a disk, however, the process of writing the installation distribution onto a flash drive has some peculiarities. In this article, we will look at how to burn Windows 7 to a USB flash drive in several ways. It should be noted here that in addition to writing the windows distribution onto a flash drive, you can also write it to a memory card, but not all laptops have the ability to boot from a memory card. Therefore, before creating a bootable flash drive or memory card, you should make sure that your laptop or netbook is capable of booting from a memory card. And how exactly to check you can find out by reading my article:
What is a computer BIOS and how to configure it
In fact, installing Windows from a flash drive is no different from installing from a regular DVD drive.
I Method for creating bootable flash media
So, the first method that we will consider is installation using the command line. This means that by specifying special commands we will create bootable removable media. But first we need a flash drive with a capacity of at least 4 GB. This method is, I would say, the most difficult for beginners, since you will have to sequentially enter commands that are not entirely familiar to novice users. Therefore, you should not be afraid of these unfamiliar commands; the purpose of each command is described below.
1. Connect the flash drive to the computer, and then click on start and select the “Run” command. At the command line, you will need to enter cmd.exe and click OK. In this case, the command must be launched as an administrator.
2. In the window that opens, you will need to type “diskpart” to open the disk management utility. After the utility appears, you need to type the “list disk” command, which allows you to view the list of used disks in your PC. You will need to select your flash drive. Let’s say in my example this is disk 1. So, we write “select disc 1”. Thus, we indicate that all subsequent actions will be performed with this disk.
3. In the next step, we will need to clean the flash media to which we will write. Type the command “clean”.
4. After the message “Disk cleanup completed successfully” appears, the next step is to create a new partition by issuing the “create partition primary” command. Here we indicate to the system that in the future we will work with this particular section - “select partition 1”.
5. In order to select this section as active, set the “active” command.
6. Then, in the next step, you will need to format the partition we created on the flash drive in the NTFS file system - “format fs=NTFS”.

7. After formatting the flash drive is completed (100%), you will need to activate the process of connecting the device by specifying the command “assign letter=Z” and pressing “Enter”.
8. Then, after the “connection successful” message appears, type “Exit” to exit diskpart to the command prompt.
E – Disk partition containing the windows distribution;
Z – Designation of USB storage device.

The copying process itself takes about 50 minutes. After the copying is complete, all that remains is to restart the computer and go into the BIOS. And then, having set the appropriate settings in the BIOS, you can begin installing the operating system.
II Method for creating bootable flash media
Let's consider the second method of how to write Windows 7 to a USB flash drive. The essence of this method is that to create a bootable flash drive we will need the UltraISO program, with which we will create bootable removable media with the Windows 7 operating system.
If you do not have this program installed, then you can download it from the Internet, and it is distributed on a paid basis. However, you can use the demo version of this program and use this program during the trial period.
So, open the program and click “File – Open”.

In the window that opens, you will need to go to the operating system image and click “Open”. We will look at what an image is and how to create it in one of the future lessons. By the way, let me remind you that various competitions and tournaments are held on the blog, participate and win cash prizes. To have a better chance of becoming a WINNER, you should Subscribe to blog updates so as not to miss new articles. You can read about how to properly subscribe to blog updates by following this link.

Then, in the top menu, click “Boot” and select “Burn hard disk image” from the drop-down menu.


Therefore, before formatting, copy the data that is important to you to your hard drive.
After formatting is successfully completed, click “Burn”.

The image will be written to a flash drive or memory card for a certain time. This method is the simplest compared to the first method.

In general, in addition to the above methods for creating bootable flash media, there are also other various methods. For example, to write a Windows distribution to a memory card or flash drive, use a utility called WinToFlash.
Plus, I suggest you also watch the live video:
The essence of this utility is similar to the previously discussed UltraIso program. That is, you open the program, specify the path to the location of the windows distribution image, copy and write. What methods of creating bootable flash media do you know? In addition, I recommend that you read the article on installing Windows 7 on your computer. From this article you will learn how to properly install the Windows 7 operating system.
Having considered in this article the question of how to write Windows 7 to a flash drive, you can thereby independently reinstall the operating system on your netbook or laptop using a flash drive.
This is where I will conclude this article. I hope the material was useful and interesting for you.
In the next article I will tell you => How I won one competition in Chelyabinsk in the Nomination...
Dear users, if after reading this article you have any questions or would like to add something regarding the subject of this article or the entire Internet resource as a whole, then you can use the comment form. Also ask your questions, suggestions, wishes..
So, for today, that’s actually all I wanted to tell you about in today’s episode. I can only hope that you found interesting and useful information in this article. Well, I, in turn, am waiting for your questions, wishes or suggestions regarding this article or the entire site as a whole ==>
temowind.ru
How to write windows to a flash drive for installation (bootable)
In this article, I will tell you how to burn an image to a USB flash drive (in this case, a Windows image) for subsequent installation of the system on a computer. Nowadays, many people have laptops and netbooks that simply do not have an optical drive, or there is no way to install windows from a disk; this is where creating a bootable Windows 7 flash drive comes to the rescue. This article is primarily aimed at these tasks.
We will write the image to a flash drive in two ways. The first method will be implemented using a very good ultra iso program, and the second using WinSetup From USB. We will start by looking at the steps to work with ultra iso, since this method is less labor-intensive and the process of creating a bootable Windows 7 flash drive will be quite fast. The second method will remain for those who, for some reason, “didn’t work out” with the first option.
Method No. 1
So, let's go. First, download the Ultra ISO program. After the program has been downloaded, installed and launched (click on the trial period if you don’t want to buy), you can begin the fairly simple process of writing Windows to a flash drive:
1. You must specify the path to the image that should be placed on your hard drive: Click “File” => Open (Fig. 1)

2. Then, select: Boot => Burn Hard Disk Image (Fig. 2)


Method No. 2
This method will also tell you how to write windows to a flash drive. What you will need for this option:
1. A little free time;
2. Computer (with hardware that supports booting from a flash drive);
3. Program for preparing a flash drive (download);
4. The flash drive itself (even an SD card will do);
5. An image of the operating system that we want to install.
As an example, I will show how we will record an image of the Microsoft windows 7 Home Premium 64-bit operating system onto a 4GB SD card. I would like to immediately draw your attention to the choice of operating system. If your computer has less than 4GB of RAM, then you should install a 32-bit (x86) version of the operating system, since a 64-bit version will simply clutter up the RAM with unnecessary processes.
We insert the flash drive into the USB port and format it to FAT32 or NTFS using Windows. To do this, you need to go to My Computer, find the flash drive there and right-click on its icon. In the context menu, select “Format...”. In the format window, select the file system FAT32 or NTFS (the latter will be better if the flash drive has a capacity of more than 4GB), and also select the cluster size “Standard cluster size” and click the “Start” button. Everything is shown in the picture:

Next, we download a small program in which we will do all the operations we need. There are several programs of this type, but I chose WinSetupFromUSB because it requires no installation, takes up almost no disk space, and is easy to use.
Let's launch the program. First, we need to select the device on which we will burn the image. This is done in the drop-down menu at the top (if the flash drive is not displayed in this menu, click on the Refresh button). Next, we need to prepare the flash drive for recording the image, because if we simply copy the image, it will be impossible to enter the system installer, because there is no boot sector. To create it, click on the Bootice button.

In the Bootice utility window that opens, click the Process MBR button, then see if the Grub4Dos checkbox is checked (if not, check it) and click the Install/Config button. In the Config Grub for DOS window, click on the “Save to disk” button, the program will display a window that the boot record has been successfully written to the drive.

We return again to the Bootice utility window, where we click the “Process PBR” button and do everything the same, without changing anything in the last window, click OK.

That's it, now all we have to do is write the image to a flash drive, this is done in the main program window, which we saw immediately upon launch. You need to check the required box - if you are going to install Windows XP, then this is the first checkbox, but if Vista or Seven - the second. Next, click on the “…” button on the other side of the checkbox and set the path where our unpacked image is stored on the hard drive, or simply mounted in a virtual drive using DaemonTools or Alcohol. Click on the “GO” button and wait until the process finishes.

Upon completion, the program will display the message “Job Done!” That's it, dear friends, you can reboot and start installing the operating system.
Also, I advise you to read the article regarding
operating system optimization.
we-it.net
How to burn windows 7 to a flash drive
Many users have at least once encountered the need to install or reinstall an operating system. The OS can be installed on a computer using a disk or a flash drive. The second method is being used more and more often due to its clear speed advantage (the installation process is 2-3 times faster than using an optical disk). That's why we want to talk about how to burn Windows 7 to a USB flash drive.
There are a fairly large number of ways to write an operating system to a flash drive. We want to pay attention only to those ways in which you can write Windows 7 to a flash drive quickly, simply, and most importantly, safely for your computer. In some cases you will have to use additional programs, but they are completely free and available for free download (in some cases we will use a free trial period).
How to burn Windows 7 to a USB flash drive using UltraISO
This method is very popular among users. To use it you will need:
- UltraISO program
- Perseverance and a little patience
Please note that the full version of the UltraISO program is paid. However, you can safely take advantage of the trial period, which lasts 30 days. During this time you can use all functions of the program absolutely free. After downloading, install the program on your computer; this process will not raise any questions for you.
Insert the USB flash drive into the computer and launch the UltraISO program. After launch, a welcome window should appear in which we need to select the “Trial period...” mode.

Select the already prepared Windows 7 ISO image and click “Open”.

After that, go to the “Boot” section and select “Burn Hard Disk Image...”.
In the “Recording method” field, you must select “USB-HDD”. Select our flash drive and click the “Format” button (note that this will delete all data from the drive).

After launching the formatting utility, a window will appear in which you need to select options for formatting the flash drive. In the “File system” item, select “NTFS” and click “Start”.

In the warning that appears, click “OK”.
After successful formatting, a corresponding window will appear.
We close the formatting window using the “Close” button and move on to directly solving the problem of how to write Windows 7 to a flash drive. To start recording, click the “Record” button.

The process of writing the operating system to the USB drive will begin. You will be able to track the recording speed, time remaining until the end of recording, and the total percentage of files already recorded.

After Windows 7 is finished recording to the USB flash drive, the message “Recording complete!” will appear. You can safely close the program and use a ready-made bootable flash drive to install the operating system on your computer.
How to burn windows 7 to a flash drive using windows 7 USB/DVD Download Tool
This program is narrowly functional and is intended only for writing an ISO image of the operating system to a USB drive or optical disk. This product does not have any other capabilities, but in this situation we don’t need them.
To burn Windows 7 to a USB flash drive you will need:
- Installed Windows 7 USB/DVD Download Tool
- Windows 7 OS disk image in .iso format
- Flash drive with a minimum memory capacity of 4 GB
The program we will use is absolutely free. You can download it from this link. Installing this software product is no different from installing other programs and should not cause you any difficulties.
Insert the flash drive into your computer and run the pre-installed Windows 7 USB/DVD Download Tool. In the window that appears, click “Browse” to select the operating system distribution.
Select the desired Windows 7 image and click “Open”.

After you have selected the prepared operating system image, click “Next”.

At this step of recording Windows 7 to a flash drive, the program provides the user with a choice of media (“USB device” - recording will be made to a flash drive, “DVD” - to an optical disk). Select the “USB device” option.
In a special window, select the flash drive on which you want to burn Windows 7 OS and click the “Begin copying” button to start the process.

In the window that appears, confirm the need to erase the flash drive and click “Erase USB Device”.
After this, the recording procedure will begin. The percentage indicator will show the recording status.
After Windows 7 is finished recording to the USB flash drive, the message “Status: Backup completed” will appear under the percentage scale. Close the program and use the resulting bootable USB flash drive for your own purposes.
How to burn Windows 7 to a USB flash drive using WinSetupFromUSB
Here is a very effective software solution that will help you create a bootable USB flash drive for Windows 7. In terms of complexity, this method is somewhat more complicated than the previous two, but, nevertheless, some users choose it.
You will need:
- WinSetupFromUSB program
- Disk mounting program DaemonTools or Alcohol
- Windows 7 disk image in .iso format
- Flash drive with a minimum memory capacity of 4 GB
The program we will use is absolutely free. You can download WinSetupFromUSB from this link. Installing this software product is no different from installing other programs and should not cause you any difficulties.
Run the program (preferably as an administrator), with the flash drive already connected to the computer. In the “USB disk selection and format” field, you must select your flash drive. After that, press the “RMPrepUSB” button.
In the window that appears, in the “Boot sector” section, set the selector opposite the “WinPEv2/WinPEv3/Vista/Win7 bootable (CC4)” item. In the “File system and Options” section, select the selector next to the “NTFS” item and check the box next to the “Boot as HDD (C: 2PTNS)” item. Then click the “Prepare disk” button.

In all warnings that appear, click “OK”. After this, a Dos window should appear, which does not need to be closed, it will close automatically.
After closing the Dos window, click the “Exit” button. Using the checkbox, you need to check the item “Vista / 7 / Server 2008 - Setup / PE / RecoveryISO” and then click on the rectangle to the right of it.

In a special window, specify the pre-downloaded ISO image of Windows 7 OS and click “OK”.

Click the “GO” button to begin the process of writing Windows 7 to the USB flash drive. When finished, the message “Job done” will appear.

conclusions
We examined in detail three effective ways to burn Windows 7 to a USB flash drive. Using the proposed methods, you can write to removable flash media and other operating systems. The first two methods of creating a working bootable flash drive are simple and convenient, the third method is more labor-intensive, so for inexperienced users we recommend using the UltraISO and Windows 7 USB/DVD Download Tool programs.
computer-info.ru
How to transfer the necessary information from a CD or DVD to a flash drive
Hello, dear visitors of the Start-Luck blog. Some readers remember those times when we shared our videotapes, disks, books and then lost them in obscurity, forgetting which particular bad friend took “our charm.”
For modern people this is already such a rarity. Digital options include recording and re-recording. Even if you want to give something to someone, you can always make a copy with peace of mind and not worry about whether the information will be returned to you or not. It will remain at hand. This is what we will talk about today.
In this article I will tell you how to transfer from a disk to a flash drive using a simple method and using an ISO image. I will work on Windows 7, although essentially this is not so important. The steps won't be much different no matter which version you're using.
And, of course, we cannot do without video instructions, which will resolve any misunderstanding between me and those eager to know the information.

I think we can start now.
A simple way without programs
So, first of all, open the “My Computer” section. Then you need to insert your CD or DVD into the drive.
Some laptops do not have a dedicated disk drive. What to do in this case? I think you already know the answer to this question and have used boot disks in ISO format more than once. You should have it now.
If this is your first time encountering this problem, I’ll explain. You need to mount the image, I already described how to do this in one of my previous publications. Thanks to programs like Daemon Tools, we can easily solve this problem.
You won't have a physical disk, but the computer will start to "think" that the CD is inserted into the correct drive. Stop for a second, now you need to take a little break from the main task and solve a related one. My article will help you with this. After reading and “inserting” the image into the “disk drive”, return here.
As soon as you have solved the most important task and inserted a physical disk or its image, you will see an autorun window. Click on "View Files".

If the required window is not displayed, then you can right-click on the image or disk so that a dialog menu appears, in it select the “Open” function, or the same “Autorun”.

Now insert the flash drive into the USB port. This goodness is enough for any laptop or computer. Select the “Open folder to view files” section again. Again, if this does not happen, the right mouse button and the “Open” or “Autorun” function will help you.

As a result, you should have two windows with the “insides” of each disk. If this does not happen, simply open the CD/DVD, then in a new window go to the “My Computer” section and open the flash drive.
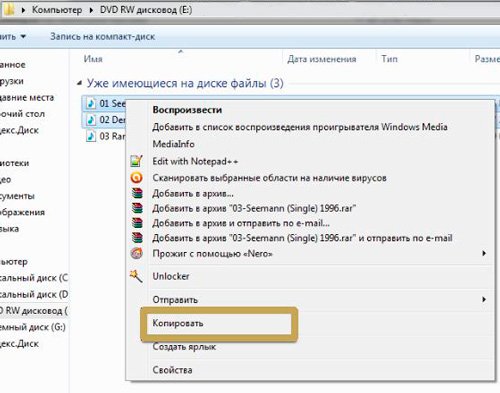
Copy files from the disk. Click on the ones you need, then right mouse button and the “Copy” function.
You can, of course, first open the disk and copy files from it, and then “open” the USB and insert everything you need there, but I wouldn’t want you to get confused.

Open a second window in which you have files from the flash drive, upload them there. Right mouse button and then "Paste" option.

That's basically it. The problem is solved.
Video instruction
In this training video you can see how to load music onto a flash drive from a disk - where the buttons are located, in what order to press them, and so on. Everything is very detailed.
If you are confused in my text, then everything will become clear in just 3 minutes.
Some licensed discs with audio files have copy protection. What to do about it? The easiest way is to use special programs that help remove it.
This method should be treated with great caution, since there are no licensed utilities to help perform this task. This activity is not legal! Therefore, you may have to download files that may contain viruses. Personally, I'm afraid of such things. There is too much “valuables” hidden on my PC.
Considering how active hackers are now, this is a really serious issue. You can read in my blog such articles as “New VKontakte virus” or “A terrible virus that everyone should know about.”
Based on the previous words, I am not giving you any specific link to the program, but I am offering the training video, in the description of which you can find the download URL, for your information only. Know that such a method exists.
Creating an image and then overwriting it
We move on to disk images. What is this, I think you already understand. The same disk, only in digital format, intended for sharing with friends, deceiving the computer, saying that something has already been inserted into it, and so on.
In general, any image can simply be transferred from a computer to a flash drive without any problems using the same principle that I have already described. However, there is an alternative method.
This blog has a detailed article on how to quickly download a disk image to a flash drive using the UltraISO program. In it, I described in detail how to create an image and upload it, so you can read it by following the link.
To make this publication of mine more useful, I will leave you with only a video on this topic, which will allow those who are in a hurry to complete this task faster. I advise others, of course, to read the publication. It describes in detail everything that may be useful.
I also recommend that you download the licensed version of this Ultra ISO program from the Allsoft website. There is too much important information stored on any PC that hackers can use to use pirated utilities with peace of mind. I wouldn't want your personal data to be hacked. The risks are too great.

Don't forget about antivirus software too. They, of course, are unlikely to get help from well-known scammers who operate on a serious scale, but there are only a few of them, and the interest in other people’s PCs is now enormous. This is very easy money. The phrase “This will never affect me” no longer works. Everyone is interested in you.
You can download a good antivirus from the same Allsoft website. For example, I like NOD32.

That's all. Don't forget to subscribe to my VKontakte group. See you again and good luck.
start-luck.ru
Transferring Windows 7 to a USB flash drive

Burning a disc with Windows OS for further use is no longer effective. The disk can be scratched, it is not as compact as a flash drive and its service life is much shorter than that of a removable drive. Therefore, let’s look at a way to transfer Windows 7 from a computer to a USB flash drive.
There are many ways to do this. Let's look at the example of using the Novicorp WinToFlash program. It doesn't need to be installed. It is downloaded as an archive. We launch the software and accept the terms of the license agreement.


Choose a free copying method. It will differ in the speed of the program.

Next will be a series of “Next” repetitions. Afterwards, a program window will appear in which the user will be notified that the “Setup Wizard” will prepare a flash drive for copying the Windows OS to it. Click on the “Languages” button at the bottom, and then on the checkbox.

Check the box “Always run in wizard mode” and click “Next”.

Insert the flash drive and check the box “I inserted the disk into the computer...”. Click “Next”.

Select the drive where the operating system is installed and the media to which the files will be copied. Click “Next”.

After the files are transferred, click done and remove the flash drive.
Imagine that you need to install Windows XP or Windows 7 on a nettop or netbook computer. What is the problem? The fact is that Windows comes on a CD/DVD, and netbooks do not have drives. Until recently, there was only one solution - to buy an external CD drive and install the operating system from it. The disadvantages of this method are obvious - you need to find the drive first, and then pay a round sum of 50 bucks for it.Later, other methods appeared that involved the use of flash drives, but the options I read made my hair stand out (it is suggested, for example, to download SP from Windows Server 2003 and insert some files from it). All this was done in the form of scripts and implied the use of the command line. In short, it's terrible and not for beginners. A little later, utilities with a graphical interface appeared, each of which had its own disadvantages and advantages.
In the end, there was only one left in my arsenal - Novicorp WinToFlash. In our country, it somehow did not take root, although, judging by indirect evidence, it was written with the participation of Russians (the translation is still sometimes lame, or is that their style?). Its size is small - 8 meters when unpacked. There’s no smell of nanotechnology here, but it wasn’t required :) As they say, “Did you check? Does it work? Don’t touch it!” To be fair, we can say that if you remove all unnecessary languages, such as Chinese, there will be a meter or one and a half left. And yes, it’s very nice - it is initially portable, you won’t need a tambourine to transfer it to a Live CD.
The utility will transfer all Windows to a flash drive, starting with XP and ending with Windows 7. It also supports DOS, probably for aesthetes and connoisseurs of beauty. You can also transfer the LiveCD to a flash drive on Windows and completely clear the flash drive.
So, download the latest version from the official website and unpack it. Run WinToFlash.exe with admin rights if you are under seven.
Click to enlarge
The big green button is responsible for calling a wizard who will transfer any Windows to a flash drive without asking you anything extra. Feel free to click on it

Click to enlarge
If we make a mistake, we will see a nice window.

Click to enlarge

Click to enlarge
Then they will ask you to accept the Microsoft license and ask about formatting.

Click to enlarge

Click to enlarge
The wizard will begin formatting the disk, copying files, etc. At the end you will need to click next and exit.

Click to enlarge
Actually, that's all. For Windows XP, 2003, Vista, 2008 and 7, the master in WinToFlash is one. No more settings.
If you have problems loading, you can play with the parameters in advanced mode. Most often, changing the file system helps.

Click to enlarge
If a problem arises, there are resources to solve it, including in Russian. Have a full description of the problem, along with program logs - support will definitely ask for them.

Click to enlarge

Click to enlarge

Click to enlarge

Click to enlarge
Probably, any computer user has more than once encountered the problem of reinstalling software and the operating system. Despite the fact that the development of technology has given us devices such as laptops, netbooks and tablets, reinstalling Windows still remains relevant and acquires new features.
Features of modern computers
Devices of new models simply do not have any kind of disk drive, and the user is faced with a difficult task: he not only needs a program for burning Windows to a flash drive, but also the knowledge of how to do it. Today, the flash drive method is becoming increasingly popular. To do this, just find a sufficiently capacious flash drive (Windows XP will require about 2.5 GB of disk space, and Windows 7 - about 7 GB), burn the Windows image to the flash drive using special software, make it bootable and follow the installation instructions.
How to get the Windows operating system?
Before starting to understand the question of how to write Windows to a flash drive, each user must first select a drive of the required size and the appropriate release of the operating system.
There are several ways to become a Windows owner:
- Buy a disc with software from one of the points of sale or from a computer store that has permission to supply Windows operating systems. All of them must be marked, and their owner is given a special sticker with a serial number, which must be placed on the computer system unit or the back panel of any device: laptop, netbook or tablet.
- Download software from one of the many torrents on the Internet. However, this method is illegal, and the owner of a computer on which a pirated copy of Windows is installed may be held accountable the first time his computer is scanned.
How to write Windows to a flash drive? Methods

Once you have your own copy of the Windows operating system, you will need a reliable way to save an image of it and write it to a flash drive. In addition, this flash drive will definitely need to be made bootable. Otherwise, all manipulations can be considered pointless, because you need to install an operating system, and not just transfer files from your computer to another storage medium.
Popular programs for creating a bootable USB flash drive
To create a full-fledged bootable USB flash drive, which will be visible when you restart your computer’s operating system, and install Windows from it, you must use one of the following programs:
- DirectGRUB.
- GRUB4DOS.
- UltraISO.
With their help, you can write a Windows image onto a flash drive and properly prepare it for installation. Working with each of these programs differs in some nuances, which we will discuss below. However, each of them allows you to create a complete bootable device that fits easily in your pocket and can install a new operating system in a matter of minutes.
DirectGrub: Windows alternative entry

How to burn Windows to a USB flash drive using DirectGRUB? This process is quite simple and does not require specialized knowledge and skills in information technology. Absolutely anyone can cope with this task. To do this, he just needs to follow the following instructions:
- Download the DirectGrub program.
- Download or create a Windows image from an existing disk.
- Write Windows to a flash drive. To do this, you need to select an image in the program and click the “start” button to start the process. The program will automatically create a bootable USB flash drive and place on it all the data necessary to install the operating system.
- To start the installation, you need to go to the computer's boot menu and select the boot priority from the flash drive.
- After the download starts, a special Grub menu will appear on the screen, where you will need to select the very first line and start the installation.
- Important! After the text stage of installing the operating system is completed and the computer requires a reboot, you should boot from the flash drive again and select the same item. After this, you do not need to press any keys until the computer boots.
Recording with GRUB4DOS

For this method, we will need several software products, namely: HPUSBFW, with which it will be formatted, and the GRUB4DOS bootloader, which will help in installing the operating system. How to write Windows to a USB flash drive if all the necessary applications are already installed? Once you have found the necessary software, you need to follow the following instructions:
- in the required format: FAT32 for WinXP and NTSF for subsequent versions.
- We launch GRUB4DOS, select our flash drive as a device and press the “Eject” button. After this, the program will create a partition C:/Program Files/WINGRUB/, install itself into it and create its own shortcut on the desktop. In addition, it will add all the bootloader files to our flash drive. After this it will happen
- In the running GRUB4DOS, find the Disk line and select our drive as the target for installation. You should carefully select a drive based on its size, since for some reason the program does not write the drive letter.
- A console window will open in which you need to press the Enter button, after which all that remains is to correctly configure the bootloader.
- To set it up correctly, we'll trick our computer a little into believing that our drive is a floppy disk. The image can usually be found in the same location as the Windows image.
- After that, we simply copy all the necessary images to our flash drive, restart the computer and install any version of Windows.
UltraISO software

How to write Windows to a USB flash drive using this program? UltraISO is an excellent application that can be used to burn an image to a USB drive and make it bootable. Despite the fact that this program is paid, its free capabilities are quite sufficient for our needs. To create a bootable USB flash drive and install the operating system from it, you will need to complete the following steps:
- First, open the previously created image in the UltraISO program.
- Select the menu item “Boot” and in it the sub-item “Burn image”.
- In this subsection, you must carefully check all recording parameters, namely: the flash drive and the image.
- We select the method for recording the USB-HDD image, but do not check the Create Boot Partition checkbox.
- Click the “Record” button.
Now you just need to wait until the process of transferring data and placing it on the flash drive is completed. After this, you can restart the computer, select from the boot menu and install the latest version of the operating system.
Advantages and disadvantages of installing Windows from USB

Now we know how to write Windows to a USB flash drive and can consider all the advantages of installing the operating system in a similar way:
- Very fast installation process. All modern flash drives have high rates of reading and writing information, which allows you to reduce the time of the entire process by several times.
- High reliability. Unlike a traditional CD, which can be very easily mechanically damaged, a flash drive is not susceptible to scratches and abrasions. In addition, it simply cannot break inside the drive.
- Very comfortably. The flash drive is small and rectangular in shape, making it easy to hide in your pocket, unlike a bulky CD.
- Compatibility. Unfortunately, on very old computers, the method of installing an operating system with However, they are most often equipped. However, on netbooks, such a device may not be available, and a flash drive will not only help with installing the software, but will also save money on buying a drive.
If your laptop or netbook does not have a disk drive or does not work (sometimes it can be broken on a home computer), this does not mean that you cannot install Windows on it, any version... even the latest Windows 7
Installing Winodws from a flash drive is a rather non-trivial task, which used to be solved using command line utilities, and even in English or, God forbid, German.
Quite an unfriendly environment, isn't it? And so much pain in order to install the operating system on your newly purchased netbook.
Novicorp WinToFlash solves all problems at once - a clear and simple interface, Russian in the menu and tips, a wizard that even a child can handle!
Read more about the WinToFlash program, there you will also find out where to download the wintoflash program for free in Russian.
What can WinToFlash do? Here is a screenshot of the advanced mode menu:
Yes, about the modes. There are two of them - for children (master) and for bearded men (advanced). I called it the mode for uncles for a reason - I didn’t immediately understand what a good half of the parameters were responsible for.
You can very, very finely tune the Windows formatting and transfer settings. The wizard, by asking just 2 questions, will do everything himself, and most likely, everything will download for you and begin to install.
So, download the latest version from the official website http://WinToFlash.com/home/ru and unpack it. It is portable and comes in a zip archive. We launch WinToFlash.exe, in the seven you will also be asked to confirm administrator rights.


Click the big green button to launch it.

ISO images are not yet supported, unzip them before operation.

Then we accept the license and format our flash drive


In about 20 minutes the process will be completed, the speed depends only
from your flash drive

Click Exit and that's it! For Windows XP, 2003, Vista, 2008 and 7 Master
in WinToFlash one.
When problems arise, the advanced mode comes to the rescue.
Most often, changing the file system helps.


WinToFlash supports saving and loading profiles

Solutions to many problems can be found on the site, and get to it
straight from the program

Parameters that can still be configured. Not a little, you will agree.
5 votesHello, dear visitors of the Start-Luck blog. Some readers remember those times when we shared our videotapes, disks, books and then lost them in obscurity, forgetting which particular bad friend took “our charm.”
For modern people this is already such a rarity. Digital options include recording and re-recording. Even if you want to give something to someone, you can always make a copy with peace of mind and not worry about whether the information will be returned to you or not. It will remain at hand. This is what we will talk about today.
In this article I will tell you how to transfer from a disk to a flash drive using a simple method and using an ISO image. I will work on Windows 7, although essentially this is not so important. The steps won't be much different no matter which version you're using.
And, of course, we cannot do without video instructions, which will resolve any misunderstanding between me and those eager to know the information.

I think we can start now.
A simple way without programs
So, first of all, open the “My Computer” section. Then you need to insert your CD or DVD into the drive.
Some laptops do not have a dedicated disk drive. What to do in this case? I think you already know the answer to this question and have used boot disks in ISO format more than once. You should have it now.
If this is your first time encountering this problem, I’ll explain. I already told you how to do this in one of my previous publications. Thanks to programs like Daemon Tools, we can easily solve this problem.
You won't have a physical disk, but the computer will start to "think" that the CD is inserted into the correct drive. Stop for a second, now you need to take a little break from the main task and solve a related one. My article will help you with this. After reading and “inserting” the image into the “disk drive”, return here.
As soon as you have solved the most important task and inserted a physical disk or its image, you will see an autorun window. Click on "View Files".

If the required window is not displayed, then you can right-click on the image or disk so that a dialog menu appears, in it select the “Open” function, or the same “Autorun”.

Now insert the flash drive into the USB port. This goodness is enough for any laptop or computer. Select the “Open folder to view files” section again. Again, if this does not happen, the right mouse button and the “Open” or “Autorun” function will help you.

As a result, you should have two windows with the “insides” of each disk. If this does not happen, simply open the CD/DVD, then in a new window go to the “My Computer” section and open the flash drive.
Copy files from the disk. Click on the ones you need, then right mouse button and the “Copy” function.
You can, of course, first open the disk and copy files from it, and then “open” the USB and insert everything you need there, but I wouldn’t want you to get confused.
Open a second window in which you have files from the flash drive, upload them there. Right mouse button and then "Paste" option.

That's basically it. The problem is solved.
Video instruction
In this training video you can see how to load music onto a flash drive from a disk - where the buttons are located, in what order to press them, and so on. Everything is very detailed.
If you are confused in my text, then everything will become clear in just 3 minutes.
Some licensed discs with audio files have copy protection. What to do about it? The easiest way is to use special programs that help remove it.
This method should be treated with great caution, since there are no licensed utilities to help perform this task. This activity is not legal! Therefore, you may have to download files that may contain viruses. Personally, I'm afraid of such things. There is too much “valuables” hidden on my PC.
Considering how active hackers are now, this is a really serious issue. You can read articles such as “” or “” in my syllable.
Based on the previous words, I am not giving you any specific link to the program, but I am offering the training video, in the description of which you can find the download URL, for your information only. Know that such a method exists.
Creating an image and then overwriting it
We move on to disk images. What is this, I think you already understand. The same disk, only in digital format, intended for sharing with friends, deceiving the computer, saying that something has already been inserted into it, and so on.
In general, any image can simply be transferred from a computer to a flash drive without any problems using the same principle that I have already described. However, there is an alternative method.
This blog has a detailed article about . In it, I described in detail how to create an image and upload it, so you can read it by following the link.
To make this publication of mine more useful, I will leave you with only a video on this topic, which will allow those who are in a hurry to complete this task faster. I advise others, of course, to read the publication. It describes in detail everything that may be useful.
I recommend that you also download the licensed version of this program UltraISO from the siteAllsoft . There is too much important information stored on any PC that hackers can use to use pirated utilities with peace of mind. I wouldn't want your personal data to be hacked. The risks are too great.

Don't forget about antivirus software too. They, of course, are unlikely to get help from well-known scammers who operate on a serious scale, but there are only a few of them, and the interest in other people’s PCs is now enormous. This is very easy money. The phrase “This will never affect me” no longer works. Everyone is interested in you.
You can download a good antivirus from the same Allsoft website. For example, I like NOD32 .

That's all. Don't forget to subscribe to my VKontakte group . See you again and good luck.