Increasing disk capacity c. How to expand the space on hard drive partition C or D without losing data
How to increase space on drive C at the expense of drive D or another
The editors of our portal have more than once received questions like how to increase the space on disk c or how to increase the volume of disk c at the expense of d and so on. In today's article we will try to answer these questions in as much detail as possible and will make for you some instructions with the help of which everyone can painlessly and without losing data increase the size of the required local disk.
Why am I running out of disk space?
Operating systems family Microsoft Windows have one unpleasant property: over time, the size they occupy grows and increases, thereby filling free place on disk. Both temporary and system files, which grow depending on the needs of the system. Sooner or later, there comes a time when there is simply not enough space on the system disk and the operating system begins to “glitch” and work slowly. You can clean and remove unnecessary files, but what to do when there is nothing left to delete. In this article we will tell you how to increase the space of the System disk at the expense of other logical volumes.
Two methods to painlessly transfer free space from one drive to another
- Method 1 - if you are using operating system or 8, then you have the option to use standard utility to view and change hard drive partitions.
- Method 2 - otherwise you will have to use programs such as Acronis Disk Director or Partition Magic.
How to increase the size of the system disk with Windows 7 or another OS - Method 1
We need utilities “To run this utility, click right key on the “Computer” icon and select “Management”.

In the window that opens, find and launch the Disk Management utility. This component of the operating system allows you to manage all storage devices, be it a hard drive, flash memory or disk.
In order to increase the space on drive C at the expense of local drive D or any other, we need to transfer the available free space from one local drive to the system drive (that is, the one where the Windows 7 or other operating system is installed). Before doing this, check your local disk for free space and calculate how much you would like to transfer.

To free up space, right-click on it and select “Shrink Volume”.

In the next window we will need to specify the size of the space that we want to transfer to another volume. Set it to the “Size of compressed space (MB)” field.

After completing the steps, free space should appear on our hard drive, which we can transfer to the system drive.
In order to add free space to the system disk, right-click on it and context menu select "Extend volume".

After this, a wizard will launch that will help you resize our volume. In the wizard window, you will need to select the volume to expand and the amount of space to add.

Increasing space on drive C using Acronis Disk Director - Method 2
Acronis Disk Director is a very powerful product for working with computer hard drives and local drives. You should read the system messages very carefully so as not to accidentally make a mistake and destroy data.
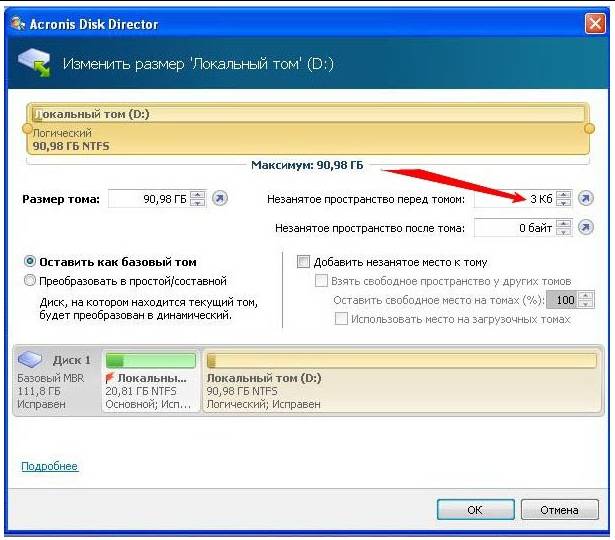
When entering the program, we are greeted by an intuitive interface in which we can select disks and perform operations with it. To increase the volume size, select the disk and click “Change Volume Size”.

In the window that opens, check the boxes next to “Add unallocated space to a volume” and “Take free space from other volumes.” By clicking on the button next to the percentage window, select how much space you want to take from other drives. Once you have freed up space, change the Volume Size.
After making all the changes, click “Ok” and apply the actions. The system will ask you to reboot and after reboot you will have a disk with a large amount of free space.
The issue of free space on the system drive C is very acute for many users. It so happens that during the operation of the operating system, even if you do not download anything to the C drive, there is not much free space.
This is due to the fact that your antivirus, like the operating system itself, is updated periodically. Browser caches also eat up free space.
Of course, you can constantly remove updates, clear browser caches, move the swap file from system disk, so that free space appears on the system disk.
But all this is only a temporary solution to the problem. It can be radically solved only by increasing the size of the C drive. And this can be done by free space on drive D. How to take a bite out of it.
In this article you will learn how to increase the size of disk c at the expense of disk d in windows 7 without losing data, and also without installing additional programs.
The process of transferring space from drive D to drive C
First, it opens computer management. To do this, click right click mouse over the “Computer” icon on the desktop or in the “Start” menu and select “Manage” from the menu that opens.
Go to computer management
In the window that opens, select “Disk Management” at the bottom left.

Disk management
Here you will see all your local drives. Free space can be added to drive C by “biting off” from the adjacent drive on the right. In most cases this is drive D.
To do this without losing data you need to more information Transfer from drive D to other local drives, if any. If they are not there, then it doesn’t matter. We'll make do with what we have.
If possible, remove from drive D everything that you do not particularly need or that can be easily restored. The point is to make as much free space as possible on drive D.
Once you have done this, right-click on it and select “Shrink Volume”.

We compress disk D by the amount that we want to attach to disk C
A window will appear in which you need to indicate how much space you need to “bite off” from drive D. But it is worth considering that this is not the volume that will later be attached to drive C. This is the volume of your drive D after “biting off” free space from it.
The calculation is as follows. For example, the volume of disk D is 150 GB. You want to transfer them to the C drive 50 GB. This means you need to compress it by 100 GB. This will be your D drive in the future, and what remains (50 GB) will be attached to the C drive.
Specify the amount of compressed space in megabytes. (100 GB should be specified as 100000 MB) and click the “Compress” button.

You will see something like this:

Unmarked area. It's your new disk D
A free, unallocated area will appear behind drive D. Right-click on it and select “Create a simple volume.” In the window that appears, click “Next” three times, and then “Finish”, without changing any parameters.
After this, a new local disk will appear behind drive D. You need to copy onto it everything important that remains on drive D before starting this whole procedure.

New disk created
Once drive D is cleared important files In the “Disk Management” window, right-click on it and select “Delete volume...”. In the warning window that appears, click “Yes”.

After copying everything important from drive D, delete it
An unallocated area will appear in front of drive C, which we will attach to it.

Unallocated area in front of drive C
To do this, right-click on drive C and select “Extend Volume”.

Attaching the unallocated area to drive C
Finally, all you have to do is change the letter of your new drive to the letter D. To do this, right-click on it and select “Change drive letter or drive path..” in the window that opens, click “Change”, select the letter from the list and in all the ones that appear in the windows, click “Yes” (“Ok”).
Specify the compression size in megabytes
Greetings. Today I’ll tell you how to add free space from drive D to drive C . And it made me re- races define space T during installation of the program. A program that is very necessary for me weighs 90 GB when expanded, and the disk space is WITH There were about 50 GB left, after all the cleaning and . DiskD also could not boast of free space. As a result, I decided to bite off a piece of the diskD and stick it to the disk WITH. I decided to perform this operation using the system Windows 7.
A little earlier I talked about how to divideusing the operating system. Everything worked out without any problems, but I experienced some difficulties with transferring free space. Perhaps you too o lkn yo hang out with them. But there is a way out in any case.
In general, lookhow to add free disk spaceD to disk WITH . I will transfer a small volume to show you and expand the system partition space a little.
How to add free disk space D to drive C
1. Go to the “Control Panel” and go to “Administration”.

2. In the new window, find “Computer Management”.

3. Then turn on Disk Management. Information about the disks will open in the window.

4. Select a diskD and by right-clicking, enable “Shrink Volume”.

5. In a new window you need to display A Select the volume you need to transfer.

I set it to 10 GB. You set your volume. Click "Compress".
![]()
After compression, unallocated space appeared. All that remains is to attach it to to the desired disk and everything is ready.
6. Select the disk WITH right-click and enable “Extend Volume”. At this stage, the “Extend volume” function may not be available; if on the contrary, then complete the steps after receiving the new disk size WITH .

In my case the function is not available. This means that it will not be possible to expand the space using the system’s means.
What to do? It's okay, there's a great one free AOMEI Partition Assistant Standart, with which you can finish what you started.
If you decide to do this operation, download the program right away and don’t bother with the system and its tools.
Next, let's look at how to increase space on drive C using the program.
The program can be downloaded from the official website using the link: http://www.aomeitech.com/
- You launch and see all the disks that you will continue to work with through the program.
The highlighted partition needs to be added to the partition WITH with the operating system.

- To do this, right-click on the selected partition and select “Merge Partitions”.

- In the new window, check the boxes next to those disks that will be merged.
- Click OK and see that the disk WITH increased by the amount that was not distributed.

- All that remains is to confirm your actions in the program by clicking the “Apply” button and in the new window “Go” and also agree by clicking “Yes”.


Using the program, you completed the started merging of disks using OS tools Windows 7.
Now let's take a quick look how to split a disk intotwo sections in the program AOMEI.
a) Right-click on the disk that you will divide and select “Partition partition”.

b) By moving the divider, you set the required space on both sections.

c) Confirm your action with the “OK” button. For the changes to take effect, repeat the confirmation steps as described above. (Apply - Confirm - Yes)
As you can see, with the AOMEI program, perform actions with sections hard drive Just. Consider the rest of the functions yourself, there is nothing complicated.
I hope the information was useful to you and you now know how to add free space from drive D to drive C .
If the system displays an error when downloading new files, then you should worry about the capacity of the system storage. There is no need to panic and clear everything stored on your computer. Delete installed components no need. It is enough to understand the methods of increasing the capacity of the system drive C without losing data.
When is it necessary to increase the disk size?
It happens that the system storage medium (often this is C) becomes full. New programs won't install, the system constantly reminds you of low memory, and the color of the local storage turns annoyingly red.
The reason for this may be:
- very small amount of allocated memory. When installing an operating room HDD systems needs to be rationally divided into sections. It is on drive C that, according to the standard, all programs and games are installed, which are becoming more and more numerous over time. Desktop documents are also stored on the system storage;
- Even if most of the memory is allocated to system media, it can fill up very quickly. Unnecessary components, countless installed games and simply irrational use leads to the fullness indicator turning red.
Due to the overload of information, the computer stops functioning normally and refuses to install anything new. Therefore it is worth increasing system partition memory.
Video: C drive enlarged
Methods
Expanding system storage capacity is sometimes very simple. But in some cases, it is enough to simply clean the computer by reviewing the information on it. This does not require installation of additional components. More often regular user can simply clean the desktop, delete temporary files, or use the command diskmgmt.msc.
Clean desktop
The desktop is best used to simply place shortcuts to your most used programs. But many users create countless folders in which a lot of information is stored. Most often, this information is multimedia in nature, which means it takes up a lot of memory.

To clear a little (or often a lot) of memory, you just need to tidy up your desktop. To do this, move all folders with movies, music and photos to the designated media (D, E). Each HDD section must be used rationally.
Clearing temporary files
Temporary data can also take up the lion's share of system memory.
Therefore, it is worth getting rid of them. TO temporary files refers to the information that the browser saved when viewing web pages, namely:
- visit log;
- files Cookie;
- download log;
- World Wide Web temporary files;
- site settings;
- saved passwords;
- autocomplete.
- manual deletion of temporary data. To do this, you need to empty the trash can and independently delete the saved information from the browser you are using. Each of them does this in their own way.
Such information speeds up the launch of many sites. This is convenient for personal use. But if the computer is a family one, it is better to get rid of them.
There are three simple and convenient ways cleaning them:


- Internet Explorer. You need to clear the log in the window "Internet Options". The section is located in the browser itself in Service;


- Opera. You need to get to deleting personal data by Menu – Tools – Delete personal data.

To select the desired items, you should open Detailed settings;

- Firefox. You need to go here Tools – Settings – Privacy.


- using the function "Disk Cleanup". It helps you get rid of a lot of unused data stored on your drive.
To do this, do the following:

Diskmgmt.msc utility
Using this utility, you can partition, create a new one, delete an unnecessary one, or format the HDD.
Further actions depend on the required task. The storage capacity on the computer can be achieved using another medium:

How to increase the amount of memory on drive C
You can increase the storage capacity of the media when the operating system is installed using special programs. Acronis Disk Director is considered the most popular and frequently used for these purposes.
Acronis Disk Director
It does not require special skills and works just like with boot disk, and from the installed software. Acronis Disk Director refers to disk partition managers. Therefore, you need to be careful with it, otherwise there is a chance that absolutely all HDD partitions will be deleted.
To enlarge the media, do the following:
- create unoccupied space.
To do this, you need to reduce the partition of another drive (for example, D):
- open Acronis Disk Director;

- hover the mouse over the media, select it;

- resize the volume downward.


So in a simple way you can significantly change the memory capacity of any media.
These methods are very simple to use. They are available to every user who can press a mouse button. Most of them don't even require the use of additional programs. Such simple operations increase the capacity of drive C without losing data. This will require a little time, desire and effort. Try it yourself.
Good day. Today we'll look at quite popular topic for beginners, this is working with already created hard drive partitions (have you already bought a new hard drive? :) and we will look at operations such as reducing the volume (compressing) of the hard drive and expanding at the expense of the unallocated area. For this we will not use any third party programs, but let’s use the built-in operating system Windows, Disk Management utility. So, why might we need this knowledge? Suppose you initially had it on your hard drive, but over time you decided that one is enough to store movies, music and photos, it’s easier to search :) Or another case, you have two local drives on your hard drive (let’s assume 2Tb), one for system (local drive C), the second for personal data (drive D), but when you partitioned them, you left too little space for drive C and this constantly creates discomfort for you. It is to solve such situations that this article was written.
In this article I will do, sequentially:
— Compression (reduction) of the local disk,
— Expansion (increase) of the local disk due to a new unallocated area.
This is what we need.
1) The first thing we need is to open the Disk Management utility. For happy owners In Windows 8.1 and 8, just right-click on the “Start” button (or in the lower left corner of the desktop for Windows 8) and select “Disk Management”. Everyone else needs to go to “Control Panel → System and Security → Administrative Tools → Computer Management → Storage Devices → Disk Management.”

3) Right-click on the partition on the right side of the window and select “Shrink Volume”.

4) A dialog box will open asking you to select the volume to compress. This window shows the current partition size, available (unused) space for compression, and the size of the local disk after compression, in megabytes. To maximize disk compression, you must defragment the partition before this operation. I use empty disk, so I have almost its entire volume available for compression. Enter the required number of megabytes in the “Size of compressed space” line and click “Compress”.


6) Now we will expand the partition using this unallocated area. To do this, right-click on the partition and select “Extend volume”.

7) The “Volume Expansion Wizard” will open, click next.

This page shows the available and selected unallocated areas, and you can also specify how much of the unallocated area should be used to expand the local disk (item “Select the size of the allocated space”). I use the entire volume, you look at your circumstances.
