How to work with Victoria 3.51. How to recover bad sectors on a hard drive using the Victoria program? Checking your hard drive for bad sectors
The Victoria program is also designed to fix bad sectors. It helps verify data integrity and restore damaged information. The overall result of the test is the display of the hard drive status characteristics.
The program is simple and free, and this has made it popular among users. Victoria HDD allows you to check the disk, but there are no functions for data recovery.
The Victoria program does not display data about integrity or problems in file systems. It is focused only on assessing the physical condition of the hard drive.
How to use the program
There is no need to install the program. It is better to write it to removable media and download from there.
The controller channel to which the hard drive is connected must be disabled through control in the operating system settings if you plan to save the program to your computer. This way you can check the integrity of your hard drive, even if you forgot to run the program from it.
For most users it will be more convenient to work with the Windows version.
After launching, the program will ask which hard drive you need to check. If one is connected, its name will appear on the screen. You can view information about the device by comparing it with the real passport. On the SMART tab you can see if everything is in order with the disk, then the “GOOD” status will appear in the message window.

Victoria provides a complete list of SMART (Self-Monitoring, Analysis and Reporting Technology) attributes, including disk read error rate, search error rate, number of disk starts and stops, total uptime, and many others.
To enable quick check, you need to select “Linear reading”. This point is not the only one with which the disk surface is analyzed. Random reading checks random areas. “Butterfly” mode – the beginning and end of disk space are read.
There is another mode, it is simply called “Reading”. Designed for a more careful and informational inspection of a specific area. It analyzes the data for a long time and displays the most detailed information on the screen.
A number of additional functions are available in the program: deleting data, recording, recording from a file, checking the interface.
On the Test tab you can start scanning the surface. To assess the performance of certain areas of the hard drive surface, you need to look at the composition of the blocks that display the test result. They are formed by response time, defects.
When the option is enabled Remap the addresses of detected sectors with a read latency greater than 1000 ms will be replaced with the addresses of working sectors from a reserve zone specially created by the disk manufacturer.

If the program has highlighted certain areas in red or brown, it is recommended to view detailed information - the integrity of the area has been significantly compromised.
The program is no longer supported, so . There is also an unofficial version of Victoria 4.47 online, which runs on x64 Windows and has some bug fixes.
(3
votes, average: 4,67
out of 5)

It often happens that the user thinks about the condition of the hard drive only when he already understands that the hard drive has begun to crumble or has completely failed. In order to protect yourself from losing important data stored on your hard drive, you need to periodically check its condition. Checking and restoring a hard drive is a long process, so reserve a couple of hours of free time and go ahead.
I suggest you consider a free program for checking the status and restoring the Victoria hard drive.
Victoria has the following features:
- providing complete information about the status of the hard drive;
- allows you to view S.M.A.R.T. hard drive parameters;
- has several levels of HDD checking - verification, writing, reading, with a summary display of the addresses of defective blocks;
- knows how to check the surface of a hard surface;
- the utility is able to diagnose disk memory and interface for failures and damage to information during reception and transmission;
- it is possible to change the shaft rotation speed;
- closing bad sectors from access and reassignment;
- low-level media formatting;
- the ability to erase information without the possibility of recovery;
- Setting and removing a password to access the HDD.
Let's get started directly with the program.
It was not possible to download the utility from the official website, to download please follow this link
Victoria launches and works under Windows 7, 8 and 10 - 64 and 32 bits - tested.
Download and unpack the archive with the program. Launch Victoria. 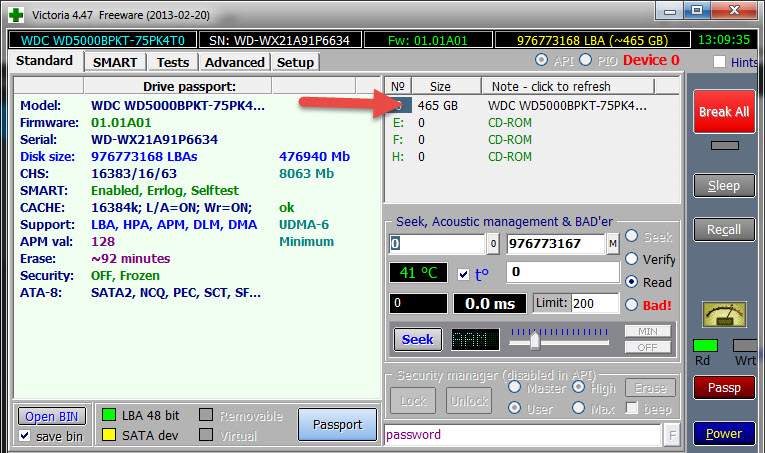
The main program window will open. We are interested in two tabs.
SMART tab
All information about the hard drive is displayed here. Displays the results of tests for read and write, performance and responsiveness of the hard drive
Press the “GetSMART” button and the program will give you information about the status of the HDD. 
Here we will go into more detail.
This function allows you to test your hard drive for errors and then correct them.
When testing a disk, the program graphically shows problem sectors and marks them with rectangles of different colors. Each cluster will be designated by a certain color depending on its state.
- Gray ones are clearly readable sectors.
- Green ones respond a little longer than gray ones, but they are also in good condition.
- Orange - these sectors take a very long time to read. As a rule, they are the ones that slow down the hard drive. When testing, there should be no more than 50 of them. They are working, but will soon fail. They cannot be restored.
- Red - sectors are damaged or cannot be read. It cannot be restored. The presence of such sectors indicates that you need to think about changing the disk.
- Blue ones with a cross are sectors whose reading causes a failure. Information from them cannot be recovered. It is necessary to re-partition such sectors so that the hard drive does not write to or read data from them. This is done using the “Remap” option, which you will read about below.
Test options: Ignore, Erase, Remap, Restore
- Ignore – this option indicates that you just need to check the disk and not perform any recovery actions on it.
- Erase – when this function is enabled, unreadable sectors will be erased during scanning.
- Remap - allows you to re-allocate sectors with errors. When an unreadable sector is detected on the disk, the program replaces this sector with a readable one.
- Restore – this function only works in the paid version. Allows you to restore non-working sectors.
After you have decided on the settings for testing the program, click on the Start button, thereby launching the test and you can go have a coffee. The verification may take quite a long time, so please be patient.
Victoria hdd is a program for extensive analysis of the hard drive of a computer, laptop, or external hard drive. This program is used by both beginners and professionals, as it has a very user-friendly interface with many tips, and at the same time, the program provides a large number of opportunities for setting up a hard drive and repairing it.
Features of the Victoria hdd program
- Works directly with Windows OS.
- View complete technical information of the hard drive.
- View SMART information.
- Scanning the surface of the hard drive and searching for bad sectors.
- Perform normal formatting.
- Recovering or reassigning damaged (Bad) blocks of the hard disk surface.
How to download and run the program
Victoria hdd 4.47 is completely free software.
You can download the program from the official website http://victoria4.ru/
Once you have downloaded the program, you can simply unpack it and immediately start working without installation.
For the program to work correctly, it must be run as Administrator.
After launching the program, we will see an interface where it is necessary, first of all, to select the hard drive with which we are going to work. To do this, simply select the disk we need with one click.
After selecting a disk, the hard drive's nameplate information will be displayed in the left window:

Hard drive SMART information
In order to view information about the status of the SMART hard drive, you need to select the hard drive you need and go to the SMART tab.
On the SMART tab, click the “Get SMART” button and wait while the program scans the hard drive information.
After the scanning is completed, we can see the general condition of the disk by the signal in the upper right part of the screen near the “Get SMART” button, in my case the condition of the hard disk is good, so the program displays the “GOOD” signal if the disk is in a critical state then in this place there will be an inscription “BAD”.
On the left side we see detailed SMART information.
To determine the status of the hard drive, you need to analyze the following points:
- Reallocated sector count – number of bad (BAD) sectors that were reassigned. If this number exceeds 10, then you should think about transferring information from this drive
- HAD Temperature – average operating temperature of the hard drive. This parameter should not exceed 40°C if the temperature is higher. Then you should think about cooling your hard drive.
- Seek error rate - the frequency of errors during the operation of the heads, this value should also be equal to zero, if the number is higher, then it is worth diagnosing the hard drive for the presence of overheating or vibrations.
Scanning your hard drive for bad sectors (BAD)
In order to scan the surface of the hard drive for the presence of bad (BAD) sectors, you need to go to the “Test” tab.
Consider the interface of this tab. The first thing you should pay attention to is the large gray field, in which the scanning process and the surface of the hard drive will be graphically displayed.
On the right we can see a field that will display the number of sectors with different response times.
Learn more about the field that displays the number of sectors with different response times.
The first 3 types of blocks are allowed on the surface of the hard drive; they display the number of sectors with an acceptable response time that will allow you to use the hard drive without problems.
Green sectors are also acceptable and may be present, but a large number of them will significantly reduce the writing and reading speed of the hard drive. Such sectors may be present in large numbers on old drives, or on hard drives that are in constant, uninterrupted use.
All other sectors (orange, red, Err) can cause the system to freeze or severely slow down the hard drive.
Scan options and what they mean:

Restore - this option is used to restore damaged sectors if they can be restored, but this option is only available in the paid version of the program.
If you have decided on the scanning parameter, then select it and press the “Start” button. We are waiting for the scanning to complete; while the program is running, we can monitor the found and successfully corrected bad (BAD) sectors in the status field, which is located at the bottom of the program window.
Conclusion
The Victoria HDD program is a good tool for viewing information about the hard drive, or SMART status, you can view complete passport information and SMART status, which cannot be done in most similar programs, or you can, but the information will not be complete. If you don’t know much about restoring and minor repairs of hard drives, but want to diagnose and return the drive to good condition on your own, then this program is just for you. But if you need to carry out more accurate and high-quality work with a hard drive, then I recommend using the program, it is a more professional tool for working with hard drives and has more functions.
“Victoria” is a PC program aimed at a wide range of users. Used to recover information from hard drives with SATA and IDE interfaces for testing. The program allows you to deeply, from all sides and quickly assess the condition of your hard drive.
Key Features
- – shows complete technical information about the hard drive
- – manipulation of the audio noise level
- – restoration and change of the physical volume of the drive
- – you can view s.m.a.r.t. settings, instant status assessment using the status register and pseudographic scales.
- -full and estimated surface plotting modes
- – can identify the existing SATA/ATA controllers in the system, as well as additional ones
- – by redistributing sectors from the reserve, hides surface defects
- -measurement and control of hard drive performance
- - tests the interface and buffer memory, during the reception and transmission of information, for the presence of bugs and data corruption
- – it is possible to start and stop the spindle motor of the drive
- – cleaning the entire hard drive or part of it
- -allows you to adjust the reading speed using graphic methods
- – allows you to measure random, linear, non-linear disk reading speed.
- -you can measure the shaft rotation speed
- – copying data by sectors of the hard disk
- – indication of hard drive operating modes, visualization of error codes through indicator lamps
Victoria how to use?
Download the program from the link. We unpack and copy the disk image with the extension .iso to disk. It is important not just to write this file to disk, but to write the image.
Next you need to run the program. This is done using the BIOS. We insert our disk and turn off the computer. To get into this BIOS, you need to press DEL or F2 on the keyboard when you turn on the computer. When you get to the blue BIOS menu, do the following.
Select “Advanced Features”, in it “Boot sequence” and you need to select boot from CD/DVD. Then you need to save everything and exit by clicking “Save and exit setup”. If your BIOS menu does not have such items, then look for something similar with the word boot.
If everything done is correct, you will automatically leave the BIOS and Victoria will start

Launching Victoria and restoring data
When you launch the program for the first time, you will need to press “P” on the keyboard to select the drive you need. In all menus, the item you need is selected using the “down” and “up” keys. When you move the cursor, an indication will be visible, which means the hard drive is ready.

For drives that are operating normally, two indicators DRDY and DRSC are lit, and INX may be lit.
The AMNF indicator may be lit in the error register. The remaining ones should be inactive.
Now we select the item we need using the enter button and the program searches for external controllers and hard drives on them. Afterwards, all serviceable and actually present HDDs in the “master” position will be determined. Other drives will not be noticed. Then, after finding additional ports on the screen, information will appear in the form of a table.
It contains the name of the controller developer (Vendor code), the name of the controller itself (ID Code), class (EXT, INT, RAID), port address (if not found, then a dash), name of the HDD (only if it is working ).On the plate everything will be numbered in order and you will need to select the one you need.
It is also possible that Victoria will not find drives on all Promise controllers. And therefore we press on F2, thereby opening the passport of our drive. The passport itself contains data on the characteristics of the HDD and describes its parameters. When analyzing a disk, the program takes into account the data in the passport.

Hard drive testing
Victoria has a good hard drive surface scanner. It allows you to diagnose the hard drive for failures, interface errors and floating defects. The program can test most drives at maximum speed. And this does not depend on the type of interface cable and controller.
Unlike other utilities of this type, exclusive algorithms are used here. These include adjusting the timer depending on the speed of the hard drive. Supported standards are recognized automatically. Thanks to this, you can test both fast and slow HDDs. Its original way of measuring time intervals makes it possible to work with the program through virtual DOS on Windows and almost does not reduce accuracy.
The surface test is closely related to the drive passport. LBA 28 and 48 bit modes are supported and automatically recognized. Everything that could be done automatically has been done and no settings are required from the user.
Linear Reading (Verification)
Performs a surface test in LBA addressing. Made for quick and accurate diagnosis of surface condition. During the test, the program divides the entire HDD address space into conditionally identical sections. The access time to each area is measured and a rectangle of the corresponding color is drawn on the screen.
Random reading
A surface test that uses a random number generator. This generator produces side addresses. The range is set in the test menu. The result obtained by the test quite accurately describes the performance of the drive in real tasks.
Butterfly reading
The butterfly algorithm alternates reading the end and beginning of disk space, offset by one block. It differs from random in that this test scans the entire surface and all sectors according to a certain law and has an end. Performs scanning much slower than linear scanning.
PIO reading
In this case, the actual reading of sectors from the hard drive occurs. The speed is low - 2-8 megabytes per second. Therefore, such reading is best done in small areas. Effective for detecting drive bugs and checking the operation of the interface and reading channel. To increase the reading speed, you need to enable the maximum mode (PIO-4) in the BIOS.
PIO read to file (Read to file)
What distinguishes this method of reading “not to a file” is that information from the HDD is written to a file in the current directory. Victoria processes bad blocks so that bad blocks are replaced with zeros. In case of an error, the sector is read twice. First with block access, then with sector-by-sector access.
Write(erase)
Data is being erased by sector. Used to remove some defects. The erase speed is close to PIO reading. But there is a faster way to delete information through the security subsystem.
Write from file
The contents of the file are written to disk by sector. Through the built-in manager, a window will open where you can select a file. The speed of such recording reaches six MB/sec. The procedure takes place with the participation of a visual scanner. Useful for cloning small drives and repairing corrupted file systems. The maximum file size is 2GB.
In order to test the surface of the hard drive, we use the F4 key. You will see a menu. In it you should select “Linear reading” and below “Ignore bad blocks” (ignore bad sectors). Select the spacebar button, navigate with the arrow keys - “up” and “down”.

It is worth paying special attention to the third point. It has functions such as: recording from a file and recording (erasing). When they are used, the data from the drive is erased. You can also lose data by using “BB = Erase 256 sect”. It's in the fourth menu.
After selecting the actions we need, the scan starts. The results will appear after a while in a special window.

Problems may occur during the scanning process. The hard drive freezes due to a system malfunction. If the diagnostic test freezes, the program continues after a timeout of 16 seconds. To indicate a timeout, Victoria shows the “T” symbol on the display. Frequent program freezes may mean that the HDD is not responding to requests. You can solve this problem by pressing F3(Reset). If something is not clear, use the help system (F1 key).
Checking the program interface
In order to do this, press F4 on the third menu item. Cycles of information are written to the hard drive buffer memory, and then read from there. A comparison of the read data with the written data is also performed. Reading time is also measured. If what is read does not coincide with what is written, the program reports this. To get a complete picture of the state of the hard drive, you need to diagnose it for quite a long time.
To exit the program, click on “X”. After you exit, you will find yourself in "Volcov Commander". Exit from which is carried out by pressing the F10 key and confirming yes. Next is the “DOS” section. Ctrl+alt+del exits. The PC reboots and you need to remember to remove the disk from the drive and select boot from the hard drive.
Symbols of indicators
- DriveReady (DRDY)– the hard drive is ready to work and accept commands
- DriveSeekComplete (DRSC) – the previous meaning that the HDD has finished installing the head on the track is outdated.
- Busy (BUSY)– the drive is busy processing data or is frozen. As long as this indicator is on, everything else does not work and Victoria responds only to reset (F3).
- Index (INX)– after each revolution of the hard drive this indicator appears. Not available on all devices.
- Eror (ERR)– means that an error has occurred. By its code you can find out what kind of register it is.
- Data Request (DRQ) – the hard drive is ready to begin the process of exchanging information with the interface.
Error codes
- UncorrectableDataError(UNC)– the information is not corrected by redundant code and is considered unreadable. The error may be due to damage to the hard drive or a data checksum violation.
- IDNotFound (IDNF) – sector not found. This basically means that the microcode or lower-level format of the drive is corrupted. This error appears when working properly, if you access an address that does not exist.
- Aborted Command (ABRT) – the hard drive refused to execute the command due to a malfunction or the command cannot be executed because is not supported by the drive.
- AddressMarkNotFound (AMNF) – means it is impossible to read the sector. Most likely this is a consequence of a hardware problem.
- Track 0 Not Found (T0 NF) – It does not work due to the impossibility of recalibrating the starting cylinder. If you have a modern hard drive, then such an error may indicate that the magnetic heads or microcode are not working.
Above was information on how to use the Victoria program. This program is free, which is a big advantage. It also does not require installation, takes up very little memory, and works quickly. It includes many modes and thus surpasses similar programs in all of the above (Dalas, hddl, veryfi, vivard, etc.).
Victoria hard drive surface check
Good day everyone! Today we will continue the topic of treating a computer’s (or laptop) hard drive. Unfortunately, these sensitive devices begin to fail us over time. One of them already described how, using the standard tools of the Windows 10 operating system, you can try to eliminate errors on the disk.
When the system does not start, you need to use other software designed specifically for this purpose. This matter is not as difficult as it might seem. I think that in order to save information (and simply speed up the computer), you can make some efforts. If everything works out for you, you will spend only an hour and a half, and in return you will save yourself from unnecessary hassle and unnecessary expenses. Do you think it's worth it?
The Victoria program was developed by Sergei Kazansky. I don’t know the exact date. I tried it for the first time probably in 2007, and I think it is still one of the most popular and best. One of the disks then began to knock. The same thing can happen to you - the disk can knock during operation, at approximately equal intervals of time.
This slows down the computer significantly. I cured him, and I didn’t have to throw away that disk later. By the way, I threw it out quite recently. He worked honestly to the end. So, this useful program helped me out and still does.
How to work in the Victoria program? Testing and checking the hard drive in various modes
The program can be used by loading it from DOS (for example, version 3.5). Version 3.5 was released a long time ago, but it is quite functional. Its only drawback is that it is not updated. Nowadays, very large capacity hard drives have appeared compared to version 3.5, and testing and verification sometimes takes quite a lot of time. If you have time, then use this version to fix errors. How to make a disk image and run the program - read.
You can use the program by loading it using one of the so-called rescue disks, which necessarily includes it. Although the Author has not updated the program for a long time, enthusiasts do.
Scanning and recovery modes for hard drives in Victoria 3.5
The program is based on the principle of hiding bad sectors. When bad sectors are found, the program marks them as bad and these sectors are no longer accessed; the system does not see them. After treatment, if no surface degradation occurs, the disc can work for a long time. In this case, the information on the disk is not destroyed.

The program can read disks in several modes and provides the ability to diagnose and restore functionality depending on the degree of destruction of the device. If you need to assess the condition of a disk, restore its functionality in order to transfer data to a new disk, this program will help you.
Victoria program operating modes
The program works in two modes. First mode- this is testing. Intended for surface testing only. No operations are performed on the information stored on the hard drive. Second operating mode- testing and bug fixing. In this mode, it is possible to save all information on the disk. You can delete information - depending on the degree of damage to the disk and the task at hand - to save the information or try to cure only the disk.
Scanning modes in Victoria 3.5
After starting the scan, we see a window with settings. The modes for reading and operations with bad blocks (BB) are set immediately before startup. Let's go over the most important ones:

Enabled by default " Linear reading". The fastest, maximum speed scanning mode. Starts from the first sector to the last. Parameter " Ignore Bad Blocks" means that bad sectors will remain unchanged. Just checking.

"Random Reading" occurs according to a different algorithm. Using a random number generator, the program grabs a random sector on the disk and checks it. In this mode, the check is slower. If enabled Ignore Bad Block, then damaged sectors are only identified.

Butterfly reading, interesting algorithm. Works on the principle of butterfly wings. Sectors are checked starting “from the edges” from the beginning of the disk and from the end of the disk. Testing ends when it reaches the middle. It’s not a quick process; the check took about a day for me. Emulates disk operation under load. Allows you to evaluate the performance of the disk.

PIO-Reading is a disk access mode using the processor. A reliable but outdated mode today, but still supported by many devices.

PIO read to file allows you to write some data on the disk to a file. For example, you can set a specific address and write information from the disk to a file. Then you can write the information back using the same coordinates. The file size that can be written may be limited by the file system type

The write (erase) mode is similar to low-level disk formatting. Permanently destroys all data on the disk. Helps restore some types of damage when Remap did not help. You can try using this mode when trying to save the disk. I managed to extend the life of the disk for some time a couple of times.

The write from file mode is designed to write information previously saved to a file to disk.

A flaw detector is a purely diagnostic tool. Allows you to see the real number of defects on the disk, distinguish them from the “glitches” of the disk, does not correct defects.

The program corrects errors by reassigning bad sectors. This is done in two modes - classic...

... and alternative mode, if the classic method does not help.

Data recovery mode for bad sectors. This feature is disabled in the free version.

Mode for erasing information from bad blocks (from all 256 sectors at once). By design, it removes information from bad blocks and fills them with zeros. Sometimes it helps to reduce the number of bad sectors. Can be used to assess the extent of surface damage. Destroys data on the disk.
Video on how to use the Victoria 3.5 program
Depending on the situation, you can first check and cure the surface, then copy the necessary data by disk cloning or other methods. And then carry out erasing (low-level formatting) so that, if possible, you can use the old disk for your needs. Watch the video to see how the program works.
The Victoria program does not work with the file system and does not correct its errors. It works with the surface and can be quite useful if your Windows has stopped loading. That's all, all that remains is to wish good health to both you and your hard drives.