The third party does not contain signature information. “Third-party INF does not contain signature information”: what is it and how to get around it
If you need to connect any device (for example, a scanner, printer, camera) to a computer with the Windows 10 operating system (x86 or x64), you must also install the appropriate software for its operation - a driver.
Microsoft Corporation tests drivers for all devices produced to work with personal computers (PCs). The company puts its signature (digital) on the drivers that have successfully passed all tests, that is, it includes a special file in the software in the form of a certificate. This digital document serves as a guarantee of the authenticity of the driver and the security of the OS on which it will be installed. Equipment with signed drivers easily synchronizes with the Windows 10 system.
However, sometimes there are outdated devices that are in working condition, which need to be connected to the PC and made to work. It is impossible to find digitally signed software for such technical devices.
To deal with this problem, you can use one of three methods.
Method 1
- Click on the icon " Start" (in the lower left corner), select " Shutdown».
- On the keyboard, press the Shift button, hold it and at the same time select “”.
- As a result of the reboot, the following menu will appear on the screen containing additional parameters. Enter the folder "".

- Choose "".

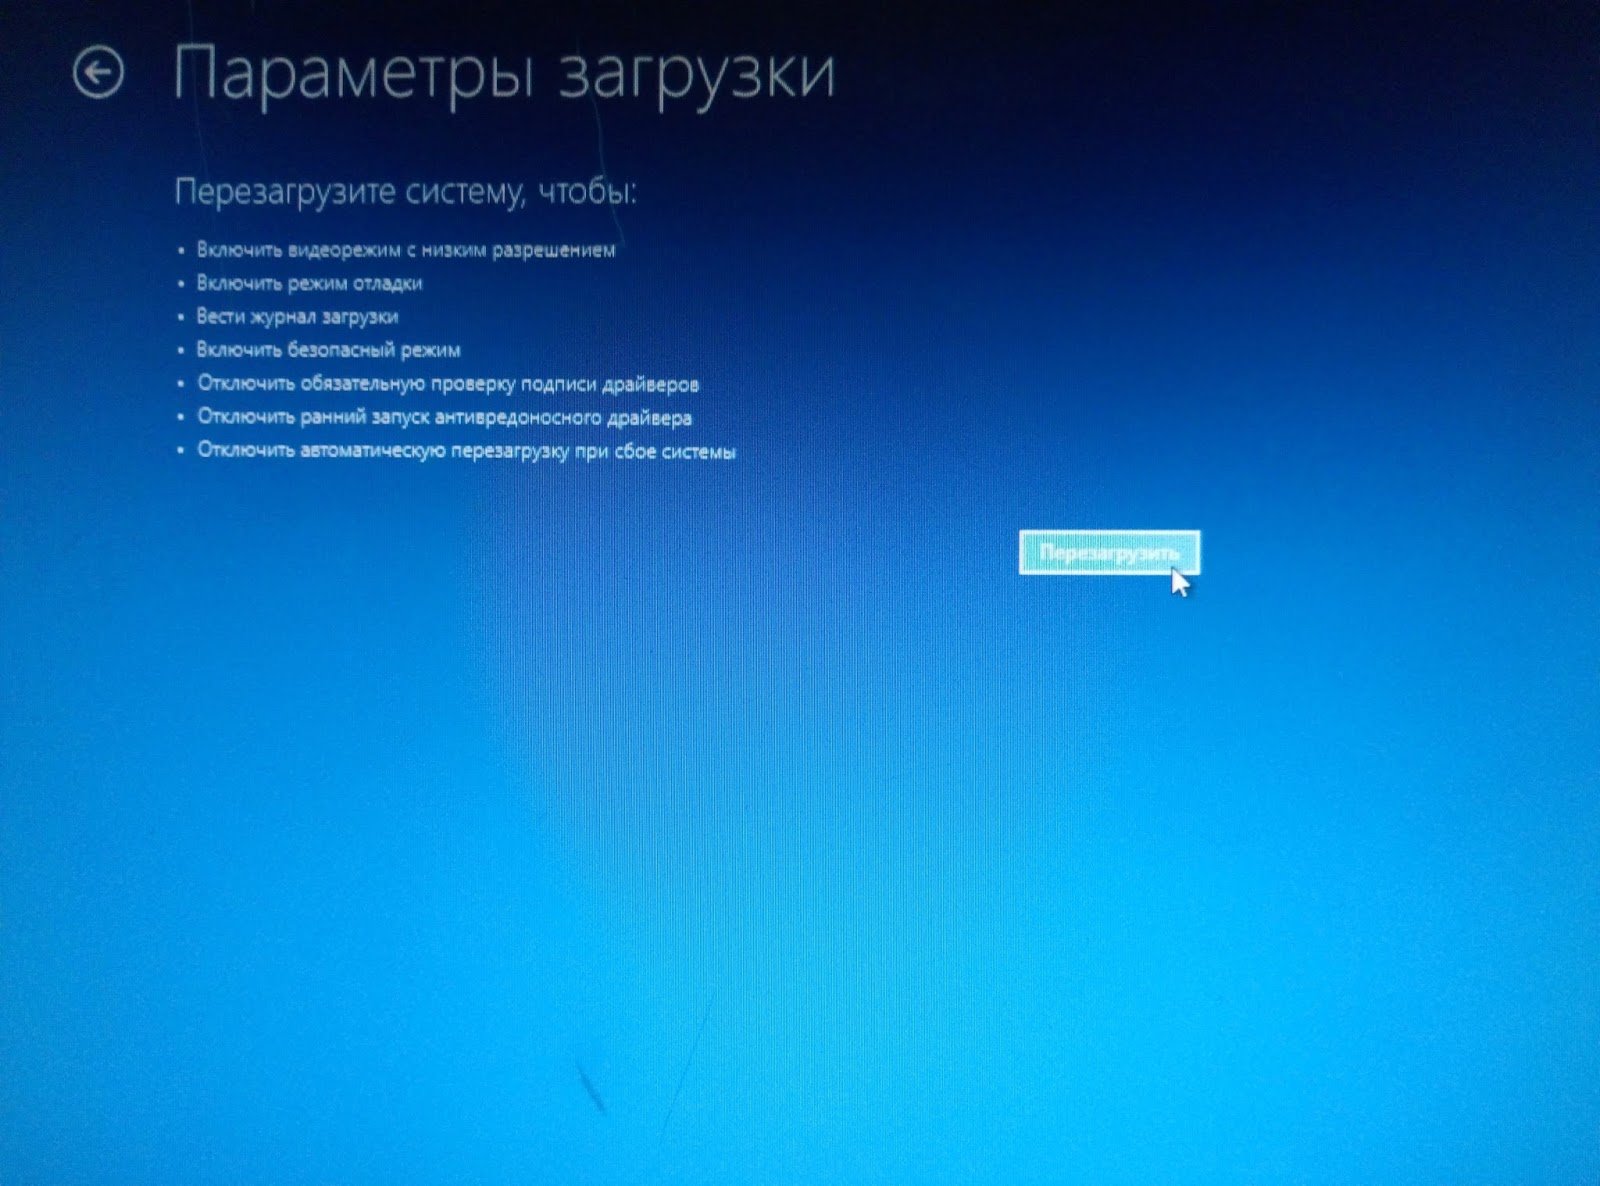
- Go to " Boot Options».

- Click Restart (bottom right).

- The Windows 10 boot options menu will appear on the screen of the rebooted computer.
- To change the Windows 10 startup configuration, you need to press the desired button (F1 -F9). Press F7.

- After the system starts again, unsigned drivers may be installed.
- Reboot again to restore OS settings.
Method 2
Attention! This option is only suitable for PCs with Basic Input/Output System (BIOS).
If your computer is equipped with a Unified Extensible Firmware Interface (UEFI), you must first disable the Secure Boot option.

To return to previous settings, enter bcdedit.exe -set TESTSIGNING OFF into the command line and confirm (Enter). When the specified operation is completed, restart the PC.
Method 3
Attention! This option will not work for Windows 10 Home.
- Simultaneously pressing the keys " Start" and R launch window " Execute" In the “Open” line, type gpedit.msc. Click OK (or Enter).
- In the editor (on the right) enter the folder " User Configuration».
- Then " Administrative Templates».
- Further " System».
- Select section " Driver installation».
- After "".

- Check the box for “Disabled”
If you need to flash your Android phone or install old or special drivers, you can easily bypass the Windows 10 requirement to digitally sign drivers.
There are several ways to disable driver digital signature verification in Windows 10. But not all of them are permanent; after a reboot, the system will again require a signature. In this article we will look at two ways to cancel driver signature verification and get rid of errors like:
- First - Temporarily disable driver signature verification in Windows 10
- Second - How to completely disable driver digital signature verification in Windows 10.
To disable driver signature verification in Windows 10, you need to do the following:
Method 1 - Disable driver digital signature verification.
Detailed instructions.
- Open the application by pressing the keyboard shortcuts Win + I or click on the gear icon in the Start menu.
- Open section "Update and Security"

- In the Update and Security Center, on the left, click the button

- On the right, find the inscription: “ Special download options" and press the button "Reboot Now"
- After the system reboots, a window will open "Select action", Press "Troubleshooting"

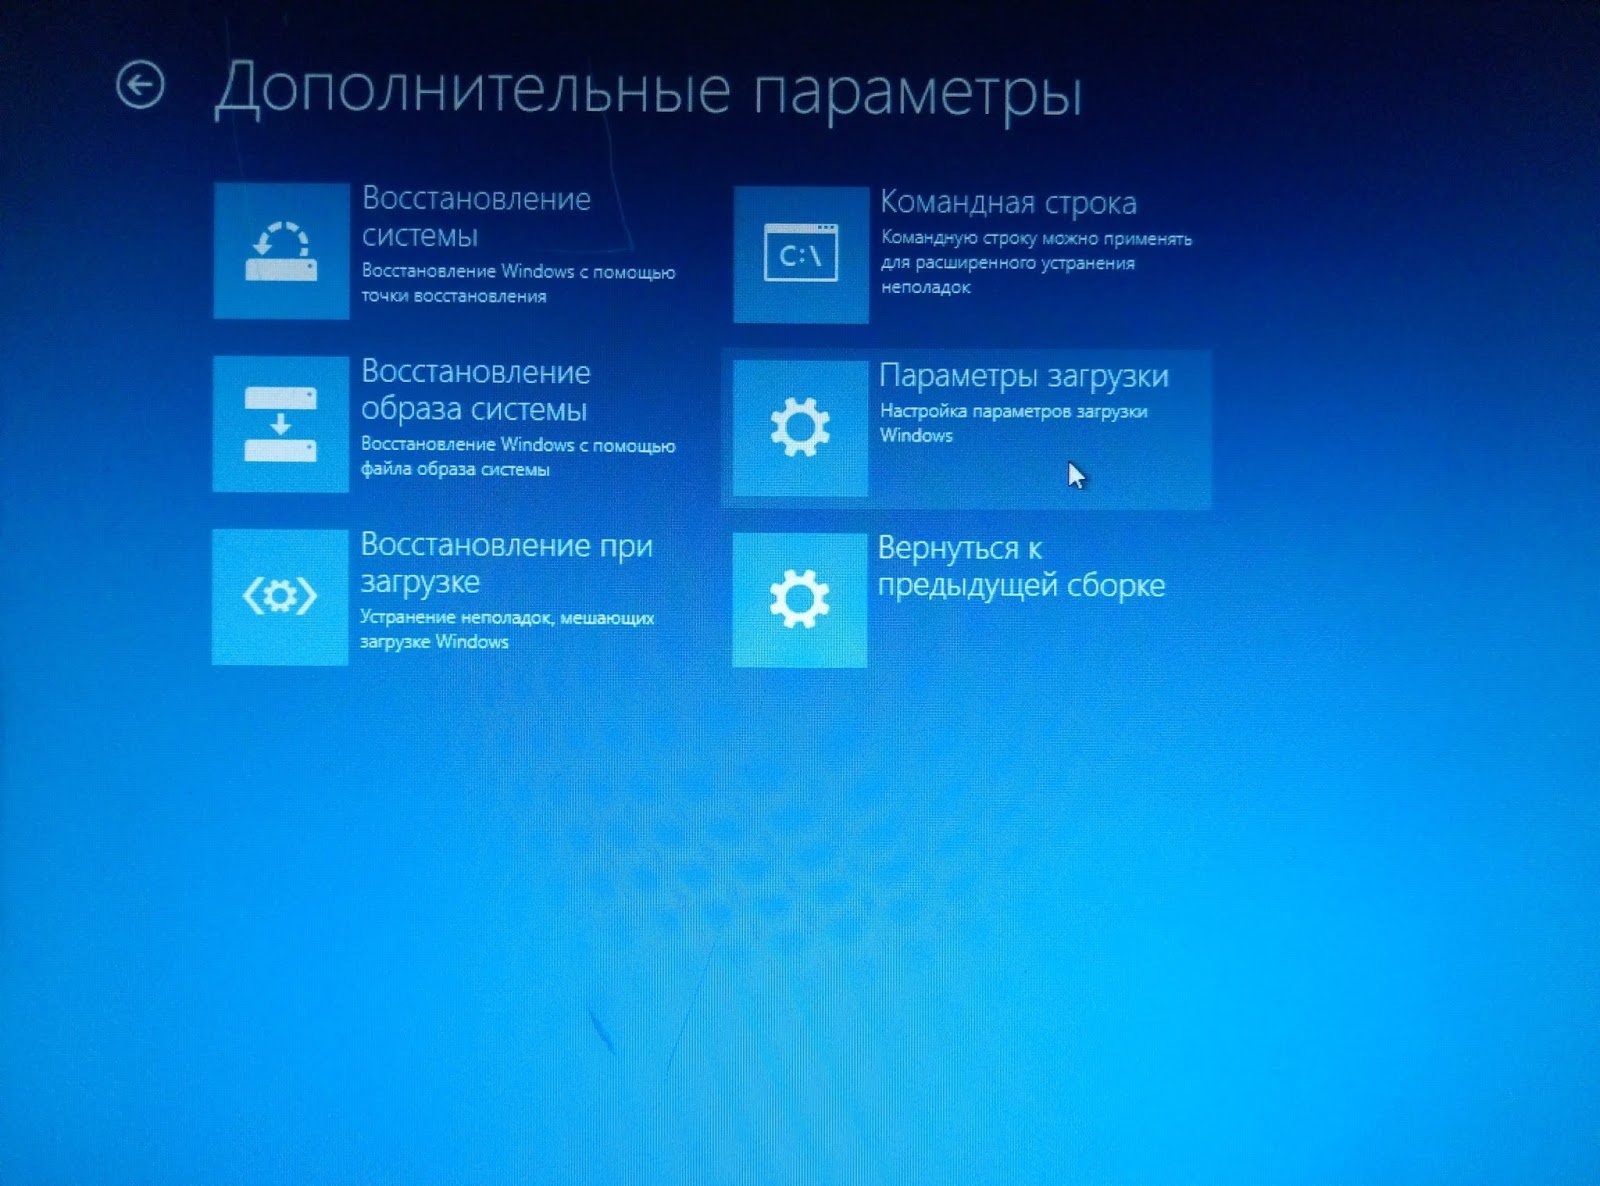
- Next, click on the button "Extra options" see picture below:

- Open "Boot Options" and press the button "Reboot"


After a short wait, you will see options that allow you to use the keyboard keys with numbers or F1–F9, indicate to the Windows 10 system which of the presented parameters you need.
- Since we want to disable mandatory driver signature verification, press 7 or F7.

- After the system reboots again, you can easily install the driver you need without a digital signature.
Note: When you reboot or after turning off the PC, mandatory driver digital signature verification will be enabled again.
Method 2 – Disable editor driver digital signature verification using - Local Group Policy.
Here we disable driver digital signature verification, after which Windows 10 will not be able to activate automatic verification in the future - This is good if you often install unsigned drivers, but bad for system security.
1. Press the Win + R key combination and enter or copy and paste into the window line "Run".

2. In the Local Group Policy Editor window, go to the menu tree:
- A- “User configuration” →
- IN- “Administrative Templates” →
- WITH- “System” →
- E- “Installing the driver”
3. In the right part of the policy window - double-click to open the parameter “Digital signature of device drivers” This policy setting determines the least secure action allowed to users in the group on the system.

4. In the parameter settings window, you need to enable it; to do this, check the check box against the item "Turn on", as in the picture below.
Imagine a situation where you, the happy user of the “most reliable, stable And safe"of the Windows 10 operating system, you joyfully bring home a brand new gadget, connect it to a USB port, and instead of the usual message that the new device is ready to work, you get this “Third-party INF does not contain signature information”:
In this simple way, Microsoft is trying to protect its customers from using non-kosher (according to Microsoft itself) devices. More precisely, drivers for them. Typically, a driver, like a regular official document, contains a signature. Only digital, certifying that it has been tested for compatibility with the system and is safe for the user’s computer. But there are often cases when the driver does not have this signature. This is often observed in gadgets of Chinese origin or in slightly outdated devices.
But if you still did not heed Microsoft’s warnings and firmly decided to install the driver, of course, this can be done “very simply” - just a few steps. Let's get started.
Installing unsigned drivers on Windows 10
1) Go to Start > Settings > Update and Security, open the Recovery tab and in the Special boot options section click the button “ Reboot now«.

2) The system will ask us to wait a little and display the following menu where we need to select Troubleshooting.

3) On the next screen, select the item Extra options.

5) After waiting for the computer to restart, select the item in the menu that appears Boot Options.
6) In the next section we are interested in point No. 7, therefore, after carefully reading the instructions, press the key F7.

7) Wait until the system boots completely and try to install the device driver again. The system is trying for the last time to make us come to our senses.

But we do not give in to provocation and choose the option “ Install this driver anyway", once again confirming our irresponsibility. Hooray! Usually after this we can happily see a message that the driver has been installed successfully.
Conclusion
Permission to install unsigned drivers lasts until the system is rebooted. Then, when installing other “non-certified” equipment, the procedure will have to be repeated.
In principle, it is possible to disable digital signature verification completely (by editing the registry), but I do not recommend doing this, because security suffers from this, and you are unlikely to often need to install unsigned drivers.
All 64-bit versions of Windows, starting with Windows 7, by default prohibit the installation of device drivers that are not signed with the correct digital signature. Unsigned drivers are blocked by the operating system. The presence of a digital signature guarantees (to some extent) that the driver was released by a specific developer or vendor, and its code has not been modified after it was signed.
Today we will show how you can independently sign any unsigned driver for the 64-bit versionWindows10 or Windows 7 .
Let's assume that we have a driver for a certain device for x64 Windows 10 or Windows 7 that does not have a digital signature (in our example, this will be a driver for a fairly old video card). An archive with drivers for our version of Windows (I managed to find a driver for Windows Vista x64) was downloaded from the manufacturer’s website and its contents were unpacked into the c:\tools\drv1\ directory. Let's try to install the driver by adding it using a standard utility pnputil.
Pnputil –a "C:\tools\drv1\xg20gr.inf"
Note. This and all subsequent commands are executed in a command prompt run with administrator rights.
During its installation, Windows 7 will display a warning that the system cannot verify the digital signature of this driver.
In Windows 10, such a warning does not even appear, but in the console a warning appears that the third-party INF file is missing digital signature information.

When trying to install a driver from Windows Explorer, if you right-click on the driver inf file and select Install / Install an error will appear:

The third-party INF does not contain digital signature information.
The third party INF does not contain signature information.

Let's try to sign this driver using a self-signed certificate.
Utilities required for driver signing
To work, we will need to download and install (with default settings) the following application developer tools for Windows.
- Windows SDK (or Microsoft Visual Studio 2005 or higher) for your version of Windows - these packages include the Windows SDK Signing tools for Desktop, which includes the utility we need - signtool.exe;
- Windows Driver Kit 7.1.0 - ISO image GRMWDK_EN_7600_1.ISO size 649 MB
Advice. On Windows 10, you can use newer versions of the Windows SDK and Windows Driver Kit. Before installing these tools, make sure that the .NET Framework 4 is installed on your system.
Create a self-signed certificate and private key
Let's create a directory C:\DriverCert in the root of the disk.
Let's open a command line and go to the following directory:
cd C:\Program Files (x86)\Microsoft SDKs\Windows\v7.1\bin
Let's create a self-signed certificate and a private key issued, for example, to the company Winitpro:
makecert -r -sv C:\DriverCert\myDrivers.pvk -n CN="Winitpro" C:\DriverCert\MyDrivers.cer
During creation, the utility will ask you to specify a password for the key, let it be P@ ss0 wrd.

Based on the created certificate, we will create a public key for the software publisher certificate (PKCS).
cert2spc C:\DriverCert\myDrivers.cer C:\DriverCert\myDrivers.spc
Let's combine the public key (.spc) and the private key (.pvk) in one Personal Information Exchange format certificate file (.pfx).
pvk2pfx -pvk C:\DriverCert\myDrivers.pvk -pi P@ss0wrd -spc C:\DriverCert\myDrivers.spc -pfx C:\DriverCert\myDrivers.pfx -po P@ss0wrd
Advice. You can create a self-signed Code Signing certificate without using third-party tools using the PowerShell 5.0 cmdlet - .
$cert = New-SelfSignedCertificate -Subject “Winitpro” -Type CodeSigningCert -CertStoreLocation cert:\LocalMachine\My
Then you need to export this certificate to a pfx file with a password:
$CertPassword = ConvertTo-SecureString -String “P@ss0wrd” -Force –AsPlainText
Export-PfxCertificate -Cert $cert -FilePath C:\DriverCert\myDrivers.pfx -Password $CertPassword

Advice. Although the certificate has a limited validity period, the expiration of a CodeSigning certificate means that you will not be able to create new signatures. A driver already signed by this certificate is valid indefinitely (or old signatures are valid for the specified timestamp).
Generating a CAT driver file
Let's create a directory C:\ DriverCert\ xg and copy into it all the files from the directory into which the archive with the driver was originally unpacked (c:\tools\drv1\). Make sure that among the files there are files with the extension . sys And . inf(in our case xg20grp.sys and xg20gr).
Let's go to the directory:
cd C:\WinDDK\7600.16385.1\bin\selfsign
Based on the inf file, using the inf2cat.exe utility (part of the Windows Driver Kit -WDK), we will generate a cat file for our platform (contains information about all files of the driver package).
inf2cat.exe /driver:"C:\DriverCert\xg" /os:7_X64 /verbose

To make sure that the procedure was completed correctly, check that the log contains the following messages:
Signability test complete.
And
Catalog generation complete.
Advice. In my case, the Inf2Cat.exe command returned the error:
Signability test failed.
22.9.7: DriverVer set to incorrect date (must be postdated to 4/21/2009 for newest OS) in \hdx861a.inf
To fix the error, you need to find the line with DriverVer= in the section and replace it with:

After executing the command, the g20gr.cat file should be updated in the driver directory
Sign the driver with a self-signed certificate
Go to directory:
cd "C:\Program Files (x86)\Windows Kits\10\bin\10.0.17134.0\x64"
Let's sign the set of driver files with the certificate we created, and use the Globalsign resource as a timestamp service. The following command will digitally sign a CAT file using a certificate stored in a password-protected PFX file.
signtool sign /f C:\DriverCert\myDrivers.pfx /p P@ss0wrd /t http://timestamp.globalsign.com/scripts/timstamp.dll /v "C:\DriverCert\xg\xg20gr.cat"

If the file is signed successfully, the following message should appear:
Successfully signed: C:\DriverCert\xg\xg20gr.cat
Number of files successfully Signed: 1
Note. The digital signature of the driver is contained in the .cat file, which is referenced by the driver .inf file. Using the following command you can check the digital signature of the driver in the cat file:
SignTool verify /v /pa c:\DriverCert\xg\xg20gr.cat

Lido in the file properties on the Digital Signatures tab.

The CAT file contains digital signatures (fingerprints) of all files that are located in the driver directory (files that are specified in the INF file in the section CopyFiles). If any of these files have been modified, the checksum of the files will not match the data in the CAT file, as a result, the installation of such a driver will fail.
Installing a certificate
Because The certificate we created is self-signed; the system does not trust it by default. Let's add our certificate to the local certificate store. This can be done using the commands:
certmgr.exe -add C:\DriverCert\myDrivers.cer -s -r localMachine ROOT
certmgr.exe -add C:\DriverCert\myDrivers.cer -s -r localMachine TRUSTEDPUBLISHER
Or from the graphical wizard for adding certificates (the certificate must be placed in the storage Trusted Publishers And Trusted Root Certification Authorities local machine). In a domain, you can centrally .

Note. You can check the presence of the certificate we created in the trusted ones by opening the certificate management snap-in (certmgr.msc) and checking the presence of the certificate we created (issued for winitpro) in the appropriate stores. 
Note. When checking the certificate store using the utility, this certificate will be displayed as untrusted, because it is not listed with the list of Microsoft root certificates (this list is needed periodically).
Installing a driver certified by a self-signed certificate
Let's try again to install the driver we signed by running the command:
Pnputil –i –a C:\DriverCert\xg20\xg20gr.inf
Now during the driver installation process, a warning window about the missing digital signature of the driver will not appear.
Successfully installed the driver on a device on the system.
Driver package added successfully.

In Windows 7, this warning appears. about whether you are sure you want to install this driver (in Windows 10 x64 1803 this pop-up window does not appear). By clicking " Install", you will install the driver on the system.

If for some reason the driver does not install, a detailed driver installation log is contained in the file C:\Windows\inf\setupapi.dev.log. This log will allow you to get more detailed information about the installation error. In most cases, the error “Driver package failed signature validation” appears - most likely this means that the driver certificate has not been added to the trusted certificates.
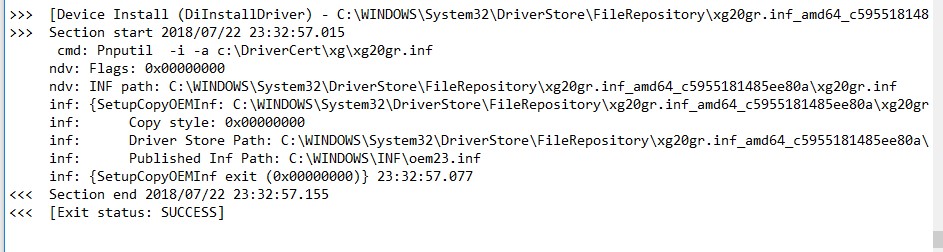
If the driver installation was successful, the setupapi.dev.log file will contain lines like this:
>>> >>> Section start 2018/07/22 23:32:57.015 cmd: Pnputil -i -a c:\DriverCert\xg\xg20gr.inf ndv: Flags: 0x00000000 ndv: INF path: C:\WINDOWS\System32 \DriverStore\FileRepository\xg20gr.inf_amd64_c5955181485ee80a\xg20gr.inf inf: (SetupCopyOEMInf: C:\WINDOWS\System32\DriverStore\FileRepository\xg20gr.inf_amd64_c5955181485ee80a\xg 20gr.inf) 23:32:57.046 inf: Copy style: 0x00000000 inf: Driver Store Path: C:\WINDOWS\System32\DriverStore\FileRepository\xg20gr.inf_amd64_c5955181485ee80a\xg20gr.inf inf: Published Inf Path: C:\WINDOWS\INF\oem23.inf inf: (SetupCopyOEMInf exit (0x00000000)) 23:32: 57.077<<< Section end 2018/07/22 23:32:57.155 <<<
As you can see, to install the self-signed driver, we did not even have to disable driver digital signature checking using bcdedit.exe, as described (commands bcdedit.exe /set loadoptions DISABLE_INTEGRITY_CHECKS and bcdedit.exe /set testsigning ON).
How to resolve the "third-party inf does not contain signature information" error in Windows 10?
inf from a third party does not contain win 10 signature information. What should I do?
When installing and connecting new devices in Windows 10, the error “ inf from a third party does not contain signature information". This means that the driver that is trying to install with this device has not been tested for compatibility with this version of Windows 10. According to the operating system developers, such a driver should not be installed.

Error window "third party inf does not contain win 10 signature information"
But what can we do? After all, a device without a driver will not work. There is an exit! This is a temporary disabling of driver signature verification in Windows 10. You will learn how to do this in this article.
Why is the driver not digitally signed?
Most often, this situation occurs with computer devices (flash drives, web cameras, etc.). purchased in China. There, manufacturers do not care much about compatibility and obtaining a digital signature from Microsoft.
Also, driver signature errors can occur with older devices that have not been tested for compatibility with Windows 10 simply because they were created long before it was introduced.
But if the driver does not have a digital signature, this does not mean that it will not work correctly or harm the operating system.
You can try to install it by disabling this very check, and in case of problems, remove the faulty driver via .
How to install an unsigned driver in Windows 10?
To do this, open the Windows 10 settings by clicking on the notification icon in the lower right corner of the screen and select “ All parameters«.


Update and security in Windows 10
In the window that opens on the left, select the “ Recovery" and in the paragraph " Special download options» select « Reboot now«.

After a few moments, the system will display a window with a choice of actions, where you need to select “ Troubleshooting«.


Windows 10 Advanced Boot Options
In the next window, click " Boot Options" and further " Reboot«.

Windows 10 download options

List of download options
The computer will restart and then a menu will be displayed in which you need to select “ Disable mandatory driver signature verification» at the touch of a button F7 on keyboard.

Disabling driver signature verification in Windows 10
After this, the operating system will load, but with driver signature verification already disabled. You can try to install a driver during installation of which the message “third-party inf does not contain signature information” previously appeared.
A warning message will be displayed in which you need to click " Install this driver anyway". After this, the driver will be installed.

Window warning about a missing driver signature
It is worth noting that driver signature verification will remain disabled until the first system reboot. As soon as you reboot it, the verification will be enabled again and you will not be able to install an unsigned driver.
The best way to thank the author of the article is to repost it on your page