What is an FTP client, an FTP connection and how to connect to FTP? Ftp connection: setup, connection to the server.
The simplest connection to an FTP server can be made using a familiar and standard file manager - Total Commander, which is installed on almost every office and home computer. At the same time, we do not consider more complex options with downloading special FTP clients, programs that require separate step-by-step installation (by at least not in this article).
Who and why might need a connection to an FTP server? The question is multifaceted and has a whole host of different answers. Some users connect to file storage on the Internet in this way, others - webmasters - with using FTP download files for their own sites, install plugins, modules, and in general, all types of work with file system virtual project. But since you're looking this topic— apparently, it was needed for some reason, which means that the site is simply obliged to provide simple and fast step by step solution this task, which is what we will do right now!
Connecting to an FTP server: step-by-step instructions
1. First, we need to make sure that a reliable FTP client is installed on our computer - a licensed Total Commander, through which the connection will be made and the access passwords will be saved.
2. If an unknown Total Commander assembly is already installed, among other things software, we still recommend removing the incomprehensible version (downloaded from the Internet), replacing it licensed product, which 100% will not steal our FTP passwords!
3. Once we are confident that Total Commander is “clean” and that our passwords will not fall into the hands of others unauthorized persons, let's start setting up a connection to the FTP server.
Note: since hosting, servers, logins and passwords are different for everyone, the author of the site is simply not able to accurately name your personal data. In this regard, we can only describe general process works, and the personal data of users and sites will always be different - your personal.
3.1. We go to the server we are using (usually hosting) and make sure that FTP access is open and allowed:
Access is allowed:
3.2. If you have not yet created an FTP account, then create one. But usually the main user FTP hosting channel is created automatically when you connect the FTP service.
New FTP account:

In any case, to connect to the FTP server you will need:
1. FTP server address - can be found on the server (hosting).
2. Account hosting (server) user - essentially a login to the system.
3. Access password - password for the created FTP account (look at the server).
3.3. Let's start setting up an FTP connection, run:
Total Commander - “Network” - “Connect to FTP server” (key combination Ctrl+F)

3.4. Click the “Add” button

3.5. Fill in the required fields:
Connection name - Any arbitrary name (does not matter)
Server (Port) - We look at the hosting (in our example “pod-kopirku.jino.ru”)
Account - Login on the server (in our example “pod-kopirku”)
Password - Password for the FTP account on the server (********* - hidden with asterisks).

3.6. Upon completion of entering secret data, which will be individual in each case (if anything is unknown, check with server technical support), and click “OK”.

4. If all the data is entered correctly, a new FTP connection will be created, to connect to which you just need to click the “CONNECT” button.

In active Total panels Commander will launch a server with which you can now perform any permitted operations: upload and delete files, copy and rename directories, make necessary edits, etc.
And finally, a small useful video for all readers of the site to finally consolidate the material presented above!
To use the FileZilla program, you need to set it up by following the following steps, illustrated with pictures.
1. Launch FileZilla program, after which in top menu click item File Site Manager.
New site.

Host- FTP server address.
Server type- FTP - File Transfer Protocol.
Input type- normal.
User- Username.
Password- password.
Encryption- Use plain FTP.

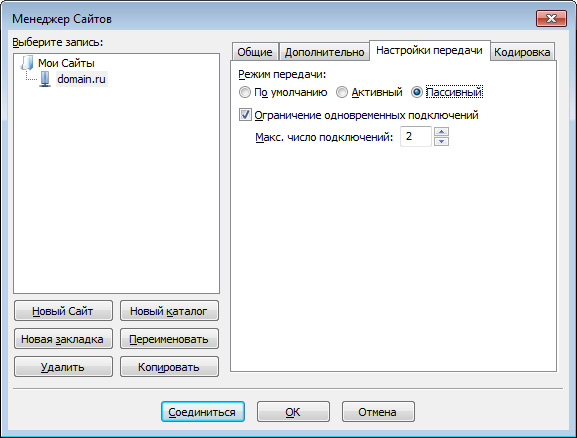
4.Go to the tab Transfer settings, select passive transmission mode, check the box Limitation simultaneous connections and install Maximum amount connections equal to two. Click the button Connect.
Important: The content of your site should be placed in a folder /home/login/Your_domain/docs/.

FAR
For use FAR programs You need to set it up by following the steps below, illustrated with pictures.
1. Launch the FAR program. Determine in which panel you want to make an FTP connection. Let's say on the right. Then press Alt F2 and in the window that appears, select FTP line.

2. Press Shift+F4, a window for entering connection parameters will appear.

3. Fill in the required fields. In field Descripton you can give any name to the custom ftp connection, mark the position Passive mode.

4. After that, click the button Save.

5. On the panel of the FAR program you selected, for us it is the right one, a line will appear with the newly created name of the ftp connection. While on this line, press Enter.

6. A connection to the server will occur and you can work in the usual mode of a two-panel file manager.

Total Commander
You can download Total Commander at http://www.ghisler.com.
1. Launch Total program Commander, then in the top menu click Net, in the menu that opens, select Connect to FTP server.

2. In the window that opens, click on the button Add.

3. In accordance with the instructions, obtain and specify the parameters for connection:
Connection name- come up with a name, for example, “Hosting login”.
Server- FTP server address.
Account- Username.
Password- user password.
Set the flag Passive sharing mode (like a Web browser).
After that, click the button OK.

4.Select the created connection and click the button Connect.

5. A connection to the server will occur, after which you can work in the usual mode of a two-panel file manager.
Important: The content of your site should be placed in a folder /home/login/Your_domain/docs/.

Total Commander (version 6.53)
Russified version
1. Launch the TotalCommander program, then, in the top menu, click Configuration and select the line Setting: FTP

2. In the next window, you need to check for a checkmark in the line Default to use passive mode and if it is not there, install it.

After which, click OK and the window will disappear.
3. In the top menu, click FTP and select the line Connect to FTP server.

4. In the window that appears, click on the button Add.

5. A new window will appear in which you need to set the necessary parameters and check the box Passive exchange mode.

After which, press the button OK.
6. In the remaining window, click on the button Connect.

7. A connection to the server will occur and you can work in the usual mode of a two-panel file manager.

iWeb
After creating the site, the iWeb program window will appear on the screen with the contents of your site.

On the left side of the window, click on the name of the site you want to publish. IN in this example the site is called My site.

On the page that opens, enter the parameters required for publication.
In chapter Publication:
Publish to: FTP
Site Name: The name of your site
Email for communication: yours email

In chapter Options FTP servers :
Server address: ftp.your_login.nichost.ru
User: username (usually your ftp_login)
Password: your_password
Directory/path: your_site/docs
Protocol: FTP
Port: 21

For the URL, enter your website address.


If unsuccessful, check again that the entered parameters are correct.
After testing is successfully completed, click the button on the bottom panel Publish a website.

If the publication is successful, a message will appear: “Your site has been published.”

Important: By default, iWeb uses UTF-8 text encoding. Our hosting uses Windows-1251 encoding by default. To display your site correctly, you need to go to the section Web server → Websites → your website and select from the list Site encoding encoding UTF-8.
CuteFTP (version 7.0)
1. Launch the CuteFTP program, then in the top menu click Tools

2. Select a line Site Manager.

3. In the window that appears, select the line Display Site Manager.

4. In the new window, click on the button New.

5. Two submenu lines will appear at the bottom. Select line FTP Site.

6. A window will appear:

7. Fill in the fields in this window.

8. Then, without leaving this window, click the button Type.

9. In the new window, in the section Data Connection Type select line Use PASV- This is a passive data transfer mode.

10. Then, in the bottom row of buttons, click on the button Connect.

11. A connection to the server will occur and you can work in the usual mode of a two-panel file manager.

FlashFXP
You can download the trial version here: http://www.inicom.net/pages/en.ffxp-download.php
After installation, there are several ways to connect to the server: By registering through Site Manager and Quick Connect.

Fast connection.
1. For quick connection you need to click on the lightning icon and select Quick Connect or press the F8 button.

2. After which, in the form that opens:

3. Fill in the fields Server or Url, User Name, Password.

4. After this, your FTP account will open.

5. After which you will need to go to the folder with the name of your site and in it to the Docs Folder. After that, on the left side, go to the folder with the files necessary for the site,
Site Manager.
1. In order to enter the Site Manager you need to go to the bookmark Sites→ Site Manager or press the F4 button


4. Enter the name of the site and click on the button OK. Next, fill in the fields IP Address, User name, Password

5. Replace test111 with your hosting ID. Then press the button Apply. Then, by clicking on the lightning button in the drop-down menu, select the name of your connection.

6. Clicking on it will take you to your ftp account.

Macromedia Dreamweaver 8
1. When you launch the application, the following window will open:


3. A site manager window will open.


6. If everything goes well, you should see a list of files on the right:
Good afternoon!
Thanks to the FTP protocol, you can transfer files and folders on the Internet and local network. At one time (before the advent of torrents) there were thousands of FTP servers on which you could find almost any file.
However, even now FTP protocol is very popular: for example, by connecting to a server, you can upload your website to it; Using FTP you can transfer files of any size to each other (if the connection is broken, the download can be continued from the moment of the “break”, rather than starting over).
In this article I will give several best programs to work with FTP and show you how to connect to an FTP server.
By the way, there is also a special online. Sites you can search on various files on hundreds of FTP servers in Russia and abroad. For example, you can search for rare files on them that cannot be found in other sources...
Total Commander
One of the most universal programs, helping with work: with big amount files; when working with archives (unpacking, packing, editing); working with FTP, etc.
In general, more than once or twice in my articles I recommended having this program on PC (as a supplement to to a standard conductor) . Let's look at how to connect to an FTP server in this program.
Important note! To connect to an FTP server, you need 4 key parameters:
- Server: www.sait.com (for example). Sometimes, the server address is specified as an IP address: 192.168.1.10;
- Port: 21 (most often the default port is 21, but sometimes different from this value);
- Login: Nickname (this parameter is important when anonymous connections are prohibited on the FTP server. In this case, you must be registered or the administrator must provide you with a login and password for access). By the way, each user (i.e. each login) can have their own rights to FTP - one is allowed to upload files and delete them, and the other is only allowed to download them;
- Password: 2123212 (password for access, used in conjunction with the login).
Where and how to enter data to connect to FTP in Total Commander
3) In the window that appears, click the “Add…” button.
- Connection name: enter any name that will allow you to easily and quickly remember which FTP server you will connect to. This name does not affect anything except your convenience;
- Server:port - here you need to specify the server address or IP address. For example, 192.158.0.55 or 192.158.0.55:21 (in latest version The port is also indicated after the IP address, sometimes you can’t connect without it);
- Account: this is your login or nickname, which is given during registration (if anonymous connection is allowed on the server, then you do not need to enter it);
- Password: well, no comments here...
After entering the basic parameters, click “OK”.
5) You will find yourself in the original window, only now in the list of FTP connections there will be our newly created connection. You need to select it and click the “Connect” button (see screenshot below).
If everything is done correctly, after a moment you will see a list of files and folders that are available on the server. Now you can get started...
Free and convenient FTP client. Many users consider it the best program of its kind. The main advantages of this program, I would include the following:
- intuitive interface, simple and logical to use;
- complete Russification;
- the ability to resume downloading files in case of connection failure;
- works in OS: Windows, Linux, Mac OS X and other OS;
- ability to create bookmarks;
- support for dragging files and folders (like in Explorer);
- limiting the file transfer speed (useful if you need to provide other processes with the required speed);
- comparison of directories and much more.
Creating an FTP connection in FileZilla
The required connection data will be no different from what we used to create the connection in Total Commander.
1) After starting the program, click the button opening site manager. She's on the left top corner(see screenshot below).
- Host: this is the server address, in my case ftp47.hostia.name;
- Port: you don’t have to specify anything if you use standard port 21, if excellent, please indicate;
- Protocol: FTP data transfer protocol (no comments);
- Encryption: in general, it is advisable to select "Use explicit FTP over TLS if available"(in my case, it was impossible to connect to the server, so the normal connection option was chosen);
- User: your login (for an anonymous connection there is no need to specify);
- Password: used together with the login (for an anonymous connection there is no need to set it).
Actually, after setting the settings, all you have to do is click the “Connect” button. This way your connection will be established, and in addition, the settings will be saved and presented as a bookmark (pay attention to the arrow next to the icon: if you click on it, you will see all the sites for which you have saved connection settings) so that next time you can connect to this address with one click.
Very convenient and powerful FTP client. It has a number of great features, such as:
- restoration of interrupted download;
- creating a list of bookmarks for sites (moreover, this is implemented in such a way that it is simple and convenient to use: in 1 click you can connect to an FTP server);
- ability to work with groups of files;
- the ability to create scripts and process them;
- user-friendly interface makes work simple and easy even for novice users;
- Availability of Connection Wizard - a convenient wizard for creating new connections.
In addition, the program has a Russian interface and works in all popular versions of Windows OS: 7, 8, 10 (32/64 Bits).
A few words about creating a connection to an FTP server in CuteFTP
CuteFTP has a convenient connection wizard: it allows you to easily and quickly create new bookmarks to FTP servers. I recommend using it (screenshot below).
Next, the wizard itself will open: here you need to first specify the server address (an example of how to specify is shown below in the screenshot), and then specify the host name - this is the name that you will see in the list of bookmarks (I recommend giving a name that accurately characterizes the server, i.e. so that it is immediately clear where you are connecting, even after a month or two).
Then you need to specify the login and password from FTP servers. If you don’t need to register to access the server, you can immediately indicate that the connection is anonymous and click next (like I did).
Next you need to specify local folder, which will be opened in the next window with the opened server. This is a super handy thing: imagine, you connect to a book server - and your book folder opens in front of you (you can immediately upload new files to it).
If you entered everything correctly (and the data was correct), you will see that CuteFTP has connected to the server (right column), and your folder is open (left column). Now you can work with files on the server, almost the same way as you do with files on your hard drive...
In principle, there are a lot of programs for connecting to FTP servers, but in my opinion, these three are among the most convenient and simple (even for novice users).
That's all, good luck everyone!
Continuing the topic of transferring files over the Internet, today I’ll talk about the FTP server. Although I gave my preference, to miss out type FTP server is not possible, as it is very popular way file transfer. So, a little theory. What is FTP?
FTP (File Tranfser Protocol) translated from English means “File Transfer Protocol” and is used for exchanging files between computers via the Internet or local network. To log into the FTP server, a regular browser or even Windows Explorer. The only condition is open port 21 (used by default, but can be replaced with your own), that is, it must be open. So, if you have a Firewall or a router, you will have to remember where you have the instructions to forward port 21.
So, let's move on to setting up an FTP server.
1) And the first thing we need is to add components to our operating system. To do this, go to “Control Panel” → “Programs” → “Programs and Features” and click the button on the left “Turn Windows features on or off”:
2) In the list that opens, we need to enable the group of components “IIS Services”, namely: “FTP Server”, “Internet Services” and “Website Management Tools”. It should look the same as in the screenshot:

Click OK and wait for the installation of components to complete. Depending on the release of your operating system, you may need a disk with installation package Windows.


In the window that opens, in the left column, open the tree to the “Sites” tab and click on this tab right key. Select “Add FTP site”:

We indicate the name of the site and the directory that will be accessed via the FTP protocol:

Specify the parameters for launching the FTP server. If you do not want the server to start automatically when the system starts, uncheck the box. In the SSL subsection, check “Without SSL”:

On next page Check the box next to “Anonymous” and “Normal” and click done:

The FTP site has been created, let's continue with the setup.

4) Go to “Control Panel” → “System and Security” group → “ Windows Firewall" and in the left column select "Advanced parameters":

Go to the “Rules for incoming connections” tab. You need to find and include two items:
— FTP server ( incoming traffic);
— FTP server traffic in passive mode(incoming FTP traffic in passive mode).
To do this, right-click on the rule and select “Enable Rule”:

Then go to the “Rules for outgoing connections” tab and enable the “FTP server traffic (outgoing FTP traffic)” rule:

If you have a Firewall or router installed, you need to open port 21(TCP) for incoming connections and port 20(TCP) for outgoing connections.
5) It is necessary to create a user who will have full access to the server via FTP (write/delete). First you need to create new group users. Therefore, go to “Control Panel” → “System and Security” group → “Administration” → “Computer Management”. In the left part of the window, select the section “ Local users and groups" → "Groups". Right-click on the empty space in the central part of the window and select “Create group...”:

Enter the name and description of the group and click the “Create” button:

Go to the “Users” tab and, by analogy, click on an empty space and select “New User”:

We enter the data and come up with a password (at least eight characters). We also check the boxes for “Prohibit the user from changing the password” and “Password does not expire”:

Open the properties of the new user by right-clicking on it. Go to the “Group Membership” tab. Click the “Add” button → “Advanced” → “Search” and select the group that we created a few minutes ago. Click OK.


Click the “Add” button and add the group that we created. We give the group full access by checking the appropriate box at the bottom of the window:

Click OK to apply the changes.
Go to “Control Panel” → “Network and Security” group → “Administrative Tools” and open “IIS Services Manager” → “Sites” and select our site:


Select “Specified roles or user groups” and enter the name of our group. Give this group read and write permissions and click OK.


We return to the site and go to “FTP Logging”.
We indicate maximum size log or disable it completely. Click “Apply” on the right:

That's all. I hope you found this article useful, click one of the buttons below to tell your friends about it. Also subscribe to site updates by entering your e-mail in the field on the right.
Thank you for your attention:)
Hello admin, please explain to me what an FTP server is and can I create it myself on my computer?
In short, I have a regular one at home system unit and three laptops, all these machines are connected to the Internet via a router, can I from desktop computer make a real one FTP server, and directly from all laptops download and upload files to it? Just installed on a regular computer HDD 3 TB and it turns out that no one uses it, all relatives prefer laptops that are already running out of disk space.
Hello friends! Our Ro8 wrote a great article for you on this topic, read it.
Firstly, FTP is a protocol for transferring files over the Internet using the client-server principle, and FTP server is a file storage on the Internet, that is - regular computer With installed Windows 7, 8.1 or Windows Server 2012 and several hard drives large volume, on which any of your files can be located. This computer has a program installed, for example - FileZilla Server , anyone else can connect to this computer using: command line , Windows Explorer And various programs, we will consider two in our article:FileZilla Client, And Total Commander. After connecting to Using an FTP server, you can upload any files (movies, music, etc.) to it and also download them.
ControlThe FTP server will be run by the administrator who installed the program - FileZilla Server. It is here that you can assign each user various rights access (opportunity file changes on server): Append (the ability to change files), Read (read only), Write (record), Delete (delete). Naturally, most users do not need to be given Delete rights.
- Note: From almost any computer or laptop (even with just one hard drive) can be done FTP server and connect other computers to it to receive files, and it is not at all necessary that all computers be connected to one router,An FTP server can be created on the Internet and given access to hundreds and thousands of users.
How the work happens
As a software implementation of an FTP server, the article will consider the FileZilla Server program, which will be installed on a machine with Windows Server 2012
Also, the machine from which the connection to the created FTP server will be made is a computer with pre-installed Windows 8.1 Enterprise (x64)
In order for a machine with Windows 8.1 to connect to the FTP server, the FileZilla Client program will be installed on it (one of the methods of connecting using this program)
Go to https://filezilla-project.org and download FileZilla Server and FileZilla Client
Downloaded file We run FileZilla Server on a machine with Windows Server 2012, A FileZilla Client file on a Windows 8.1 machine. Both programs are installed the same way. First of all, let's install the FileZilla Server program.

Installing FileZilla Server
After running the downloaded FileZilla Server file on Windows Server 2012, click next

Click Install


Install

FileZilla Server installation process

Installation completed

After installation, a window like this will open in which we enter the local address of the FTP server and click OK

After entering local address FTP server the main window of the FileZilla Server program will appear

Let's make some settings by selecting Edit-Users

On the General tab, to add a new user, click on the Add button

Enter your username. OK

Next to Password, check the box and enter the password of the added user

Go to the Shared Folders tab. On this tab we will add the folder FTP01 which will be available to the created user Ro8. Click Add

Specify the previously created folder FTP01. OK

Select the added folder and specify access rights for it: - Read (read only), Write (write), Delete (delete), Append (the ability to change files in this folder)

Determining the IP address of a machine running Windows Server 2012 (192.168.1.4)

Installing FileZilla Client
We switch to a machine with Windows 8.1 and install the FileZilla Client program
We accept the license agreement


Installation


Installation completed

We have a network represented in the diagram

Let's connect to the FTP server in various ways.
Connect to the FTP server using the command line
On a machine with Windows 8.1, launch the command line.
Specify the username (Ro8) and enter the password. The password is not displayed when entering
Logged on means that we have logged into the FTP server

Create a folder My_Backup_win8.1 on the FTP server by entering the command mkdir My_Backup_win8.1

Let's look at the list of folders on the FTP server by entering the ls command
As you can see, there is a folder My_Backup_win8.1 on the FTP server

Close the connection to the FTP server by entering the bye command

Connecting to an FTP server using the T program otal Commander
Let's run the file on a machine with Windows 8.1 Total manager Commander. To set up a connection to the FTP server, click on the button shown in the screenshot

Click Add

We specify the connection name (optional), server and port (the server is the IP address of the FTP server, the port is set to 21). We also indicate the username and password. OK

Select the created FTP connection and click Connect

Connection to FTP server established


To disconnect from the FTP server, click Disconnect

Disconnection from FTP server completed

Connecting to an FTP server using the program FileZilla Client
Let's launch the FileZilla Client program

The main program window will open
