DMP file extension. Why do you need a blue screen of death or “instructions for interpreting a small memory dump file”
Basic information about the DMP file
The DMP file is one of the category files System files. Its full name is Windows Memory Dump. Format DMP file created by Microsoft. If you came to us, you are probably looking for programs that will help you work with this specific extension. On following pages you will find lists of programs that support the DMP file sorted by operating system. If our database contains information about converting a DMP file, you will definitely find it here.
Description of the DMP file
The .dmp file is an extension of dump file. This file contains data which is dumped from the memory of the computer. Such files are created by Windows when a program crashes. In order to form a dump file the operating system requires paging file in the boot volume of computer which should have at least 2MB of file size.
The main purpose of dump file is to store data about the crashing program at the time of its dump. This data can later one be used to resolve the issue. To open such file you need utility tool like Dumpchk.
Tags: DMP extension, how to open a DMP file, how to convert a DMP file, opening a DMP file
We hope we helped you resolve your DMP file problem. If you don't know where you can download an application from our list, click on the link (this is the name of the program) - you will find more detailed information regarding where to download a secure installation version of the required application.
A visit to this page should help you answer these or similar questions specifically:
- How to open a file with a DMP extension?
- How to convert a DMP file to another format?
- What is the DMP file format extension?
- What programs support the DMP file?
What else could cause problems?
There may be more reasons why you cannot open a DMP file (not just the lack of an appropriate application).
Firstly- DMP file may not be linked correctly (incompatible) with installed application for its maintenance. In this case, you need to change this connection yourself. To do this, right-click on the DMP file that you want to edit, click the option "To open with" and then select the program you installed from the list. After this action, problems with opening the DMP file should completely disappear.
Secondly- the file you want to open may simply be damaged. In this case, it would be best to find a new version of it, or download it again from the same source (perhaps for some reason in previous session The download of the DMP file has not completed and it cannot be opened correctly). If you have Additional Information
about the DMP file extension, we will be grateful if you share it with users of our site. Use the form located During outages operating system often BSOD appears on the screen ("blue screen of death-p
) or the computer simply reboots. When rebooting, it is impossible to find out the cause of the error. To determine it, they use memory dump files, which are not so easy to open.
- You will need
- BlueScreenView software.
Instructions If you enable the dump recording option in the operating system settings, in case of failures you can find out the cause of the error. Memory dump files have a dmp extension. To open them use special programs , for example BlueScreenView or Microsoft debugging tools. Latest utility although it is intended specifically for Windows platforms, it requires the installed .NET package Framework latest
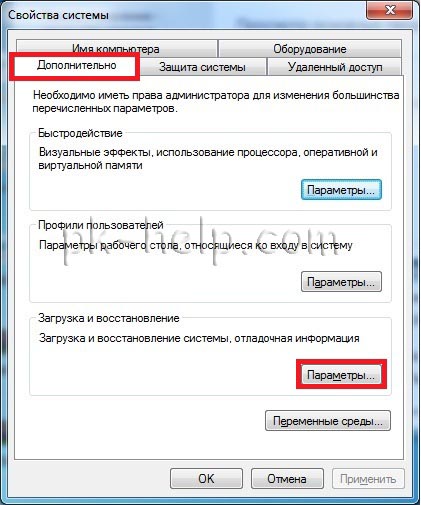
version, so it is rarely used. Initially, you need to disable the ability to automatically reboot the system in order to see the error number and its explanation, and also enable the ability to create memory dump files when the system crashes. Go to your desktop and click right click mouse on the My Computer icon. IN context menu
select "Properties". In the window that opens, go to the “Advanced” tab, in the “Boot and Recovery” block, click the “Options” button. Uncheck "Run"" If you are faced with a situation where the system can no longer boot, activate this option through the boot menu: press the F8 key when the system boots and select the line “If the system fails, do not reboot.” Now you can see the “blue screen of death” and, by writing down the error code, find out its origin using another computer.
But it is not always possible to find out the reason for the appearance of BSOD using 2-3 lines. If you use the BlueScreenView program, you can find out more details. You can download the program from the following link http://nirsoft.net/utils/bluescreenview.zip, and the Russifier can be downloaded from this link http://nirsoft.net/utils/trans/bluescreenview_russian.zip.
After running this program, in the main window of the program, you will be able to see all the dump files that are on your system. Their absence suggests that emergency shutdowns The computer was not powered up or the ability to write DMP files has not yet been used.
Select the most recent dump file by creation date and read the detailed explanation for it. If there is too little information to solve the problem, click the "File" menu and select "Find in Google code errors and driver." With help search engine a solution can be found.
Instructions for interpreting the file small memory dump.
Very often you can come across questions related to the appearance blue screen of death (Blue Screen Of Death = BSOD). However, almost anyone can independently determine the cause of the error that led to the appearance of BSOD. The fact is that when a blue screen appears on HDD a special file is written which is called Small Memory Dump(of course, provided that its recording is allowed in the settings).
You can enable Small Dump recording as follows:
1. Click the button Start and select from the menu Settings paragraph Control Panel.
2. Double-click the icon System.
3. Open the tab Additionally and press the button.
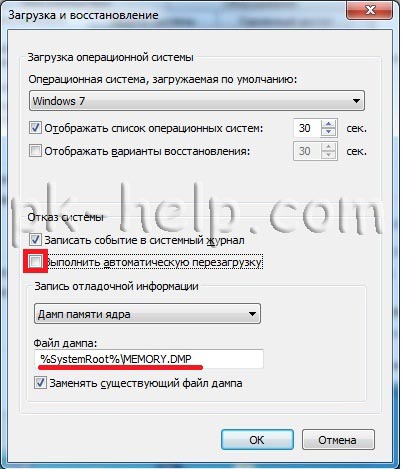
4. On the list Writing Debug Information select Small memory dump (64 KB).
The small memory dump file records minimum set useful information that allows determine the cause of an unexpected computer crash. For this parameter on boot volume requires a swap file of size at least 2 MB. On computers with an operating system Microsoft Windows 2000 or later Windows versions in case of unexpected computer failure each time a new file is created.
When the following error occurs and a second small dump file is created Windows memory saves previous file. Windows gives each file a separate name with a date. For example, Mini022900-01.dmp is the first memory dump file created on February 29, 2000. A list of all small memory dump files is stored in the %SystemRoot%\Minidump folder.
Tools for interpreting a small memory dump file
To download small memory dump files, you can use utility program Dump Check(Dumpchk.exe). Dumpchk.exe is also used to verify that the memory dump file was created correctly. Dump Check does not require access to debug symbols. Dump Check is included in the support kit Microsoft Windows 2000 Support Tools And Microsoft Windows XP Support Tools. You can download these packages by following this linkhttp://www.microsoft.com/whdc/devtools/debugging/default.mspx
To interpret small memory dump files, you can also use the tools WinDbg or the KD.exe. Programs WinDbg and KD.exe included V latest version Debugging Tools Pack for Windows.
How to open a memory dump file
To open a memory dump file, follow these steps:
- Click the button Start, select item Execute, enter cmd command and press the button OK.
- Go to folder "Debugging Tools for Windows". To do this, enter on the command line
cd c:\program files\debugging tools for windows
and press ENTER.
- To load the memory dump file into the debug program, type one of the following commands and press ENTER:
windbg -y path_to_symbol -i path_to_image -z path_to_dump_file
kd-y path_to_symbol -i path_to_image -z path_to_dump_file
|
Stub section |
Description |
|
path_to_symbol |
The local path to the folder where the symbol files were downloaded, or the path to the symbol server, including the cache folder. Because a small memory dump file contains limited information, the actual binary files must be loaded along with the symbols to correctly interpret the memory dump file. |
|
path_to_image |
The path to these files. These files are contained in the I386 folder on the Windows XP CD. Example path: C:\Windows\I386. |
|
path_to_dump_file |
The path to the memory dump file being analyzed and the name of this file. |
Memory dump file analysis
There are several commands to collect data in a dump file, including the following:
- Team !analyze -show displays the fatal error code and its parameters. The fatal error code is also known as the control error code.
- Team !analyze -v displays detailed result analysis.
- Team lm N T displays a list of the specified loaded modules. The data includes the module's state and path.
Note. Command with extension !drivers Lists all drivers loaded on the destination computer, along with information about the memory they use. Extension !drivers not used in Windows XP and later. To display information about loaded drivers and other modules, use the command lm. Team lm N T displays information in the same format as the legacy extension !drivers.
For information about other commands and complete command syntax, see the debugging tools reference documentation. Help documentation for debugging tools is located in the file: C:\Program Files\Debugging Tools for Windows\Debugger.chm
Note. If problems arise related to With using symbols , use the utility program Symchk to verify that the required symbols are loaded correctly. Additional information about the program Symchk See the following Microsoft Knowledge Base article:
311503 (http://support.microsoft.com/kb/311503/) Retrieving debug symbol files from the Microsoft symbol server
Blue screen of death(English) Blue Screen of Death, Blue Screen of Doom, BSoD) - messages about critical system error in operating rooms Microsoft systems Windows. Many who encounter a blue screen of death on their computer/laptop see the only solution as reinstalling the operating system. But sometimes the OS has nothing to do with it, but the problem is in the hardware. In order not to guess - why did it appear blue screen of death, you need to use the information provided by the operating system itself in the form of logs. In this article, I will describe step by step how to find out the cause of the blue screen of death.
So, the appearance of the blue screen of death is always unexpected and at the wrong time, so many simply do not have time to see what is written, and it must be said there (though not in a very explicit form) the reasons for the failure. First of all, I suggest setting up your computer/laptop so that it does not reboot immediately after a system failure, but gives you the opportunity to see the cause of the failure, if this information is not enough, you need to look dump a file that contains information: an error code with parameters, a list of drivers loaded into RAM at the time of the system crash, etc., but this information is enough to identify the faulty driver.
Settings regarding rebooting after a system failure can be specified by right-clicking on the My Computer/Computer shortcut (suitable for Windows XP, Windows7, Windows8), selecting " Properties", or press the key combination

On the "tab" Additionally"select in the Boot and Recovery field" Options".
Uncheck " Perform automatic reboot", in order to have time to see everything that the blue screen of death writes. The line Dump file indicates the path where the file will be saved, which will indicate the reasons for the failure.
Now you can carefully study the information when a blue screen of death appears. If your computer no longer boots and you cannot change these settings, in this case, when booting, press F8 on the keyboard and select the menu item “If the system fails, do not reboot.”
If the information indicated there is not enough, you can use a dump ( dmp file). To do this you can use the tool microsoft-microsoft debugging tool, but it weighs a lot and requires installation and framework 4.5. You can get by with fewer sacrifices if you use the program BlueScreenView . In my opinion very convenient program does not require installation and in Russian (add the file to the program folder). By running the BlueScreenView.exe file, the program interface will open in which the dump of this computer will already be loaded (the default path is C:\Windows\MiniDump, if you go to Settings - Advanced parameters, you can specify a different path if you copied the dump to another location).
Hello friends, today we will look interesting topic, which will help you in the future when a Blue Screen of Death (BSoD) appears.
Like me, many other users had to observe the appearance of a screen with a blue background on which something was written (white on blue). This phenomenon indicates a critical problem, as in software, for example, driver conflict, and in physical malfunction some computer component.
I recently got a blue screen issue in Windows 10 again, but I quickly got rid of it and will tell you about it soon.
So, most users don't know that BSoD can be analyzed to understand the problems later critical error. For such cases, Windows creates on disk special files– then we will analyze them.
There are three types of memory dump:
Full memory dump– this function allows you to completely save the contents random access memory. It is rarely used, because imagine that you have 32 GB of RAM, with a full dump, all this volume will be stored on disk.
Core dump– saves kernel mode information.
Small memory dump– saves a small amount of error information and loaded components that were present at the time the system malfunction occurred. We will use this type of dump because it will give us enough information about the BSoD.
The location of both the small and full dump is different, for example, the small dump is located in the following path: %systemroot%\minidump.
The full dump is here: %systemroot%.
To analyze memory dumps, there are various programs, but we'll use two. The first is Microsoft Kernel Debuggers, as the name suggests, a utility from Microsoft. You can download it from the official website. The second program is BlueScreenView, a free program, download from here.
Analyzing a Memory Dump Using Microsoft Kernel Debuggers
For different versions systems you need to download your own type of utility. For example, for a 64-bit operating system, a 64-bit program is needed, for a 32-bit operating system, a 32-bit version is needed.
That's not all, you need to download and install the package of debugging symbols needed for the program. It's called Debugging Symbols. Each version of this package is also downloaded under a specific OS, first find out what system you have, and then download. So that you don’t have to look for these symbols anywhere, here is the download link. The installation should preferably be done in this path: %systemroot%\symbols.
Now you can launch our debugger, the window of which will look like this:
Before analyzing the dumps, we will configure something in the utility. First, we need to tell the program where we installed the debugging symbols. To do this, click on the “File” button and select the “Symbol File Path” item, then indicate the path to the symbols.

The program allows you to extract symbols directly from the web, so you don't even have to download them (sorry to those who have already downloaded them). They will be taken from a Microsoft server, so everything is secure. So, you need to open “File” again, then “Symbol File Path” and enter the following command:
SRV*%systemroot%\symbols*http://msdl.microsoft.com/download/symbols

Thus, we indicated to the program that the symbols should be taken from the network. Once we have done this, click “File” and select “Save Workspace”, then click OK.
That's all. We have configured the program in the right way, now we begin to analyze memory dumps. In the program, press the button "File", Then "Open Crash Dump" and select the desired file.
Kernel Debuggers will begin analyzing the file and then output a result about the cause of the error.
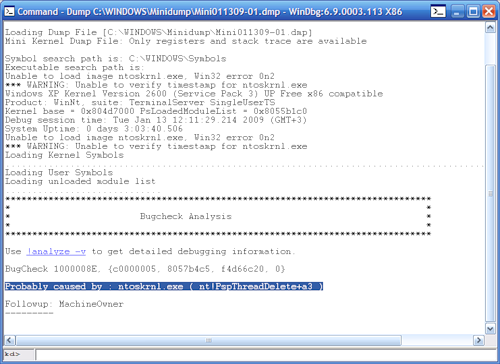
In the window that appears, you can enter commands. If we enter !analyze –v, then we will get more information.
That's all with this program. To stop the debugger, select "Debug" and the "Stop Debugging" item.
Analyzing a memory dump using BlueScreenView
The BlueScreenView program is also suitable for analyzing various errors and BSoDs; it has a simple interface, so there should be no problems with mastering it.
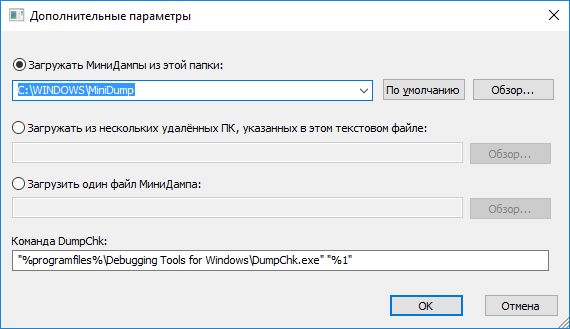
Download the program from the link above and install. After launching the utility, you need to configure it. Go to the parameters: “Settings” - “ Extra options" A small window will open with a couple of items. In the first paragraph, you need to indicate the location of the memory dumps. They are usually located in the path C:\WINDOWS\Minidump. Then just click the "Default" button.
What can you see in the program? We have menu items, part of the window with the names of the dump files, and the second part of the window – the contents of the memory dumps.

As I said at the beginning of the article, dumps can store drivers, the screenshot of the “screen of death” itself, and other helpful information, which may be useful to us.
So, in the first part of the window, where the dump files are, select the memory dump we need. In the next part of the window we look at the contents. Drivers located in the memory stack are marked in reddish color. They are precisely the cause of the blue screen of death.
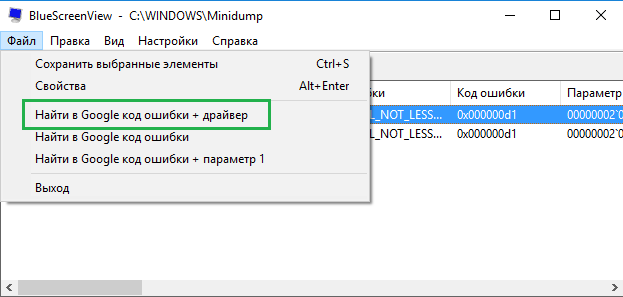
On the Internet you can find everything about the error code and driver that may be to blame for BSoD. To do this, click “File”, and then “Find error code + Driver in Google”.
You can display only the drivers that were present at the time the error occurred. To do this, click “Settings” - “Bottom window mode” - “Only drivers found in the crash stack”. Or press the F7 key.

To show the BSoD screenshot, press F8.
To show all drivers and files, press F6.
Well, that's all. Now you know how to find out about the Blue Screen of Death problem, and if something happens, find a solution on the Internet or on this site. You can offer your error codes, and I will try to write for each article to solve the problem.
Also don't forget to ask questions in the comments.
http://site/wp-content/uploads/2016/08/analiz-dampa-pamyati.jpghttp://site/wp-content/uploads/2016/08/analiz-dampa-pamyati-150x150.jpg 2017-09-29T19:00:57+00:00 EvilSin225 Problems BlueScreenView,Microsoft Kernel Debuggers,dump analysis,memory dump analysis,windows 10 memory dump analysis,windows 7 memory dump analysis,crash dump analysis,BSoD causeHello friends, today we will discuss an interesting topic that will help you in the future when a blue screen of death (BSoD) appears. Like me, many other users had to observe the appearance of a screen with a blue background on which something was written (white on blue). This phenomenon indicates a critical problem, such as in software, for example...EvilSin225 Andrey Terekhov [email protected] Administrator Computer techologies