How to configure a ZyXel router? Connecting and setting up a router. Self-installation and configuration of a Zyxel router
Zyxel Keenetic Lite is a compact, inexpensive, but at the same time very functional device that allows you to distribute the Internet channel to several users working on different devices. The web interface is quite friendly, the process of entering the necessary parameters is not difficult. Therefore, any user can cope with setting up the Zyxel Keenetic Lite router.
Connecting to a computer
There are two ways to connect the device in question to your computer:
- via Wi-Fi;
- using patchcord.
The first method is somewhat simpler:
Also, if necessary or simply due to lack of opportunity, you can use a network cable. You need to insert one end of it into the PC’s network card, and the other into LAN 1.
When the connection is complete, you can safely proceed to work with Zyxel Keenetic Lite. All you need is a web browser.
Go to the control panel
To find the control panel of the device in question, you should:
- open any available browser (GoogleChrome, Opera, InternetExplore);
- write 192.168.1.1 in the address bar;
- The login window will open:

After completing the above steps, you will be able to perform various manipulations with Zyxel Keenetic Lite. This combination of login and password allows you to enter any data.
Setting up an Internet connection
Before the device in question can be used for its intended purpose, it is necessary to carry out preliminary preparation. Moreover, this applies not only to the Internet connection, but also to working with television.
Connection via TV cable
This type of router can work with television. To do this, you must correctly enter the IPTV parameters.
To perform this action you need:

- "IP parameters";
- "IP address";
- "Subnet mask";
- "main gate";
- "mac address in use"
- Click on “apply”.
Connection via leased line
To start working Zyxel Keenetic Lite with the Internet you need:
- turn on the power;
- connect the provider cable to the device;
- go to the web interface.
Further actions depend on the provider providing access to the World Wide Web. It is necessary to enter the parameters regulated by it.
Video: Setting up the ZyXEL Keenetic lite Internet center
Setting up a Zyxel Keenetic Lite router for Rostelecom
Today the provider "" is one of the most popular and successful in the Russian Federation.
In order for the device in question to provide access to the global network through this operator, it is necessary to perform PPPoEconnection:
- launch any Internet browser and enter the web interest;
- write the address 192.168.1.1;
- enter “Login” and “Password”;
- In the new window we enter the following values:
- “Internet access protocol” - PPPoE;
- “username” - login;
- “password” - password;
- “authentication method” - automatic detection;
- “data security (MPPE)” - not used;
- check the box next to “obtain an IP address automatically”;
- “MTU size” is 1400.

When all the data indicated above has been entered, you can safely click on “Connect”.
Today, a provider such as Beeline is one of the leaders in the field of communications. It provides access to the world wide web. The device in question can work successfully with this operator.
To do this, you need to perform certain actions:
- go to the web interface;
- open the section called “Internet”;
- activate the “connection” tab and enter the following values in the appropriate items:

- click on “apply”.
Wi-Fi on the router
In order for the device to begin providing access to the Internet wirelessly, it is necessary to perform a number of certain manipulations:
- open the web interface;
- select “Wi-Fi”;
- open the “Connection” section - indicate the name of the network environment to be created;
- go to the item called “Security” - select WPA2-PSK, you can also set a login password (it is advisable to include at least 6 characters of different case);
- click on “apply”.

This completes the preparation for working with the Internet via a router. To access the Internet, you need to turn on Wi-Fi on your gadget and enter the appropriate password.
The local network
Another necessary function of the device of this type is LocalNetwork. By using it, you can exchange various data between individual PCs, as well as gadgets.
To organize the network space, go to the control panel of the router and perform the actions in strict order:
- open the “Home network” section -> “Network organization”;
- In the section that opens, enter the necessary parameters:
- “IP address of the Internet center” - 192.168.1.1;
- “subnet mask” - 255.255.255.0;
- “DHCP” - it is advisable to leave the value “server” in the drop-down list;
- “address pool” - you need to set the value at your discretion (it is best to make it minimal, not automatic).
After completing all the above steps, you can safely begin working inside the LAN. It is advisable to select the value “server” in the “DHCP” field. Because otherwise you will have to manually enter the name of each individual newly connected PC.

If necessary, you can linkMAC-network card addresses:
- open the item “rented addresses”;
- We enter the physical address of the specific device in “MAC address” and “Issue IP address”.
Setting up routing
To simultaneously access the provider's resources via a VPN connection, you must enter the correct routing parameters.
Certain steps need to be taken:

Next, the user will see a table in which 25 static routes will be displayed. In each specific case they differ greatly. To correctly enter all the necessary data, you should definitely consult with your provider. To create a rule, you need to click on an unoccupied line. A window for detailed route formation will open.
Changing the internal IP address of the router
Sometimes for some reason it is necessary to change the IP of the router itself.
It's quite simple to do this:

You can select any combination from the range 192.168.0.1 to 192.168.1.254. If for some reason problems arise, you can always reset the settings to factory settings in any convenient way.
Setting up a home server
If you created HomeNetwork using a router, then you need to work on creating a server.
This will allow you to easily access data located on a PC located at home, but connected to Wi— Fior otherwise to the router:
- open via a web browser;
- go to the “VPN server” tab;
- enter the following data:

When all the above steps are completed, you can easily and without difficulty operate files on personal computers left at home.
Firmware update
Firmware updates are required periodically.
To do this you need to do the following:

Next, a window will open showing the update progress. When the process is completed, a restart will be performed automatically. It is only important not to confuse and download the appropriate firmware for a particular case.
Setting up USB ports
If necessary, the gadget in question can work with USB devices.
To make this possible, you must do the following:

After completing the above steps, it is advisable to make sure that everything is done correctly. We connect to the web configurator and open “system monitor” -> “system”. There should be a “USB devices” section where the operating equipment is displayed.
Changing the Administrator password
To avoid outside interference in the work, it is advisable to change the password to access the web configurator.
You can do it like this:

Then click on “apply”. This completes the operation.
Reset
To reset all parameters to standard, you need to arm yourself with a long thin object - an awl or a pen rod. At the end of the case there is a special hole in which the reset button is recessed. Click on it for 10 seconds.
After this, all parameters will be reset to standard.
The model in question is a very simple and reliable router. With proper care, it will serve its owner for many years.
1. By default, login is admin, password is 1234.
2. Courier-setters must change the password in the settings to the Serial Number indicated on the box (S/N). When reconfiguring, it is also recommended to use S/N (serial number) as a password for the router and wi-fi.
3. Resetting the router settings is done by pressing and holding the Reset button on the back panel of the router for 10 seconds. In order to get to the router’s web interface, you need to open your Internet browser and type http://192.168.1.1, User Name in the address bar admin (Username) 1234 , Password –
(provided that the router has factory settings and its IP has not changed).
Change the factory password.
Default: Login admin, password 1234. In the router interface, you need to go to the “ System ", Further password. In field"New Password"

Enter a new password. It must be repeated in the next field.
Setting up Wi-Fi on the router. In the router interface, you need to select the tab on the left Wi-Fi network, in the list that opens, select “».
Compound We set the parameters as follows: Field " SSID
": enter the name of the wireless network. The value in this field cannot be changed.».
Apply ": enter the name of the wireless network. The value in this field cannot be changed.».

- Next, save the settings by pressing the button “ Authentication method:WPA2-.
- PSK Protection type:
- TKIP

Click the button below ": enter the name of the wireless network. The value in this field cannot be changed.»
Setting up an Internet connection.
InternetConnection" or " Authorization", it all depends on the type of Internet connection of your provider.

Setting up a PPPoE connection.
In the router interface, you need to select the tab on the left “ Internet", in the list that opens, select " Authorization»,
1.Internet Access Protocol: PPPoE
2.Username :
Your login according to the contract
3.Password: Your password according to the agreement
4.MTU: 1472
5. Save the settings with the button "Apply."

Configuring PPTP (VPN) while automatically obtaining a local IP address.
In the router interface, you need to select the tab on the left “ Internet", in the list that opens, select " Authorization»,
1.Internet Access Protocol: PPTP
2.Server address: ppp.lan(or10.10.3.36)
3.Username: Your login according to the contract
4.Password:Your password according to the agreement
5. Save the settings with the “ ": enter the name of the wireless network. The value in this field cannot be changed.».

NAT when automatically obtaining an IP address (DHCP).
In the router interface, you need to select the tab on the left “ Internet", in the list that opens, select " Connection»
1. Configuring IP settings: Automatic
2. Save the settings with the “ ": enter the name of the wireless network. The value in this field cannot be changed.».

Saving/restoring router settings.
1. "System",menu "Configuration

To save the current router settings, you must press the button "Save". The settings file will be saved to the specified location on your hard drive.
To restore settings settings from a file, you must click the " Review", specify the path to the settings file, then click the button "Restore".
Attention! Button press "Reset" will restore factory settings!
The Zyxel company never tires of delighting us with more and more routers (routers) of the ZyXEL Keenetic series. And, despite the variety of models presented, the various technical features and characteristics, as well as the software part of all devices, are almost identical, and the settings are made in the same way. And in this faq we will deal with setting up and updating the software of the ZyXEL Keenetic series routers. If you are wondering whether this article is for you, then here is a complete list of router models for which the presented settings are suitable:
- ZyXEL Keenetic Lite;
- ZyXEL Keenetic Lite II;
- ZyXEL Keenetic Start;
- ZyXEL Keenetic;
- ZyXEL Keenetic II;
- ZyXEL Keenetic 4G;
- ZyXEL Keenetic 4G II;
- ZyXEL Keenetic Omni;
- ZyXEL Keenetic Giga;
- ZyXEL Keenetic Giga II;
- ZyXEL Keenetic Ultra.
All routers on the list run the NDMS V2 firmware, which is why the settings are made identically. And if suddenly your model is not on the list (this is possible if the router appeared after the article was written), then look at your model on the website zyxel.ru, in the “Support” section, check what firmware your router uses.
First connection of Zyxel Keenetic
To start working with the Zyxel Keenetic series router, just power up the router and connect to it for initial setup. Let's see how to do this.
After connecting the power, Zyxel Keenetic will immediately start turning on, this takes about 1 minute. If it suddenly doesn’t turn on, look - maybe your model has a power button (it’s located on the back, next to the power socket).
After turning on, we can connect to the router to perform the initial setup; this can be done in two ways:
- over a wireless Wi-Fi network. After turning on, the router immediately creates a Wi-Fi network, the network name and password for connection are written on a sticker on the bottom of the router;
- via Ethernet (using a wire). Everything is simple here - just connect the router and the network card of your computer with a twisted pair cable (included in the kit). It doesn’t matter which connector you connect the cable to the router - now all Zyxel Keenetic models come with NDMS V2 firmware (the connector operating mode is LAN/WAN is determined automatically). If you suspect that your router has an old firmware version when you first connect, connect the twisted pair cable to the yellow socket.
If you just need to create a network between several devices, then no configuration is required - just connect all devices to Zyxel Keenetic and they will “see” each other.
Basic setup of Zyxel Keenetic
Internet connection:
It all depends on the provider: unfortunately, there are no universal instructions. If no configuration is required, or you already have a configured router or modem, and you want to connect Zyxel Keenetic to it, then simply connect the devices with twisted pair cable, then turn on Zyxel Keenetic. The router itself will understand what is required of it. If configuration is required, check the settings with your provider and proceed to “First login to the WEB interface (Quick setup)”.
First login to the WEB interface (Quick setup):
If setting up is required to access the Internet, and we know its parameters, then let's see where and how to specify them.
First of all, connect the twisted pair cable (network cable) of your provider to the router, and the router to the computer (see “First connection of Zyxel Keenetic”).
Access Point tab:

Access point
Let's see what settings are available to us on the “Access Point” tab:
- “Enable access point” – checkbox to enable/disable Wi-Fi network.
- “Network name (SSID)” - you can set the network name (what your Wi-Fi network will be called).
- “Hide SSID” - you can hide the name of the network, then it will not be visible in the list of available networks (but devices on which this Wi-Fi network was saved, and the automatic connection option was enabled, will still connect to the wireless network automatically) .
- “Network protection” - here you can select the type of password encryption for connecting to the Wi-Fi network. If you do not have antediluvian computers with WinXP SP2, then choose “WPA2-PSK”. If you have legacy devices, you can select “WPA-PSK + WPA2-PSK”. If you want an open network, then select “No”.
- “Network key” is a password that must be entered to connect to a Wi-Fi network; for WPA2 it must be at least 8 characters (Latin letters and numbers). Keys 1-4 are used for WEP encryption, but it is used extremely rarely.
- “Standard” is a communication standard; for a successful connection, your network card must comply with the selected standard. I recommend choosing “802.11bgn”, all devices should work with it.
- “Channel” is the frequency at which the wireless network will be broadcast; select “Auto” - then the router itself will determine the least noisy frequency and will work on it.
- “Signal strength” - signal strength, for an average apartment 25% will be enough; If the signal is weak in some places, you can increase it.
After all the necessary settings have been specified, do not forget to click “Apply”. If you were connected to the router via Wi-Fi, then after changing most of the available settings you will disconnect from the network and you will need to select the network again and connect to it.
When changing the password, you should also change the network name (otherwise, to connect, you may need to manually delete the old saved network on the device from which you are connecting).
Guest Network tab:

Guest network
The essence of a guest network is that devices connected to it have access to the Internet through your router, but do not have access to your home network (the parameters of which are set on the “Access Point” tab). After enabling the guest network, you will see a new network in the list of available networks, which will be completely independent from your home network.
All settings are almost identical to the settings in the “Access Point” tab, so there is no point in describing them. But you should pay attention to the “IP Settings for Guest Access”. In general, everything should be left as it is, but just in case, the “DHCP address pool size” is equal to the maximum possible number of devices connected to the guest network.
Access List tab:

Access list
This tab provides the ability to control access to the network created by the router using MAC addresses (MAC address is a unique identifier of a network device). The function is very convenient if you have a fixed number of devices connected to your router, and you do not plan to connect more to the router. Then you can add their MAC addresses to the white list, and only they will be able to connect to the router.
The following blocking modes are possible:
- “Do not block” - entered MAC addresses are not taken into account;
- “White list” - only those devices whose MAC addresses are on the list will be able to connect to the router’s network;
- “Black list” - only those devices whose MAC addresses are on the list will not be able to connect to the router’s network.
To add a new MAC address to the list, click “Add address”, indicate the MAC address in the window that appears and click “Save”.
The MAC address of the device can be viewed if it is connected to Zyxel Keenetic, in the “Home Network” section (icon with two miniature monitors at the bottom left) or at the link http://192.168.1.1/RU/hosts.html.
Connecting the Yota USB modem to Zyxel Keenetic
All Keenetic series routers (except Lite/Lite II, Start routers) can be connected to a USB modem (3G/4G) to access the Internet; this feature is widely used. Let's see how to connect the Yota Modem to the Zyxel Keenetic.
In fact, everything is very simple - turn off the router, connect the Yota Modem to the USB connector, turn on the router. Everything should work (the modem should be detected by the router).
You can check whether the modem is detected or not on the main page of the router’s WEB interface - information about the new connection should appear there.

Yota modem connected to the router
If the modem is not detected, try resetting it to factory settings (press and hold the “RESET” button on the device body for 15 seconds). If it doesn’t help, make sure that the router software version is up to date and update if necessary.
Saving and restoring Zyxel Keenetic settings
It is often necessary for one reason or another to save the current router configuration (for example, to transfer to a similar device or to restore the configuration after a firmware update). On Zyxel Keenetic routers, of course, the ability to save and restore settings is provided.
Saving Zyxel Keenetic settings:
1) Open the “System” section of the router’s WEB interface, the “Files” tab (the page is also available via a direct link - http://192.168.1.1/RU/files.html).
2) Click on the “startup-config” file.

Restoring Zyxel Keenetic settings:
1) Just like when saving settings, go to the WEB interface in the “System” section, “Files” tab (the page is also available via a direct link - http://192.168.1.1/RU/files.html).
2) Click on “startup-config” and in the dialog box that appears, click “Select file”, select the previously saved “startup-config” file from the computer. Then click “Replace”.

Select “Replace”
3) In theory, the router should reboot itself with the new settings, but in practice for some reason this does not always happen (perhaps it depends on the model/firmware version). Therefore, go to the “Reboot” tab and click “Reboot”.
The router will reboot and start working with the settings from the file.
Zyxel Keenetic firmware update
Let's look at how to update the Zyxel Keenetic firmware. There is one peculiarity here: a number of models were previously produced with firmware fundamentally different from NDMS V2, but in new models it was abandoned.
The old firmware looks something like this:

Old firmware
The new (current) firmware (NDMS V2) looks something like this:

Firmware NDMS V2
Updating Zyxel Keenetic with an old firmware version:
There are several nuances that should be taken into account - when updating, all settings will be lost - you cannot transfer them to the new version (you will have to configure them again). Rolling back is quite difficult.
Let's get started (a connection to the Internet must be configured on the router):
zyxel.ru
2) Go to the WEB interface of the router (http://192.168.1.1), go to the “System” section, select “Firmware” there.

Firmware installation
3) Click “Browse” and select the previously downloaded *.bin firmware file, click update.
4) Wait for the process to complete, this may take up to 3 minutes. The router will reboot during the update process.
Updating Zyxel Keenetic with new firmware version (NDMS V2):
1) Open the WEB interface of the router (http://192.168.1.1).
2) On the “System Monitor” page we find the “System Information” block and there we look for the “Updates” line. If a newer version of the firmware is available (than the current one), then opposite the “Updates” line there will be an “Available” link.

Update available
3) Click on “Available”. The “Components” tab section will open (in the “System” section), where we will be asked to install updates. Click “Ok” and wait until the update is downloaded and installed.

Click “Ok”
This method has one drawback - an Internet connection must be configured. But it may turn out that the firmware needs to be updated, but the connection to the Internet is not configured on the router. Therefore, there is the following option to perform the update under these conditions:
1) Download the current firmware version for your router model from the website zyxel.ru. Extract the *.bin file from the archive.
2) Open the “System” section of the router’s WEB interface, the “Files” tab (the page is also available via a direct link - http://192.168.1.1/RU/files.html).
3) Click on the “firmware” file, and in the dialog box that opens, first select “Select file” - select the *.bin firmware file, then click “Replace”.
4) Wait for the installation to complete.
We will definitely talk about more complex settings in future articles. If you are interested in a specific topic, or have questions, write in the comments.
If you have just signed an agreement with one of the Internet providers and purchased everything you need (router, cable), you may want to install and configure network access yourself, without additional expenses for technical specialists. That's why you came to this page and that's why everything will work out for you.
This article will discuss in detail the process of independently connecting the Internet via an Ethernet cable to the Zyxel Keenetic ii router for various providers and data transfer protocols (PPPoE, L2TP, PPTP).
How to start the router?
Carefully remove all components of the device from the packaging and follow the following algorithm when connecting it:
- Unpack and connect the power supply to the device;
- Insert the cable from the provider (the one through which Ethernet data is transmitted) into the WAN port that is selected among all;
- Take it out of the package and connect the connecting cable to the router, as well as to the network card of the main PC: it is quite short, the same at both ends, inserted into any of the five free connectors of the router and the only one available on the computer/laptop;
- Plug in the power supply, then press the power button on the rear panel;
- Wait until the device starts up completely, as a result of which 3 diodes will light up on the indicator panel: power, network, connection to PC.
The new connection should now appear in the bottom right corner of your PC screen. Let's do some preparatory work:
- Right-click on this icon and open Control Center;
- On the right side of the window that opens, the name of your connection will be located, highlighted in blue. Click on it;
- Another window opened. Open properties by clicking on the corresponding button;
- Scroll down the list of parameters for the current connection and find Internet Protocol version 4: select it and open properties (the button below the list);
- Make sure that in both cases IP and DNS are set to receive settings automatically. If this is not the case, set the selectors to the appropriate value;
- Apply the changes.
This completes the preparatory work. Let's move on to the main settings.
Connection setup
When configuring the Zyxel Keenetic ii router, we will use a web configurator common to the entire Kinetic family. Therefore, having learned how to configure this model, you will be able to cope with connecting third and third generation devices and other types like Lite, 4G, etc.
And so, first we need to open this very web configurator:
And now you are in the main menu of the device. In it you can find information about the current firmware (top list on the right), about connected connections (top left), as well as two types of menus: a text menu at the top and a bottom one, consisting mainly of graphic icons. We are interested in the second one – “Internet”.
But before you proceed to entering parameters, find the provider’s contract or obtain the following data from the support service:
- What access protocol is used: we have already listed the most popular ones above (PPPoE, L2TP);
- Authorization data (personal login and password - contained in the contract);
- Is it necessary to specify the IP address as well as the dedicated server name (VPN). These values, if required;
- Is a static address assigned to you, or is it updated (dynamic) in each new session?
- Does the provider register MAC addresses (for example, Dom.ru does this) and, if so, which one belongs to you;
We will need all this to connect the Zyxel Keenetic ii router to the network.
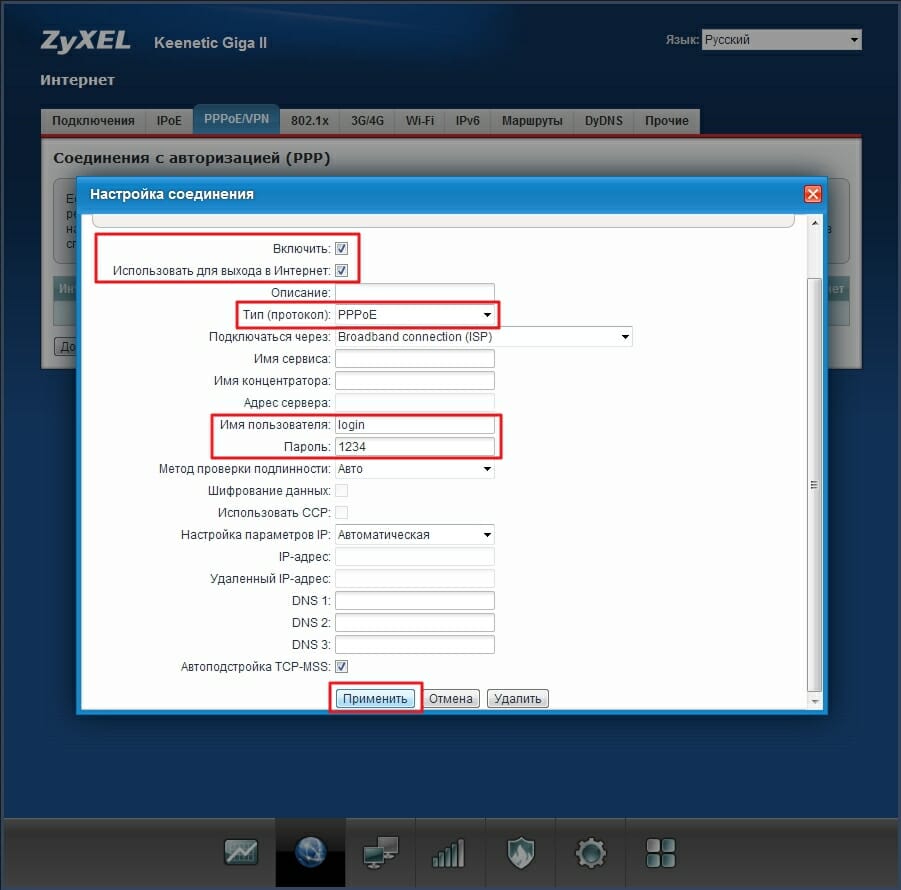
After going to the Internet tab of the main menu, you will see an updated list of tabs at the top of the page. Go to the PPPoE/VPN section and click on the add connection button. In the window that opens, make the following settings:

Example of setting up a router in PPPoE mode
- We check the first two selectors, which will enable the connection and designate it as the main one for accessing the external network;
- In the protocol field, indicate the one that your provider told you. For example, PPPoE;
- If the supplier reported that this is necessary, indicate the server address;
- Immediately after it we indicate our personal data as a user;
- The protection method (i.e. authentication) is set only at the request of the Internet provider;
- Below, if you are supplied with a dynamic IP, we do not change anything. And if it is static, then we select manual settings and enter the corresponding values for the address, subnet mask and gateway used (Some providers do not supply an IP address on the client wan port at all. In this case, you must select the “Without IP address” option);
- All other parameters are optional for owners of the Zyxel Keenetic ii router and are assigned only at the request of Rostelecom, Beeline or any other company with which you have entered into an agreement;
- Click on apply settings and wait for changes to be made to the router configuration;

Example of setting up a router in PPTP mode
If the supply agreement provides for a static IP, and you were unable to configure the connection using the algorithm above, try the following additionally:
- While in the same “Internet” section of the Zyxel Keenetic ii router, open the IPoE tab of the top menu;
- Click on the name of the only interface indicated in the table;
- In the pop-up window, we also check the two top selectors;
- Find the IP parameters line and select the manual configuration method;
- In the fields that appear, enter the data from the provider;
- If domain server addresses were provided, please indicate them below;
- Here you can also specify the static MAC address assigned to you by your provider. To do this, remove the “Default” setting in the corresponding field;
- We apply the changes and check the Internet availability again.

Example of manually setting IP addresses
To be sure, you can reboot Zyxel Keenetic ii and turn it off, then (after 15 seconds) turn on the network adapter of the PC you are using.
If the router is not new, and the setup was carried out previously for other providers, you need to reset the settings to factory settings. To do this, you need to find the Reset button on the back panel of the device and press it for 10-15 seconds, after which the router will reboot. In this case, the login password (1234) and other parameters will become initial. Now you can configure it again and continue to use a high-quality Internet connection using the Zyxel Keenetic ii router.
Found a typo? Select the text and press Ctrl + Enter
The budget version of the elite family of Zixel routers, Keenetic Start, which appeared at the beginning of 2013, immediately gained popularity in the new price segment of the market “about 1000 rubles” for the brand. For a relatively low price, the manufacturer has provided the same consistently high quality and reliability of the device. The router was designed to function both with a wired connection and to distribute a Wi-Fi network. Thanks to a high-quality antenna, the maximum transmission speed of this device via radio has reached 150 Mbit/s, and setting up the Zyxel Keenetic Start router has become even faster and more intuitive.
But, no matter how well-developed the process is, many may still have the question of how to connect the router to the Internet and iptv (dedicated video channel for a TV) on their own. It is this algorithm that this article is devoted to.
In order for the router to work for the first time, you need to take a few simple steps:
- Connect the device to the network using the power supply and pressing the power button;
- Connect the router to the external network (provider cable) via the WAN port (highlighted in color on the rear panel);
- Connect the PC via the included cable (inserted into one of five connectors);
- Check the correct execution using the indicators on the front panel: the power light, network connection light and the port indicator with the PC cable inserted should be on;
Afterwards we can open the computer, check the network connection (if there is an “Access Restricted” error) and set an important setting:
- From the tray (the place on the Start panel next to the time and date) open “Network Center...” by right-clicking on the network icon;
- In the window that opens, find the adapter settings tab and open it;
- On a working connection, right-click and select properties;
- In a new window, look for the fourth version of the Internet protocol, using the button under the list, open properties;
- For both selectors we set automatic retrieval (IP and DNS);
This is where the connection to the Wi-Fi network begins for the Rostelecom provider and any other service provider.
Setting up the router
To start setting up Zyxel Keenetic Start, you need to go to the main interface. And to do this, we need to open the browser and enter the number 192.168.1.1 into the address bar - the standard address of the Kinetic family. Immediately after loading the page, we will see an authorization form, into which we will enter the standard data: login - admin and password - 1234. Behind it, a Setup Wizard, unified for the entire line of routers, awaits us.
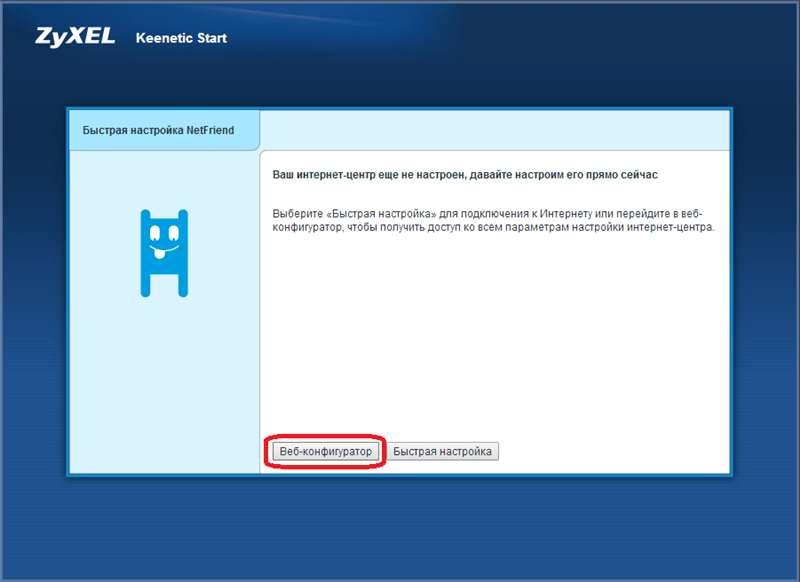
To enter the settings, open your browser and enter the address: HTTP://192.168.1.1
On the newly opened page we will find only two buttons to choose from: “Quick setup” and going to the “web configurator”. In this case, we are interested in the first option. After clicking on it, we will see three selectors that allow us to specify the relationship of our provider to MAC addresses. Most of the modern service providers do not record address data and for them you should select the first option (selector). But if your company is not Rostelecom, but, say, Dom.ru, you need to look at the contract or call technical support to get your MAC address. Then we indicate the resulting alphanumeric combination in the field next to the “Other” selector and click on the “Next” button.
On the page that opens, set the automatic IP configuration option or indicate your own address, as well as NDS, if the provider gave you this information. Let's move on. We indicate the login and password if they are included in the contract for the supply of Internet services, or check the box that says “I don’t have a password...”. It is important not to confuse this data with the key and name for the Wi-Fi network, which are indicated on the bottom of the router. These are completely different data, because... Rostelecom is a service provider, and Zyxel is an equipment provider.
When we go further, we get to the status page, where connection data is indicated and information about whether we were able to connect to the Internet (wired connection only, not Wi-Fi) or not. In most cases, the setup will be successful and you will have access to the network.
Other setup methods
Let's consider a few more special cases for connecting to the networks of individual Russian providers. Let's start with the companies Rostelecom, Dom.ru and TTK. The work algorithm in this case is as follows:
- Instead of quick setup, we choose to go to the web configurator;
- Set a new password to log into the web interface;
- At the bottom we see a menu with icons, open the “Internet” tab;
- The new page we're on should be the List tab from the top menu;
- Click on the only name of the network interface available in the list;
- Using the “Use connector” checkbox, select the port where the WAN cable (Internet) is inserted;
- Check the checkboxes below in the enable and use fields to access the Internet;
- Leave the IP parameters as default: “Without IP address”;
- We also do not change the MAC address;
- Apply the changes and go to the “Authorization” tab of the top menu;
- Add a connection;
- Let's enable it by checking the corresponding selector;
- Select the PPoE type, assign an arbitrary (custom) description name;
- Assign a connection to access the Internet;
- We enter the authorization data from the service delivery agreement (login/password);
- We select all or the first two security protocols: pap and chap;
- We enter the name of the PPoE server as “Internet”.
Apply the changes made. This completes the connection of the wired connection for Rostelecom. We will look at setting up WiFi and IPTV next. In the meantime, let’s look at how setting up a router for Beeline differs from the description above:
- At the first stage (configuring the network interface), you only need to set the automatic configuration of IP addresses. Otherwise, everything is the same as for the Rostelecom router.
- When adding a connection in the “Authorization” tab, only the protocol type changes (to L2TP), and the link “tp.internet.beeline.ru” is entered in the “Server Address” field;
After setting the necessary parameters, apply the settings and check the connection of the Kinetic Start router to the Internet. If everything functions as it should, we proceed to setting the Wi-Fi transmission parameters.
Wi-Fi setup
To set up WiFi transmission on Zlex Keenetic Start, you need to open the corresponding item in the lower menu. Then, on the web page that opens, set the device’s operating mode to “Access Point”, select a connection to a new radio network, and apply. After that, you need to go to the menu item of the same name at the top (Access Point), where a table for setting up a Wi-Fi network will appear in front of us:
- Set the desired connection name that users will see when searching for available networks (SSID);
- We set the protection to the maximum level. The key is the password for connecting to your Wi-Fi;
- Without touching anything else, click on Apply.
After the router processes the received data, the wireless network light should light up on the indicator panel. Devices capable of connecting to WiFi communication channels should detect a new available connection. Try logging in using the password you specified earlier and test the connection.
P.S. If several routers/Wi-Fi receivers operate on the same frequency in a room or adjacent area, the signal may be mixed and slow down. To avoid this, you need to change the channel used in the settings above (from Auto to any other unused number). In this case, you need to reboot the device so that it starts broadcasting the Wi-Fi signal at the new frequency.
This completes the setup of your WiFi! Enjoy the Internet!
IP-TV settings
To set up a video stream, called IPTV today, you must first select a port for it: go back to setting up the existing network interface (from the algorithm above) and check the additional box next to the WAN port on a different connector. You will insert a cord from IPTV into it and you will be able to watch TV channels even on a laptop via Wi-Fi (in the installed viewing program).
Next, you should check the correctness of the settings in the WAN menu, the field for selecting ports for creating a bridge: the same as above should be specified. Also in the LAN connection settings the corresponding ip must be set: 192.168.2.2 and 192.168.2.1 for the upper and lower fields. The subnet mask should display the value 225.225.225.0 and leave the remaining parameters undefined (default). After saving the changes, we check IPTV and make sure that everything works.
If something goes wrong (the Wi-Fi signal or the Internet is lost altogether), you can reset the settings to factory settings by pressing the Reset button on the rear panel. Holding it in the clamped position costs 10 seconds or more, after which the login data for the router and all parameters will be reset to the original ones.
Found a typo? Select the text and press Ctrl + Enter