How to format a fat32 removable hard drive. Do I need to format my external drive? Methods for formatting HDD - from simple to complex
There are two types of external breakdowns hard drives, this is: damage received during mechanical impact on external hard disk, in which some elements of the device fail. Of course, what to fix yourself similar malfunction almost impossible. Another type is failures of such equipment, which are most often associated with power outages. You can solve this problem yourself using regular formatting.
Standard formatting method
For hard formatting disk you can use standard software Windows operating system. To do this you need to connect external storage to your computer and then open it. Next, in an empty space you need to click right click mouse and select "Format". Here the user will have access to two systems: FAT 32 and NTFS. It is advisable to use the first one if files of a size not exceeding 3.5 GB will be stored on the hard drive. The second system is used in all other cases. After selecting the system, you need to click on the “ Full formatting" and start the procedure. Upon completion, you can check again HDD functionality and in case it still does not work properly, you need to use other software.
Formatting a hard drive using special software
For example, one of the most best utilities, proven over the years, this Acronis Disk Director. It is distributed absolutely, which means it can be easily found on the Internet. After installation and launch you will need to select manual mode working with the program. A special window will open in which absolutely all disks installed on the computer will be displayed. The user needs to select an external hard drive and click on the “Format” button. Here you will also need to select a file system from NTFS or FAT32 according to the criteria described above.
For formatting external hard disk can also be used HDD program Low Level Format. It is worth noting that this software is best suited for “advanced” users personal computer, since understanding its interface is not so easy. This utility performs low-level formatting various devices, even those connected via a USB cable. It works with SATA, IDE and SCSI HDD. After launching this software, the user just needs to click on the LowLevel button located at the very top, select the formatting section, and then click on the Format This Device button.
Sources:
- External hard drive won't format
Today external hard disks can be programmed with several file system options. In order for the device to work on your PC, you need to run it correct formatting.
You will need
- Computer, external hard drive.
Instructions
Today there are several varieties external hard disks. Some of them are implemented with pre-installed formatting for a specific file system, while some devices are universal; they are formatted for the desired file system during installation. Let's consider two options for formatting external .
Formatting a disk with a pre-installed file system. Once you connect your device, it will appear in the "My
I suggest that before you start changing the file system, look at what file system is used in this moment on a USB storage device. To do this, go to " My computer"/ "Computer" / "This computer" (respectively in Windows XP, Windows7, Windows8) right-click on the flash drive / external hard drive and select " Properties". In the properties window you will see the file system of the device.
Attention!!!
Formatting/changing file systems-process, which deletes all the files and folders on the storage device, so you need to transfer all the data to another storage device before starting this process.
Formatting/changing the format of a USB flash drive or external hard drive using the Windows interface.
For this method, you need to insert the USB storage device into the computer/laptop open " My computer"/ "Computer" / "This computer" (respectively in Windows XP, Windows7, Windows8). Right-click on the device that needs to be formatted and select " Format".

In the formatting window, in the line File system select the required file system (NTFS, FAT32, exFAT). The remaining parameters can be left as default. Click " Begin".

A warning window will appear stating that all folders and files from the media will be deleted, click " OK".

After a few seconds, a window indicating successful formatting will appear.

This completes the procedure for changing the file system USB devices/ formatting can be considered completed.
Formatting/changing the format of a USB flash drive or external hard drive using the Windows command line.
For this method, you need to launch the command line, to do this, click the " Start" or press the keyboard shortcut

A command prompt will open. here we have to use the FORMAT command to USB formatting devices.
FORMAT command syntax:
FORMAT volume
FORMAT volume
FORMAT volume
FORMAT volume
FORMAT volume
volume Specifies the drive letter (followed by a colon), mount point, or volume name.
/FS:filesystem Specifies the file system type (FAT, FAT32, NTFS, or UDF).
/V:label Volume label.
/Q Quick formatting. Overrides the /P option.
/C NTFS only: Sets the default compression mode for all files created on the new volume.
/X Initiates dismounting of the volume as a first action, if necessary. All open handles to the volume will be invalid.
/R:edition UDF only: Formatting in the specified UDF version (1.00, 1.02, 1.50, 2.00, 2.01, 2.50). The default version is 2.01.
/D UDF 2.50 only: Metadata will be duplicated.
/A:size Overrides the default cluster size. In general, it is recommended to use the default cluster sizes. NTFS supports sizes 512, 1024, 2048, 4096, 8192, 16 KB, 32 KB, 64K. FAT supports sizes 512, 1024, 2048, 4096, 8192, 16 KB, 32 KB, 64 KB, (128 KB, 256 KB for sector size > 512 bytes). FAT32 supports sizes 512, 1024, 2048, 4096, 8192, 16 KB, 32 KB, 64 KB, (128 KB, 256 KB for sector size > 512 bytes). exFAT supports sizes 512, 1024, 2048, 4096, 8192, 16 KB, 32 KB, 64 KB, 128 KB, 256 KB, 512 KB, 1 MB, 2 MB, 4 MB, 8 MB, 16 MB, 32 MB.
File FAT systems and FAT32 impose the following restrictions on the number of clusters on a volume:
FAT: number of clusters<= 65 526
FAT32: 65,526< число кластеров < 4 177 918
The FORMAT command will abort immediately if a violation of the above restrictions is detected using the specified cluster size.
NTFS compression is not supported for clusters larger than 4096.
/F:size Indicates the size of floppy disks to be formatted (1.44)
/T:tracks The number of tracks on each side of the disc.
/N:sectors Number of sectors on each track.
/P:times Zeroes each sector of the volume the specified number of times. This option has no effect with the /Q option
/S:state Where "state" can be "enable" or "disable" 
An external hard drive is a compact device that provides the ability to store copies of data and transfer large amounts of information from one device to another. The advantage of an external HDD is the use of a USB interface, which allows you to conveniently connect the device to any tablet, laptop and PC. Its remaining parameters are similar to a regular computer hard drive.
Despite the advantages of conventional hard drives, the device also has disadvantages. When working with an external HDD, users may have the following problem: the disk cannot be accessed and it needs to be formatted. Let's look at the causes of this problem and how to deal with it.
To organize and store information on any type of storage device (external hard drive, flash drive, hard drive), you need to apply a set of special rules determined by the location and method of storage. This is a specific set of software tools that provides access to information in a convenient form for various applications. The most popular file system now is NTFS. It is also used on external hard drives.
Damaged or missing file system
When viewing information about external drive, to which access is prohibited and if it is necessary to format it, you can see that instead of the NTFS file system it has become RAW. This indicates a missing or damaged file system on the disk. Often the data itself remains intact.
Not all users know that in addition to recorded files, there are special file identifiers on the HDD. They contain information about the file type, its size and other attributes. This method of organizing information storage can be compared with a table. There is a key and the data itself, and they can be accessed by using a specific identifier. If the key column disappears, it will be quite difficult to gain access to specific information. This occurs when the disk file system is damaged.
Options for solving the problem when the external hard drive does not open
The easiest way to return the file system to an external drive is to use the standard CHKDSK command type:
- The command line is launched (press Windows + R, enter “cmd” in the field that appears and click “Run”).
- A console will appear in which to write the command “CHKDSK disk_name: /f”. In disk_name, enter the name of the external drive that has the RAW file system.
- This method copes with minor damage to the file system. There is a risk of losing some data.
There are applications that provide file system recovery on disk. The most popular is GetDataBack. The utility recovers all data without loss.
If these two methods do not work, and the external drive still does not open and asks for formatting, then you need to format the hard drive. Quick formatting will not result in data loss. Information in the form of zeros and ones will remain on the disk, but access to it is lost. There are applications that help restore this information. Conventional formatting completely deletes information, but solves the problem with accessing the external hard drive.
Formatting using Windows
The following steps are required:
- Connect the external hard drive to your computer and open the My Computer window.
- After the system detects the hard drive and it appears in the “My Computer” window, you need to open the context menu of the external drive and select “Format”.
- A window will then open showing the disk formatting settings. Here you need to select a file system, specify the disk name and enable the quick format function.
It is better to choose the NTFS file system. FAT has a large number of restrictions, and under modern conditions it has become frankly outdated. Using the Quick Format feature will create a clean file system without physically deleting files from the external drive.
If you disable the quick format feature, this process may take several hours. The volume label is optionally set. After setting the required parameters, you need to click on the “Start” button. Then a window opens where a warning is written about deleting all existing data on the disk being formatted. Once the formatting process is complete, the external drive will open again and be available for use.
Formatting via the command line
You can format your external hard drive using the command line. To do this, connect the disk and launch the Windows command line.
Disks are formatted using the FORMAT command. To find all the parameters that this command accepts, just enter "FORMAT /?".
To format an external hard drive, you must execute the FORMAT command with the following parameters:
- /Q – enables the quick formatting function.
- /V:MyDisk – indicates the name of the disk. You can use any other name instead of MyDisk.
- /FS:NTFS – formatting using the NTFS file system.
To format an external hard drive, you can use this summary command: FORMAT X: /FS:NTFS /V:MyDisk /Q. Here the letter X represents the name of the external drive being used. When formatting using the command line, it is important not to mix up the drives.
There are no additional warnings displayed during the disk formatting process using the command line, so you need to be careful.
Formatting via Disk Management
Windows OS has a handy tool called Disk Management. Its functions include formatting disks, creating and deleting partitions, as well as performing other operations. To access this tool, you need to open the “Run” menu and enter the command “diskmgmt.msc”.
After opening the window, the following steps are performed to format the external hard drive:
- Search for an external hard drive and open its context menu (right mouse button).
- Selecting the “Format” item in the context menu.
- The user is shown a warning about deleting all data from this disk. To start formatting, click on the “Yes” button.
External hard disks very convenient and useful devices. If a situation arises when the external hard drive does not open and asks for formatting, then you can solve the problem yourself. Just follow the instructions given above in the article. To prevent incidents of information loss, you can copy important data to other storage media.
Hard drives (hard drives, hard drives, HDDs) are unusually pampered devices. Just shake it a little, overheat it, look askance - and the disk is already covered with terrible “bad blocks” that threaten both it and all the information on it with inevitable death.
In the event of disk failures, the most important thing is to save valuable data. But what to do then with their carrier? Can it be used in the future? They say that one medicine helps with all such “sores”: low-level formatting of the hard drive. Let's figure out what this “pill” is and when it becomes necessary to prescribe it.
What is it really?
Low level formatting today is called something completely different from what it really is. In fact, this is one of the stages of manufacturing disk drives, and it is carried out at the factory.As you know, all . Each piece of data has a unique address where it can be found. Creating areas for recording data on a clean magnetic surface and assigning addresses to them is low-level formatting.
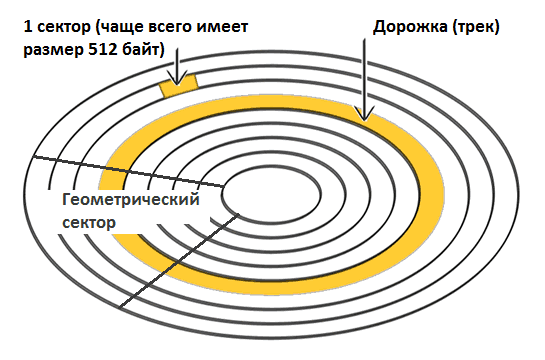
More precisely, this is the process of physically dividing the disk surface into tracks(circles or tracks along which the read/write heads move), their sectors(track sections are the smallest areas of information storage on a disk drive with their own address) and intersectoral intervals. And also - application servo tags– service records between sectors and within them, according to which the head control system ( servo system HDD) will be able to position the latter.
After marking, the disk surface is thoroughly scanned to identify defects in the magnetic layer (physically “broken” sectors), which must be excluded from addressing. Based on the test results, a list of defects and a translator are formed - a table correlating good physical sectors with logical (numbered) ones. This is also part of the factory formatting.
A long time ago, this entire procedure could be performed using the BIOS of a home PC. Today there are practically no such computers and storage devices left. Modern HDDs cannot be physically repartitioned without special equipment and software, and low-level formatting is the operation of “filling” the logical space with zeros (without access to the service areas in which the translator is stored).
As a result of this formatting:
- All information (except for service information) is deleted from the hard drive.
- A custom defect list is created with the addresses of bad sectors that will be hidden - excluded from subsequent read and write operations.
- Defective sectors are replaced by “healthy” ones from the reserve area (remap).
What problems does pseudo-low-level formatting help solve?
The operation is used:
- To prepare a computer for transfer into the wrong hands, so that the new owner cannot restore the files of the previous one.
- For corrections that cannot be removed using non-destructive methods.
- For the treatment of certain types of boot viruses.
It is effective:
- If the appearance of “broken” sectors is not associated with a malfunction of the mechanical and electrical components of the hard drive. For example, they formed after a short-term overheating of a disk or a sudden power outage of the computer, and their number is not growing.
- If there are relatively few defects.
An example of detecting several unstable sectors when scanning a hard drive with the HD Tune utility:

It's useless:
- If the hard drive has suffered from a fall, drowning, or depressurization of the case (hermetic unit).
- If it makes grinding, knocking, grunting and other unnatural sounds when turned on or is poorly detected by the computer (disappears periodically).
The main area of this disk is occupied by unreadable sectors. Treatment with homemade “low-level” formatting will most likely not help him:

What and how to carry out “low-level” formatting at home
Any utility designed for this will be able to fill the surface of the hard drive with zeros and replace the “bad” sectors with normal ones. Even created by a manufacturer of hard drives of a different brand. Rewriting and remapping operations are launched by a standard algorithm that is understood by all disk controllers (the final decision on reassigning bad sectors is made by the controller). These utilities do not have the ability to use highly specific technological commands, so they are not able to cause any harm to the device.Which utility will do the job you need best? It’s not a fact that the native version of your hard drive will work more accurately than the universal one. One didn’t help, try another. There will be no harm from this, but there may be some benefit, since to correct one defective block sometimes you need to make several attempts.
Let's figure out how to perform “low-level” HDD formatting using three free utilities.
Universal HDD Low Level Format Tool (HDDLLFT) for Windows
- Let's connect the problem disk to a PC running Windows.
- Download and install the application HDDLLFT. After installation, select “ Continueforfree» (Continue for free).

- In the list of drives, mark the one that we are going to format and click the “ Continue>>>».

- In the next window, go to the section “ LowlevelFormat" and click " Formatthisdevice»

- Let's confirm the operation again and wait for it to finish.
SeaTools for DOS for HDD Seagate
SeaToolsforDOS released in format iso image to sign up for bootable dvds, flash drives and floppy disks. After starting the computer from such media, the main window of the utility immediately opens. For convenience, let’s switch it to Russian, mark the problematic drive in the list, go to the menu “ Additional functions » ( Advanced Features) and click " Erase everything"(Erase all).

Windows Data Lifeguard Diagnostics for WD hard drives
W indows Data Lifeguard Diagnostics is one of Western Digital's proprietary applications with the function of “low-level” disk formatting. In addition to it, this function is supported by utilitiesWhen installing the operating system, as well as when changing files or redistributing space between partitions, it is necessary to format the hard drive. It's pretty frequent operation performed by PC users. If you haven’t done anything like this before, then let’s look at the theoretical part of the question.
What is the formatting process?
Marking areas for storing information, in which some of it is deleted, is called formatting. It creates a system for accessing stored information.
Typically done for:
- changing one file system to another;
- deleting files from your hard drive.
At the moment there are a large number of different file systems. They are used on a variety of equipment, including not only computers, but also mobile devices. To work in the latest Windows versions The NTFS file system is used.
Video: How to format a hard drive
Why format your hard drive?
Formatting is performed to delete files from the hard drive, as well as to change one file system to another.
In most cases they resort to it:
- before installing a new operating system;
- to create an installation Windows image, for example, on a flash drive;
- due to the need to clear the disk of files if they are not needed.
Formatting with Windows tools
Despite the large number of various programs for working with hard drive operating room Windows system has its own own set utilities
Let's look at the process of formatting disks using Windows:
- select the disk that needs to be formatted;
- press right key mice;
- select Format;
- in the window that appears, select the file system, cluster size, and formatting method;
- It is recommended to set NTFS as a file system, and leave the cluster size at the default – 4096;
- After setting the necessary parameters, click Start.

Windows also includes more full service for working with hard drives.
To open this menu, do the following:
- right-click on My Computer;
- select Management;
- open Disk Management;
- V this menu user can execute various operations, with the hard drive including formatting.

Formatting via the command line
Execute this operation You can also use the command line:
- Press the key combination Win+R;
- enter cmd and press Enter;
- V command line we register format command y:, where y is your drive letter, for example c or d;
- the system will ask you to confirm the operation by pressing the Y key;
- after confirmation, the system will begin the formatting process;
- When finished, this message will appear


Formatting HDD in BIOS
If you need to format from the BIOS hard section disk, you'll have to tinker a little. Unfortunately, the BIOS does not have tools for formatting the hard drive, so you should use third party programs to perform these operations.
One of the most common is Acronis Disk Director. To work with it, you need to create bootable media in the operating system with the files of this program. But before you start creating bootable media Another option worth considering is formatting using Windows installer. This decision is a simpler option compared to Acronis program Disk Director.

For this method you only need a disk or flash drive with the recorded installation package operating system.
To format, you must perform the following steps:

Attention! The drive partition letters may not match. For a more precise definition required disk use the wmic logicaldisk get deviceid, volumename, size, description command.
Creating a bootable USB flash drive for Acronis Disk Director
To create a bootable flash drive you will need:

Algorithm of actions:
- insert the flash drive;
- install and open the program;
- in the application, open the Tools section and select Acronis Bootable Media Builder;
- click next;
- select boot type Windows media PE;
- in the next menu it should be noted necessary components for recording to a flash drive;
- After selection, you must select the media on which to record and click Next. The flash drive should be formatted in FAT 32 format using the Windows utility;
- you can also create an image for later burning to a flash device or disk using the Ultra ISO program.
Working with a bootable USB flash drive Acronis Disk Director
To load a flash drive you need:

How to format an external hard drive to NTFS
The most convenient formatting method is to do everything using standard utilities operating system. This solution does not require installation additional programs and creating additional boot disks.
If you don't have it installed operating system, then in this case you should use special programs, such as Acronis.
Steps describing how to format a hard drive as ntfs:

Utilities
In addition to the standard Windows programs There are various utilities used for the same purpose.
The most common options include the following:

What program in ntfs is better just format the drives?
Each program has its own characteristics, but the main direction for all utilities remains the same - working with disks, including creating partitions, forming into others file systems etc. Therefore, choosing a program is a purely personal question for each user, which depends on his preferences.

Problems and solutions when formatting
How to quickly format a disk without losing data?
Unfortunately this is not possible. All stored information will be deleted. Only part of the data can be recovered.
Which drive is better: external or external?
Formatting external drives is performed in the same way as for a regular hard drive. At this process All information will be deleted, including windows, after execution the disk will be like new without windows.

Unable to format hard drive
If you did everything according to the instructions, but did not achieve results, do not sound the alarm. This doesn't always mean something bad.
- format command - cannot be used for system disk, if she is in his environment;
- if the operating system is located in another partition of the HDD, it cannot be deleted;
- settings antivirus program access to different sections hard drive;
- various applications and viruses can block access.
If you have removed the above factors, but still cannot format the hard drive, you will have to resort to special programs. The most popular tool is HDDscan, which is easy to install and free.

Algorithm of actions:
- download the utility;
- open and install;
- run as administrator;
- click on the icon in the form of a sphere located in the center of the interface;
- select Surface tests;
- check the box next to Erase;
- go to the Add test tab;
- click on Scan;
- in the lower right corner, write down the error data;
- set the EraseWAITs option to ON and select Scan again;
- repeat until the error is cleared.
You can also use Acronis Disk Director. If you can't format portable hard disk, using this program, most likely the hard drive has partially failed. And the entire procedure can sometimes be performed only from bootable media, that is, not in the operating system.
How to force format a flash drive?
To format flash drives you can use the program HP USB Disk Storage Format Tool
- provide the necessary set of functions;
- They have a fairly simple interface that will be easy for novice users to work with.