How to open a RAV camera in Photoshop. Useful techniques for processing photo images
© 2013 site
At the time of writing this article I am using Adobe plugin Camera Raw version 7, which comes with Adobe Photoshop CS6. This is the first Adobe version Camera Raw (ACR), where fully automatic correction of chromatic aberrations is implemented in a human way, which is very important to me. I find earlier versions of ACR unacceptable, and before release Adobe Camera Raw 7 used DxO Optics Pro as the main RAW converter. DxO is not too different user-friendly interface, but provides excellent quality for converting RAW files, which Adobe was able to approach only in 2012. Since the ACR interface is more convenient for me, I, having appreciated the advantages of the seventh version, changed the converter.
If you are using any other RAW converter, try to follow the same steps as described in this article. General principle The operation of all converters is the same, and they differ, by and large, in details. Among the popular converters, in addition to Adobe Camera Raw, I can recommend DxO Optics Pro and Phase One Capture One PRO. converters from photographic equipment manufacturers - Canon Digital Photo Professional and Nikon Capture NX do an excellent job of converting images taken using Canon cameras and Nikon, respectively, but have an extremely inconvenient interface. The widely used Adobe Lightroom runs on the Adobe Camera Raw engine, and therefore does not differ from the latter in conversion quality.
When choosing a RAW converter, make sure that the images converted with it are no worse in quality than the JPEG obtained using the camera. Intracameral conversion to last years provides (with proper settings) such good results that often shooting in JPEG is preferable to inept processing of a RAW file in a converter that is not the first freshness (see “RAW or JPEG?”).
Let's look at the basics of processing RAW files using the example of a photograph of a picturesque valley in the Skole Beskids. Let's open the file in Adobe Photoshop, and the Adobe Camera Raw window will open in front of us. The raw landscape, as always happens with RAW files, looks quite washed out, but we'll fix that soon.

At the top left is a panel of the most frequently used tools from the point of view of program developers. I usually have magnifying glass selected ( Zoom Tool– Z key) or hand ( Hand Tool– H key or holding down the space bar). In the upper right corner you can see a color histogram, and below it there are tabs for groups of tools for image editing.
If you open several RAW files at once in ACR, you will see them on the left as a row of icons. Camera Raw supports batch processing of files, i.e. By selecting multiple images, you can change different settings simultaneously for the entire batch. Can also be applied to all open files uniform parameters based on an already edited sample using the Synchronize function.
Before you start working with Adobe Camera Raw for the first time, you should configure some plugin settings so that you won't be distracted by them in the future.
Setting up Adobe Camera Raw
First of all, open the ACR settings dialog. It can be found in top panel tools (third button from the right) or call by pressing Ctrl/Cmd+K.
In chapter General, in the Save image settings in item, select where the processing parameters for each edited image should be saved - in separate .xmp files (Sidecar “.xmp” files) or in a special database (Camera Raw database). I prefer the first option, i.e. after saving the results of the work, the program creates next to each RAW file additional file settings with the extension .xmp, in which all changes made are recorded. In the case of a database, all information is stored centrally, which is inconvenient for me. In both cases, the RAW file itself does not undergo any changes, and therefore you can always go back in the editing process or even reset all settings and start editing again. Also, settings are reset when the .xmp file or ACR database is deleted.
In chapter Default Image Settings Uncheck all the boxes to prevent the program from arbitrarily adjusting images.
In chapter Camera Raw Cache indicate the maximum volume acceptable for you temporary files(at least 1 Gb) and the folder where they should be stored (preferably not on the system drive).
Chapter DNG File Handling you can not touch it, but in the section JPEG and TIFF Handling disable support JPEG formats and TIFF (Disable JPEG support and Disable TIFF support), since these formats are best processed directly through Photoshop.
Save the settings by clicking "OK".
At the very bottom of the Adobe Camera Raw window, in the form of a blue link with an underline, there is a description of the workspace that will be assigned to the image after you finish working in ACR and open it in Photoshop. Click on the "link". In the window that opens, check the following points:
Try to avoid clipping in highlights by constantly monitoring your histogram. By pressing the O key you can turn on the highlight clipping warning. Clipping shadows is much more common, but also requires caution.
Contrast– contrast. Controls the overall contrast of an image using an S-curve, changing the difference in brightness between the darkest and lightest areas. I rarely use Contrast values above +25, and now I won't touch it at all.
The following two tools work in tandem to selectively control the brightness of highlights and shadows:
Highlights- Sveta. Helps bring out details in excess bright lights. I'll give it -50.
Shadows– shadows. Brightens shadows like a fill flash. +25 will be enough.
The next pair of tools operate even more narrowly, affecting only the extreme points of the histogram, which is sometimes necessary to combat clipping, or, conversely, lack of contrast:
Whites- dot white. I'll move the edge of the histogram to the right by +30, although I use negative values much more often.
Blacks– black dot. I’ll leave it unchanged – the black color is still in its place.
Experiment with Highlights/Shadows and Whites/Blacks to see how they differ from each other.
Clarity– clarity or local contrast. Clarity is the most useful tool, since in many scenes you have to deal with the disadvantage of local contrast, while the overall contrast is ok, or even excessive. But be careful: in pursuit of detail, it’s easy to go too far and end up with unnatural halos around objects. I usually don't go above Clarity +50, but today I'll make an exception and set it to +75.
Vibrance And Saturation control color saturation. The difference between them is selectivity. If Saturation increases the saturation of all colors indiscriminately, then Vibrance works more delicately, increasing the intensity of only the least rich colors. I'll set the Vibrance to +50 and Saturation to +15, which is quite high. More often you have to use lower values in order to then selectively increase the saturation of only individual color channels.
Often, after I've adjusted all the Basic tab tools, I'll go back to the white balance sliders to adjust them to account for any changes in brightness, contrast, or color saturation that might have affected the color balance.
Here's what we got for at this stage. You can compare the processing results with the original image by hovering your cursor over the image.
I am unhappy with the sky - it is too light, has an unnatural gradient of brightness from left to right, and its color is not intense enough. In addition, I would like the mountains closest to us (to the left and to the right) to look a little more contrasting and more prominent. I'll deal with the mountains later in Photoshop, and a gradient filter will help me improve the sky ( Graduated Filter– G key). It is an imitation of a real gradient filter, but has a wide variety of customizable parameters.
First of all, to shade the left top corner, I will apply a diagonally oriented gradient filter to it with the parameters: Temperature -10; Exposure -0.50. Then, across the entire sky, from the top edge of the photo to the horizon, I will draw another gradient with the parameters: Temperature -20; Exposure -0.50; Contrast -25; Highlights -25; Clarity -50; Saturation +15.
Note that the gradient filter allows you to selectively change the color balance in certain areas of the image, which can be useful if, for example, you want to warm up a landscape while keeping the sky cool and blue.
Since I'm already working on gradients, I'll probably add one more at the very bottom of the photo with the goal of making the water in the river bluer and the grass on the near bank greener. The only parameter: Temperature -20.
Compare the image with and without gradient filters.
To influence areas of the image that have complex boundaries, it is advisable to use not a gradient filter, but its analogue in the form of an adjustment brush ( Adjustment Brush– key K).
Tone Curve Tab
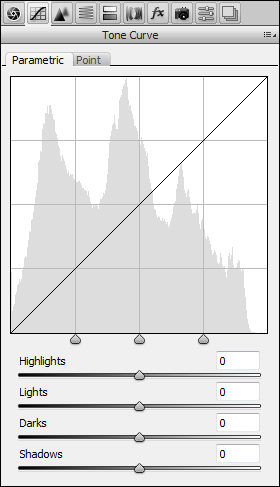
Here you can finely adjust the brightness and contrast of the image using curves. I rarely use curves in Camera Raw because... I usually have enough options in the Basic tab.
Detail tab

This tab is responsible for sharpening ( Sharpening) and noise reduction ( Noise Reduction). I prefer to increase sharpness in Photoshop, and therefore in ACR I turn off sharpening by setting Amount to 0. With suppression moderate ACR copes quite well with noise, especially chromatic noise. Typically I use following parameters: Luminance 25; Luminance Detail 100; Luminance Contrast 100; Color 50; Color Detail 100. The first three parameters are responsible for achromatic (brightness) noise, the rest are for chromatic (color). When suppressing luminance noise, special care must be taken to avoid creating a washed-out picture. When working in the Detail tab, always view the image at 100% zoom, otherwise you won't be able to see what's going on with the fine details.
HSL/Grayscale tab
An indispensable color correction tool. The HSL/Grayscale tab is designed for working with individual colors and includes three subtabs:

Hue- shade or tone. Here I'll move the Oranges to the left by -10 to make the clay on the shore redder, and the Aquas to the right by +10 to make the lower sky area look fresher.
In general, I find that Adobe Camera Raw tends to make the image a little more yellow-green than I would like, and therefore I have to adjust individual shades one way or another. If you're personally happy with ACR's color rendering, you can leave the Hue subtab alone.

Saturation– saturation. To improve the appearance of the clay I will set the Oranges slider to +25. Often I increase the saturation of blue color(Blues), but in in this case I solved the issue with the color of the sky and water mainly using gradient filters.

Luminance- lightness or brightness. I'll make the sky a little darker by moving the Blues slider to -15.
The Split Toning tab is designed for toning black and white photos and we will skip it now.
Lens Corrections Tab
Here you can correct lens aberrations, as well as perspective distortions. There are two sub-tabs – for automatic and manual correction:

Profile– automatic correction of lens aberrations based on a special profile. Profiles for most popular lenses come standard with Adobe Camera Raw. To turn on automatic correction For lens distortion and vignetting, check the box next to Enable Lens Profile Corrections. I recommend doing this only in cases where distortion or vignetting is visible to the naked eye, since eliminating distortion leads to a slight deterioration in sharpness, and vignetting is not even always a disadvantage. In the case of our example, everything suits me anyway, and therefore I will only check the box next to Remove Chromatic Aberrations. Elimination of chromatic aberrations works perfectly in ACR 7 (which cannot be said about more earlier versions), and I always use it, especially since it helps improve sharpness at the edges of the frame.

Manual– manual correction. Here you can correct a littered horizon and distortions introduced by perspective. In my photo, both the horizon and perspective are fine, so I'll leave everything unchanged. If you work in manual correction mode, I advise you to turn on the grid by pressing the V key to better see both the distortions themselves and your edits.
At this stage, I usually use the Crop Tool (C key) if the standard 3:2 aspect ratio does not suit me or if the edge of the photo has captured some foreign objects. No cropping is required now.
Effects Tab

There are only two effects: grain ( Grain) and vignetting ( Post Crop Vignetting). I will leave grain for lovers of pseudo-vintage photographs, but moderate vignetting can decorate many photographs. I'll shade the edges of the image slightly by setting the Amount to -15.
So, we went through all the functional tabs. You are already familiar with the Camera Calibration tab, but there are still two additional tabs:
Presets Tab
You can save all the changes you make to an image as presets, which can later be applied to any other images.
Snapshots tab
Snapshot means snapshot. This is the same as preset, but only within one RAW file. In other words, you can create several processing options for the same photo (for example, color and black and white versions), and then work with each option individually.
This completes the process of editing our landscape in Adobe Camera Raw. I will do the final finishing using Adobe Photoshop.
By clicking “Open”, you will open the image for further processing in Photoshop, and by clicking “Done”, simply save the results of your work in an .xmp file.
I suggest you compare the photo processed in Adobe Camera Raw with the original version.
Thank you for your attention!
Vasily A.
Post scriptum
If you found the article useful and informative, you can kindly support the project by making a contribution to its development. If you didn’t like the article, but you have thoughts on how to make it better, your criticism will be accepted with no less gratitude.
Don't forget that this article is subject to copyright. Reprinting and quoting are permissible provided there is a valid link to the source, and the text used must not be distorted or modified in any way.
Series: Camera RAW Secrets
Like negatives and slides, unopened and unprocessed RAW files are only raw material for future photos. It is no coincidence that the very name of the format is “raw” in English - raw, unprocessed. In my books and lectures, I always say that a photographer who does not know how to print his photographs himself is not a photographer. Nowadays, “being able to print” means competently processing scanned films or correctly opening RAW files for subsequent preparation for printing. Sometimes, even when opening a RAW file in Photoshop, it is clear that no additional correction is required at all. But more often than not this is not the case - usually RAW files need some work. To correctly interpret RAW files, there are various converters, one of which is Adobe Camera Raw (Fig. 3.1).
The close integration of this module with Photoshop and Bridge makes it quite convenient to use. You can only open the Bridge program and perform necessary settings desired images using Camera Raw without opening Photoshop. Or vice versa, launch Camera Raw from Photoshop to batch processing files, then go to Bridge and continue working in another folder, for example, analyzing and selecting the necessary images.
In Bridge, the Camera Raw window opens when you double-click a file thumbnail. Whether Photoshop will be launched or the image adjustments will be made directly in Bridge is determined in the Preferences window of the Bridge program (Fig. 3.2). At activated option Double-click edits Camera Raw settings in Bridge (When you double-click the Camera Raw settings parameters are edited in Bridge), settings for processing RAW files will be configured in Bridge; if the checkbox is unchecked, Photoshop will launch after double-clicking.


The buttons located in the lower area of the Camera Raw window allow you to select the action that the module should perform when working with RAW files. In this case, the buttons display how the program is launched - from Bridge or from Photoshop. If Camera Raw was opened from Bridge, the Done button will be active (Fig. 3.3), and if from Photoshop, the Open button (Fig. 3.4) will be active.
Pressing the Options (Alt) key changes the functions of the buttons (Fig. 3.5). Click on Reset button(Reset) returns to all previous settings, and clicking on the Open Copy button opens the current version of the image with the changed settings; previous versions will remain unchanged. If you press the Shift key, the Open Image button changes to Open Object. When you click on this button, the photo will be opened in Photoshop as a Smart Object (Fig. 3.6).
To open JPEG image or TIFF from Windows Explorer computer, you must do the following.
Open Photoshop and go to the main menu tab File --> Open As. In the “Open” window, click on the desired file, then click on the button located in the lower right corner (by default it says “All Formats”). A menu will open where you select “Camera Raw”:
After that, the button will change to “Camera Raw”, then click on the “Open” button.
The JPEG image opens in the Camera Raw window.
How to open several pictures at once.
You can open multiple files at once in Camera Raw. Several RAW files can be opened directly from a computer folder; to do this, you first need to select them by holding Ctrl, then simply double-click on any of the selected files with the left mouse button and they will all open in Camera Raw.
You cannot open multiple JPEG or TIFF files from Window Explorer.
It's better to open multiple images through Adobe Bridge, so you can open not only multiple RAW files, but also JPEG or TIFF. Same as before, select necessary files, holding Ctrl or Shift, and click on any of them with the right mouse button. A menu will open where you can select Open in Camera Raw, or instead press Ctrl+R after selecting your files.
Only one image will open in the window, the rest will be displayed in the form and appear as a column on the left with thumbnails of the images:

Editing JPEG and TIFF Images in Camera Raw
A few words about JPEG and TIFF editing in Camera Raw. When you make changes to a JPEG or TIFF and click the "Open Image" button at the bottom, this action opens the image in Photoshop.
However, if you want to save the changes you made in Camera Raw without opening the photo in Photoshop, click the Done button instead and your changes will be saved. But there is a big difference between editing JPEG or TIFF images and editing RAW images. When you click the "Done" button, you physically change the actual pixels of the original JPEG or TIFF, whereas this does not happen with a RAW image (this is the second big advantage of working with RAW). If you click on the "Open Image" button and open JPEG file or TIFF in Photoshop, then you also open and edit the real image. Remember this.
Two Camera Raws
And one more thing: there are actually two Camera Raws - one in Photoshop and one separately in Bridge. The benefit of having two Camera Raws comes into play when you're processing and/or saving a lot of RAW images—they can be processed in Camera Raw in Bridge while you're working on something else in Photoshop. If you use Camera Raw in Bridge more often, you might find this helpful. shortcut key Ctrl+K. It allows you to open the "Preferences" window from Bridge, go to the "General" tab at the top left and then check the "Change Camera Raw settings in Bridge by" checkbox. double click" (Double-Click Edits Camera Raw Settings in Bridge)
Although Camera Raw Photoshop was originally created for processing photos taken in the RAW format of cameras, you can use it to process JPEG and TIFF photos as well. Big advantage What many people don't understand about Camera Raw is that making images look good is easier and faster using Camera Raw than any other method. Camera Raw's controls are simple, immediate, and completely reversible, making it incomparable to others. But first, you need to open the images in Camera Raw.
Since Camera Raw was designed to open RAW images, if you double-click a RAW image (whether in Mini Bridge or just a folder on your computer), it will launch Photoshop and open it RAW image in Camera Raw (its full official name is Camera Raw Photoshop).
Note: If you double-click an image that you know is a RAW image and it doesn't open in Camera Raw, make sure you have the latest version of Camera Raw - to recognize images from recently released cameras as RAW files, you need latest versions Camera Raw).
How to open JPEG & TIFF images in Mini Bridge:
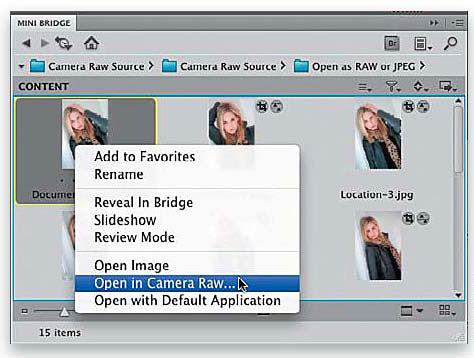
If you want to open a JPEG or TIFF image in Mini Bridge, it's easy: click on it right click and select Open in Camera Raw from the drop-down menu.
How to open JPEG & TIFF images from computer:
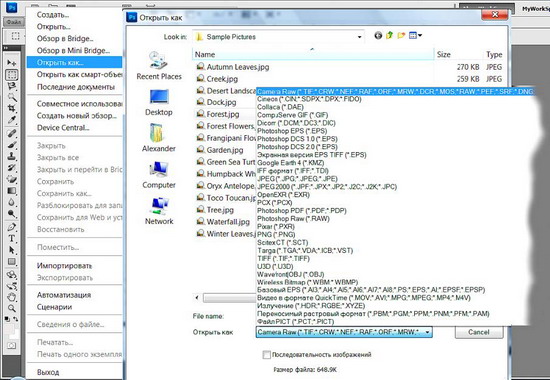
If you want to open a JPEG or TIFF image from your computer, here's what you need to do. On Windows in Photoshop, open the File menu and select Open As, then find the JPEG image you want (or TIFF, but we'll use JPEG as an example) and select Camera Raw from the Open As drop-down menu. , and click Open. On a Mac, go into Photoshop from the File menu and select Open. When the Open dialog appears, click the desired image JPEG (or TIFF), and the Format drop-down menu will be set to JPEG. You need to click-and-hold on this Format drop-down menu, and from this menu select Camera Raw. Then click the Open button and the JPEG image will open in CameraRaw.

You can open multiple RAW photos in Camera Raw by first selecting them (either in Mini Bridge or a folder on your computer), then double-clicking any of them, and they will all open in Camera Raw and appear in the Filmstrip along the left side of the Camera Raw window. To open several selected files from PC in Camera Raw, you need to execute the Open command or press CTRL + Double-click. They will all open in Camera Raw, but will not appear in the Filmstrip on the left side of the Camera Raw window. Access to the next file will be after closing the window with the previous one. For them to appear in the film strip, you need to drag them into the CS5 screen or open several Raw files in Camera Raw from Mini Bridge. If the photos are JPEGs or TIFFs, first select them in Mini Bridge, then switch to Review mode and press Alt+R (Mac: Option+R). If they are in a folder on your computer, you will also need to use Mini Bridge to open them (using the path bar in Mini Bridge, navigate to the folder with the images, then select them, switch to Review mode and press Alt+R ( Mac: Option+R)).
Editing JPEG & TIFF Images in Camera Raw:

It's important to know the following about JPEG and TIFF editing in Camera Raw. When you make changes to a JPEG or TIFF and click the Open Image button, the image opens in Photoshop (as you'd expect). In another case, if you definitely want to save the changes that you made in Camera Raw, and not by opening the photo in Photoshop, then after finishing the changes, click the Done button, and the changes will be saved. But there is a big difference between editing a JPEG or TIFF image and editing a RAW image. By clicking the Done button you are actually changing the actual pixels of the original JPEG or TIFF, whereas this is not the case with a RAW image (and this is the other big benefit of shooting RAW photos). If you click the Open Image button and open a JPEG or TIFF in Photoshop, you are also opening and editing the actual image (the original). Now all the i's are dotted.

The second thing that is important to know: there are actually two Camera Raws - one in Photoshop, and a separate second one in Bridge. The advantage of having two Camera Raws comes when you're processing (or saving) a ton of RAW photos—you can process them in the Camera Raw version of Bridge, and work on something else in Photoshop. If you use Camera Raw most often in Bridge, you'll probably run Ctrl+K (Mac: Command+K) when you launch Bridge to bring up Bridge's Preferences dialog. Then click on the General option on the left, and then check the Double-Click Edits Camera Raw Settings in Bridge checkbox. Now double clicking on the photo will open RAW photos in Camera Raw Bridge, not Photoshop.
Selecting the correct process version (not for new users)
So, this part is only for those who have used Camera Raw in previous versions Photoshop (CS4, CS3 and so on) because if this is your first time using it, this part does not concern you at all and you can skip it. Here's why: Adobe has dramatically improved the math in Photoshop CS5 for handling noise reduction, sharpening, and vignetting after cropping RAW images. If you have RAW images edited in earlier versions of Camera Raw and you open them in CS5, you will be able to make a choice (and I think it will be easy).

When you open a RAW image in Camera Raw 6 (from CS5) that you once edited in Camera Raw from an earlier version of Photoshop (like CS4 or CS3), you'll see a warning message (like exclamation mark, highlighted here with a red circle). It tells you that the image is being processed still using the old Camera Raw processing algorithm from 2003, but you have the option to update the image to apply a new, improved version of the processing called "Process Version 2010" ( Current version processing 2010).

To update a previously edited RAW photo to the 2010 processing version, you can either click directly on the warning exclamation point(fastest and easy way), or click on the Camera Calibration icon (third icon from the right at the top of the panel), and select 2010 (Current) from the Process drop-down menu at the top of the panel. Now, if there was no sharpening or noise reduction applied to the image, or vignetting after cropping, and you didn't notice the changes, if you look closely, you'll be amazed at how much better the photo looks.
For editing, however, such a simple operation has its own nuances. Let's bring them out into the light of day.
I will work in a combination of Bridge and Camera Raw (hereinafter referred to as ACR), since this combination allows not only opening images, but also batch processing them. Usually a photo is opened by double-clicking on the thumbnail in the selection window, there is nothing reprehensible about this, but there is a better way depending on the situation.
So that there are no doubts about the definition of raw, here is a link to the Wikipedia article where you can in detail get acquainted with what is hidden behind this concept. There is also a definition of DNG which I mentioned in the article. In the era of “stagnation” it was said: “When we say party we mean Lenin, when we say Lenin we mean party.” It's about the same here, with the exception of Lenin.
Double-clicking the mouse is an analogue of the “open file” command from the “File” menu, the combination Ctrl + O. When using it in Bridge, if selected photo raw format, will open in the ACR module launched Photoshop, pictures in other formats will open immediately in Photoshop.


Open in ACR, a picture of any format can be pressed using the combination Ctrl+R, or several pictures by first selecting them in the selection window, and the module will be launched directly Bridge. This is relevant for batch processing. large quantity raw files since there is no impact on Photoshop performance.


You can upload several photos to ACR in this way, process them there, and along the way, “puzzle” Photoshop with some useful task, for example, performing batch processing using a previously recorded Action - this “noticeably” saves total time work in the program.
If in the Bridge settings Editing - Settings (Ctrl+K) on the General tab in the Behavior block the Double-Click Edits Camera Raw Settings in Bridge option is set while holding down Shift key By clicking on the selected picture, or several, they will open in Photoshop bypassing ACR, regardless of the file format (raw or jpg).

The function is useful if you want to immediately work with raw in Photoshop, it definitely saves time, but I haven’t used this editing method myself, so I can’t judge the effectiveness. That's actually all I wanted to tell you about opening a photo in Camera Raw. See you in the next blog article.
Take a break
After I hope you have a pleasant reading, coupled with receiving useful information. Take a break, think about what you read, and at the same time watch the trailer for a truly popular film about the feat of Panfilov’s heroes, scheduled for release in the spring of 2016: