Windows 7 startup repair does not work. What to do if Windows won't start
Greetings to all. Usually, if you have problems starting operating system or turning off the light during operation, upon subsequent boot of the system, a list of possible starts appears.
In order not to mislead you and teach you some nuances, I will share some very useful tips. So, if the system did not boot but provided a boot choice, then I recommend selecting the following option - Last Known Good Configuration or loading the last good configuration.
This start option cancels any changes made to the registry key CurrentControlSet which directly caused the problem.
This registry key determines the values of hardware parameters and all drivers installed on the system. Function loading last known known configuration will replace the contents of the above registry key with the data stored in the backup copy that was used during the last successful launch Windows.
Reboot the computer. After sound signal press the F8 key and hold it until the operating system start selection menu appears. From the list of launch options that appears, select and activate it by pressing the key "Enter".
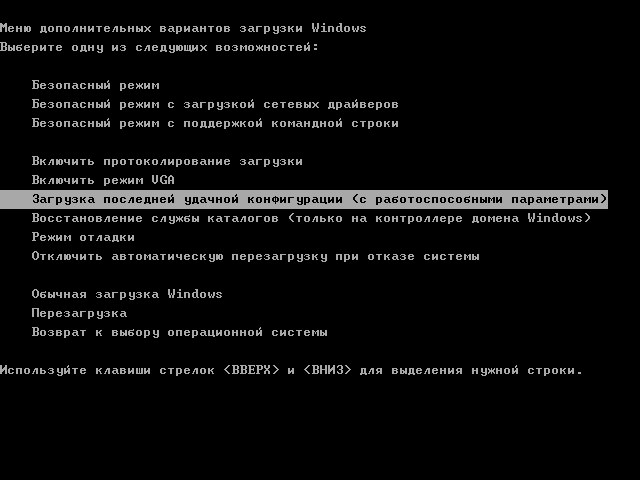

Remember, you are given one single attempt to restore the system's last known known configuration.
In general, if you were unable to restore the system after starting the OS from the mode, then this means only one thing - the backup copy is damaged. In this case, this recovery method will not help us.
1 Recovery Console
This method involves using the utility "recovery console". How more difficult problem loading the operating system, the more serious the approach to solving it should be. Bootable CD with installation system usually contains very useful utility - "Recovery Console"
To autorun boot CD with Windows OS, place in DVD-CD drive and restart your computer. As soon as the computer restarts and the drive begins to read data from the disk, you will see the Setup and Installation Wizard dialog box.
This will happen if you are in BIOS settings in download priority « Boot first device" You put "DVD/CD-ROM". I wrote about this in more detail in the article -. Once the download begins, follow all instructions that appear on the screen.
The program will provide you with a selection of basic files to run the installation program. The installation wizard greets you with the phrase "Welcome To Setup". Now all you have to do is press the key "R" which facilitates the opening of the recovery console.
Now the Recovery Console dialog box has opened in front of you. Here we will see a folder with files and also a request to select the operating system with which you plan to start working.
Next, you have to press the key with the number corresponding to the operating system number, then the program will ask for the administrator password, if any. Well, now you have it full access to the command line.
I wrote more about how to work with the recovery console in the article -
3 Fixing damage to the Boot.ini boot file
On initial stage Windows OS starts, the Ntldr program accesses the boot file Boot.ini. As a result, the program determines the location system files And available options to continue downloading.
This is precisely why, in case of damage to the boot file Boot.ini, the operating system cannot continue or even start booting correctly.
In the event that Windows OS does not boot and the reason for this is a damaged file Boot.ini then the recovery console toolkit will help you - Bootcfg.
To start it Bootcfg you will of course need to start the system from boot Windows disk HR. To run the command Bootcfg, must be entered in command line management consoles: Bootcfg /parameter
Where /parameter- this is one of the functions that I will tell you about now.
Add– performs scanning hard drive for the presence of all installed operating systems. In addition, it adds the identifiers of new operating systems to the boot file Boot.ini.
Scan- produces scanning hard disk for all installed operating systems.
List– displays a list of records in the file Boot.ini.
Default– displays the identifier of the operating system that is being run during startup
Rebuild– completely restores the Boot.ini boot file. The user is given the opportunity to control every step.
Redirect– in administration mode this function allows you to redirect download operations to another designated port. It has several subparameters, or rather two: | ./Disableredirect – Disables redirection.
It is worth noting that in Windows Xp and Windows 7 boot.ini is formed differently. I have written several articles on the topic of boot.ini for XP and 7:
4 Repairing a defective master boot record
The master boot record uses the first sector of the hard drive and carries out the boot procedure for Windows XP. The entry contains a table of all available hard drive partitions and a small program "primary loader" The primary bootloader, in turn, is responsible for placing the active or boot sectors in the partition table.
Once placed in the table, the boot sector begins to start the operating system. If suddenly the boot record is damaged, the active sector will not be able to start the system.
In order to eliminate this problem The recovery console includes the Fixmbr program. Booting from installation disk and activate the recovery console.
In order to run the Fixmbr command, you need to enter the following into the command line of the management console: Fixmbr
Where
- the compound name of the disk for which there is a need to create a new primary boot entry. The qualified name for the main boot drive C:\ will look like this: \Device\HardDisk0
5 Restoring a damaged HDD boot sector
The boot sector is a small hard section disk allocated for storing data in the operating system, having a file NTFS system or FAT32, and is also a fairly small program that helps with the boot process of the operating system.
In the event that the system refuses to start precisely because of inoperability boot sector The recovery console tool can help you FixBoot. To do this, you need to load the installation disk and go to the recovery console menu.
In general, I have already indicated above how to do this. In order to launch this program you will need to enter the following in the command line of the management console: Fixboot:
Where- the drive letter that requires creating a new boot partition.
6 Quick reinstallation of Windows
In the event that the system cannot be started and you do not have a backup copy, you can perform a Quick Reinstallation of Windows.
This procedure involves reinstalling the operating system in the same directory (similar to updating old version system to a newer one) and can fix almost any Windows boot problem.
Place the boot disk into the DVD/CD drive, then restart the computer. Once the disk is recognized and reading begins, you can begin the installation procedure. During installation, a license agreement will appear.
In order to agree to the terms of the agreement, press the F8 key. Next, the program will scan all installed versions Windows. As soon as at least one of the versions is found, the installation screen will appear.
In order to start restoring the version of the system you need, you need to click "R", and to start the installation "Esc". The system recovery procedures will start. The installation wizard will now begin checking the disks for functionality, and then begin a quick reinstallation.
Remember, after reinstalling or recovering a damaged installation, all updates will have to be reinstalled again.
7 How to cancel automatic reboot
Typically, if an error occurs during stable operation The system automatically reboots the operating system.
When an error occurs directly at system startup, a cycle of endless reboots occurs. In this case, you need to disable the function of automatically rebooting the system upon failure.
At the beginning of the operating system startup or after POST, press the F8 key, which will open a menu in front of you "Extra options".
Next you need to select the item "Switch off automatic reboot in case of system failure" and activate it by pressing the key "Enter". Now, when Windows XP starts up, it will display an error message, the essence of which will tell us about the malfunction.
Restoring the Windows operating system from a backup copy.
If none of the system recovery methods helped you, then there is a chance to restore the operating system using a backup copy (if you have one).
The recovery algorithm completely depends on the program you are using. backup, which provides you with all the necessary instructions.
Conclusion
There can be many recovery methods and reasons why Windows does not boot. The main thing is that the system is mostly recoverable and you don’t have to perform. That's all. I wish you success in dealing with the problem.

There are at least three common mistakes that lead to problems with loading Windows 7. When errors occur, the system displays on the monitor screen short message, which indicates a problem. It is these small guidelines that we will be guided by when solving problems that arise.
Perhaps the most popular error is Disk boot failure, insert system disk and press Enter
It is characterized by the following situation: you turn on the computer, but instead of the usual loading of the operating Windows systems 7, this inscription is displayed for you. It means that the system has recognized the drive from which it starts as a non-system drive, that is, according to Windows 7, there are no system files necessary to run it on this drive. This can be caused by various reasons. Let's look at the most common ones.

Possible variant. A disc was inserted into the DVD-ROM or a flash drive was connected and your BIOS is configured so that by default it launches one of these media. As a result, the system cannot find the files it needs to run on the flash drive or DVD disc and reports an error.
Elimination. You should try turning off absolutely everything external drives: phones, memory cards, flash drives and external drives. After this, you should turn on the computer again. Most likely, the system will start correctly this time.
It may be that the recommendations provided above will not help. In this case, you need, firstly, in the BIOS settings to set your system drive as the default startup device. And secondly, you should make sure whether the BIOS detects your system disk at all. It may be that it is out of order.
If the system correctly displays the system disk, you can use it. We will touch on this a little later, at the end of the article.
If the system does not display your main HDD, you can try to disconnect it and connect it back, or to the socket next door, if present.
Other problems can also lead to this error, for example, viruses, etc. In any case, it is best to first check the methods that we have mentioned. Most likely they will work. If not, then feel free to go to the end of the article in which we indicated step-by-step elimination Windows problems 7 using the utility.
Error BOOTMGR is missing

Due to this error, you will also not be able to start Windows 7 correctly - a message on a black screen - BOOTMGR is missing. This problem can also cause different reasons, including all kinds of viruses. It can be caused by erroneous actions of an inexperienced user who accidentally changed the boot recording hard disk. Also physical HDD problems are often the cause of this error.
Elimination. Check whether the hard drive on which the system is installed is working properly. Seek help from the Windows 7 recovery environment, which is discussed below.
Error NTLDR is missing. Press Ctrl + Alt + Del to restart

This problem manifests itself in almost the same way as the previous one. You should also use the Troubleshooting Environment to resolve this issue.
When starting Windows 7, the user sees only a black screen and a mouse pointer
If, when the system starts, the usual desktop with the start menu does not load, and all we can see is the mouse pointer, then everything is not so difficult and in the vast majority of cases it is easy to fix. Very often this error occurs if you use antivirus program got rid of some serious virus that had already caused trouble and these same troubles were not fully corrected by the antivirus program.
Elimination. Restart your computer and as soon as the mouse pointer appears, press Ctrl + Alt + Del. The Task Manager will immediately appear.

In it you need to select the “File” menu in which to create a new task (execute). A dialog box will appear, in which you should enter the regedit command and press Enter. This will launch the Windows 7 system registry editor.
We will need to look through the sections in the editor:
HKEY_LOCAL_MACHINE/Software/Microsoft/Windows NT/Current Version/Winlogon/
- HKEY_CURRENT_USER/Software/Microsoft/Windows NT/Current Version/Winlogon/

Now you need to edit the value Shell.
With the first section, make sure that the Shell parameter is set to Explorer.exe, if this is not the case, then install it yourself. In the second case, you need to go to the section and look: if there is a Shell entry in it, then it needs to be removed from there. Now all that remains is to close the registry window and simply restart the computer. Everything should fall into place.
And so, everything that we could not eliminate on our own, we eliminate with the help standard utilities systems
In most cases, if problems arise when starting the operating system, we can see the Windows 7 recovery screen. It is this screen that will help us in restoring the system startup. If the recovery screen does not appear on its own, then the next time the system reboots we can call it up by pressing a key F8. Select "Troubleshoot your computer" from the menu
As soon as problems are found, they will be automatically corrected by the utility. But it may also be that system utility will not find any problems. Then we can use the system restore functions, this often helps if problems with starting the system arose due to the installation of a system update or third party software. Since the service interface is intuitive, the problem will not be difficult to solve.
That's all. In 99% of cases, you will be able to solve one of the problems that leads to the Windows 7 startup error. Otherwise, the problem is in the hardware of your computer. It is also possible if you are sure that everything is in order with the hardware. Good luck!
If a user has a problem when Windows 7 does not start on a computer or laptop, then this article will help solve this difficult problem. Starting Windows 7 is sometimes impossible due to errors occurring in the system after hardware problems or incorrect installation software, malicious utilities and so on.
But the most common reason why Windows 7 sometimes won’t load lies in the operating system itself.
Solution
In the case when all the initial stages Windows launch 7 on a PC or laptop runs fine, but Windows 7 still doesn’t start completely, which usually confuses novice users. Although if available detailed instructions, the question: “What to do?” will not appear even for beginners. If the problem is caused by hardware failure, then it will be indicated by a signal from the laptop speaker or desktop computer during POST test. If this is the case, then the OS will not start.
But if the problem is of a software nature and the process stops at the stage Windows downloads 7, this means that the user has encountered the most common problem that can be solved using an algorithm of typical actions.
Instructions for action
You must use an OS recovery tool. During the PC startup process, if Windows 7 does not start, the system often recommends that the owner of the computer or laptop select boot options. If for some reason such an offer has not been received, then the user can independently open this menu by clicking on the “F8” button. Then proceed to "Sevens".

What to do if the above instructions did not solve the problem?
To fix the problem when Windows 7 does not start, you need to use a CD with the OS:
- Insert the installation disk into the PC drive;
- Start the system from the disk (in the BIOS the appropriate order for booting the system from media must be set);
- In the window that appears, click on “Apply recovery functions that resolve OS boot problems” and click on “Next”;
- Then in the “OS Recovery Options” menu, click on “Startup Repair”;
- Wait until the system analysis is completed and the causes of failures are eliminated;
- Reboot the PC;
- In the BIOS, set the system to start from the hard drive ( When exiting the BIOS, be sure to save the adjustments made);
- Restart the computer again;
- Ready! Windows 7 will now boot normally.
Using the command line
If for some reason it was not possible to restore Windows using the installation disk, then there is another way to do this through the command line.
First you need to take the steps indicated in the recovery paragraph normal loading"Sevens". The only changes are that you just need to specify the section “Command Line” in the menu.

What to do when you fail to achieve a positive result by following the above instructions?
If success was not achieved and the user has already reached this part of the article, then the problem cannot be classified as a typical failure of a bootable OS distribution. It'll take everything further actions do in safe mode e Windows. It is recommended to analyze drive “C” for the appearance of broken clusters.
To enter “safe mode” you must do the following:

Why are preventive measures important?
Windows 7 has a special system that can make special reference points, with the help of which, if necessary, it is restored. By using this protection function, even a novice user can always easily return the OS to a working state.
For example, in case of failures due to incorrect installation of applications, drivers and other utilities such as codecs, or when errors occur due to adjustments being made to the registry.
It should be noted that in “Seven” it is possible to allocate a fixed amount of memory on the hard drive specifically for such protection of the operating system. Implementation available in Windows 7 self-configuration protect files along with system data, or you can do this separately.
Often, when working on a computer, a problem arises such as Windows 7 not starting, startup restoration does not help. IN previous versions
There was no recovery of the OS, which means that choosing the Windows 7 system makes it possible to do everything as it was, without loss. In order to restore the system, we need to decide how to do this. There are several categories.
Namely:
By loading the last successful login. For the most quick fix system, you need to start the PC and hold down the F8 key. Then select “ last
good configuration
This method allows you to boot your computer and restore all data from the registry, as well as driver files that help successful download Your OS.
Restore the system as normal.
If the download does not help, then you need to turn to system recovery, and for this you need to have existing restore points. They allow you to roll back your computer settings to the moment when the entire device was functioning. System Restore is located in the Start menu, under Control Panel. To do this, you need to select the appropriate date and follow the instructions further. At successful recovery, after the reboot, a window will appear notifying you about this.
“System Restore” using the main windows disk.
If Windows 7 still does not start, startup repair does not help, then you should contact secure boot. A menu that still launches when you hold down F8. From the list of suggested options, select “Troubleshoot your computer.” Afterwards, you need to insert the original disk with the operating system corresponding to the installed one, and select the “system recovery” field. Next, a window will appear with several recovery options.
Considering that “startup recovery” did not help us, we should select “ System Restore", and then, as in the previous paragraph, we select available recovery points.
By resorting to a system backup that was created earlier.
In order to use recovery from a backup, you should connect a USB device with this same file. And go to Start, where select Control Panel and then restore. If the system does not start and there is no way to this manipulation, then you should go through the previous step. In the new window you should select “r” advanced methods…", Further " use the system image created earlier" After which you will be prompted to use profile archiving. Now think for yourself, you need this. Afterwards you need to restart your computer and go through all the instructions for setting it up.
Conclusion
If none of the methods helped and Windows 7 still does not start, startup recovery does not help, then you should reinstall the operating system, and you will have to lose all your data.
You turn on your home computer/laptop, and an error appears on the screen instead of the usual desktop, blue screen death, endless reboot, system freeze or a banal shutdown occurs. Let's figure out why Windows 7 won't start and look at options to fix the problem.
Open the manual on a working PC or phone, and then start restoring!
Errors and malfunctions
Our tips will help users eliminate following problems, because of which “Seven” stopped loading:
We use standard OS tools
In most cases, the operating system itself can restore functionality. If the computer is malfunctioning as a result of minor damage to the registry, system settings, incorrect shutdown, or “crooked” updates, then when you restart the computer you will see the following window. The first point (in English version– Launch Startup Repair) is just launching this utility. When choosing the second option, the problem is ignored and the computer tries to start the damaged system. This option will only work if there is a random failure (for example, a power outage).
- As the window on the screen recommends, select the first option:
- Now you will see a window in which you need to select a language for keyboard input:
- Enter the name account and the password for it:
- Now a menu will appear with the option to select a recovery tool:
Let's consider their purpose:
- Auto mode diagnostics Corrects the majority minor mistakes.
- Rolling back the operating system to the previous one control point.
- Allows you to restore Windows from a copy that the user saved on your hard drive or external media in advance.
- The memory test program is launched if problems with RAM are observed. For example, the “blue screen of death” when working with a PC.
- Allows you to execute commands outside the running OS.
Using points 2 and 3 is possible only in cases where the user has taken care of creating checkpoints/archiving data in advance.
To begin, select the first item.
- The PC will launch the diagnostic tool, which will automatically start working. This one looks like this:
- Wait until the end, no matter how long the verification procedure takes. The utility will ask your permission to restore. Click “Restore”:
- After another couple of minutes, the software will finish working, and you will see the final window. Click on the marked button and wait for the device to reboot:
- A black splash screen will appear on the screen with Windows logo 7 – normal startup of the operating system:
If the procedure was successful, then you can easily start your PC and continue to use it as before. If the problem cannot be fixed, and the computer still freezes or does not start when loading, then we try other methods.
Restore from a checkpoint
Windows, by default, periodically creates checkpoints tied to certain events. You can perform a rollback from a working OS, but not in our case.
- To do this, open the troubleshooter again according to the previous instructions and run the second option:
- After this, we wait for the checkpoint wizard to turn on and follow the algorithm. On the first screen, click “Next”.
- We select a save point based on the date when there was no OS malfunction. We continue the procedure.
- We start the recovery process with the “Finish” button. After this, a confirmation window will appear.
- If the restore is successful, you will see the following window. Reboot the computer.
- Wait until your computer turns on. If the operation is successful, the following message will appear on the screen. You can simply close it and continue using the device!
In most cases, the checkpoint option helps when making incorrect changes to system settings or registry.
If the user previously created a system backup, he will be able to restore the OS state using it. To do this you need to do this:
- Open the diagnostic and recovery tool again when you start the computer using the F8 key. Select the third item.
- Check the box “Select a system image” and move on to the next step.
- The table should contain a list of archived operating systems to which the computer has access. Select the one you need and click “Next”. After this, automatic Windows recovery from the image. If the list is missing, as shown in the screenshot, it means that the system did not archive automatically.
The software is restored along with all custom settings and configuration.
Another option available in the standard recovery wizard. With its help, you can install a backup copy of the registry, diagnose system files, restore boot files.
- Open the corresponding item in the recovery environment:
- A regular command line window appears before us with only one difference: for cmd launched without Windows hard disks are autonomous. Therefore, entering commands will look slightly different. Enter the line [k]sfc /scannow /offbootdir=C:\ /offwindir=C:\Windows, where the first path indicates the letter system disk, and the second is the road to Windows folder. Press Enter to apply.
Now we wait for the end of checking the structure of system files. If the utility managed to find problematic sectors or data, then next switch on the computer will work properly.
Safe mode
When you turn on your PC, you can launch a menu with an expanded list of actions. Among them there is both Lunch Startup Repair, described above, and other extremely useful remedies.
Safe Mode does not always start. At serious damage or equipment malfunctions this option does not work.
- When restarting the computer, press F8. It is necessary to be in time before the moment when it appears loading screen Windows. If you click at the right time, you will see the following:
- Here you need to start safe mode (normal, with network drivers for Internet access or with the command line). To restore, it is advisable to choose the third option. Then you need to wait until the program downloads all the files:
Seemingly safe Windows mode 7 is very different from the standard OS. A simplified interface and a black desktop will appear on the screen. In this mode, you can rollback to a checkpoint.
We can say that the functionality of Safe Mode is an analogue of the recovery tool mentioned above. However, you can run some programs and work with files here, which is a plus.
Let's look at the instructions for starting recovery from a checkpoint:
- Open “Start” and go to “Control Panel”.
- Go to the “Recovery” section.
- Now click the marked button to launch the wizard.
It is not possible to restore using a system image in safe mode (only in normal mode).
Now let's look at the command line functionality in Safe Mode:
- We launch the application through a search in the Start menu or Win + R by entering the command [k] cmd.
- Enter the command [k]chkdsk /r and press Enter to analyze the hard drive.
- Accept the prompt to check the disk the next time you restart using the Y key.
- Restart your PC, then wait until the scan is completed. If possible, the utility will correct errors and damage.
Analyze the active partition from under running Windows impossible, which is why the procedure will be carried out during restart.
The next option to use the command line for your own purposes is to restore startup files. This method will help get rid of the error with the text “BOOTMGR is missing”, after which the computer endlessly reboots. In cmd you need to enter the command [k]bcdboot.exe C:\Windows (you need to change the letter system partition to yours) and press Enter:
Replacement will be made damaged files launching new ones. After reinstallation, you need to check the “Seven” for trouble-free activation.
Repairing the Windows registry
Now let's restore the registry log via the command line. The properties and capabilities of the registry include recording all system changes. If the user has updated any parameters or installed software, the registry records this. Due to malfunctions in it, problems may arise when Windows startup 7. Consider manual recovery backup copies registry:
- Launch the command line through “Troubleshoot your computer” and enter the command [k]notepad. We will need a notepad to gain access to the explorer.
- Press the Ctrl+O combination to make the explorer appear. Now open the path [k]C:\\Windows\system32\config.
- Here are the files with the names marked in the screenshot - this is the current registry. You need to rename them. For example, add ".OLD" at the end.
- When all the files have been renamed, open the “RegBack” folder, where the backup copies are stored.
- Select one file at a time (it will not be possible to copy everything together), press Ctrl+ C.
- Return to the “Config” directory and use Ctrl+V to paste backup file. We perform the same operation with all other documents.
- Now all that remains is to restart the computer and check the status of Windows
To use this method, you need to restart your computer again and press F8.
Pay attention to the “Last Known Good Configuration” item:
When choosing this option, the program selects the optimal parameters of the “seven”, at which the system launched successfully.
Virus check
A protected computer works much more stable and longer. There is often a situation where a PC is so infected with viruses that it refuses to start or be updated through special means. Since we cannot verify this normal mode, safe comes to the rescue. We turn it on with loading network drivers and do the following:
- To scan the system and remove viruses, you need a similar scanner. You may ask: can I scan my PC with my antivirus? Of course you can if you have it installed.
- Launch the downloaded file. The utility does not undergo long initialization and will not be updated - this is its advantage over antiviruses. On the first screen, check the box.
- Now click the “Start scan” button.
- We are waiting for the application to scan the entire system. If the ticker stops for a while, don't be alarmed - this is normal.
- At the end of the procedure, you will see the following window. If the problem is not a virus, then the threats will not be detected. Otherwise, the program itself will delete them or quarantine them.
Setting download priority
If, when you turn on the computer, a screen appears with the text “DISK BOOT FAILURE, INSERT SYSTEM DISK AND PRESS ENTER,” then there is a high probability that the priority in BIOS settings.
Don't forget to check connecting hard disk to the computer, perform a performance check on another device and run diagnostics. If the equipment is working properly, then “Seven” does not load due to priority.
Let's learn how to open BIOS and work with it:
- When the PC just turns on, you need to press F2 on the first screen. After this you will see the following interface:
- Control is carried out only by keys (hint at the bottom of the screen). With their help, go to the “Boot” section.
- You can save changes and immediately restart your PC by pressing F10. After this, we agree to the action with the “Yes” button.
The appearance and management of the BIOS may vary slightly depending on the motherboard model or specific firmware. However, the principle of operation and the names of the sections are as similar as possible.
If you manage to load Windows, then rejoice - no additional operations will be required, and your OS is working. If this does not give results, then do not be discouraged and move on according to the instructions.
Using a bootable USB flash drive
If you don't have boot drive for Windows 7, then you can create it yourself using an empty flash drive/DVD and instructions from our website.
So, to launch the bootable media menu, the BIOS skill learned in the previous section of the instructions will be useful. Press the menu start key again (it may differ depending on the model and firmware) when the computer starts, and go through the steps to set the priority. Only this time the connected flash drive is put in first place.
Reboot your computer to start Windows installer 7. After this, follow the instructions:
- At the language setting stage, click “Next”.
To reset the settings to factory settings, you need to disconnect the computer from the network, remove the battery and after 1-2 minutes put it back. After this, turn on the device and check operation. Remember that with such a reset, the date and time in the settings disappears - you need to set them again.
If the date and time are constantly reset to factory settings, then you cannot do without replacing the battery with a new one.
Option for laptops
In the event that you have lost licensed Windows 7 on a laptop, repairs can be done without diagnostic tools or bootable media. The OS is restored using the built-in recovery utility. Each laptop manufacturer has them differently, but they have approximately similar controls and interface in Russian.
The application can be launched both in the working “Seven” and before turning on the laptop. One of the system keys or a combination. For example, on HP devices it is F11, on Acer Alt+F10, and so on. Through this application An OS license is installed that does not require further activation.
When nothing helps
You may also need the help of a specialist if we are talking about hardware faults. Often the reason is motherboard, hard drive or RAM. Without professional knowledge, you won't be able to fix your PC.
Conclusion
The topic of restoration is broad and complex, since failure can depend on many factors. If you own boot disk and handle it correctly standard means diagnostics, you can eliminate most common software errors.
Write in the comments about cases and breakdowns of Windows 7 that you fixed yourself. Feel free to ask questions about unclear points and nuances of the instructions!
What to do if Windows 7 won't start
5 (100%) 1 Votes