Burning an iso image to a USB drive (creating a bootable flash drive). How to burn an ISO image to a flash drive
Not all modern laptops have a DVD drive; we are silent about ultrabooks, whose manufacturers initially abandoned the ability to read/write discs for the sake of an ultra-thin body. Therefore, reinstalling the operating system from a disk, as we are all used to doing, will no longer work and we need to look for another option. That is why we decided to tell you through UltraISO - a program that allows you to work with images. Of course, there is more convenient software, tailored specifically for creating bootable flash drives. In addition, it is paid, but there are a number of analogues distributed free of charge. But if you choose the UltraISO program, we will not challenge your decision and will help you understand its functionality. Well, get your flash drive ready, let's get started!
Create a bootable USB flash drive using UltraISO
So, first of all, we need to acquire the operating system image itself. This could equally be Windows 7 or the newer “Ten”. As a rule, bootable media is created not only for installing the OS, but also for resuscitating the computer. However, this is no longer so important - after all, in this instruction we are considering the creation of a bootable version.It is not for nothing that the name of the program contains the prefix “ISO”, symbolizing the extension of the image file. The image itself can be downloaded on the Internet, on the official website, or borrowed from a friend. This is not so important, the main thing is that it is complete and works flawlessly.
We will need a flash drive with a memory capacity of at least eight gigabytes. This is more than enough. Copy important data from it first, because the media will be formatted.
Creating a bootable USB flash drive using UltraISO
Let's assume that you already have the program installed. Let's get started:
By repeating exactly the steps described above, you will actually write the operating system onto the flash drive and be able to install it.
How to create a bootable USB flash drive from a DVD
At the beginning of the article, we said that the image can be taken from anywhere: download it from the official website, from a third-party resource, or burn it from disk. So let's quickly look at the last option.Let's imagine that you borrowed a boot disk with Windows 10 from a friend, but for some reason you do not want to install the OS from it. It is not at all necessary to create an ISO image through a third-party program, and then make a bootable USB flash drive according to the instructions above - you can take another, shorter route by writing a bootable USB flash drive directly: 
Well, now you know how to make a flash drive bootable. All that's left to do is learn how to restore/install Windows from it. But that is another story…
In this article, I will tell you how to burn an image to a flash drive (in this case, a Windows image) for subsequent installation of the system on a computer. Nowadays, many people have laptops and netbooks that simply do not have an optical drive, or there is no way to install windows from a disk; this is where creating a bootable Windows 7 flash drive comes to the rescue. This article is primarily aimed at these tasks.
We will write the image to a flash drive in two ways. The first method will be implemented using a very good ultra iso program, and the second using WinSetup From USB. We will start by looking at the steps to work with ultra iso, since this method is less labor-intensive and the process of creating a bootable Windows 7 flash drive will be quite fast. The second method will remain for those who, for some reason, “didn’t work out” with the first option.
Method No. 1
So, let's go. First, download the program Ultra ISO. After the program has been downloaded, installed and launched (click on the trial period if you don’t want to buy), you can begin the fairly simple process of writing Windows to a flash drive:
1. You must specify the path to the image that should be placed on your hard drive:
Click “File” => Open (Fig. 1)
Fig.1

Rice. 2

Rice. 3
Method No. 2
This method will also tell you how to write windows to a flash drive. What you will need for this option:
1. A little free time;
2. Computer (with iron, which supports booting from a flash drive);
3. Program for preparing a flash drive ( download);
4. Actually the flash drive itself (even an SD card will do);
5. An image of the operating system that we want to install.
As an example, I will show how we will write an operating system image to a 4GB SD cardMicrosoft Windows 7Home Premium 64-bit. I would like to immediately draw your attention to the choice of operating system. If your computer has less than 4GB of RAM, then you should install a 32-bit (x86) version of the operating system, since a 64-bit version will simply clutter up the RAM with unnecessary processes.
We insert the flash drive into the USB port and format it to FAT32 or NTFS using Windows. To do this, you need to go to My Computer, find the flash drive there and right-click on its icon. In the context menu, select “Format...”. In the format window, select the file system FAT32 or NTFS (the latter will be better if the flash drive has a capacity of more than 4GB), and also select the cluster size “Standard cluster size” and click the “Start” button. Everything is shown in the picture:

Next, we download a small program in which we will do all the operations we need. There are several programs of this type, but I chose WinSetupFromUSB because it does not require installation and takes up almost no space on disk and easy to use.
Let's launch the program. First, we need to select the device on which we will burn the image. This is done in the drop-down menu at the top (if the flash drive is not displayed in this menu, click on the Refresh button). Next, we need to prepare the flash drive for recording the image, because if we simply copy the image, it will be impossible to enter the system installer, because there is no boot sector. To create it, click on the Bootice button.

In the Bootice utility window that opens, click the Process MBR button, then see if the Grub4Dos checkbox is checked (if not, check it) and click the Install/Config button. In the Config Grub for DOS window, click on the “Save to disk” button, the program will display a window that the boot record has been successfully written to the drive.

We return again to the Bootice utility window, where we click the “Process PBR” button and do everything the same, without changing anything in the last window, click OK.

That's it, now all we have to do is write the image to a flash drive, this is done in the main program window, which we saw immediately upon launch. You need to check the required box - if you are going to install Windows XP, then this is the first checkbox, but if Vista or Seven - the second. Next, click on the “…” button on the other side of the checkbox and set the path where our unpacked image is stored on the hard drive, or simply mounted in a virtual drive using DaemonTools or Alcohol. Click on the “GO” button and wait until the process finishes.

Upon completion, the program will display the message “Job Done!” That's it, dear friends, you can reboot and start installing the operating system.
Also, I advise you to read the article regarding
Greetings to all readers. It's about recording ISO image on USB flash drive, not just recording, but also loading from a USB drive with the function BOOT. Because just unpack ISO image and copying to a flash drive is easy. All you need is a program WinRAR, because ISO image partially considered an archive file. Well, the most important question is - why on a USB drive? The answer to this question is very simple - a USB drive does not scratch like a disk, lasts longer with constant use of the device, capacity in a small pocket and other little things.
Method one:
In this method, the most important thing is that ISO image there must be a file bootmgr(without any extension). To do this, just open ISO image any archiver (for example WinRAR). To do this, use the context menu with the right mouse button (if there is no file association for this extension) and select nm item " To open with" Further " Select another application", or select from an existing list or by clicking the " button Review" (alternative - More app > Find another app on this PC, everything depends on Windows OS) and selecting the path to the software (in our case WinRAR) press the button " Open"(see Windows 10 pictures).
 |
 |
 |
 |
 |
We see that such a file exists.
Download the simplest recording utility ISO image to a USB drive and open it. In the window that opens, click the button " Yes" and selecting ISO image and press " Open"

At the same time, do not forget to insert the USB drive into the appropriate slot and press the " Installation". After which formatting will begin in a certain format, and then copying of files to the USB drive will begin.

After completion, the utility will not inform you about this, but will simply close the process of copying files, and the utility will remain open. Press the button " QemuTester"and we see that our flash drive is working.

Method two:
This method must also contain the file bootmgr V ISO image, without it, as we understand, the BOOT function will not work. Open the program, select from the menu File > Open... and choosing our ISO file press " Open".
In the first upper part we have files and folders with the name of the image. Go to the Boot menu > Burn Hard Disk Image...

In the window that appears, select our flash drive, set the recording method USB-HDD+ and press the button " Write down"

We are warned that all data on the USB drive will be erased, so if there is important information, copy it to the computer and agree with the appropriate button.
The recording process is not that fast, so you can calmly drink tea.

The recording is complete, the flash drive is ready. Unfortunately, UltraISO does not have testing like the utility in the first method, so to check it we will need to restart the computer or use the USBboot Installer++ utility.
Method three:
In this method we will use the utility and will not look to see if the file exists bootmgr V ISO image.
Download (pictures may differ depending on the version).
We unpack the archive to a place convenient for you.

We go to the unpacked folder and launch it depending on the bit depth of the OS and in the window that opens, select our flash drive and click .

Check the boxes as shown in the figure and click " Prepare disk".

After which the command line will open and prepare your flash drive, after completion the command line will close itself.

In the same window, click " Install Grub4DOS".

A window will appear with installation information install grub4dostoMBR.

We agree with the " YES".
The bootable USB flash drive is almost ready. Now let's copy our ISO file to the root of the flash drive and create a text document (with any name for now), open it and paste the following text
title Start WXPOEM RU
map --unmap=0:0xff
map --unhook
root(hd0,0)
map /WXPOEM_RU.iso (0xff)
map --hook
root (0xff)
configfile /grub4dos.lst || chainloader (0xff)
map --unmap=0:0xff
Where you just need to know" title Start WXPOEM RU" is the name of the image being loaded (displayed in the boot menu, title do not wash). " map /WXPOEM_RU.iso (0xff)" way to ISO image, i.e. you just need to change the name ISO file.
Now we rename the text document with the title menu and change the extension txt on lst, it should work menu.lst.

Return to , check the box Test in QEMU and press the button GO.

Testing our bootable USB flash drive. A window will appear with a test download and with only one inscription " Start WXPOEM RU"

Click " Enter"As we can see, everything worked out.

Hello friends, today I will again touch on the topic of bootable media. I have already written a lot of materials on how to create a bootable USB flash drive. They cover a bunch of tools that allow you to do this. Perhaps I will list these articles below. And today we'll see...
First, let's see how to burn an image to a disk and then to a flash drive. This can be done using the UltraISO utility.
How to burn an image to disk using UltraISO
The well-known UltraISO program for working with images allows you to record something on optical media, but also has many other useful functions. I would like to review this wonderful program, but is it necessary? Write in the comments.
To burn the image to disk, you must first run UltraISO. Select a section "File" and press "Open". Select an image, for example, Windows.
The window is divided into four parts, the first shows the directories located inside the image, the second section contains files and folders. If the files are loaded in the window, then the image was selected successfully.
Next, go to the tab "Tools" by selecting the option "Burn CD image"(or click on the button F7). In addition to the above, the utility’s taskbar already has a corresponding icon indicating writing to disk; it is shown as a burning optical disk.

DoctorSmm is one of the best SMM services for promoting social networks. Here you can get very cheap services for promoting pages, communities and channels. At the same time, you will be provided not only with low prices, but also with guarantees for the high-quality execution of any order, as well as for the protection of all payments made.
A window opens where we press the button "Record". Before doing this, do not forget to insert the disk into the drive.
(At the time of writing this article, I didn’t have a disk drive in my laptop; instead, there was a hard disk drive, so you see this screenshot; if you have a disk drive, the burn button will be active!)

As you can see, burning an image to disk using UltraISO is very easy. The disk can be used for its intended purpose.
Well, now we come to the real topic of the article. Let's not delay, but let's get straight to the point.
Now it is advisable to run UltraISO with elevated privileges. Then select the desired image, as I described above.

In field "Disk Drive" select your flash drive. Usually it is determined automatically. We leave the recording method as USB-HDD+. Press the button "Record".

A message appears warning you that the data on the drive has been destroyed. We agree by clicking the button "YES".
When the creation of the bootable USB flash drive is completed, the message “Recording complete” will be displayed in the window.
The flash drive is ready for use.
How to make bootable media using Windows tools
On modern Windows systems, the image icon looks like this.

This means that the system already has a built-in tool for working with images. For example, double-clicking on the icon will connect a virtual drive.
You can do this as follows: right-click on the image and select the option "Burn disc image".
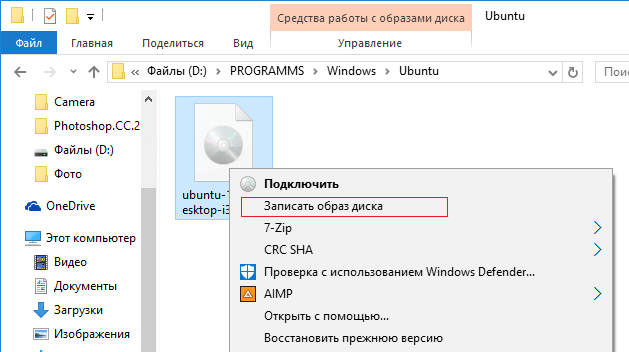
A tool opens where we select the drive and press the only button - "Record".

Here I have shown three more options for creating bootable media. Now you know how to burn an image to a flash drive via UltraISO, to an optical disk, and how to use the standard Windows tool for burning images.
What is a disk image? This is a file that stores an exact digital copy of the file system, or data previously recorded on disk (CD/DVD/BR).
Previously, such images were widely used for data backup, but with the development of the Internet, ISO applications migrated to the category of files that were convenient to transfer over the network.

In order for the image to be used, it must be written to disk. For these purposes, many programs are used, including Alcohol, Daemon Tools, Nero, and UltraISO. We will focus on the last one, since it is very convenient and intuitive.
Most often, this software is used to record an OS image, in particular Windows. Why is this being done? Over time, any system acquires a certain number of obscene system and user files that consume memory, disk space and slow down the performance of the OS as a whole.
You can also use standard Windows tools, for example, recovery, but this is not always possible, so it is much easier to remove the old system and install a new one. To restore, you will need a disk or bootable USB flash drive.
Let's consider the process of creating an image using the example of recording Windows 8, although “seven” and other operating systems are written the same way.
Step 1. Beginning of work
To perform further actions, you will need to run the program as Administrator, otherwise the system will simply not allow you to do anything.
After you have opened the program, you need to click the “open” menu as shown in the first screenshot and start creating a bootable ultraiso flash drive.
The example shows a prepared image of Windows 8. The files themselves are easy to find on the Internet, in particular, on torrent trackers. The extension must be ISO, not EXE.
As soon as you have confirmed the choice of image by clicking the “open” button, a list of used OS files will be displayed in the right window of the program. Do not delete or rename anything to avoid any installation errors in the future.
Step 2. Preparing an image for recording
Now we insert the flash drive into the connector and wait for the device to be connected and recognized.
Important: The device must be formatted in the FAT32 file system format. But if you didn’t do this, don’t worry. The program will automatically do all the necessary manipulations. If the device contains the necessary files that have not previously been copied to the hard drive, do this BEFORE recording the system. Otherwise, all data will be permanently erased.
When all the copying manipulations have been completed, in the UltraISO window, click on the “Boot” item, and in the drop-down list, select the “Burn hard disk image...” menu.
The program will prompt you to check the correctness of the selection of the disk on which the image will be written. Re-check that everything was done correctly, and then proceed to the next steps.
The “Recording method” item should be set to “USB-HDD+”, and “Hide Boot Partition” should be set to “no”. If the flash drive was previously formatted, feel free to click “Burn”, and if you missed this point, then click on “Format”.
Step 3. Formatting a flash drive
As previously stated, when formatting, you need to set the FAT32 format, which, in theory, is specified by default, but just in case, it’s not a sin to verify this yourself. After all the manipulations, click “Start”.
A dialog box will immediately pop up warning that everything on the flash drive will be irretrievably destroyed. We agree with this by clicking on “OK”.
When the process completes successfully, a corresponding window will appear. If the message states that “formatting is NOT completed,” the flash drive is defective, so we recommend using another one, or understanding what the problems are with this one, and then repeating the process again.
Step 4. Burning an image
If everything is successful, close the dialog box and return to the “Burn image...” menu, or “Write Disk Image” and click “Burn”. A menu for final creation of a bootable USB flash drive will appear.
A pop-up window will appear again, once again warning that the data will be deleted. We agree with this and move on.
Now the fun begins - direct recording of the OS. Multiboot flash drive ultraiso began to be created , which will take some time.
The program itself works quite quickly and efficiently, but the system often slows down the entire creation process. Be patient.
Upon completion of the process, a “Recording complete” notification will be displayed in the logs! This means that our flash drive with Windows 8 is ready for use.
Since we no longer need UltraISO services, the program can be closed. When you connect the flash drive to the PC a second time, something similar to the one shown in the screenshot should appear.
Depending on the image, its name may differ from this. The picture shows just an example of the final version.
