How to publish rdp applications. How to add shortcuts to remote applications on client machines
“RemoteApp allows applications that can be accessed remotely through Remote Desktop Services to be presented as if they were running on the user's local computer. These applications are called RemoteApp programs. Instead of presenting Remote Desktop Session Host on the server's desktop, RemoteApp integrates with the client's desktop. RemoteApp runs in its own window that can be resized, can be moved between multiple monitors, and has its own icon on the taskbar." — Technet.
To paraphrase technet, you can create shortcuts to remote applications on client workstations. On machines running Windows 7, shortcuts will be added automatically to the menu Start, on machines controlled Windows 8 shortcuts will appear in the application list.
Before setting up RemoteApp, the Work Resources workspace was renamed on "Laboratory" on this.
How to add shortcuts to remote applications on client machines.
In this example, the client machines will be Windows 8.1 And Windows 7.
Method 1. Use WebFeed URL .
On the client machine, specify the connection path to the remote desktop server.
In the start bar, in the search, type “ remoteapp" and select " Access to remote work applications RemoteApp«


IN Windows 8 they can be seen in the list of applications “Win | "

IN Windows 7 apps are in the start menu

Method 2. Use user login. (For Windows 8)
In general, this method is similar Method 1, with one small difference .
Instead of a complex URL, the user simply indicates his logs in the format "user login name" ( [email protected]).
This method is only supported on Windows 8 machines.
However, to do this, you need to create a TXT record in DNS.

On client Windows 8.1 you can run the command gpupdate or reboot it so that the new group policy is applied. Immediately after applying the policy, a new resource will appear in the list of remote desktop connections.

Unfortunately, this group policy only works on machines running Windows 8, but for Windows 7 you will need to perform a number of steps.
Happy Windows 8 users will see RemoteApp in the list of applications

Group Policy for Windows 7.
For Windows 7, you need to create a new policy. First of all, before creating a policy, you need to prepare 2 files:
2. Create file " feed.wcx» with the following content:
I used this version of the wcx file:
Next, create a new or use an existing group policy. Go « User Configuration | Windows Settings | Scripts | Logon". In the window " Logon Properties» Click “Show Files”. In the folder that opens, you need to copy the 2 files prepared above. You won’t be able to place files directly into this folder; you will have to open the network path locally and copy the files there. the local path looks something like this:
"C:\Windows\SYSVOL\sysvol\ Domain name\Policies\( GP GUID)\User\Scripts\Logon"
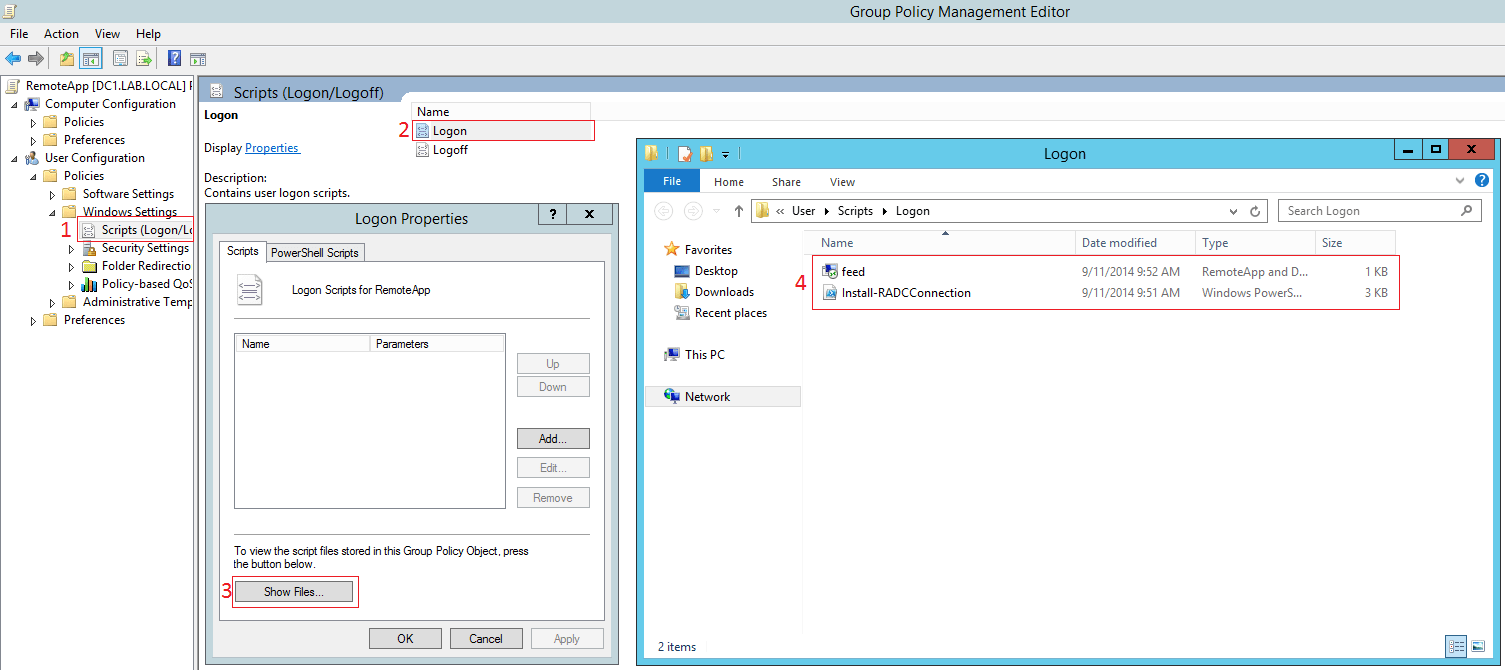
Further in the same window “ Logon Properties" go to the tab " Powershell Scripts" and press the button " Add". In the window that opens, in the field “ Script Name" Select a file " Install-RADCConnection.ps1″, in field " Script Parameters» enter the name of the wcx file, feed.wcx.

With a new login, after a while, Windows 7 users will have shortcuts to deleted applications.
P.S. If the script does not run successfully, make sure the wcx file is filled out correctly and try running the script locally.
In the next article, I will look at using a dedicated RemoteApp application for Windows 8 and mobile platforms.
RemoteApps technology is one of the features of the Terminal Services role in Windows Server 2008. Before the introduction of RemoteApps, Terminal Services involved rendering the entire virtual desktop of a remote server on the client side. This approach is quite convenient in a number of situations, however, if the user needs to create the effect that an application running on the terminal server was displayed on the client side of the terminal, creating the illusion of its local operation, this approach does not work. This is precisely the functionality provided by the functions RemoteApps, which we will talk about in this article.
Preparing the server for installing RemoteApps
Before you can use RemoteApps technology on Windows Server 2008, you must meet a number of conditions. First of all, your server must have .
Secondly, all applications that are planned to be used using RemoteApps must be installed on the terminal so that they support simultaneous multi-user operation. You can read how to do this in the article.
And finally, if you plan to access applications through a browser using the TS Web Access role, you need to make the settings described in the article.
After completing the first two, and, if necessary, the third requirements, you can proceed to the RemoteApp configuration process.
What are RemoteApps?
RemoteApps are part of the Terminal Services role in Windows Server 2008. The purpose of Terminal Services is to provide client systems with access to the desktop and applications running on a terminal server. As the name suggests, remote desktop access means displaying Total server desktop on the local client screen. This approach allows the user to perform various tasks on the server, including running and interacting with applications on a remote host. The RemoteApps feature helps avoid giving a user access to the entire desktop of a remote system if he only needs one application. When each RemoteApp application is launched, it appears in a separate window on the client's desktop, exactly as if it were installed and running locally.
RemoteApps can be launched using a special link on the TS Web Access web page, or by installing a special file on the client computer.
Setting up an application as a RemoteApp
The RemoteApps setup process is carried out using the utility TS RemoteApp Manager. It can be launched from the menu Start -> All Programs -> Terminal Services -> TS Remote App Manager, or using equipment remoteprograms.msc. After launch, the manager interface will look something like this: 
To configure the application as a RemoteApp, you must click the link Add RemoteApp Programs in the panel Actions located in the upper right corner of the RemoteApp Manager screen. A wizard will appear on the screen RemoteApp containing a list of applications installed on the system. You need to tick one or more applications and press Next.

Also with this wizard you can configure various properties for each application, these settings can be accessed using the button Properties. The RemoteApp settings window is shown below. 
This dialog allows you to configure the following parameters:
- RemoteApps program name– the name of the program under which this application will be visible to the user.
- Location:— physical path to the application executable file.
- Alias- a unique identifier for a program or application; as a rule, the name of the executable file is used here without an extension.
- – controls access to the application RemoteApp via TS Web Access. Read more about TS Web Access in the post entitled.
- Command-Line Arguments–sets the rules for how the application uses command line arguments.
- Change Icon–Allows you to set and change the application icon
After making any changes to the RemoteApp properties, click OK and thenNext. Once you've finished configuring your apps, they'll be listed in the list RemoteApp Programs as it shown on the picture: 
After setting up RemoteApps, remote users can start using them. All that remains is to install a special Windows Installer package on the client’s PC or copy a pre-generated .rdp file to him, or provide him with access to TS Web Access. Each of these approaches will be discussed in detail in subsequent sections.
User access to RemoteApps via TS Web Access
By default, RemoteApps is available via TS Web Access. You can check this fact, as indicated above, using the RemoteApp properties window and the presence of a checked checkbox in it RemoteApp is available through TS Web Access. Naturally, this parameter can be changed at any time, for which you need to select the required application in the list of RemoteApp applications and go to its properties.
So, if your RemoteApps are configured to be accessed via TS Web Access, simply open a browser window and enter the webpage URL:
As a value Server1
, you can use the IP address or name of your terminal server. When the connection is established, the browser will ask for a username and password before displaying the page. 
To launch an application, the user simply needs to click on its icon, after which the initial launch window will appear RemoteApp.
Here you will need to select terminal connection settings, for example, which local client resources (for example, disks, devices, keyboard, mouse, printer, ports, etc.) should be available to the application running on the remote system. This can be useful, for example, if the user needs to print from a remote application to a local printer, or save files directly to a local disk or USB flash drive: 
Once the connection is established, the terminal application window will be displayed in a window on the local computer.
Accessing RemoteApps Using Windows Installer Packages
An alternative way to access RemoteApp applications is to use Windows Installer packages, which must be deployed on the systems from which you intend to access the terminal server. To create a Windows Installer file for RemoteApp, right-click on the selected application in the RemoteApp manager and select the command CreateWindowsInstallerPackage. In the wizard that appears, you must select the directory in which RemoteApp will be installed on the client. You can also use this wizard to override the RDP protocol port that will be used by the client to access the RemoteApp server. And finally, here you can configure remote access protection using certificates.
After pressing the button Next You can specify whether the client should create desktop and Start menu shortcuts. And the last setting is setting the association with file extensions. As an example of file associations, for the Word application - files with the extension .doc, and for Excel - .xls. When you configure such an association of an application with a .doc extension, the associated Word application will automatically launch via RemoteApp, in which this file will be opened. The specified mapping is controlled by the option parameters Takeoverfileextensions .
After creating the package, the file . msc will be located in the path that you specified when creating such a package (by default this is \ ProgramFiles\PackagedPrograms). This file can be copied to any client system where it is to be run. As a result of installing the Windows Installer package, RemoteApp can be found in the Start menu ( Start-> AllPrograms-> RemotePrograms).
In this case, just as when using TS Web Access, the user will be given the opportunity to specify which local resources such as disks, ports and printers should be available to the remote application.
Launching RemoteApps using .rdp files
The process of creating an RDP file for RemoteApp is exactly the same as the process of creating a Windows Installer package. To create an RDP file for a RemoteApp, right-click on the selected RemoteApp in the TS RemoteApp manager and select the menu item Create.rdpFile. As a result, a wizard will open that will require you to specify the directory in which it will be created. . rdp file, it will also be possible to define it for the created RemoteApp, and it is also possible to protect the terminal session using a digital signature.
After completing the settings, click the Finish button, and as a result, a new . rdpfile. This file must be copied to any system from which you intend to use the RemoteApp application.
As with TS Web Access, the user can define which local resources can be accessed in the published terminal application.
A full remote desktop session is not always necessary for users to work on a terminal server. Let’s say in your company users use only an application on the terminal server 1C: Enterprise 8.2. Here we can use technology RemoteApp, which appeared in Windows 2008.
RemoteApp are programs that can be accessed remotely through Terminal Services and run as if they were running on the user's local computer. Users can run programs RemoteApp along with their local programs. Users can minimize and maximize a program window, resize it, and easily run multiple programs at once. If the user is running more than one program RemoteApp on one terminal server, programs RemoteApp will be in the same Terminal Services session.
Setting up a RemoteApp application using an example 1C: Enterprise 8.2:
- Open (Fig. 1):
2. In the manager, on the action panel on the right, select "Add RemoteApps"(Fig.2):

3. Opens. Click Further(Fig.3):


5. In the next window, click Ready(Fig.5):

6. We see what's in the window "RemoteApp Manager" Below, the 1C Enterprise application appears in the list of remote RemoteApp applications. Right-click on it -> "Create RDP file"(Fig.6):

7. Will open "Remote Application Wizard (RemoteApp)", click Further(Fig.7):

8. In the next window we set the parameters of our package. We can change the location where the RDP file is saved, change the server port, set the Terminal Services Gateway parameters and select a certificate. press Further(Fig.8):

9. In the next window, click Ready(Fig.9):

10. Copy our RDP file to the necessary users (we can change the location where the file is saved in step 8, by default - C:\Program Files\Packaged Programs. You can copy it manually or through a logon script in Group Policy. Open our RDP file (Fig. 10):

11. To launch the application, click To plug(check the box so that this question will not be repeated in the future) (Fig. 11):

12. Enter your credentials and click To plug. Remember that the user must have rights to connect to the Remote Desktop Service (Fig. 12).
Hi all! In the first part of the article we looked at how to install RemoteApp in Windows Server 2008 R2, in this part we will look at methods for distributing the program via RemoteApp. You specify which software products and applications should be presented through this technology. What's great is that they can be run on any Android device.
Setting up the RemoteApp list
So let's start setting up RemoteApp in Windows Server 2008 R2. Open Start - Administrative Tools - Remote Desktop Services - RemoteApp Manager.

The RemoteApp Manager snap-in opens. In the upper right corner, click "Add RemoteApps".

The Add Application Wizard will open. Click next.

We select an application from the list, for me it will be CCleaner. I would like to note that this list will only contain programs that are available to all users; what is installed in the local profile of a specific user will not appear here, and even if you force it, adding it will not work.


Now the Ccealner program has appeared in the RemoteApps item.

Now let's distribute our application.
Distribute RemoteApp via RPD file.
Right-click and select Create RDP File.


As a result, you have an RDP file in c:\Program Files\Packeged Programs.

We give this file to the clients, they launch it. Clicks connect.

Enter login and password

and he opens CCleaner on the server, but visually he sees it as if it were his own, this is useful if you have software with one license but want to distribute it to many.

Distribute RemoteApp via MSI file.
Also right-click and select Create Windows Installer Package.


If you wish, you can specify an alternative location for creating the package and specify a certificate if necessary.

Check the boxes where a shortcut to the software should be created.


All in c:\Program Files\Packeged Programs you have an MSI file

We install it on the client or through group policies. Click on the shortcut on the desktop and click connect.
