Opening PDF files in Adobe Photoshop CS5. All about editing PDF files
- Choose File > Save As... and select " Photoshop PDF» in the Format menu. You can select the Color option if you want to use a built-in profile or a profile specified by the Proof Settings command. You can also include layers, notes, spot channels or alpha channels. Click the "Save" button.
- In the Save Adobe PDF dialog box, you should select a style that suits the task at hand: printing on a desktop printer or proofing device, in a print shop, email distribution, online posting, and so on.
The choice of style is the most in a simple way Set options for the Photoshop PDF file. Once you've chosen a style, click the Save PDF button to create a Photoshop PDF file. If you need to add security settings or fine-tune settings save PDF-file, follow the remaining steps in this procedure.
- (Optional) Select options from the Standard menu and the Compatibility menu to set compatibility with the PDF/X standard and with the version of Acrobat for this PDF document.
- (Optional) Select General on the left side of the Save Adobe PDF dialog box to set basic options for saving a PDF file.
Note. Users of Photoshop 7.0 and earlier can open Photoshop PDF documents as PDF with flattened layers. Choose File > Open As and then Basic PDF from the Files of Type menu (Windows) or File > Open and Basic PDF from the Format menu (Mac OS).
- (Optional) Select Compression on the left side of the Save Adobe PDF dialog box to set compression options and downsampling for the PDF file.
- (Optional) Select Output on the left side of the Save Adobe PDF dialog box to set color management and PDF/X compatibility options.
- (Optional) To define security settings for a PDF document, select Security on the left side of the Save Adobe PDF dialog box. Provide a password and set permissions for this PDF document.
Note. The encoding level depends on the Compatibility setting of the PDF document. Select a different Compatibility setting to set a higher or higher low level coding.
- (Optional) Select Summary on the left side of the Save Adobe PDF dialog box. You can view the settings you have made.
- (Optional) If you want to reuse the PDF save settings later, click the Save Style button to save the selected settings as a PDF style. A new style appears in the Adobe PDF Style menu the next time you save a Photoshop PDF file in any application in the Adobe Creative Suite.
- Click the "Save PDF" button. Photoshop closes the Save Adobe PDF dialog box and creates the PDF document.
The PDF format appeared in the computer world thanks to Adobe Systems. It was originally developed for printing products, but for many reasons it became popular among clerks. Official documents saved in PDF cannot be edited in Word or another. But is this state of affairs the final verdict on a sheet of text? How to edit a PDF file? Any search should start from where the “legs grow.” Adobe Systems offers a solution to the issue through another of its creations - Adobe Acrobat.
Editing a text PDF document
And also laziness and lack of time to tap on the keyboard - these are not all the reasons for wanting to use Acrobat. Download and install it trial version you can from the official website. This software- one of the simplest, most practical and convenient when working with PDF files.
When you first get acquainted with the editor, you should carefully consider its control panel. It includes features:
Corrections of typos and errors in the text;
Replacing the document creation date;
Moving, adding, deleting text fragments;
Editing a word or phrase in the text by highlighting it in color throughout the canvas using the “Search” function.

Tools
It’s clear how you can edit PDF files. But how to use the program tools correctly? The user should:
- Launch Adobe Acrobat.
- In the left part of the window, select the page on which the text to be edited is located.
- In the toolbar, so similar to the command panel Word line, select “Edit and change”.
- Double-click the left mouse button to mark the word or line that needs to be corrected.
- Enter the correct version of the text or its fragment.
- If you need to move a paragraph, then you need to select it and, holding the mouse button, drag it to its intended place.
These are the simplest operations that can be performed using the powerful editor from Adobe Systems. You can create and save documents, resize images, and select additional options.
Some people ask: "How to edit a PDF file in Adobe Reader?" This software product is intended more for viewing documents. Its editing functions are limited.

PDF and Photoshop
The word “document” often implies some kind of text or tabular form. But it is not so. A document in PDF format is more likely to have semantic meaning file. That is, this extension saves not only text, but also pictures, photographs, and any other images. If you accept this, then it becomes clear that the question of how to edit a PDF file in Photoshop is not so ridiculous.
Why Photoshop, if there is one? native program? The fact is that you cannot set security parameters in it. PDF files are unique in terms of their versatility. And when working with them in Photoshop, it is possible to set access restrictions. Second reason to use graphic editor- the ability to edit PDF files with saving layers, using a palette, filters, changing sizes.

Save from Photoshop to PDF
After launching the program and adding an image file, you need to click on it right click mouse and select “Save” from the drop-down menu. Computer Explorer will offer a window in the very bottom line of which you can decide on the format of the document to be saved. Naturally, the user's choice should be PDF. Next, you need to click on the “Save” icon.
At this stage, differences arise from the usual saving of a file. Photoshop will alternately offer two selection windows. The first of them will contain a warning that the file will not be able to support some of the selected parameters in the previous dialog. The user must agree to this. The second will contain several tabs and sections. An important one is Preserve Photoshop Editing Capabilities. Translated from English, this is “the ability to save editing in Photoshop.” Opposite the line with this function in the checkbox you must put a tick. After this, all you have to do is click on the Save PDF icon.
Changing text and images
- The user needs to open the folder containing the saved document.
- Right-click on the file and select Photoshop in the “Open with” line.
Almost everything. The created PDF file can be edited, and it will contain a full set of layers, including their masks, paths and shapes. The advantages of using Photoshop are that the output is an image that can be easily viewed in Adobe Reader by any user. And the same file can be edited in the most popular graphics program.

Working with a PDF document online
Users who have access to the network at their workplace do not need to install special editing software. Not sure how to edit a PDF online? Great for this Google service Docs. But to use it, the user must have his own Mailbox with gmail domain. It is from there that you need to go to the service. Its functionality seems unusual at first, but if you use it several times, the principle of operation becomes clear. In the future, the user is unlikely to think about how to edit a PDF file using other services.
The first step is to set up file uploads. To do this, in the right top corner window, you need to click on the gear icon. In the drop-down menu, select the “Download Settings” line. After that, in the window that appears on the left, check all the items, including “Convert text from PDF files and images." The setup practically ends there.
Before you can edit a PDF file, you must download the document itself. In the upper right corner, the word “Create” is highlighted in red and there is an arrow on which you need to click. In the explorer window that appears, select the document to download. The online editor should display it in the general list (of course, if the user stores any files in the Google service).
Double-click on the downloaded document with the left mouse button, after which the PDF file will open. It will be displayed as a picture, but below it there will be text that can be formatted using tools in top panel editor windows. It is very similar to the standard office command line.

PDFeskape - it's very simple
Is it possible to edit a PDF file in other online editors with a simpler and more intuitive interface? Without a doubt. There are other services. Among them is PDFeskape, a multifunctional, full-fledged online editor. It is posted on the official website at English language, but this is not a problem, because modern browsers translate all portal content instantly and make it accessible to any user.
However, let's return to the editor. On the very first page of the site, a long list outlines all possible operations with PDF files. Below is a large orange button - “Edit document now”, by clicking on which the user can start working almost immediately. When you use the editor for the first time, a wizard is activated, which offers options for operations. This feature is very convenient for a beginner.
Finally
How to edit a PDF file? Which editor should I use? In each specific situation, the answers are individual. But we can summarize the general features:
if you have Free access Internet with unlimited traffic, choose online services.
If you have a large volume of documents to edit, use Adobe Acrobat.
Photoshop gives you the ability to open and edit images like a pro.
As part of the Creative package Suite program Photoshop offers very good integration with other CS products, including one you might not expect - Adobe Acrobat. Photoshop can create native Acrobat PDF files directly from their file using the function Save, But that is not all. Oh no, that's not all!
Acrobat's PDF file format offers several very useful functions, not the least of which is cross-platform. Almost everyone on any computer can open and view a PDF, so when you start creating a PDF from Photoshop, you're starting to create a file with the same versatility as a JPG file.
But the PDF format offers more advanced features that can be integrated into your workflow. Specifically, I'm talking about document security, and back-and-forth editing capabilities. Yes, there from Photoshop to PDF format and back, with full opportunity editing. Moreover, you can creatively mix and match security features with editing features.
Let's see... we'll start with this layered Photoshop file that we want to distribute as a PDF

On this moment we get a simple warning informing us that the changes we are about to make in the next dialog box may override the options selected in the previous (Save As) dialog box.

Next we get a dialog box with options for saving the PDF file, which has several sections on several tabs. For now we will focus on only one of the main parameters: Preserve Photoshop Editing Capabilities(Keep editable in Photoshop):

When enabled, the PDF file will behave the same as a PSD file when opened again in Photoshop. Leave the checkbox and press the button Save PDF(save PDF). Another warning will appear that earlier Photoshop versions will not be able to open this file as “Photoshop PDF”. We press the button Yes, to continue.

The file will be saved. Now close original file in Photoshop and open (File > Open) the created PDF.

The file will open, it's a PDF - but it contains a full set of layers, including layer masks as well as any text layers, shapes, paths, etc. All this is present and can be further edited at will in Photoshop!

So what does this mean? You have a PDF file, you can send it to someone and they can open and view it in Acrobat or Reader. Plus, you or anyone else will be able to open and edit the file just as if it were a native PSD file - all from one source document.
To do this, while saving the file, in the PDF options dialog box, go to the section Security(Safety). Check the box there Require a password to open the document(Require a password to open the document). You need to come up with a password (and don’t forget!!!) and enter it in the field Document Open Password.

This time when the button is pressed Save PDF, a confirmation window will appear and you will need to enter the password again:

Now, when you try to open a file, you will be prompted to enter a password before the program will allow you to open or view the file.
But wait - that's not all!
Using security features, you can restrict document editing with a password without requiring a password to open or view the file. In this case, we need to make some changes to the write security settings. Clear the checkbox for setting a password to open the document, but add another one to restrict printing, editing, and other tasks:
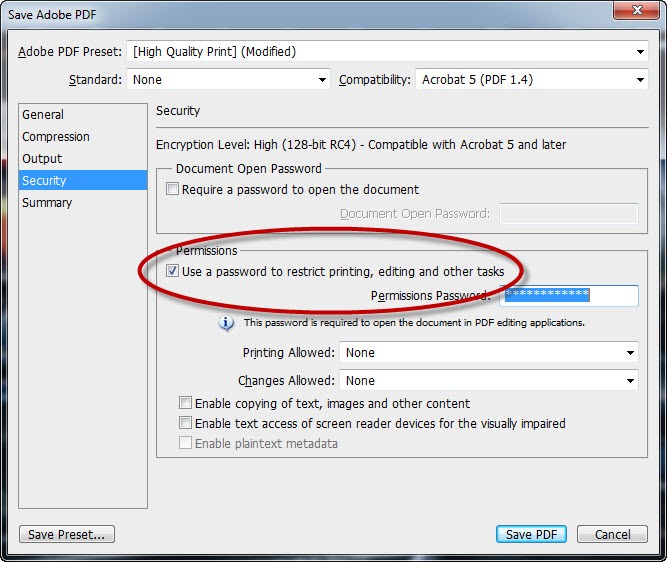
Below are the parameters Printing Allowed And Changes Allowed, which by default completely prohibit printing and modification of any kind - no copying of text, images or other content. You can set these parameters as you wish. For example, the image below only allows low-resolution printing and is not editable at all. However, anyone can view the document and no password is required to view it.

With these options, if we try to open this document in Photoshop, we will get the following dialog box

If we enter the password correctly, the file will open with the layers intact as before. If not, it won't open in Photoshop.
If we open the PDF file in Acrobat, we can see that the document is protected - the editing tools are displayed gray and are completely inaccessible - changes to this document cannot be made even in Acrobat.

These features can be used in your work, both with clients and customers, and with colleagues working together. Try it!
The original article in English is located
Mike Hoffman has been a photographer, artist, and educator for most of his life. Early in his career, he created technical illustrations and photographs for electronic equipment manufacturers, and also taught classes in computer training and 3D modeling. Michael is currently an Adobe Certified Professional in Photoshop and Acrobat and is proficient in Lightroom, Photoshop Elements, Illustrator and InDesign. He has contributed greatly to the work done by Operation Rescue Photo to restore photographs damaged by natural disasters. As an active member of the National Association of Photoshop Professionals, he continues his excellence in the art, design excellence, and education.
Note.
Users of Photoshop 7.0 and earlier can open Photoshop PDF documents as PDF with flattened layers. Choose File > Open As and then Basic PDF from the Files of Type menu (Windows) or File > Open and Basic PDF from the Format menu (Mac OS).
Note.
The encoding level depends on the Compatibility setting of the PDF document. Select a different Compatibility setting to specify a higher or lower encoding level.
Style Convert to PDF is a group of options that control how the PDF document creation process proceeds. These settings are designed to balance file size and quality depending on how the PDF document will be used. Most of the preset styles are common to all Adobe components, including InDesign, Illustrator, Photoshop, and Acrobat. For special output conditions, the user can also create and share their custom styles.
Some of the styles mentioned below become available only after the user, if necessary, moves them from the Extras folder, where they are installed by default, to the Settings folder. Typically, the Extras and Settings folders are located in the directory ( Windows Vista and Windows 7) ProgramData\Adobe\AdobePDF, (Windows XP) Documents and Settings\All Users\Application Data\Adobe\Adobe PDF or (Mac OS) Library/Application Support/Adobe PDF. Some styles are not available in some Creative Suite components.
User settings are located in the (Windows XP) Documents and Settings/ directories [Username]/Application Data/Adobe/Adobe PDF/Settings, (Windows Vista and Windows 7) Users/ [Username]/AppData/Roaming/Adobe/Adobe PDF/Settings, or (Mac OS) Users/ [Username]/Library/Application Support/Adobe/Adobe PDF/Settings.
It is recommended to check your PDF file settings from time to time. The program does not provide automatic return to default settings. Programs that can create PDF documents use the last option specified or selected.
High quality printing
Designed to create PDF documents for high-quality printing on desktop printers and proofing devices. This style uses PDF 1.4, reduces the resolution of color and grayscale images to 300 ppi and monochrome to 1200 ppi, embeds character subsets of all fonts, leaves color unchanged, and does not perform transparency processing (for file types , supporting transparency). Such PDF documents can be opened using Acrobat 5.0 and Acrobat Reader 5.0, as well as their later versions. In InDesign, this style also allows you to create tagged PDF documents.
Illustrator by default (Illustrator only)
Designed to create PDF documents in which data is stored, necessary for the program Illustrator. PDF files created with this style can be opened in Illustrator without any data loss.
Large formats (Acrobat only)
Allows you to create PDF documents suitable for viewing and printing engineering documents larger than 200 x 200 inches (5080 x 5080 mm). These PDF documents can be opened with Acrobat 7.0 and Acrobat Reader 7.0 and later versions.
PDF/A-1b: 2005 (CMYK and RGB) (Acrobat only)
Used when creating electronic documents intended for long-term (archival) storage. PDF/A?1b uses PDF 1.4 and converts all colors, depending on the selected standard, to either CMYK or RGB. These PDF documents can be opened by Acrobat 5.0 and Acrobat Reader 5.0 and their later versions.
PDF/X?1a format (2001 and 2003)
The PDF/X-1a format requires that all fonts be embedded, the appropriate printer's and PDF bleed marks defined, and that the colors be in CMYK, spot color, or both. Files that comply with this standard must contain a description of the printing conditions for which the files were created. PDF files that comply with the PDF/X?1a standard can be opened in Acrobat 4.0 and Acrobat Reader 4.0 and later versions.
The PDF/X?1a style uses PDF 1.3, downsamples color and grayscale images to 300 ppi and monochrome to 1200 ppi, embeds character subsets of all fonts, creates untagged PDF files, and flattens transparency using the High Resolution option.
Note.
Styles PDF/X1?a:2003 and PDF/X?3 (2003) are installed on the computer along with the program, but are not available until the user moves them from the Extras folder to the Settings folder.
PDF/X?4 (2008)
This style is for creating ISO files PDF/X-4:2008 supports live transparency (no flattening) and ICC color management. PDF files are exported with this style in PDF 1.4 format. Images are reduced and compressed, and fonts are embedded in exactly the same way as in PDF/X-1a and PDF/X-3 modes. PDF files that comply with the PDF/X-4:2008 standard can be created in Creative Suite 4 and 5 components such as Illustrator, InDesign, and Photoshop. Acrobat 9 Pro includes capabilities to prepress and validate PDF files against PDF/X-4:2008, as well as the ability to convert non-PDF/X files to PDF/X-4:2008 format (if available).
Print quality
Designed for creating PDF files for high-quality letterpress printing (such as digital presses or film output on phototypesetting and plate printing machines), but is not intended for creating PDF/X-compliant files. In cases like these, quality is critical. The goal is to store in a PDF file all the information that is needed to reproduce it correctly and print it in a printing office or print shop. This set of options specifies the use of PDF 1.4, converting colors to CMYK, reducing the resolution of color and grayscale images to 300 ppi and monochrome images to 1200 ppi, embedding character subsets of all fonts, and preserving transparency (for types files that support it).
Note.
Before you create a PDF file to send to a print shop or print shop, you should check with your service provider for output resolution and other required settings, or request a *.joboptions file with recommended settings. Based on the results, you may need to change the PDF file options to suit your printer's requirements and then provide your own *.joboptions file.
Informative PDF
Designed to create widely accessible PDF documents that contain tags, hyperlinks, bookmarks, and interactive elements and layers. This set of options specifies that PDF 1.5 is used and that subsets of characters from all fonts are embedded. It also optimizes files for "portion serving". Such PDF files can be opened with Acrobat 6.0 and Adobe Reader 6.0, as well as their later versions (the “Informative PDF” style - Rich Content PDF - is located in the Extras folder).
Note.
In earlier versions of some applications in the suite, this style was called eBook.
Smallest file size
Creates PDF files for posting on the Internet, intranet, or distribution to e-mail. This set of options compresses and reduces the resolution of images to a relatively low resolution. This converts all colors to sRGB and embeds fonts. It also optimizes files for "portion serving". For best results, do not use this setting if you plan to print a PDF file.
These PDF files can be opened with Acrobat 5.0 and Acrobat Reader 5.0 and later versions.
Standard (Acrobat only)
The kit is designed to create PDF files that will be printed on a printer or digital copier, burned onto CDs, or sent to the client as proof of publication. It compresses and downsamples to reduce file size, but also embeds character subsets of all legal fonts used in the file, converts all colors to sRGB, and prints at medium resolution. Note that character subsets are not inlined by default Windows fonts. PDF files created with this settings file can be opened by Acrobat 5.0 and Acrobat Reader 5.0 and later versions.
The PDF/X and PDF/A standards are approved by the International Organization for Standardization (ISO). The PDF/X standards address the conditions for transmitting graphic content, while the PDF/A standards define requirements for electronic documents, intended for long-term storage. When converting a PDF file, it is checked to ensure it meets a specified standard. If the PDF document does not match the selected ISO standard, a message appears allowing you to choose between canceling the conversion and continuing the conversion, which will create a non-standards compliant file.
Several PDF/X formats are the most widely used in publishing and printing: PDF/X-1a, PDF/X-3 and PDF/X-4 (in 2007). The most widely used standards for creating archives from PDF files are PDF/A-1a and PDF/A-1b (in the case of less stringent requirements).
When you start creating PDF documents, you need to decide which one PDF versions use. The PDF version number varies by style; it can also be specified explicitly when selecting compatibility when saving or editing a PDF style.
In general, unless there is a special requirement backward compatibility, it makes sense to use the most new version(V in this case- version 1.7). Latest version includes everything latest features and opportunities. But if the document is intended for wide distribution, then it is better to choose Acrobat 5.0 (PDF 1.4) or Acrobat 6.0 (PDF 1.5) so that anyone can view and print it.
The table below shows the characteristics of PDF documents created with different compatibility settings.
Note.
Acrobat 8.0 and 9.0 also support PDF 1.7.
Acrobat 3.0 (PDF 1.3) |
Acrobat 5.0 (PDF 1.4) |
Acrobat 6.0 (PDF 1.5) |
Acrobat 7.0 (PDF 1.6) and Acrobat X (PDF 1.7) |
|---|---|---|---|
PDF documents can be opened by Acrobat 3.0 and Acrobat Reader 3.0 and later versions. |
PDF documents can be opened by Acrobat 3.0 and Acrobat Reader 3.0 and later versions. Please note that features introduced in later versions may be lost or may not be able to be used. |
Most PDF documents can be opened with Acrobat 4.0 and Acrobat Reader 4.0 and later versions. Please note that features introduced in later versions may be lost or may not be able to be used. |
|
They cannot contain objects with live transparency effects. All transparency should be reduced before converting the file to PDF 1.3 format. |
Supports use graphic objects with “living transparency” effects. (Acrobat Distiller always performs transparency flattening.) |
Supports the use of graphic objects with “living transparency” effects. (Acrobat Distiller always performs transparency flattening.) |
|
The format does not support the use of layers. |
Layers will be preserved when creating PDFs using applications that support multi-layer PDFs (such as using Illustrator CS and later or InDesign CS and later). |
||
DeviceN color space with 8 colors is supported. |
DeviceN color space with 31 colors is supported. |
||
(Distiller converts fonts during the embedding process.) |
Embedding of multi-byte fonts is allowed. |
Embedding of multi-byte fonts is allowed. |
Embedding of multi-byte fonts is allowed. |
The use of 40-bit RC4 encryption algorithm is supported. |
The use of 128-bit RC4 encryption algorithm is supported. |
Supports the use of 128-bit RC4 encryption algorithm and 128-bit AES (Advanced Encryption Standard). |
You can set following parameters in the General section of the Adobe PDF Options dialog box:
Description
Displays the description from the selected style and offers the ability to edit the description. You can paste a description from the clipboard. If the style description has changed, the word "(as modified)" is added to the end of the style name.
Saves Photoshop data to PDF such as layers, alpha channels, and spot channels. Photoshop Documents PDFs with this setting can only be opened in Photoshop CS2 and later.
Embed page thumbnails
Creates a thumbnail image of an illustration.
Optimize for quick view on the Web
Optimizes a PDF file for quick viewing in a web browser.
Show PDF after saving
Opens the newly created PDF file in your default PDF viewing application.
When you save artwork in Adobe PDF, you can compress text and vector objects, as well as compress and downsample bitmap images. Depending on the settings you choose, compression and downsampling can significantly reduce the size of a PDF file with virtually no loss of detail or accuracy.
The Compression area of the Adobe PDF Options dialog box is divided into three sections. Each section contains options for compressing and interpolating the images in your illustration.
Downscaling
If you plan to use the PDF file online, lower the resolution for more effective compression. If you plan to print a PDF file from high resolution, do not downgrade. Select the Don't Downsample option to disable all downsampling options.
Downsampling involves reducing the number of pixels in the image. To downsample images, select interpolation method- average downsampling, subsampling, or bicubic downsampling - and enter the desired resolution (in pixels per inch). Then enter the resolution in the "For images with higher resolution" field. All images with a resolution above this threshold are downsampled.
The selected interpolation method determines the approach to removing pixels.
Average Downsampling B
Averages the pixels in a sample area and replaces the entire area with the average pixel color at the specified resolution. Averaged downsampling is the same as bilinear resampling.
Subsample B
Selects the pixel in the center of the sample area and replaces the entire area with the color of that pixel. Subsampling significantly reduces conversion time compared to downsampling, but the resulting images are less smooth and continuous. Subsampling is the same as interpolation over neighboring pixels.
Bicubic downsampling B
Uses a weighted average to determine the color of a pixel, which usually produces better results than the simple average downsampling method. The bicubic method is the slowest, but also the most accurate for obtaining the highest quality smoothing.
Compression
Specifies the type of compression to use.
ZIP compression
Effectively used for images with large areas of the same color or repeating patterns, and for black and white images containing repeating patterns. ZIP compression is lossless.
JPEG compression
Suitable for color or grayscale images. JPEG compression is in progress with data loss, which involves deleting image data, which may degrade image quality, but reducing file size with minimal data loss. Because JPEG compression removes data, it produces significantly smaller file sizes than ZIP compression.
JPEG2000
Is new international standard compression and packaging of image data. Like JPEG compression, JPEG2000 compression is suitable for color and grayscale images. It also provides additional benefits, such as progressive display and lossless compression, which are not available in JPEG. JPEG2000 compression is only available when Acrobat 6 (PDF 1.5) or later is selected in the Compatibility menu.
Image quality
Determines the amount of compression to apply. Options are available depending on the selected compression method. For JPEG2000 compression, Photoshop offers Lossless, Maximum, High, Medium, Low, and Minimum options. For JPEG compression, Photoshop offers Minimum, Low, Medium, High, and Maximum options. For ZIP compression, Photoshop offers an 8-bit option. The 8-bit option provides lossless compression, meaning no data is removed to reduce file size, so image quality is not compromised.
Segment size
Sets the size of segments used in images when JPEG 2000 compression is applied. When applying values Low quality to optimize images whose size does not exceed 1024 x 1024 pixels, use maximum size segments allows you to get the best results. Generally, a segment size of 1024 is most appropriate for most images. Smaller sizes segments are usually used for images not big size(intended for viewing on cell phones and so on.).
Convert 16 bit/channel image to 8 bit/channel
Converts 16-bit RGB images to 8-bit (selected by default). ZIP compression is the only one accessible method compression if the “Convert 16-bit/channel image to 8-bit/channel” option is not selected. If the Compatibility setting for this document is set to Acrobat 5 (PDF 1.4) or greater early versions", the "Convert 16-bit/channel image to 8-bit/channel" option is not available and images are automatically converted to 8-bit/channel.
You can set the following options in the Output section of the Adobe PDF Options dialog box. The possible combination of options in the Output section depends on whether the option is enabled or disabled "Color Management" and which PDF standard is selected.
Convert colors
Specifies the presentation characteristics of color data in Adobe file PDF. When converting color objects to RGB or CMYK, also select a target profile from the drop-down menu. During color conversion, all spot color data is preserved, while process color equivalents are converted to the target color space.
No conversion
Stores color data unchanged.
Convert to Target Space
Converts all colors to the profile selected for the " Target profile" Profile embedding is determined by the profile's embedding strategy.
Portable Document Format (PDF) is universal format files that can represent both vector and point data. It has electric
throne document search and navigation features. PDF is the primary format for Adobe Illustrator and Adobe Acrobat.
Some PDF files contain a single image, while others contain multiple pages and images. When you open a PDF file in Photoshop, you can choose specific pages or images to open and determine the rasterization method.
You can also import PDF data using the commands Place(Pestit) and Paste(Insert) and Drag-and-Drop technology(Drag and drop). The page or image is posted on separate layer as a vector object.
Please note that the following procedure is only used to open PDF files created in Photoshop. You should not specify options in a dialog box Import PDF(Import PDF) when opening PDF files in Photoshop.
Do the following:
1. For Photoshop: select command File | Open(File | Open). Next in the dialog box Open(Open) select the file name and click the button Open(Open).
For Bridge: select PDF file and command File | Open With | Adobe Photoshop CS5(File | Open with | Adobe Photoshop CS5).
2. In the dialog box Import PDF(Import PDF) select Pages(Pages) or Images(Images), depending on what kind of PDF document you want to import.
3. Click on the icons to select the pages or images you want to open. To select more than one page, hold down the click
Use large icons only to present them in the preview window. The large icon options control them in the preview window. A scroll bar appears for the three large icons.
4. To give the new document a name, enter a name in the text box. If you want to import more than one page or image, select them all at once and open.
5. When selecting a PDF document, you should set the options to enable from the menu Crop To(Limitation):
◆ Bounding Box(Limitation circuit). This option eliminates outer white margins and any document elements outside the area to which the tool is applied. Trim Box(Cutting box). Bounding Box(Constraint Outline) will not clip white margins that are part of the background created by the original application;
◆ Media Box(Mediabox). Crop to original page size;
◆ Crop Box(Boxing cropping). Crop the edge area of a PDF file;
◆ Bleed Box(Sharp cut box). Crop specific areas specified in the PDF to accommodate the constraints inherent in presses such as shrinking, folding and trimming;
◆ Trim Box(Cutting box). Crop specific areas specified for the intended finished page size;
◆ Art Box(Artistic trimming). Crop specific areas specified in a PDF file to accommodate PDF data in other applications.
6. In section Image Size(Image size) enter values in the fields Width
(Width) and Height(Height):
◆ maintain page proportionality. Because they are scaled within the rectangle defined Width(Width) and Height(Here), then select Constrain Proportions(Limited proportion);
◆ accurately scaling the page, select Width(Width) and Height(Height).
Some distortion may occur when pages are scaled.
When more than one page is selected, text fields Width(Width) and Height(Height) show the maximum width and height of the selected pages. All pages are provided in their original size if the option is enabled Constrain Proportions(Limited proportion) and the values cannot be changed Width(Width) and Height(Height). Changing these values will scale all pages in proportion to how rasterized they are.
7. Define the following options for Image Size(Image Size):
◆ Resolution(Permission). Sets the permission for a new document;
◆ Mode(Mode). Installs color mode new document;
◆ Bit Depth(Bit depth). Sets the bit depth for the new document.
The width and height plus resolution determine the final pixel size of the resulting document.
8. To respond to warnings color profile, select Suppress Warning(Suppress warning).
9. Press the button OK.