What is a web document in Word? Save a document as a web page
TOPIC 8
CREATION
WEB-PAGES WITH HELP
WORD
As editors that make it easier to create Web -sites, you can use applications Microsoft Office – Word, Excel, PowerPoint and others. In this case, the user may not know the language HTML and have a familiar environment for document execution - WYSIWYG (what I see is what I get). A huge number of people using Word become potential developers in their daily work HTML documents.
Create a Web page in Word Can two ways: Using a wizard or template, or by converting an existing document Word to HTML format. At the same time Word generates tags itself HTML , although not in an optimal way.
First way HTML creation -documents is quite simple - you need to start creating a document “from scratch” and just follow the Wizard’s advice and use the tools that are available in the program menu.
Second way- conversion of an existing document Word to HTML tags when saving the file - Word in HTML format . The transformation naturally leads to the fact that some elements of the document will be lost or changed.
One of the distinctive features HTML -documents is that the document itself contains only text, and all other objects are built into the document at the time it is displayed by the Browser using special tags and are stored separately. When saving HTML -file at the location of the document Word creates a folder on the disk in which it places accompanying graphic design elements. For example, when saving a file with drawings - frieds. htm , Word creates a frieds .files folder , in which all the drawings will be placed.
Therefore, when creating a site - a group of interconnected Web -pages, it is recommended to place the site in a separate folder, and when moving or publishing the site, strictly preserve the entire internal folder structure.
When preparing to publish on the Internet materials created in Word , it is useful to know the features of converting to the format HTML . Some of them are given below (Table 8.1).
Table 8.1
| Document element Word | ConversionWord® HTML |
| Font sizes | In Word fonts from 9 to 36 points are displayed. Font sizes HTML range from 1 to 7 and serve as an indication to the Browser of the font size |
| Text effects: | Text effects are not saved, but the text itself remains |
| Styles: | Remains, but some types of underlining are converted to a solid line |
| Text Animation | The animation is not saved, but the text remains. To give the text an animated effect, you can use the creeping line (panel " Web components") |
| Graphics | Images are converted to GIF or JPEG , if they have not been previously saved in such formats. The lines are converted to horizontal lines. |
| Graphics: AutoShapes, Shaped Text, Text Boxes, and Shadows | Objects are converted to files in the format GIF . In the editing environment Web -pages you can insert graphic tools “Insert” - “Drawing” |
| Tables | Tables are converted, but options are not supported HTML , are not saved. For example, colored borders and variable width borders |
| Page numbering and footers | Since the document HTML considered one Web -page, then the concept of headers and footers is absent and numbering is not preserved |
| Page margins and multi-column text | |
| Styles | User-defined styles are converted to direct formatting if supported HTML |
If necessary, insert on HTML -page own tags, in Word direct editing HTML-code. This can be done by calling the editor window through the menu “View” - “Source” HTML " Before switching to this mode, you should save the file. After editing is completed, before closing the window, the file must also be saved.
Another option is to open the document in the Browser and call the “View” menu - “As HTML " By default, editing is done in Notepad.
Although Word displays the document in almost the same form as it will later look in the Browser, preview Web -the document can be executed without leaving Word.
BASIC TERMS
ASCII ( American Standard Code for information Interchange– American Standard Code for Information Interchange) – seven-digit code for representing text information.
GIF ( Graphics Interchange Format– graphics interchange format) – used for low-color, clear images, supports transparent areas and animation.
HTML ( Hyper Text Markup Language) – hypertext markup language.
JPEG ( Joint Photography Experts Group– a joint group of experts on photo processing machines) – a common raster graphics format that is ideal for scanned photographs.
Web- page ( Web-page)– an electronic document intended for posting (posted) on the Internet.
Web- site ( Web-website)– set of Web -pages interconnected by topic, hyperlinks and close location on the Internet.
Web server -server) – a server designed to host Web -sites on the Internet, and providing services based on customer requests.
WYSIWYG ( What You See Is What You Get– what I see is what I have) – a type of editor in which a document is displayed as it will be printed or presented on the Internet.
TASK No. 8
Topic: Creation
Web
-site based on software applications
MS
Office
(
Word
And
Excel
)
Part 1: Creating a group
Web-pages by conversion method
documents
MSOffice
1. Prepare a folder on your working disk to place your documents.
2. Create a Word document with the following content.
Main heading, for example WordArt:
![]()
Then place the text:
And create a table of contents consisting, for example, of 2 paragraphs.
My hobbies
My friends
3. Complete the document and save it in your folder on your hard drive under the name main.doc.
4. Create a Word document dedicated to your passions. Save document under name hobby.doc in your folder. The document must be formatted, have a footer, and contain pictures in addition to text.
5.
Create an Excel workbook with a table according to the example given (Fig. 8.2), save under the name friends.xls.
To calculate the average values should be used formulas.
| My friends |
|||
| Name | Age | Height | Weight |
| Vasya | |||
| Zina | |||
| Kolya | |||
| Lena | |||
| Average value | 27,5 | 176 | 71,75 |
Rice. 8.2. Example table for a file friends.xls
5.1. Build graphics, illustrating information about your friends. Place the graphs under the table, adjust the size of the table and graphs.
5.2. Prepare the sheet for printing:
5.2.1. Configure the parameters of the “Page...” tab in the modePreview, create headers and footers.
6. Establish connections between documents using hyperlinks.
6.1. Open the main document main.doc and sequentially selecting the section headings, attach hyperlinks to them (“Menu - Insert”) to the corresponding documents.
7. In the main document, set a bookmark to the title My hobbies . Give it the name “Hobby”. Save the document.
8. Create hyperlinks at the end of each supporting document that provide a return to the main document.
8.1. Prepare a drawing to ensure return from supporting documents to the main one. For example, a picture can be obtained by creating a graphic copy of the active window in the buffer (Alt+PrintScreen) and further editing the picture in the Paint editor.
8.2. Insert a picture at the end of each document and attach a hyperlink to the document main.doc. In file hobby.doc the hyperlink should provide a link to the “Hobby” tab.
10. Create a related group Web-pages, by converting prepared documents .
10.1. Prepare a folder for Web -documents with name My_Web.
10.2.
Sequentially opening previously prepared documents, save them in a folder My_Web by specifying
File type: Web page (*.htm; *.html)
10.3. Close all documents, analyze the changes that have occurred in the folder structure.
11. Browse the Web -documents starting from main. htm . Analyze which elements of documents have changed or disappeared altogether. Make an attempt to follow the hyperlink. Make sure that connections between Web -pages need editing.
12. Edit Web -documents, change hyperlinks, perform additional design.
Attention:To switch from the Browser to editing mode, you need to use the menu “File” - “Edit in Microsoft Word for Windows" or the button on the toolbar.
13. Save and close all documents, copy folder My_Web to drive A: . Submit your work Web -pages to the teacher.
Part 2. Creation of new
Web-documents using
applications
MSOffice
1. Get acquainted with the structure and composition of a multi-page hypertext document combining four pages (see appendix).
2. Create a folder namedPresentation, and in it a folder for your drawings -Gallery.
3. Prepare drawings for inclusion on appropriate pages. Save them in a folderGalleryas separate files of the format bmp, gif or any other format used on the Internet. Pay attention to the size of the pictures and the size of the files. The file size should not exceed 3 - 10 KB.
4. Create a separate file for each page using a text processor Word (pages 1,2,4). For Page 3 use a ready-made file friends. htm. Save files in the format htm or html in the folder Presentation.
4.1. Launch word processor Word and use it to create the main page, save the file in the format html under the name index. htm.
4.1.1. When creating a structured document, it is recommended to use a table. After placing the objects, remove the table border.
4.1.2. Complete the document. For the main headers use the object WordArt , for others - Heading style
4.1.3. To decorate the background, use one of the texture fill methods (menu "Format" - "Background" - "Fill methods") or thematic design (menu“Format” – “Theme”).
4.1.4. View in the browser changes in the folder structure that occurred during saving Web -pages. Open the created page and edit it if necessary.
4.2. Create a second website page using the editor Word.
4.2.1. To create a document, use the menu item“File” - “Create”, in the dialog box that opens"Creating a document"select tab“WEB pages” and the “New WEB page” icon . Keep clean WEB -page in a folderPresentationby giving the page a name in Englishchildhood. htm
4.2.2. Use "My childhood" as the title Creeping line, having previously displayed the panel Web -components. Get acquainted with the parameters of the Creeping Line, configure it so that it appears no more than 2 times.
4.2.3.
Make markings for placing objects using a table.
Insert picture from folderGallery.
4.2.4. Design the background of the page using a two-color gradient fill. Choose colors that are close to the color of the texture or theme of the main page.
4.3. Create a third page based on the file created in Part 1 friends. htm.
4.3.1. Copy the file and its accompanying folder to a folderPresentation.
4.3.2. Open the file in the Browser and make sure that the document is displayed correctly. Edit if necessary.
4.4. Create the fourth page of the site using the editor Word.
4.4.1. Prepare a drawing - a view of the GUT building from the Moika side (find the old GUT website). Save the drawing in a folderGallery.
4.4.2. Create a file in a folderPresentation, with name university. htm.
4.4.3. Insert a drawing into the file - a view of the GUT building, previously saved in a folder Gallery. Copy or enter your university email address. Write a few phrases about your faculty and insert a hyperlink to the faculty website.
5. Establish connections between site documents.
5.1. Open in Word document index. htm, and sequentially highlighting the “Contents” items, insert hyperlinks to the relevant documents.
6. Insert a picture () at the end of each document. Create hyperlinks that provide a return to the main document, anchored behind the picture.
Attention! The picture for transitions to the main page must also be in the folderGallery.
8. View the contents of each of the newly created files in the format HTML.
8.1. Find tags that provide the insertion of hyperlinks and pictures.
9. Copy folderPresentation with all its contents on disk A: or on disk C: to the Temp folder . Test the site by launching it from a new location.
10. Show your website to the teacher and start viewing it from the main page.
Application
Site structure
|
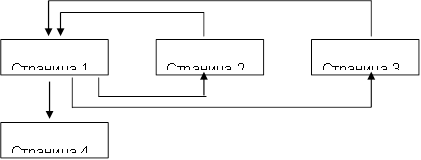
Page 1(main page)
| Greetings |
||
| My childhood My hobbies My universities | Introduction – Brief Summary | Text (comments on the photo) |
| Text (a few lines on a given topic) |
||
Page3 (My friends) – use the previously created Web-document friends. htm , created using Excel.
Page 4 (My Universities)
Full name of the University, GUT website address, picture with a photograph of the main building of GUT
Introduction
During the computational practice:
· developed a pedagogical scenario on the topic of an individual task;
· developed a Web page that implements the developed pedagogical scenario;
· configure and test the developed Web page using Internet Explorer;
· prepare a report on computing practice;
Using Word to Create Web Pages
During the internship we learned:
· save Word documents as web pages;
· view web pages in Web markup mode;
· save web pages in the Web folder;
· create web pages using the Web Page Wizard.
and World Wide Web
The World Wide Web is a system of interconnected documents hyperlinks. Hyperlinks allow you to navigate from one document to another. Documents may include text, pictures, audio and video files. There are some limitations to formatting documents in HTML (the main file format of the World Wide Web). For example, in these documents, without special tricks, it is usually impossible to place text in several columns, and it is also impossible to align it on both edges of the page.
Each web page is a plain text file with formatting options for text, graphics, and hyperlinks specified as commands. This file is called an HTML source because the corresponding commands are written in Hypertext Markup Language (HTML) format. The browser (the program that allows you to read information in World Wide Web documents) recognizes the web page and displays it on the screen in the same way that Word does in web page mode.
We will see that in Web viewing mode the text is convenient to read, since it is displayed in large letters and the lines are automatically wrapped, adapting to the width of the page. In this viewing mode, the text can be edited and formatted.
Save a Word document as a web page
Word 2000 uses the Internet File Format (HTML) as one of the Word formats. This means that you may not need to specifically convert Word documents to Web format. If you open a ready-made web page, Word will automatically save it in the same format. If you start working with a document in Word, you'll need a special save command to convert it to a web-ready format. Now we will create a document, make some changes to it and save it as a web page.
1. Open the Book Review.doc file that we created in one of the previous lessons.
2. Select View > Page Layout.
You will see a document formatted in several columns (Fig. 1)
The Save Document dialog box will appear on the screen, shown in Fig. 2.In it you can select a computer, disk or folder to save the document.
Fig.1.

Rice. 2
In addition, you can specify the file name and format. To set titles for web pages, use the Edit Title button. Let's save the web page in our working folder.
The title is the name of the document under which it will be published on the Internet. Various search engines use the content of such titles for priority searches. If you want your documents to be easily found in the vast amount of material published on the Internet, try to give them meaningful titles.
4. Click the My Documents button. The contents of this folder will be displayed on the screen.
5. Double-click the Work icon.
6. Highlight the file name in the File name field.
7. Enter the name My Web Document.
Word converts the document to HTML format to allow it. could be viewed online (Fig. 3).

Rice. 3.
Notice that the document is now displayed on the screen without columns. They can be displayed on the screen in page layout mode, but when viewed in a browser window they will not be displayed (Fig. 4).

Rice. 4
When you save documents in HTML format, Word saves the graphics and other objects from that document in separate files.
Also articles about working with pages in Word:
- How to adjust page margins in Word?
- How to display two pages on the screen at once in Word?
- How to highlight a page in Word?
- How to make a zebra in Word?
A web page in Word can be created even without any knowledge of HTML markup, and next we will look at how this can be done. There are two ways to create a web page in Word: create it from scratch or convert a ready-made Word file into HTML format.
Creating a web page in Word from scratch begins with creating a new Word document. After creating a new document, you should set the view mode to “Web Document” on the “View” tab, which will allow you to display the page to the full width of the screen.
When designing and filling out a page, you should take into account the fact that when this page is converted to HTML format, some design elements will be lost or converted to a different form. Some of the conversion features are shown in the table below.
After designing a page or opening a ready-made Word file, you can proceed to saving the Word document as a web page. To do this, go to the “File” tab, select the “Save As” menu and select the save location and specify the file type to save “Web page”.
When saving a Word document as a web page, a file will be created with the extension *.htm, and a folder with the same name and adding *.files at the end. The htm file stores all text information and html markup of the document, and the folder will contain all objects inserted into the document and other auxiliary files.
In this way, creating page after page, you can create a simple HTML website, which, with skillful design, will look decent, have its own menu and work very quickly.
Work courses in Korda
While it is entirely possible to generate an HTML page in Word, in most cases it is not recommended to do so if you intend to use the page in any professional or mainstream environment. Creating your personal website using Word is like building your own house out of LEGO blocks: you can do it this way if you have no other experience, but using the right tools or a professional will yield immeasurably better results.
Word is designed to create paper documents that have a fixed page size, font, and layout, whereas the page size, font, and design available to anyone viewing a website may vary significantly from yours. Because Word is specifically designed to format a fixed document, the web page code it generates loads in a non-standard paper style that may not display as you intended in browsers other than Internet Explorer, Microsoft's own program.
Steps

Print on the "Homepage" page.


Save your page as index.html. For Office 2007, change the file type in the “Save as type” menu to “Web Page”.

You'll now see that the page doesn't look like a regular Word document—you're now in sketch mode.

Add some extra text; Try typing something like "This is my home page."

Save your work often (just click the save icon - Word will remember the document as a web page).

Do the same when creating other pages (read below on how to create a hyperlink).


Select the text.


Look for the index.html file.

Once you have found the file, select it and click on the “OK” button.

Note that you have just created a hyperlink. This means that in your browser you can click on the corresponding hyperlink and go to another page on your site.


Keep doing this until your site is ready!

You did a good job. However, do not forget what was said in the introduction to this article.
Download Word.
- Make your site attractive with a variety of photos, links, and information.
- Name the pages (except the main page) so that they are easier to remember.
- Learn HTML.
- Get hosting. No one can see your site until it is online. There are free hosting sites (they are really simple resources), as well as professional paid services.
- Look online for some simple websites that fit what you're trying to do. Although you cannot make a dynamic site like WikiHow or MSN.com in Word or Publisher - you need too advanced settings (PHP, Client-Site Includes, ASP.NET and many others).
- It is much easier to make a website in Publisher, which features special web pages for designers.
Warnings
- If you plan to put your website on the Internet, be careful not to include any personal information that you do not intend to make public in the information document.
- As noted in the title of the article, creating HTML using any Microsoft Office product other than Expression Web is, for the most part, a bad idea. Just because a program can save a file as HTML does not make it web design software.
What you will need
- Computer
- Microsoft Office Word (all versions)
Article information
This page has been viewed 29,127 times.
Was this article helpful?
Purpose of the work: mastering the techniques of creating Web pages and Web sites using the Microsoft Word word processor: page design; organization of internal hyperlinks; organization of external hyperlinks.
Software used: word processor Microsoft Word.
Comment. To check if the Webmaster is running, run the command File -> New. If the window that opens has a tab Web pages, which means you can continue to work. If there is no such tab, then you will need to reinstall Microsoft Office and enable HTML creation mode.
Exercise
In this work you are implementing a family website project. Below you can see the Home Page layout and the Dad Page layout. You can create the layouts of the remaining pages yourself by analogy.


1. Open the word processor Word.
2. Run the command File -> New. In the window that appears, select the tab Web pages. Click on the New icon Web page.
3. Design the appearance of the page in accordance with the given sample, using the usual Word tools (managing formatting, fonts; you can make a colored background, select a texture, fill, etc.). When typing the text of the page, do not underline the words (Dad, Mom, Seryozha, Timka, biography). Underlines will appear automatically after you insert hyperlinks.
You can insert a picture either from a file with a scanned photo (if you have one), or by selecting any picture from the Microsoft Clip Gallery.
=> place the cursor before the paragraph beginning with the words: “My dad’s name is...”;
=> execute command Insert -> Bookmark;
=> in the window that opens in the line Bookmark name enter some name, for example “M1”; click on the button Add;
=> in the list above, highlight the word “Dad”;
=> execute command Insert -> Hyperlink;
=> Review opposite the line “Object name in document”;
=> select the name of the created bookmark (M1); click on the button OK, then again on OK. The hyperlink is ready.
5. Similarly, organize internal hyperlinks on other words from the list (Mama, Seryozha, Timka) to the corresponding paragraphs of the main page.
7. Create a “Dad’s Page” (see steps 1-2); There is no need to create hyperlinks in it yet. Save the page as a file father.htm in a folder My documents.
8. Return to the main page. Create an external hyperlink in it to “Daddy’s Page”. To do this:
=> highlight the first word “Biography” in the text;
=> execute command Insert -> Hyperlink;
=> in the window that appears, click on the button Review opposite the line File/URL Link;
=> find and select the previously created father.htm file; click on the button OK, then again on OK. The hyperlink is ready.
9. Return to “Daddy’s Page.” Create an external hyperlink in it to the Moscow University website. To do this:
=> select the text “Moscow State University named after. M.V. Lomonosov";
=> execute command Insert -> Hyperlink;
=> in the window that appears in the line File/URL Link type MSU URL: click on the button OK, then again on OK. The hyperlink is ready.
10. Create the remaining pages of the family website according to the plan presented in the diagram. Organize connections between pages and external connections. Don't forget to save all created files. (My documents/11th grade/full name)
11. Set the browser to offline mode.
12. Open the main page of the family site using a browser (to do this, just double-click on the file icon with the main page in the folder My documents). Check the operation of all internal hyperlinks (within the main page, as well as between the pages of your site).
13. Cancel offline mode, check the operation of external hyperlinks.
A web page in Word can be created even without any knowledge of HTML markup, and next we will look at how this can be done. There are two ways to create a web page in Word: create it from scratch or convert a ready-made Word file into HTML format.
Creating a web page in Word from scratch begins with creating a new Word document. After creating a new document, you should set the viewing mode "Web Document" on the tab "View", which will allow the page to be displayed across the entire screen width.
When designing and filling out a page, you should take into account the fact that when this page is converted to HTML format, some design elements will be lost or converted to a different form. Some of the conversion features are shown in the table below.

After designing a page or opening a ready-made Word file, you can proceed to saving the Word document as a web page. To do this, go to the tab "File", select menu "Save As" and selecting the save location, specify the file type to save "Web page".

When saving a Word document as a web page, a file with the extension *.htm, and a folder with the same name and addition *.files at the end. The htm file stores all text information and html markup of the document, and the folder will contain all objects inserted into the document and other auxiliary files.
TOPIC 8. CREATION OF WEB PAGES USING WORD
As editors that simplify the creation of Web sites, you can use Microsoft Office applications - Word, Excel, PowerPoint, etc. In this case, the user may not know the HTML language and have a familiar environment for document design - WYSIWYG (what I see is what I get). A huge number of people who use Word in their daily work become potential HTML document developers.
There are two ways to create a Web page in Word: using a Wizard or template, or by converting an existing Word document to HTML format. In this case, Word itself generates HTML tags, although not in an optimal way.
First way creating HTML documents is quite simple - you need to start creating the document “from scratch” and just follow the Wizard’s advice and use the tools that are available in the program menu.
Second way– Converts an existing Word document to HTML tags when saving the Word file in HTML format. The transformation naturally leads to the fact that some elements of the document will be lost or changed.
One of the distinctive features of HTML documents is that the document itself contains only text, and all other objects are built into the document at the time it is displayed by the Browser using special tags and are stored separately. When you save an HTML file in the location where the document is located, Word creates a folder on disk in which it places the accompanying graphic elements. For example, when saving a file with drawings frieds. htm Word creates a folder frieds. files, in which all the drawings will be placed.
In accordance with this, when creating a site - a group of interconnected Web pages - it is recommended to place the site in a separate folder and, when moving or publishing the site, strictly preserve the entire internal folder structure.
When preparing to publish materials created in Word on the Internet, it is useful to know the features of converting to HTML format. Some of them are given below (Table 8.1).
Table 8.1
Converting design elements to HTML
Word document element | Convert Word ® HTML |
Font sizes | Word displays fonts from 9 to 36 points. HTML font sizes range from 1 to 7 and provide the Browser with an indication of the font size |
Text effects: | Text effects are not saved, but the text itself remains |
Styles: | The font style remains, but some underlining is converted to a solid line |
Text Animation | The animation is not saved, but the text remains. To give text an animated effect, you can use the ticker (Web Components panel) |
Images are converted to GIF or JPEG format if they were not previously saved in such formats. Lines are converted to horizontal lines |
|
Graphics: AutoShapes, Shaped Text, Text Boxes, and Shadows | Objects are converted to GIF files. In the Web page editing environment, you can insert graphic tools "Insert" - "Drawing" |
Tables are converted, but non-HTML-supported settings are not preserved (such as colored borders and variable width borders) |
|
Page numbering and footers | Since the HTML document is considered one Web page, there is no concept of headers and footers and page numbering is not preserved |
Page margins and multi-column text | |
User-defined styles are converted to direct formatting if supported by HTML |
If you need to insert your own tags into an HTML page, Word provides direct editing of HTML code. This can be done by calling the editor window through the menu "View" - "HTML Source". Before switching to this mode, you should save the file. After editing is completed, before closing the window, the file must also be saved.
Another option to switch to HTML editing mode is to open the document in the Browser and call the “View” menu – “As HTML”. By default, editing is done in Notepad.
Although Word displays the document almost exactly as it will appear in the Browser, you can preview a Web document without leaving Word.
In the "View" menu, methods for displaying a Word document are set (Fig. 8.1). When you select "Web Document", the file is displayed as it will look in the Browser installed on your computer. Through the "View" menu you can return to the normal mode of working with the document.
https://pandia.ru/text/78/284/images/image002_81.gif" width="32" height="32 src=">Autobiography" href="/text/category/avtobiografiya/" rel="bookmark ">autobiography).
My hobbies
My friends
4. Create a Word document dedicated to your hobbies. Save document under name hobby. doc in your folder. The document must be formatted, have a footer, and contain pictures in addition to text.
5. Create an Excel workbook with a table according to the example below, save it under the name friends. xls
https://pandia.ru/text/78/284/images/image004_38.jpg" width="464" height="164 src=">
To calculate the average values should be used formulas.
5.1. Build graphics, illustrating information about your friends. Place the graphs, adjust the size of the table and graphs under the table.
5.2. Prepare the sheet for printing: configure the parameters of the “Page…” tab in Preview mode, create headers and footers.
6. Establish connections between documents using hyperlinks.
6.1. Open the main document main. doc and sequentially highlighting the section headings, attach hyperlinks to them ("Menu - Insert") to the corresponding documents.
8. Create hyperlinks at the end of each auxiliary document that provide a return to the main document.
8.1. Prepare a drawing to ensure return from supporting documents to the main one. For example, drawing Buffer" href="/text/category/bufer/" rel="bookmark">buffer (Alt+PrintScreen) and further editing the drawing in the Paint editor.
8.2. Insert a picture at the end of each document and attach a hyperlink to the main document. doc. In file hobby. doc the hyperlink should provide a link to the “Hobby” tab.
10. Create a group of related Web pages by converting prepared documents.
10.1. Prepare a folder for Web documents named My_Web.
10.2. Sequentially opening previously prepared documents, save them in a folder My_Web, indicating:
File type: Web page (*.htm; *.html)
10.3. Close all documents, analyze the changes that have occurred in the folder structure.
11. View Web documents starting from main. htm. Analyze which elements of documents have changed or disappeared altogether. Try to follow the hyperlink. Make sure that links between Web pages need editing.
12. Edit Web documents, change hyperlinks, and perform additional design.
Attention! To switch from the Browser to editing mode, you need to use the "File" menu - "Edit in Microsoft Word for Windows" or the button on the toolbar.
II. Creating new Web documents using MS Office applications
1. Get acquainted with the structure and composition of a multi-page hypertext document combining four pages (see Appendix 8.1).
2. Create a folder named Presentation, and in it - a folder for your drawings Gallery.
3. Prepare drawings for inclusion on the appropriate pages. Save them in a folder Gallery in the form of separate files in bmp, gif or any other format used on the Internet. Pay attention to the size of the pictures and the size of the files. The file size should not exceed 3–10 kbytes.
4. Create a separate file for each page using the word processor Word (Pages 1, 2, 4). For Page 3 use a ready-made file friends. htm. Save files in htm or html format in a folder Presentation.
4.1. Launch the word processor Word and use it to create the main page, save the file in html format under the name index. htm
4.1.1. When creating a structured document, it is recommended to use a table. After placing the objects, remove the table border.
4.1.2. Complete the document. For the main heading, use a WordArt object; for others, use the Heading style.
4.1.3. To decorate the background, use one of the texture filling methods (menu " Format" – "Background" – "Filling methods") or thematic design (menu " Format" – "Subject").
4.1.4. View in the Browser changes in the folder structure that occurred when saving the Web page. Open the created page and edit it if necessary.
4.2. Create a second page of the site using the Word editor.
4.2.1. To create a document, use the menu item " File"-"Create", in the dialog box that opens " Creating a Document"select tab" Web pages"and pictogram" New Web page". Save a blank Web page in a folder Presentation by giving the page a name in English childhood. htm
4.2.2. Use "My childhood" as the title Creeping line, having previously displayed the Web Components panel. Get acquainted with the parameters of the Creeping Line, configure it so that it appears no more than 2 times.
4.2.3. Make markings for placing objects using a table. Insert picture from folder Gallery.
4.2.4. Design the background of the page using a two-color gradient fill. Choose colors that are close to the color of the texture or theme of the main page.
4.3. Create a third page based on the file created in part I friends. htm
4.3.1. Copy the file and its accompanying folder to a folder Presentation.
4.3.2. Open the file in the Browser and make sure that the document is displayed correctly. Edit if necessary.
4.4. Create the fourth page of the site using the Word editor.
4.4.1. Prepare a drawing - a view of the SPbSUT building. Save the drawing in a folder Gallery.
4.4.2. Create a file in the Presentation folder named university. htm
4.4.3. Insert a drawing into the file - a view of the SPbSUT building, previously saved in the folder Gallery. Copy or enter your university email address. Write a few phrases about your faculty and insert a hyperlink to the faculty website.
5. Establish connections between site documents.
5.1. Open in Word document index. htm and, sequentially highlighting the “Contents” items, insert hyperlinks to the relevant documents.
6..gif" width="32" height="32 src=">MsoNormalTable">
Greetings
Performance -
short summary
Drawing or
photo
Write to me
(e-mail address)
Page 2 (My childhood)
Page 3 (My friends).Use a previously created Web document friends. htm, created using Excel.
Page 4 (My Universities).Give the full name of the University, the address of the SPbSUT website, a picture with a photograph of the main building of SPbSUT. Write a few words about your faculty, give a link to your faculty’s website.
Security questions
In what ways can you create a Web page in Word? How does Word change the folder structure on disk when saving a new Web page? What new document design techniques appear when working with Web pages? Which ones are becoming unavailable? How to insert a hyperlink to another document? How to insert a picture? How to view and edit tags of an HTML document created in Word?