Diagnostics of external hard drive wd. WD (Western Digital) Hard Drive Data Recovery
Hello Friends! In this article we will understand the topic - Hard Drive Diagnostics. The reason for writing this article was a message from relatives - our operating system has been installed for a maximum of two months, after which glitches begin and we have to reinstall it. Even after I installed Windows 7 for them, complaints began. I had no doubt about the operating system. It was already installed on more than 10 computers. I tested the RAM, replaced the thermal paste on the processor, cleaned the system of dust - nothing. Then I tested the entire system using the system stability test (functions of the AIDA64 program). Everything is fine.
After repeated successful testing, enlightenment came. Completely slipped my mind hard check disk. Spent HDD diagnostics third party first HDD program Regenerator. Having discovered errors (8 unreadable sectors), I ran the check again using a program from the manufacturer Western Digital. The latter confirmed the malfunction and the hard drive was sent to a service center under warranty. How to diagnose hard drive read on...
Diagnostics using the operating system is what can and should be used first. To do this, open the main Start menu and select Computer. Click on the section right click calling mice context menu and select the item Properties

Disk Properties opens. Go to the tab Service and in the section Checking for errors press the button Check

It will be Data Lifeguard Diagnostic for Windows.
The WinDlg_v1_28.zip archive will be downloaded, which can be opened using the 7-zip or WinRar program in the same way as a file with the rar extension. Unpack and run the Setup.exe file.
When finished, click Ready

Launch the SeaTools program again
Searches for supported drives. Need to wait a little

Then, accept the license agreement again


For diagnosing hard disk is sufficient for Short and Long universal tests

To be safe, choose Long lasting universal and wait for it to finish. If the test does not pass, follow the instructions and if the program does not fix the disk, bring it under warranty.
In the Basic tests menu there is an item Repair all. This function I haven't tried it. I’ll try as soon as I get a suitable hard drive.
Restoring the Seagate HDD
10_21_2013 A few months ago, bring a 160 GB Seagate hard drive without warranty. A long-term universal test produced an error. When connecting to another computer, I was able to copy all the important information from this disk without any problems.
To restore functionality we used Additional tests

A warning window opened saying that you should activate Additional tests possible using the key F8

By clicking on F8, the window closed and the Additional tests section appeared. Since our data was saved, I chose Full erase (SATA)

Another warning popped up

Scrolling the screen in this message with the slider, it was discovered that to start a complete erase, you need to press F8. After pressing, erasing started.
When the process was completed, I ran the Long-Term Universal Test again. The test was passed. After that we reinstalled the image working system using Norton Ghost. And until this moment no one complained.
Conclusion
In the article hard drive diagnostics You learned how to check your hard drive (HDD) for errors. Here we looked at two methods: built-in checking using Windows and check special utilities from manufacturers. In a combat situation, I like to use diagnostic utilities. Since this, for me, is 100% an option. If the disk passes the test, everything is fine. Otherwise, we will take it for repair under warranty. This is why in the article on choosing a hard drive I attach such importance to the warranty. It is necessary that she be 3 years old. This is a whole 3 years without a headache. Naturally, it is necessary to treat the hard drive well throughout the warranty period, since service center They look closely at the scratches.
The main thing I want to convey to you is. Hard drives are consumables. Like cartridges for a printer. You need to have at least two copies of your important data on two different drives. For example, on an internal and external hard drive. One fails, buy a new one, restore the data from the backup one and you are happy again. In order not to buy often, look at the same guarantee. I wish it was longer. Another great option is to use Windows 7 archiving.
WITH hard drives Samsung I haven't encountered it. I couldn't find any utilities specifically for these disks. If anyone has information, please share in the comments. For now I will check them with a utility from Seagate or WD.
Data Lifeguard Diagnostics is proprietary utility Western Digital, which was developed specifically for testing hard drives from this manufacturer. The program performs diagnostics, recovery and identification with USB interfaces, EIDE and FireWire.
The utility includes two tests: EXTENDED TEST and QUICK TEST. The first test is a quick diagnostic (duration about 2 minutes), during which data is collected on the S.M.A.R.T state and service information, which determines the degree of operability and defectiveness of the hard drive. The second test is an extended diagnostic (duration about 30-60 minutes), which, in addition to collecting S.M.A.R.T data and service information, identifies bad sectors and, if possible, corrects or isolates them.
In addition, the utility has the option WRITE ZEROS (erasing information) and VIEW TEST RESULTS (viewing test results). Data Lifeguard Diagnostics can also display information about the model number and serial number of the hard drive.
Instructions for working with Data Lifeguard Diagnostics
In order to start working with the Data Lifeguard Diagnostics utility, you need to download the program archive, extract and run the WinDlg.exe file. To run WinDlg.exe (provided that the work is running on Windows 7), you need to right-click on the WinDlg.exe shortcut and select the “Run as administrator” menu item.
To continue the installation process of the utility, you must familiarize yourself with license agreement and accept its terms. Home screen The utility consists of two windows. IN top window displays information about the drives installed on the computer that are available for verification, indicating their capacity, serial number and model number. In the lower window you can see information about the partitions of the selected hard drive.
In order to check the hard drive or view the S.M.A.R.T status, you need to highlight the drive and select the icon in the top row.
After the “DLGDIAG - Select Mode” window appears, you need to select your preferred menu item
:
- Quick check(QUICK TEST) - involves quick diagnostics of the hard drive using S.M.A.R.T to collect and check Data Lifeguard information.
- Full check(EXTENDED TEST) - performs a full scan of the drive to detect bad sectors. The duration of the scan directly depends on the capacity of the hard drive and can last up to several hours.
- Overwrite with zeros (WRITE ZEROS) - erases all information from the hard drive. There are two modes: fast and complete erasure. Attention! When you select this menu item, the file system and data stored on the hard drive will be deleted, so before using the utility it is recommended to do backup copy data.
- Viewing test results (VIEW TEST RESULT) - displays information about the results of the last test.
For the utility to start diagnosing the hard drive, you need to select suitable look check and click the "Start" button. After the test is completed, a message will appear indicating whether the hard drive passed the diagnostics. To finish working with the utility, click the "Close" button.

Western Digital Data Lifeguard Diagnostics is a utility from Western Digital designed to diagnose hard drives. Using special tools integrated into the software, users will be able to diagnose the presence of possible problems in the functioning of sectors, identify as well as restore hard drives their desktop devices. Please note that only hard drives manufactured by WD are supported. If you are using a hard drive from another manufacturer, installing this software there's simply no point.
The undoubted advantage of Data Lifeguard Diagnostics is its free distribution, but there are also several disadvantages - the absence of the Russian language in the settings and the impossibility of installing a localizer due to the fact that it does not exist. But, despite the fact that the program does not support the Russian language, its interface is not as complicated as it might seem at first glance.
The main functionality of the software is divided into three blocks. The first two are testing - Quick Test and Extended Test. The first test should be used to quick diagnostics. The scanning itself takes about 2-3 minutes, and upon completion of the analysis the program will display comprehensive information, which can be used to determine the degree of performance of the disk and the presence of any problems. The second test is an extended version of the first - it takes from 30 minutes to an hour and, among other things, identifies all bad sectors. After this, the program either corrects them (if possible) or isolates them if it is no longer possible to “cure” the sectors. In addition to scanning the disk, users can familiarize themselves with the Write Zero function, which allows you to format the hard drive by deleting all existing information from it.
Key Features
- lack of a Russified interface;
- The program only supports Western Digital hard drives;
- the utility has several scanning modes;
- Before using Write Zero it is recommended to do backup data;
- the program provides a detailed report on the scan performed.
In today's article:
1. How to find out the condition of my hard drive or solid state SSD drive how long will he live? How to find out the health status of a used hard drive or SSD. What is S.M.A.R.T and what do its indicators say: Value, Worst, Raw, Threshold?
2. What are bad blocks? How to find out how many bad sectors (bad blocks) there are on my hard drive, can they be fixed, and most importantly, how can I fix them?
3. What to do if the operating system does not boot or freezes even after reinstallation, and the hard drive makes clicking noises during operation extraneous sounds? Why every time booting Windows does the disk check utility chkdsk run?
4. How to create a bootable USB flash drive with the Victoria program and check the hard drive of a computer or laptop for bad blocks, even if it does not boot, and so on...
Welcome friends to our website! Today's article is about the Victoria program. I can say with confidence that this program is the best among diagnostic and treatment utilities. hard drives. This creation was developed by the first category sorcerer Sergei Kazansky.
I prepared for this article for a very long time and responsibly, feeling grateful to this program. Sometimes Victoria saved seemingly lost data on hard drives my clients, friends and acquaintances (often the master is NOT faced with the task of returning to normal operation faulty hard drive, but only save the data on it), and sometimes brought the hard drive itself back to life!
- I really wanted to write an article that would help novice users figure it out, and most importantly, they are not afraid of this program, but they are afraid of something, if you use the program carelessly, for example, start a mindless scan in Erase mode or, even worse, Write, then you can delete all the data on the drive, even if you come to your senses in time, you’ll still crash boot entry MBR and you will not be able to boot into the operating system next time.
Friends, it’s impossible to put everything I want to tell and show about the Victoria program in one article.. As a result of my efforts it turned out several articles:
- Today's article. How to download and run directly from a working one Windows program Victoria. What is S.M.A.R.T. or how to determine the health status of your hard drive or SSD in a couple of seconds. More articles...
- How to cure a hard drive.
Firstly, there are two main versions of the Victoria program:
The first version will allow us to diagnose and minor repairs of hard drives directly in a running Windows, but I want to say that it is possible to diagnose a hard drive using this version, but correcting bad sectors (remap) often ends in failure, and there is also the possibility of errors when working with Victoria directly “from Windows” is present, so many experienced users and professionals prefer the second version of the program.
The second version of the Victoria program will be located on a boot disk or flash drive, with of this disk(flash drives) we will load our desktop computer or a laptop and we will also carry out diagnostics and, if necessary, treat the hard drive.
Note: The second version will be very useful to many, since most users have one hard drive in their computer, or even more so in a laptop, in this case you can boot from Victoria’s disk (flash drive) and work with one single hard drive.
1. Victoria on the boot disk is very useful if you cannot start the operating system due to bad blocks.
2. If you have one hard drive and an operating system is installed on it, and you run Victoria in the same running operating system, then it will probably refuse to correct bad sectors (bad blocks).
Many users will notice that often a good bad problem cannot be fixed even by Victoria, to which the answer can be this - not all bad problems are of a physical nature (a failed sector on the hard drive), many bad problems are of a logical nature and can be easily fixed by this program.
Let me just say briefly that physical problems (a physically destroyed sector) cannot be restored, but logical ones (software, sector logic errors) can be restored.
Friends, we can talk a lot, but there is a good life proverb: “It’s better to see once than to hear a hundred times,” so I will give you a few examples of how the Victoria program works.
Victoria for working from a boot disk
We go to the official website of the program and select Victoria 3.5 Russian ISO image of the boot CD-ROM.
We also need Victoria on the boot disk, but we will consider working with this version second. If you do not have a disk drive, then we will make a bootable USB flash drive with the Victoria program.

Victoria for working directly in the operating room Windows system XP, 7, 8, 10
We also download the Windows version on my cloud.
Right-click on the downloaded program archive and select Extract files.

The files are extracted into the created vcr43 folder. We go to this folder and be sure to run it as administrator executable file programs victoria43.exe.

Main program window Victoria
In the main window of the program, we will go through all the tabs superficially, and then in detail.
Standard
Select the initial tab Standard. If you have several hard drives, then in the right part of the window, select the hard drive you need with your left mouse and immediately in the left part of the window the passport data of our hard drive will be displayed: where you were born and married, model, firmware, serial number, cache size and so on. At the bottom there is a log of our actions.

What is S.M.A.R.T.
Then select the hard drive we need in the right part of the window, if you have several of them, and select it with the left mouse. Let's choose a hard drive for example WDC WD5000AAKS-00A7B2(volume 500 GB).


Go to the SMART tab, press the button Get SMART, a message will light up to the right of the button GOOD and S.M.A.R.T. will open. the hard drive we have selected.
S.M.A.R.T.(from the English self-monitoring, analysis and reporting technology) - an improved technology for self-monitoring, analysis and reporting of the hard drive, developed in 1995 by the largest hard drive manufacturers.
In other words, friends, if you look at this window, you can find out the state of your hard drive.
Please note that the Victoria program has highlighted the number 8 in red (alarm!) in the Raw value, the most important attribute for the health of the hard drive
5 Reallocated Sector Count - (remap), indicating the number of reassigned sectors.
Note: the value of the Raw attribute is very important, read why .

In simple words, if the firmware built into the hard drive detects a bad sector (bad block), it will reassign this sector as a sector from the backup track (the process is called remapping). But reserve sectors there is not an infinite number on the hard drive and the program warns us that soon there will be nothing to reassign bad blocks to, and this is fraught with data loss and we need to prepare to change the hard drive to a new one.
Looking ahead, I will say that in the next article we will try to treat this hard drive.
9 Power-On time 14810, not highlighted in red, but I want to say that approaching the figure of 20,000 operating hours in most cases is associated with illnesses and unstable work hard drive.
The attributes are also highlighted:
196 Reallocation Event Count - 3 . The number of operations of reassigning bad blocks to sectors from backup tracks (remapping), both successful and unsuccessful operations are taken into account.
197 Current Pending Sector - 1 3. An indicator of the number of unstable sectors of real candidates for bad blocks. The hard drive firmware plans to replace these sectors in the future with sectors from the reserve area (remap), but there is still hope that in the future some of these sectors will be read well and will be excluded from the list of candidates.
198 Offline scan UNC sectors - 13 . The number of actually existing non-reassigned bads on the hard drive (possibly fixable ones with logical structure- details later in the article).
199 UltraDMA CRC Errors - 63771. Errors that occur when transmitting information via external interface, the reason is that the SATA cable may be twisted and of poor quality and needs to be replaced or loose SATA connector on the motherboard or on the hard drive itself. Or maybe the hard drive itself of the SATA 6 Gb/s interface is connected to the connector on the motherboard SATA board 3 Gbps, needs to be reconnected.
S.M.A.R.T attributes and their meanings. Very important to know!
Attribute values
Val is the current value of the attribute, it should be high (up to 255); if the value of Val is equal to the critical Tresh or even less than it, then this corresponds to an unsatisfactory assessment of the parameter. For example, in our case, on a WDC WD5000AAKS-00A7B2 (500 GB, 7200 RPM, SATA-II) hard drive, the Reallocated Sector Count attribute has the value Val-199 and the attribute Tresh(threshold) has a value of 140, which is bad, but the value of Val -199 is not yet equal to the value of Tresh (threshold) of 140 and we have time to copy the data from this disk and retire it.
Wrst is the lowest value of the Val attribute for the entire operating time of the hard drive.
Tresh - attribute threshold value, given value should be much lower than Val (current value).
Raw - the “raw value” that will be converted into a value Value, the lower this value, the better. An important indicator for evaluating the attribute represents the real number from which the Value value is formed, but how exactly the process of forming the Value value occurs is a proprietary secret of each hard drive manufacturer!

Decoding S.M.A.R.T.
Let's look at all the S.M.A.R.T attributes, but I want to say that most often on “bad” hard drives it is this Reallocated Sector Count attribute that will be unsatisfactory. This is already a reason to be wary and test the surface of a hard drive or SSD (we will learn how to do this later in the article).
Friends, to instantly assess the health of the S.M.A.R.T hard drive, I use another a simple program in Russian CrystalDiskInfo, be sure to download and install it for yourself. All attributes are indicated in Russian!
http://crystalmark.info/download/index-e.html
Select Shizuku Edition (exe).

In this window, you can select Russian for the program language.
As you can see, CrystalDiskInfo directly tells us (confirming Victoria’s fears), on the WDC WD5000AAKS-00A7B2 hard drive (500 GB capacity) there are bad values of the attributes responsible for Reassigned sectors, Unstable sectors, Uncorrectable sector errors, highlighting them in yellow and indicating those . hard drive status in one word: "Alarm"

What does the S.M.A.R.T of a faulty hard drive look like?
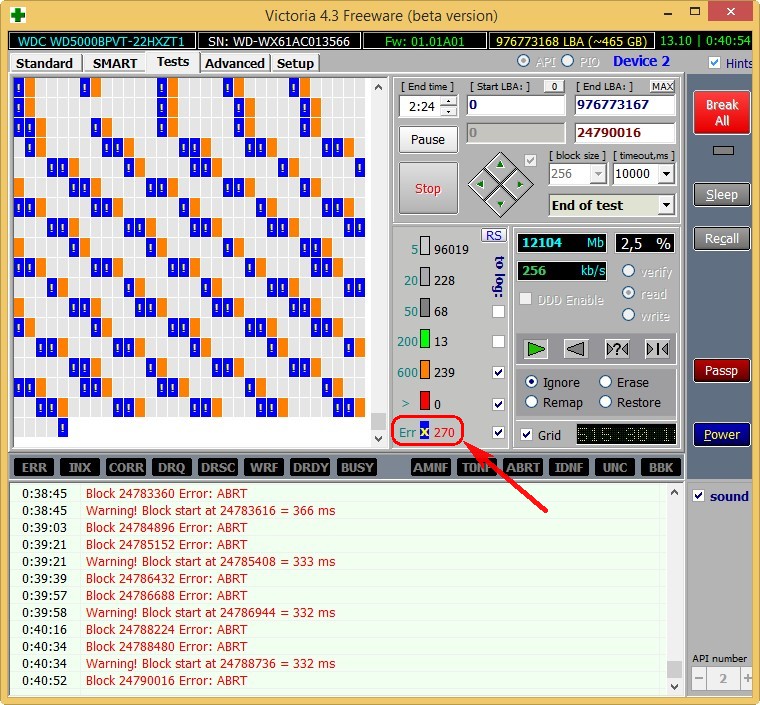
But S.M.A.R.T of a faulty hard drive WDC WD500BPVT laptop, which was brought to me for repair.


Victoria from Windows. Pay attention to the attribute:
5 Reallocated Sector Count (reassigned sectors), it has a value of Val -133, and the Tresh attribute has a value of 140, this is unsatisfactory, since the value of Val -133 should not be less than the Tresh limit value of 140, that is, the number of failed sectors will grow, but there is nothing to reassign them with, the spare sectors on the reserve tracks have already run out.
197 Current Pending Sector - the indicator of the number of unstable sectors of real candidates for bad blocks has gone beyond all possible limits.
And most importantly, self-assessment SMART status = BAD (unfit).

Program CrystalDiskInfo(download link is just above). We see the same thing, the Reallocated Sector Count attribute has a value of Val (current) -133, and the Tresh attribute (threshold) has a value of 140, the program rated the condition of the hard drive as Bad.

this laptop is terribly slow, data cannot be copied from it, Windows cannot be reinstalled, periodically the hard drive disappears from the BIOS, that is, such a hard drive must be replaced without hesitation, even ours Victoria will not be able to completely cure such a screw, since healthy sectors on the reserve tracks have ended and there is nothing to reassign bad sectors with, and copying data from it will be a real adventure for a week (I’ll definitely write an article about it).
Looking ahead, I will say that a test of this screw in the Victoria program showed the presence of 500 irreparable bad sectors (bad blocks).
DOS is a version of the Victoria program.

Note: To make your life easier, some hard drive diagnostic programs map each attribute, good or bad, to the color of the icon.
Green - the hard drive attribute is normal.
Yellow - indicates a slight discrepancy with the standard and it is better not to store important data on this screw. If you have Windows on such a hard drive, transfer it to an SSD.
Red indicates a significant discrepancy with the standard and the hard drive should have been changed yesterday.
S.M.A.R.T of the same WDC WD500BPVT hard drive in the program HDDScan

Attributes
001 Raw Read Error Rate-frequency of errors when reading information from disk
002 Spinup Time-time to spin up disks to working condition
003 Start/Stop Count-total number of spindle starts/stops.
005 Reallocated Sector Count - (remap) indicates the number of reassigned sectors. If the firmware built into the hard drive detects a bad sector (bad block), it will reassign this sector as a sector from the backup track (the process is called remapping). But the reserve sectors on the hard drive are not an infinite number and the program warns us that soon there will be nothing to reassign bad blocks to, and this is fraught with data loss and we need to prepare to change the hard drive to a new one
007 Seek Error Rate- the frequency of errors when positioning the head unit, a constantly growing value, indicates overheating of the hard drive and an unstable position in the basket, for example, it is poorly secured.
009 Power-on Hours Count- the number of hours spent in the switched on state.
010 Spin Retry Count-the number of repeated spins of the disk to operating speed if the first one fails.
012 Device Power Cycle Count-Number full cycles turning on/off disks
187 Reported Uncorrectable Error-Errors that the hard drive’s firmware could not recover using its own methods of eliminating errors with hardware, the consequences of overheating and vibration.
189 High Fly Writes-the recording head was higher than necessary above the surface, which means the magnetic field was insufficient for reliable recording carrier. The reason is vibration (shock).
For laptops this figure a little higher.
190 Important parameters regarding temperature. It is important that the temperature does not rise above 45 degrees.
194 HDA Temperature-temperature of the mechanical part of the hard drive
195 Hardware ECC Recovered-the number of errors that were corrected by the hard drive itself.
196 Reallocation Event Count- The number of operations of reassigning bad blocks to sectors from backup tracks (remapping), both successful and unsuccessful operations are taken into account.
197 Current Pending Errors Count- uncorrectable sector errors, too important parameter, the number of sectors that are difficult to read and are very different from reading a normal sector. That is, the hard disk controller could not read these sectors the first time, usually these sectors belong to soft bads, also called software or logical bad blocks (sector logic error) - when writing user information to a sector, the same is written proprietary information, namely the ECC (Error Correction Code) sector checksum, it allows you to recover data if it was read with an error, but sometimes this code is not recorded, which means the sum of user data in the sector does not match the ECC checksum. For example, this happens when sudden shutdown computer due to electrical failures, because of this, information was written to the hard disk sector, but the checksum was not.
- Logical bad blocks cannot be corrected by simple formatting, since when formatting the hard disk controller will try to first read information from bad sector, if he fails (in most cases), then no rewriting will occur and the bad block will remain a bad block. You can correct the situation in the Victoria program, it will forcefully enter information into the sector (will cure the sector), then read it and compare checksum ECC and the bad block will become a normal sector. More details about all types of bad blocks in our article How to check a hard drive.
198 Offline scan UNC sectors- The number of real non-reassigned bads that actually exist on the hard drive (possibly fixable ones with a logical structure - details later in the article).
198 Uncorrectable Errors Count-the number of uncorrected errors when accessing a sector, indicates surface defects.
Reported Uncorrectable Errors- shows the number of uncorrected bad sectors.
199 UltraDMA CRC Errors-the number of errors that occur when transmitting information via an external interface, the reason is a twisted and low-quality SATA cable, it may need to be changed.
200 Write Error Rate- the frequency of errors that occur when writing to a hard drive; this indicator is usually used to judge the quality of the surface of the drive and its mechanical part.
202 Data Address Mark Errors- I haven’t seen a decryption anywhere, literally an address marker data error, it could mean something that only the manufacturer of this hard drive knows.
How to quickly check a hard drive or SSD for serviceability?
Victoria

Hard drive surface test!
On the right side of the program window, check the Ignor item and the read item and click Start. This will run a simple hard drive surface test without error correction. This test will not bring any negative or positive effects on the hard drive, but at the end of the test you will know what condition your hard drive is in..

The test results are excellent. Not a single block with a delay of more than 30 ms!

CrystalDiskInfo


Hard SAMSUNG disk HD403LJ (372 GB) from a recent article
There were bad blocks on it and I had to transfer Windows 8 from it to an SSD. After a successful transfer, the owner (my classmate) gave me this screw and Victoria soon brought it back to life after “writing all over the clearing” (Write algorithm). The previous owner refused to take back the cured hard drive.


The test results are slightly worse. 3 blocks with a delay of more than 200 ms and 1 block with a delay of 600 ms (possibly a candidate for trouble).


The not quite serviceable hard drive MAXTOR STM3250310AS (250 GB, 7200 RPM, SATA-II) is 8 years old (veteran) and still works, although I take care of it, storing only unimportant data files on it.

Although there are no obvious bad things on it, we see that the attribute is 5 Reallocated Sector Count - (remap), indicating the number of remapped sectors critical and soon there will be nothing to reassign bads with.
9 Power-On time - total number of hours worked by the hard drive 23668 , this is a lot, usually problems with hard drives begin after 20,000 hours of operation.
Also unimportant attribute 199 UltraDMA CRC Errors - 63771, errors that occur when transmitting information via an external interface, the reason is a poor-quality SATA cable and it needs to be replaced (this is not always the case).

The test results are even worse. 71 blocks with a delay of more than 200 ms and 1 block with a delay of 600 ms (possibly a candidate for trouble).


Hard drive ST3200826AS(200 GB, 7200 RPM, SATA). The propeller is about three years old and the flight is still normal.


Test results. 6 blocks with a delay of more than 200 ms.

New solid state drive SSD SPCC SSD162


At the end of the article, let's check my oldest SSD solid state drive - ADATA S510 60GB (60 GB, SATA-III)
It’s already three years old, but it works perfectly, it’s a pity that the capacity is only 60 GB, but when I bought it there wasn’t more, and it cost about two hundred bucks.


Let's move on to the next article
In this article we will look at tools for checking disks for errors and diagnosing their condition. Let's look at the diagnostic function built into Windows. There are a large number of diagnostic utilities that will help you determine, if necessary, the problem with hard drive. Tools such as Check Disk for Errors and chkdsk command from Microsoft are already present as a standard feature of Windows. And some others are provided by hard drive manufacturers and other third-party developers.
In some cases, testing a hard drive must be done by connecting it as a second one to another computer.
There are also many paid programs for hard drive diagnostics. But in this article we are interested in free programs or those that have a partially free version.
Content:
Seagate SeaTools
Seagate SeaTools is a freeware product provided by Seagate diagnostic utility for a hard drive, which comes in two types:
SeaTools for DOS– supports Seagate or Maxtor drives, and runs regardless of the operating system from a disk or USB drive, which makes it very reliable. It is more powerful than the Windows utility, but more difficult for the user.
SeaTools for Windows is a program that is installed on Windows and supports all its modern versions. With its help, you can do basic or advanced testing of any hard drive, external or internal, from any manufacturer. It has simpler functionality than the DOS program, but is much easier to use.
These programs can perform testing serviceability of the hard disk of any type: SCSI, PATA or SATA, as well as external hard drives. To do this, just launch the program, select the disk that needs to be tested, the type of testing and run it.
Seagate SeaTools programs are used to test hard drives by professional computer services, but are simple enough for any user to use. If, for example, you are concerned about the sounds made by your hard drive, you can safely test it using programs from Seagate.
Windows Drive Fitness Test (WinDFT) is another free diagnostic utility for hard drives of any type and manufacturer, which is presented by the hard drive manufacturer Western drives Digital (formerly owned by Hitachi). But the ability to test with it is not limited to WD or Hitachi drives.
The program includes not only several disk scanning functions, but also the ability to view SMART attributes and cleaning hard disk.
Although WinDFT is designed to work on Windows, it does not scan or test the disk on which the operating system is installed. The utility supports external hard drives and others USB media. It displays only supported hard drives in its list and shows information about them: serial number, firmware version, capacity, status.
By double-clicking on the disk, you will see its SMART status. There is also the option to select Quick Test or Ext Test. You can test one or several disks at the same time.

The Utilities button is an expanded menu that appears in separate window from the main one. From it you can select one of the additional functions of the program: clearing the partition table, disk cleanup, short test, long test, etc.
Western Digital Data Lifeguard Diagnostic (DLGDIAG) is another free program for diagnosing and testing hard drives from Western Digital. Western Digital Data Lifeguard Diagnostic comes in both a PC version and a portable version.
There are also versions of the program for Windows and for DOS. Version for Windows is simpler easier to use than the DOS version, but has more modest functionality. For the DOS version of the program to work, the main (primary) disk must be WD. Both versions have the ability to wipe the hard drive.

Fujitsu Diagnostic Tool is a hard drive testing program that only works with hard drives manufactured by Fujitsu.
The program has two forms: one runs from Windows, the other runs from a Floppy disk. The Windows version supports all versions. DOS version works regardless of the operating system.
Both versions perform two tests: Quick Test – which will take no more than three minutes, and Comprehensive Test – in addition to the read/write test, it also checks the disk surface. The duration of the second test depends on the size of the media being scanned.

Using the built-in Windows tool checking the disk for errors can detect and correct a number of errors: starting with errors file system to physical errors, such as bad sectors.
The disk error checking tool is graphic version a tool that works from the command line - "chkdsk", one of the most famous commands from all versions of Windows. He is present at everyone modern versions Windows, and has only minor differences.
Checking the disk takes from several minutes to several hours - it all depends on the size and speed of the storage medium, as well as the number of errors detected.
Windows 10 and Windows 8 already check disks for errors automatically, but you can also run the check manually.
To run the tool, open the “This PC” folder and right-click on the drive you want to check. From the pop-up menu, select Properties and go to the Tools tab. To start the program, click the Check button.

The “chkdsk” command is also simultaneously available on the computer, but has broader functionality. You can launch it using Command line and it contains two functions:
chkdsk /f – detects and fixes system errors.
chkdsk /r – detects and, if possible, repairs bad disk sectors.
To do this, type the specified commands in the Command Line field and press Enter. If errors are detected, the tool will notify you and prompt you to restart your computer.
Of course, this is not a complete list of tools for diagnosing hard drives and may not even be their main representatives. In this article we simply focused on several free utilities from manufacturers of hard disks that were available to us on at the moment. If necessary, we can also suggest that you pay attention to such free tools hard drive diagnostics such as: HDDScan, DiskCheckup, GSmart Control, Samsung HUTIL, Bart’s Stuff Test, HD Tune, EASIS Drive Check, Macrorit Disk Scanner, Ariolic Disk Scanner, etc.