How to disable the microphone input on Windows 7. How to disable the internal microphone in a laptop and connect an external one? Sound problems
Modern laptops have many gadgets that help in working and communicating via the Internet. However, due to careless behavior, or if you let someone else use your laptop, the microphone may be turned off. An inexperienced user often does not know how to turn on the microphone on a laptop, but there is nothing complicated here. It's enough just to remember Golden Rule Windows, read where you click.
In fact, you can talk about how to turn on the microphone on a laptop for a long time, because there are many models that differ from one another, and there are several operating system options, which may also differ in appearance. However, if problems arise, the first thing you need to do is go to the “Control Panel”. This is where you can simply turn on the microphone.
Here you need to find the “Sounds and Audio Devices” section. This is where you can mute the microphone on your laptop or enable it. Having entered the section, we will see this picture:
Of course, depending on the operating system, it will differ, but the principle is the same on all systems. You need to find the menu and check the “Show disabled devices” box, and then simply turn off the microphone on the laptop.
If you have a microphone from Realtek installed on your laptop, you can turn it on and off in the manufacturer’s utility. In this case, the following picture will appear in front of you.

This is a Realtek utility; it allows you to fully manage all audio components on your laptop. However, you should not rush to install it; it only works well when you have a sound card from this manufacturer.
If the microphone is not muted, but simply does not work well, then you need to strengthen it, but you should not do this if the microphone is working normally, since in this case it will pick up unnecessary noise. 
For the laziest, there is another way to turn off the microphone on a laptop or how to turn it on. You can use additional utilities, for example, such as Skype. The fact is that Skype also has access to the equipment and can control devices. Therefore, you can go to the Sound and Audio section in Skype, and configure the microphone there accordingly.
This approach, however, has significant drawback, it may slightly damage the drivers on the laptop. And this may result in some inconvenience, and in addition, it will be necessary to completely reinstall the entire system.
If you have the drivers installed correctly on your laptop, then in most cases you can turn the microphone on and off directly from the keyboard.
If there is no separate button, then it can be functional, in simple language speaking only work in pairs with another key. So look for the microphone icon on your keyboard, after that find the FN key, and after that press them together, in most cases the microphone will turn on immediately. To tell the truth, most of the time it turns off by accident.
The most important thing is to try to think logically, and then use any operating system it will be simple.
The microphone on a laptop is one of the most rarely used devices. Almost immediately after purchase, it is replaced with an external device or a device built into the headphones. At the same time, most users simply forget about it when using the peripherals. However, while remaining active, the built-in microphone can become a threat to your privacy, as it remains vulnerable to malware (viruses).
To avoid unauthorized collection of user information, and simply to avoid conflicts with external devices, it is best to turn off the laptop microphone completely.
In general, there are two ways to mute the microphone on a laptop - either using special keys, or using Windows software elements.
The simplest and obvious way– use the keys provided by the manufacturer to turn off the equipment. If there are no separate buttons for manipulating sound and microphone, take a closer look at the keyboard. Often the option to mute the microphone is located as an additional value right on one of the function keys, and is activated by pressing it in combination with the “Fn” button.

Mute the microphone in the Windows OS interface
If this key is missing from your device, does not work, or you need to disable the built-in audio recorder for more than in a reliable way, you will have to use the tools of the system itself.
In the special section “Recording Devices”
The easiest and fastest way to mute the microphone that works for all versions of Windows. The settings for this option are right at hand at any time.

If you need to reactivate the built-in microphone, you can do this in the same menu.
Note! However, in some cases, devices that are this moment was disabled, they no longer appear in the results.
Then you need to call context menu by clicking on an empty area of the window and checking the box next to “Show disabled devices”.

In "Device Manager"
Device Manager is Windows tool, allowing you to directly control all computer devices, both external and integrated. Through it, the microphone can actually be physically disabled to definitely avoid bypass by malware or attackers.
IN Windows versions Previously, the tenth “Dispatcher” can be found by searching among programs in the “Start” menu.

You can also open Device Manager using the Run tool. To do this, press the “Win” key combination (the key with Windows logo) and "R". In the window that appears, in the command line you need to type “devmgmt.msc” and click “OK”. The Manager will open immediately.

Using Registry Editor
The most complex, however, the most reliable of the methods presented. Generally suitable for more experienced users, and requires attention and concentration so as not to damage your computer data.
Registry Editor is a special computer debugging tool.
- To open it, type “regedit” in the search and click on the found tool.

- In order to get to the desired properties, you need to find them among huge amount all sorts of characteristics, so be careful. Among the sections we find “HKEY_LOCAL_MACHINE”, in it we expand the SOFTWARE subsection, then “Microsoft”, in it – “Windows”, then “CurrentVersion”, here we look for “MMDevices”, select the first option “Audio”, and finally open the menu "Capture"

- IN this section need to search desired item manually, since in such a complex debugging environment, for the sake of stability, regular search is not provided. Namely, in each item with an unreadable alphanumeric name, you need to check the “Properties” subsection for the presence of a file with the value (third column) “Microphone”. Next, click on the section itself in which the file was found.

- In the selected item, you need to select the “DeviceState” debugging parameter and open it by double-clicking.

- The system will issue small window changes for the selected parameter. Here, in the line for entering values, enter “10000001” and confirm the changes by clicking “OK”. The setting will change to completely disable the built-in microphone. Now it is almost impossible to hack it and listen to you.

That's all! You are aware of everyone possible ways muting the microphone with all the nuances.
Video - How to mute the microphone on a laptop
Yes, not a problem at all, the point is that the internal one will turn off when connected external microphone, the main thing is that the laptop can see the external microphone, the internal microphone can also be manual mode disable, go to the audio device sounds and disable it yourself.
Internal microphone Simply turn it off. The main thing is to know the configuration of your laptop. For example, I read an article on the Internet about my laptop model.
Very often, sound and video on a laptop are connected. If this is the case in your case, you will have to turn off the video as well.
Now the stages. Let's go to my computer
I just read your question and decided to check my settings. I'm on the Internet from my laptop. In general, I also had this internal microphone turned on. It's easy to disable it. I went to the control panel and selected control and sound, then sound and recording. Everything that is there needs to be turned off. That's the whole secret.
You can disable the internal microphone in your laptop.
To do this, you need to connect an external microphone. The internal one will turn off automatically.
If this does not happen, then by going into the equipment and sound - sound - recording, you can select and turn off the microphone yourself.

When you connect an external microphone, the internal one turns off automatically.
Sometimes a problem arises that the internal microphone does not automatically turn off if you connect an external one.
The reason may be that the external microphone is not detected by the system, and accordingly it does not receive a shutdown command. In this case, recording can proceed without loss. Then go to the recording devices, see what microphones are detected there. If the external microphone is not detected, reconnect it.
The next reason may be that when connecting an external microphone, the internal microphone is not configured to be turned off. Try changing the settings to default, then the problem may be solved.
To disable the internal microphone on a laptop, you need to go directly through the Start menu to your laptop's control panel. There you should open the folder called - sounds and audio devices.
There you will need to open a tab called properties, there will be a choice of
sounds and audio devices. So you need to go to the panel called audio
There you will see a post called - Audio Recording. You will need to select a microphone. And there you need to uncheck the box called select.
IN different laptops The shutdown process may vary slightly, but the essence is basically the same. These are the simple steps.
Some laptops cannot have two microphones installed in hardware. If the connector for an external microphone is activated, the external one is automatically activated. (like speakers) Check if the drivers are installed on sound card, if so, then in the corresponding software there will be configuration and selection of the microphone.
How to mute the microphone on a laptop?
It's simple. For example, I have Lenovo laptop . I’ll explain it on it, but I think that the same thing can be done on many laptops.
So, Control Panel - Sound.
Then open Record - General. Below we turn on do not use this device.
That's it, and when you connect your microphone, the system will automatically see and recognize it.

It all depends on the laptop model. But there is nothing complicated here.
When you connect an external microphone, the internal one should turn off by itself. If this does not happen, then turn off the internal microphone manually in the control and sound settings and turn everything off.
On many laptops the process looks like this: first you need to go to Control Panel >> Sound
But for more modern laptops, when you connect an external microphone, the internal one turns off without your participation.
Usually, when you connect an external microphone, the internal one turns off automatically; the contact in the connector simply opens. But this doesn't always happen. If the microphone does not turn off, then most likely there is no such contact in the connector; for the internal microphone in sound chip There is a separate entrance. Then you need to go to the control panel, sound. Select the Recording tab and turn off the unnecessary microphone.
Most modern laptops are equipped with a webcam. In many cases, the standard camera used for Skype and other video conferencing services is used, but some laptops come with infrared cameras, which are used for facial recognition in Windows service Hello. The vast majority of laptops also have a built-in microphone that works in conjunction with the camera.
If you don't use your camera or microphone, you'll probably want to turn off these devices. You may ask why is this necessary? The fact is that some malware can gain control of hardware components and will carry out unauthorized access, even when you're not using them. If you are concerned about protecting your personal data, then the instructions below will clearly show how to disable the webcam and microphone on a laptop under Windows control 10.
Scan your computer for threats
If you suspect that your computer may be infected with malware, the first step is to: full check systems. Even if the webcam and microphone are disabled, you cannot know for sure what kind of threat has taken up residence on your computer.

Defender Windows already built in Windows system 10, so this is a great option to start with. If desired, you can use a third party free antivirus or antivirus scanners.

Disabling the camera and microphone in Device Manager is the most in a fast way, but not the most secure - insidious malware will be able to reactivate devices without the user’s knowledge. However, it is useful to know how to disable your webcam and microphone using Task Manager.

To disable your webcam you only need to follow a few simple steps.
- Expand the “Image Processing Devices” section.
- Click right click mouse under the entry “Built-in camera” (the name may differ depending on different devices).
- Select Disable.
To turn the webcam back on, follow these steps again, but instead of the “Disable” option, select “Enable”.

To disable the webcam, you need to follow the same steps as when disabling the camera.
- Right-click on the Start button.
- Select “Device Manager”.
- Expand the “Audio inputs and outputs” section.
- Right-click on the “Built-in microphone” entry (the name may differ on different devices).
- Select Disable.
- In the confirmation window, select Yes.
To turn the microphone back on, follow these steps again, but instead of the “Disable” option, select “Enable”.
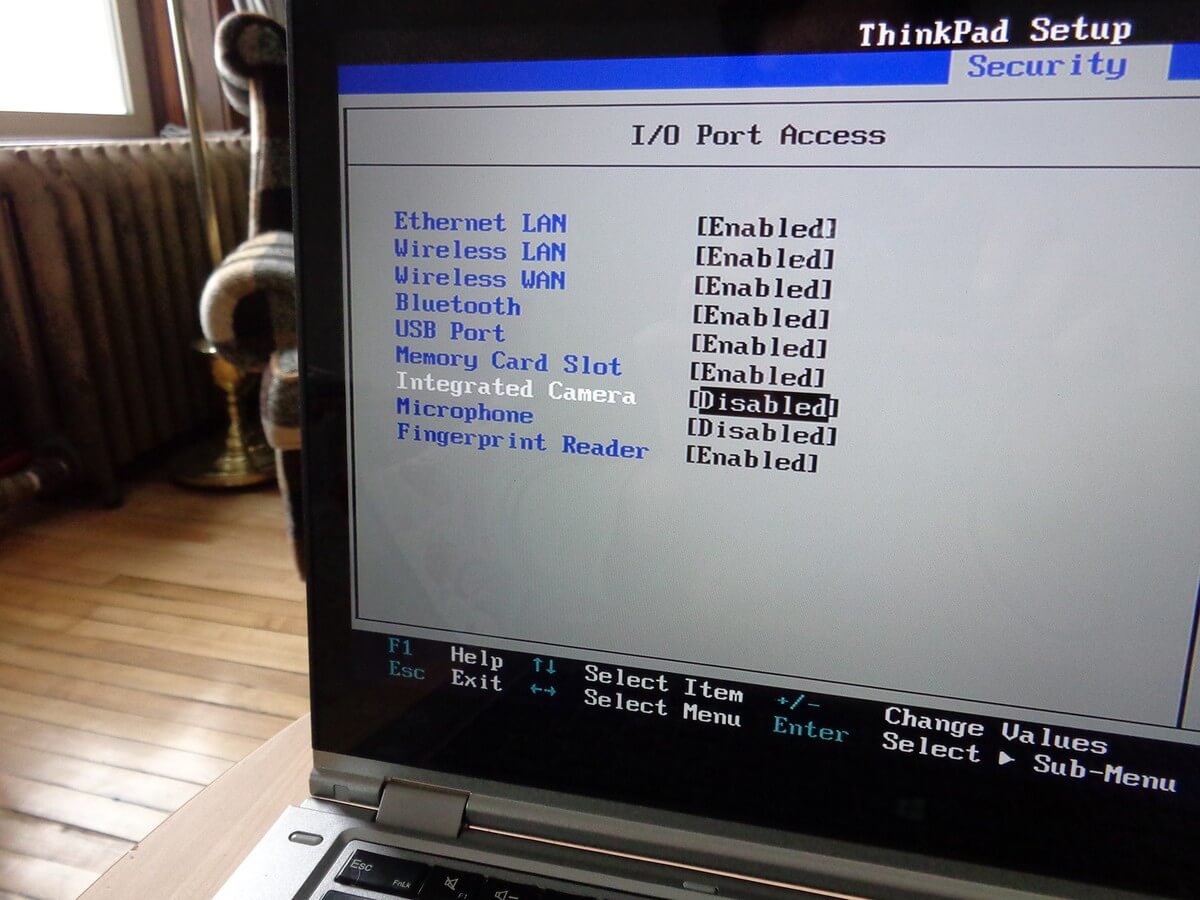
Some laptops allow you to disable the camera and microphone at the hardware level from the BIOS. The following steps may vary from device to device, but the basic principle is to interrupt the system boot and enable the management interface BIOS settings and search for parameters responsible for the operation of the webcam and microphone.
In case of Lenovo ThinkPad, the options for the built-in camera and microphone were located in the “I/O Port Access” section of the “Security” tab. After disconnecting both devices, you need to save the settings and exit the BIOS, after which the computer will restart.
Keep in mind that the BIOS on your laptop may look different, but the end result will be the same. If you go to Device Manager after disabling devices in the BIOS, you will not be able to detect them.
To re-enable devices in the BIOS, repeat the steps, but instead of the “Disable” option, select “Enable”.

When it comes to necessity permanent shutdown cameras, many users simply unplug the camera cables. This is a very drastic option and may void your laptop's warranty. More simple solution It will be as simple as sealing the camera.
Many users use sticky notes or tape to cover the camera, but some prefer a more professional approach. For these cases, inexpensive specialized accessories are available on the market that allow you to close the camera and unlock it if necessary using a slider.
Privacy?
Keep in mind that the only guaranteed way Disabling a camera or microphone is the physical disconnection of devices by removing them from the laptop or by disconnecting cables and cables. Most likely, you won’t want to do this yourself, but at least remember it for the future.
Have you been a victim malware, which gained control of the camera and microphone? Under what circumstances was this and how did you deal with the problem?