How to resolve disk errors using standard Windows functions. Causes of errors
The computer hard drive is a very sensitive component. Errors that appear in its file system, bad sectors on the surface, and mechanical problems sometimes cause a complete failure of the computer system.
The same problems are typical for flash drives, which in essence are practically no different from a hard drive. How to determine the presence of errors and bad sectors and how to correct them if possible?
Just a little bit of theory
Many people simply confuse mistakes file system and bad sectors. Therefore, we will try to explain the difference between these phenomena and the reason for their occurrence. We will also determine what the symptoms of errors that appear on the surface of the hard drive may be.
File system errors
When they talk about mistakes hard drive and trying to fix them using the built-in Windows utilities chkdsk, then most often they mean file system errors. Such errors are associated with problems in the metadata that describe the file system itself: errors in the $Bitmap, $BadClus files, the main file table, and various indexes.
For example, errors in the $Bitmap file NTFS systems may cause the system to incorrectly recognize the volume free space volumes And problems with the $BadClus file can lead to incorrect identification of bad sectors and an attempt to write data to such sectors, which will cause completely frozen computer.
Bad sectors
The nature of bad sectors is somewhat different. The hard drive is “cut” into sectors at the factory during production. That's when it is created logical structure, then it gets magnetic properties to record data. These structures become faulty as a result gradual degradation areas of the hard surface that become such due to careless handling of the hard drive, which was accidentally dropped on the floor or was hit on the case even with an ordinary screwdriver.
Testing programs that fall on parts of a degrading surface detect so-called faulty or damaged sectors - bad sectors. Sectors that have lost their magnetic properties do not allow data to be read or written to them. It is possible to eliminate faulty hard drive structures. For this purpose, manufacturers create special reserve areas of sectors. When a bad sector appears, diagnosed at a specific address, its address is reassigned to a sector from this reserve area.
Symptoms of errors and bad sectors
We have already talked a little about the symptoms of file system errors above. However, the symptoms are sometimes very varied. Here are some manifestations of errors and bad sectors that have arisen in the hard drive.
- Noticeable freezing of the operating system when performing read and write operations.
- Failure to load the operating system. For example, downloading continues only until the download notification and Windows logo appear.
- Frequent occurrence of errors in the operating environment.
- Extremely slow and unproductive operating system.
Here is a far from complete list of error manifestations associated with file system problems and the presence of degrading areas of the hard drive. What to do in such cases?
Checking errors using Windows
Checking and correcting file system errors in Windows is carried out by a standard utility of this operating environment called chkdsk. It can also be useful in eliminating programmatically generated bad sectors as a result of viruses. It can be run as in graphical environment, and from the command line. Let's consider the most affordable option its execution in a graphical environment.
Checking an inactive volume
Checking an inactive volume is the simplest. It can be completed completely in graphic mode. By inactive volume we mean a partition on which the current one is not installed. this moment operating system. This could be another connected hard drive or, for example, drive D.
Click the "Run check" button.
The utility is launched from the “Service” tab of the volume properties. This tab contains the “Perform check” button. If you click it, the chkdsk utility window will open. To check bad sectors that appeared as a result of software errors, you need to check the box next to the corresponding option. Next, just click the “Run” button - the utility will check and correct errors.
The chkdsk utility checks volume D, also diagnosing bad sectors.
Checking the system volume
Checking and correcting errors on the system volume, where the operating environment valid at the time of checking is located, is carried out a little differently. The utility identifies such a volume as mounted, and therefore warns that it cannot perform the check, but offers to perform it during the next reboot.
The chkdsk utility reports that it cannot scan the disk.
After restarting the computer, the user will find that during boot, after the Windows logo appears, a black screen appears. This black screen is gradually filled with lines of text. This is the chkdsk utility that checks the system volume of hard disk. After checking and making the necessary corrections, it will show the result, and then the operating system will continue loading.
The chkdsk utility checks volume C after a reboot.
Programs for checking hard drives for bad sectors
On the market software There are a number of applications that can test the surface of a hard drive. In this case, not just one volume is tested, but the entire surface of the hard drive. Of course, the user can independently set the boundary sectors and test individual areas. To identify bad sectors, a sector read test is usually performed.
Important: the results of the test for the presence of bad sectors must be considered in conjunction with SMART indicators, such as Reallocation Sector Count, Reallocation Event Count.
Data Lifeguard Diagnostic
This utility was created by the company's developers Western Digital. It is available for download on the company's official website. Lifeguard Diagnostic works great with hard drives from almost any manufacturer, and not just native WD hard drives, as one might think. It offers a number of tests: Quick, Advanced, as well as the ability to fill hard drive sectors with zeros.
Data utility interface Lifeguard Diagnostic.
We are most interested in the extended test. This test allows you to detect bad sectors on the surface of disks. When the program finds a bad sector, it informs the user about it, asking him to choose whether he wants to fix the detected error. If it agrees, then the application writes to sector 0, so the sector data will be lost.
A selection of utility tests. We need Extended Test.
This test takes longer than the quick test. Testing time depends on the size of the drive, since the test is carried out across the entire surface, starting from sector 0 and ending maximum value L.B.A.
Extended Test utilities in operation.
HDDScan
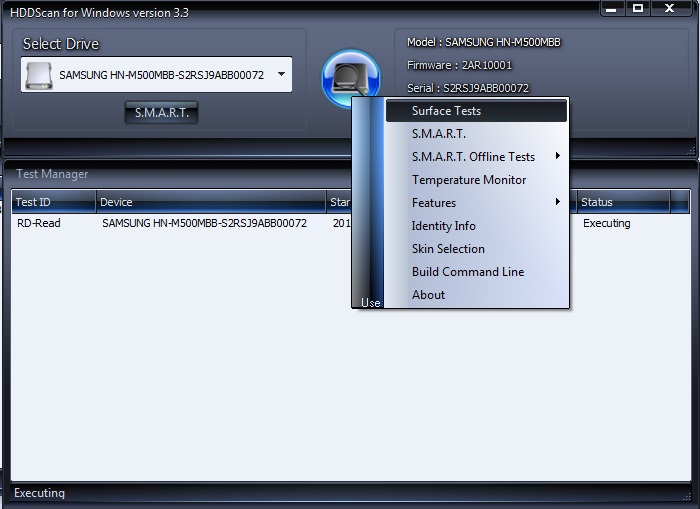
The HDDScan application also seems to be an excellent hard drive surface tester. It can often be seen as part of entire software packages such as LiveCD. This application has a graphical interface and offers a number of tests, among which, in our case, the most interesting is “Surface Tests”.
Let's choose Surface test Test from the dropdown list.
Important: when conducting surface tests under Windows, you must close all running programs to avoid random results during the test caused by the action of these programs.
After selecting a test, an additional window will open, which presents the test parameters. Let's leave the “Read” option enabled, which will only allow us to read data from sectors. Thus, we will define sectors from which information cannot be read within a specified time (bad sectors), frozen sectors and normal cells. We will leave the fields of the initial and final sectors unchanged if we want to check the entire surface.
Let's leave the Read test option enabled.
When testing with this program, a number of sectors are identified:
- bad sectors,
- stuck sectors, reading data from which takes more than 500 ms,
- sectors with reading time from 150 to 500 ms,
- sectors with reading time from 50 to 150 ms,
- sectors with reading time from 10 to 20 ms,
- HDDScan considers sectors whose data is read within 5 ms to be normal.
The program test result is available in the form line graph, maps of sector distribution, as well as in the form of a regular text report.
Checking the hard drive surface.
Ashampoo HDD Control
Unlike the programs discussed above, HDD Control is not a free program. This application is the whole complex tools designed for recovery hard health disk. This program also offers the ability to test the surface of the hard drive.
Select the "Surface Test" option.
The test is very simple and accessible to the average HDD Control user. To start it, you just need to click the “Surface Testing” button. He is deprived additional options, which would allow you to customize the type of test. During testing, only two types of sectors are identified: with excellent reading results and bad sectors.
Victoria HDD
Victoria considers the health of the hard drive being tested to be "GOOD".
This application can collect information about the SMART health of your hard drive. It also allows you to test the disk surface, reassign damaged sectors using the Remap operation, and reset bad sectors. It also divides sectors into groups:
- bad sectors (Error),
- stuck sectors with a read time of more than 600 ms,
- freezing sectors with readout times from 200 to 600 ms,
- sectors with reading time from 50 to 200 ms,
- sectors with reading time from 20 to 50 ms,
- Victoria diagnoses normal sectors within the framework of data reading up to 5 ms.
To test your hard drive, you can run this program in a graphical Windows mode. Next, you will need to select the “Tests” tab. This is where the surface tests are located. There are four options available for working with the hard surface:
- Ignore,
- Remap
- erase,
- Restore.
First of all, you can perform the Ignore test to determine whether there are bad sectors on the surface of the hard drive. If they are, then you need to start the Remap test. This test will allow you to reassign the addresses of damaged sectors to the reserved area, where normal sectors are located.
Types of available tests and sector categories. Victoria checks the surface.
If after the test Remap Victoria continues to diagnose bad sectors, you can still try to restore their functionality by using the Restore test. The Erase option should be used wisely under Windows, as it writes zeros to sectors - erases sector data. It can only be used within a certain selection of sectors, the data of which is not related to the operating system.
Brief summary
It should be noted that there is a difference between the errors resolved chkdsk utility Windows operating system and bad sectors, eliminated by programs such as Victoria HDD. The former are caused by file system problems, and the latter are often the result of the loss of magnetic properties of sectors of the hard drive surface and its gradual degradation. However, chkdsk can also fix some problems with bad sectors.
To eliminate bad sectors, you can use such applications as: Data Lifeguard Diagnostic, Ashampoo HDD Control, HDDScan, Victoria. We highlight the Victoria HDD application as the best for checking and eliminating bad sectors, as it offers a number of tests: Ignore, Remap, Erase and Restore. It allows you not only to detect faulty hard surface structures, but also to treat the HDD.
Hard disk (HDD) is the most important element of a computer on which everything is stored. necessary information, programs and user files. Like any other component, over time the hard drive wears out and its normal operation, failures begin to occur. Along with physical wear and tear, which leads to the appearance of so-called bad sectors (bad blocks), logical errors associated with the file system, indexes and the main file table often occur.
For the time being, you may not observe any problems with your hard drive, but this does not guarantee that one day the hard drive will not die. Therefore, it is important to check periodically (once or twice a year) HDD for errors and bad sectors that require correction. Regular monitoring will allow you to track the condition of the media and respond in a timely manner to changes in its condition. Of course, you should not neglect such a proven method of protecting information as backup. The most valuable data must be duplicated on a backup storage device.
Symptoms of a failing hard drive
In most cases, HDDs operate smoothly for several years without requiring special attention. However, in case of improper operation (physical impact, lack of proper cooling), the resource of the storage medium is significantly reduced. In rare situations, there may be a manufacturing defect or sudden failure.
Hard disk failure may be indicated by too many long loading operating system, unreasonable disappearance of files and folders, slow application launch. Obvious symptoms of a hard drive losing its functionality are slowdowns in programs and long periods of copying files. If the computer constantly hangs and nothing but restarting helps, then in the process of identifying the causes hard check disk should be the first item.
Using standard Windows 7/10 tools
You can test the media using standard Windows tools. The easiest way is to select in Explorer required hard disk, click on it right key mouse and go to the “Service” tab.
Next, click the “Run scan” button and set the scan parameters in the window that opens. If both checkboxes are checked, Windows will automatically fix everything during diagnostics. system errors and restore damaged sectors.

The results of the audit can be found in the report.

Command line
You can also audit your hard drive using the utility chkdsk called from the command line. In fact, such a check will not differ much from the above option.
So, launch the command line by selecting the required Start menu item. Then enter the command in the window: chkdsk G: /f /r
- G – name of the hard drive being tested (select the drive you will check);
- f – error checking and correction;
- r – detection and recovery of bad sectors.

All information about errors and bad sectors found will be displayed as the diagnostics are carried out.

Third-party programs for checking your hard drive
There are many programs and utilities for finding bad sectors and fixing HDD errors. We will list only the most famous ones.
Victoria
Perhaps the most popular hard drive checking tool. The program can be launched as in Windows environment, and in DOS mode from a bootable flash drive.
The interface provides five tabs: Standard, SMART, Tests, Advanced and Setup. First of all, go to the section Standard, where in the list of devices we select the hard drive we are interested in. The Drive passport area will display basic information about the HDD.

Next, select the tab SMART and press the “Get SMART” button. SMART (Self-Monitoring, Analisys and Reporting Technology) is a hard drive self-monitoring technology. Those. The hard drive monitors its operation during operation, recording information on a set of parameters that allows one to assess the condition of the media. Exactly this official information That's what we're trying to get.
After clicking “Get SMART”, either the inscription GOOD on a green background or the inscription BAD! will appear to the right of the button. on red. The second option will indicate that the media is in unsatisfactory condition and will most likely have to be replaced. For a more detailed study of SMART statistics, let's pay attention to the list of parameters on the left. Here we are primarily interested in the attribute 5 Reallocated sector count, indicating the number of sectors remapped. If there are too many of them, then the disk has begun to “crumble,” that is, its surface is rapidly degrading and it is urgent to make a copy of all data. In this case, there is no point in restoring the hard drive.

Chapter Tests makes it possible to check the hard drive for bad sectors, as well as try to “cure” or reassign unreadable blocks. For simple testing of the hard drive, set the switch to Ignore and start the test with the Start button. Sector health is assessed by measuring response time. The smaller it is, the better. Each response time range has its own color code. The slowest blocks are marked in green, orange and red. Sectors that could not be read at all are marked in blue. If there are a large number of “slow” and unreadable blocks, the hard drive should be replaced.

The Victoria program allows you to restore bad sectors, but we will not consider all the nuances of the procedure. Moreover, “treatment” often contributes only to a slight extension of the service life of the storage medium. To reassign bad blocks, perform a check with the mode enabled Remap. If the restoration was successful, do not rush to rejoice. Re-diagnostics the disk after certain period operation. The appearance of new bad blocks will indicate that the degradation of the hard drive is irreversible, and it’s time to find a replacement.
HDDScan
This is another one convenient program to identify problems with hard drives. After launching the application, select Select list Drive storage, needing verification.

Below we click on the “S.M.A.R.T.” button and get acquainted with the provided report.

Now let's diagnose the disk surface. Click on the round button to the right of the drop-down list of media and select Surface Tests in the menu that opens.

Click on the Add Test button, thereby adding a test to the list and starting its execution.

You can receive information about the progress of testing in Graph, Map, and Report modes. All blocks are also distributed into groups with corresponding color markings depending on access time.


At the end, a final report is generated.

Perhaps this is all we wanted to tell you about the methods of checking a computer’s hard drive for functionality. We hope the information provided will be useful to you and help you save important data.
Hello dear blog readers. - hard drive recovery, this is the topic of our article today. The last issue was dedicated.
To treat your computer - Windows and hard sections disk exists special program CHKDSK, which anyone can use.
You will learn how to enter it and what steps you need to take to restore Windows and partitions on your hard drive in this article.
Recovering the disk
Your computer has stopped functioning normally, Windows boots every once in a while or does not boot at all, you hear strange, repeating sounds and noises from system unit. What could be the matter, you ask me?
Most likely, one of the fans located inside the system unit is noisy. It is also possible that the hard drive is making such noise - it does not have enough power, it has errors or it will soon fail, this happens. You need to think about buying a new one and saving the information on the old hard drive as long as possible.
As I said above, the Windows operating system has a built-in chkdsk utility, with which you can check your hard drive for errors and restore the operating system if it does not boot.
This method does not always work, but in most cases in my practice, using the chkdsk program, it was possible to restore the previous functionality of the Windows operating system. They can also help you.
There are three ways to run chkdsk on your computer:
- Running chkdsk from Windows
Running chkdsk on Windows
You can use this method if it works fine for you Windows system and you want to check your hard drive for errors.
Go to My Computer.

Click right click mouse on the desired logical drive (C, D, E, etc.).
In the pop-up menu, go to the very bottom and select “Properties”.

In the window that appears between the top tabs “General” and “Equipment” - go to “Service”.

Select “Check disk for errors” and go to “Run check”.

Disk scan options - check the two proposed options: “Automatically correct system errors” and “Scan and repair bad sectors”, click the Start button.

If the disk is currently in use, you will be prompted to disconnect this volume.

After you disconnect this volume, a disk scan will begin, which may take some time and will depend on the amount of information on this logical disk.

If this system disk on which the operating system is installed, you will be prompted to run this scan after restarting the computer. You need to click Schedule scan and restart your computer.

After restarting the computer, when using Windows Vista and Windows 7 will display a black window with white letters.

If you are using Windows XP, the window will be blue. We don’t press anything and wait 10 seconds, after which 3 to 5 tests will run, on average it takes from half an hour to several hours.

At the end of the check, the computer will reboot itself and will operate in normal mode.
It is important to know! If you do not wait for this check to complete, restart your computer yourself. The next time you turn it on, you will receive a message about the disk check until you complete it.
Running the chkdsk utility from the command line
If you are a Dos and command line lover, or just want to see how the chkdsk utility works on the command line, you can use this method.
First of all, you need to press the key combination Win + R (English) K (Russian) on your keyboard, thereby taking us to Run the program or Run. Here's a screenshot for clarity, if you don't understand what we're talking about:

A small Run window appears, where you need to type the command, write the desired [volume:] (logical hard drive), for example, and specify the command for further operations or. Here's an example.
A little more detail:
- - team name.
- [Volume:] is a logical hard drive.
- — is set to correct errors on a logical disk.
- — is set to detect bad (damaged) sectors and restore the part that can be read.

You need to wait a little and the chkdsk program running in DOS will appear in front of you. The volume you selected must pass five tests. This procedure can take a long time, especially the last fifth test.

After all the checks, the next time you restart the computer, a window with a check disk may appear, which were described in the last paragraphs of the first method of launching the shkdsk program. So be prepared for this.
Running chkdsk using the Windows boot disk
Let's say that when you boot your computer, Windows constantly reboots to initial stage loading or just a black screen. There is a second way to use or how to run CHKDSK, but for this you must have a Windows boot disk handy.
Thank you for reading me on
If the HDD issues strange noises or there are problems with writing and reading information, you should use one of the programs to check the hard drive for errors. Depending on the task (checking the disk surface for damage, searching for bad sectors, correcting errors, etc.), different software may be useful.
You can quickly check the disk for errors using standard system tools, but to restore the hard drive you will need special third-party programs. Having learned how to check the health of a hard drive using various utilities, a user of any level will be able to cope with any problems that may arise.
The CheckDisk system service is the simplest program for diagnosing a hard drive, which is not able to find complex errors and fix them bad sectors, but is useful for fixing basic problems. It is available on all versions of Windows OS and can be used to check drives of any type. All users need to know how to check a hard drive for errors with this tool.
The graphical interface version of the utility is most convenient for novice users. You can launch it through the disk management menu, which can be accessed in two ways:
- in Windows XP/Vista/7 - select “Management” in context menu“My computer”, then go to the desired menu;
- in Windows 8/10 - press the Win+X combination and select the appropriate item.
In the window that opens, select the device that needs analysis, right-click on it and select “Properties” from the drop-down menu. By going to the “Service” tab, you need to run the hard drive diagnostic program.
The system will check and automatically correct errors if the disk is not currently busy with read or write processes. Otherwise, the program will offer to test after rebooting the PC. If necessary, in the scan results window you can see detailed information about the HDD status.
The GUI version does not always help, since it is sometimes necessary to check the status of the hard disk safe mode or not launching at all operating system. In such cases, the console comes to the rescue; you can launch it before the system starts using boot disk.
Once you open the recovery console, you need to run the chkdsk /f command, which will check all connected drives. In some cases, this will help fix the error. However, in most situations, if a HDD failure has made it impossible to start the system, a more in-depth check will be required hard state disk.
To take advantage console command from inside the system you need:
- launch the command line (via Win+X or by entering cmd in the “Run” window);
- enter the chkdsk command indicating the letter of the partition being checked and additional flags;
- Confirm the operation by pressing Y.
Checking the HDD via the command line will be a little faster than using the GUI version of the program; the results will be shown here in the console.
Linux systems also have standard tools— hdparm and smartctl, launched from the console.
Simple programs for quickly checking HDD
If standard utilities are not suitable, diagnosis of hard disk can be carried out using simple third-party programs. They allow you to get more information about the health status of the HDD, but in case of serious problems they will not be suitable, since they cannot be used to correct the damage.
HDDScan is a free program that performs analysis in two modes:
- according to S.M.A.R.T. indicators;
- linear processing.
The tool evaluates the read and write speed of various sectors, marking the “slow” cells. During the analysis, the program ensures that the tested hard drives do not overheat; at the end of processing, the user is presented with a full report.
HDDScan good versatility. The utility allows you to check disks for errors regardless of the type of device: it can either check an external hard drive or analyze a RAID array, SSD drive or memory card.
Crystal Disk Mark has only one function - it evaluates the read and write speed. Despite this, it is often used, since it is still possible to check the hard drive for serviceability using just two indicators.
The test uses different algorithms, one of which is sequential recording mode. The program gradually fills all the space on the drive with blocks specified by the user size, after which it clears the HDD. The same technique is used by hard drive manufacturers to check product quality. Its disadvantage is that it accelerates the wear of SSD drives.
CrystalDiskInfo And DiskCheckup They are similar in their set of functions, differing only in the interface. They check the status of the hard drive using S.M.A.R.T. algorithms and compile a history of checks, which allows you to track the dynamics of changes. CrystalDiskInfo has more options for visualizing history. For example, you can create a graph, not just get a written report.
Another feature of these programs is a convenient notification system. In-depth hard drive tests usually take a long time. If the user needs to step away from the computer, they can turn on critical notifications. HDD errors by E-Mail.
Programs from hard drive manufacturers
Some HDD manufacturers have developed their own utilities for analyzing the status of the hard drive. They are intended for use with devices of the same name; diagnosing a hard drive from another company is possible with their help, but this must be done carefully. Unlike more simple programs, these utilities have versions on different languages, including in Russian. Which program is better to analyze the HDD status?
The proprietary program from Seagate exists in two versions: a standard version for running under Windows and a DOS version in ISO image format, from which you can make bootable USB flash drive. It is recommended to use the second option, since the check in this case will be more accurate and efficient.
SeaTools uses part of the S.M.A.R.T indicators. For hard testing disk, without giving out details about each item. Three tests can be performed:
- short self-test of HDD;
- short rapid test;
- a long-term check in which all sectors are read sequentially.
As the scan progresses, the program automatically corrects any errors found.
Owners of hard drives from WD should know how to check the performance of hard drives using proprietary software from this manufacturer. The range of its capabilities is similar to that of the program from Seagate, but is somewhat expanded and allows for more in-depth work with the affected device.
There are two additional functions:
- deep disk formatting - the program writes zeros to all sectors, permanently destroying information;
- blocking access to bad sectors - the program marks bad blocks, excluding recording new information in them.
Unlike SeaTools, this program for diagnostics, the HDD can be freely used with devices from any manufacturer to check the hard drive for errors - no problems were identified with this.
Deep testing software
If you need not only checking the hard drive for errors, but also correcting bad sectors, you cannot do without sophisticated software that carries out the most in-depth analysis of the HDD state.
Victoria HDD
According to many users, Victoria HDD is the best software for detecting hard drive problems. The program gained this reputation due to its wide range of functions.
Victoria exists in two versions:
- With graphical shell for use from inside Windows;
- with a DOS shell to create a boot disk.
enjoy better than the second one version. HDD diagnostics outside the system allows you to achieve best results, so it is always recommended to follow the principle “if possible, test the disk from the boot disk.” As a last resort, you can use a LiveCD of another OS, for example, a Linux distribution like Ubuntu.
Victoria HDD has a variety of functions:
- fast and full check disk;
- reassignment of bad sectors and their restoration;
- checking the status of contacts in the IDE or SATA cable;
- equipment performance analysis;
- viewing S.M.A.R.T. indicators.
When checking, you need to pay attention to the access time to sectors. It should not exceed 200-600 ms. You can also view the temperature of the disk during operation, but this is not so important.
HDD Regenerator
HDD Regenerator is a program for professional hard drive recovery. It not only marks bad sectors as unused, but also tries to revive them. For this purpose it is not used standard method deep formatting, and its own algorithm based on transmitting signals to the sector different levels. Despite its professional level, inexperienced users can also use this software, since testing a hard drive with its help is not difficult thanks to its convenient Russian-language interface.
Program features:
- ensuring data safety - it works only in read mode;
- support for different file systems;
- the ability to scan the disk surface;
- real-time monitoring.
The program is not suitable for everyone, since you can check your hard drive for functionality for free, but you will have to pay $90 for the sector recovery function.
If you don’t want to pay, you can use TestDisk, a free program that can restore the partition table, boot sectors and MFT. It also detects bad sectors and can repair deleted information and fix file system errors. The only drawback is the lack GUI, you have to work from the console.
If after HDD checks and if all problems are corrected, the computer has not stopped working incorrectly, it is worth checking the registry. Perhaps the failures are caused not by equipment failure, but by internal errors systems.
This article describes causes and solutions to the error “Windows has detected hard drive problems disk". If you see this warning, it means it's in progress. work hard there are problems with the disk. The system may be corrupted or may not boot the next time you start it. As a result, there is a possibility of losing your data, such as photos, videos, music, important documents and more.

This is due to the fact that problems or other problems may arise when operating the disk. serious mistakes, damaging the operating system, slowing down or even stopping its operation. It is very annoying because it can appear every 5-10 minutes. In most cases, such a message is a sign hard drive malfunction disk, system failure, loss of a system file, etc. It is not recommended to ignore it, and the best solution would be to find out the reason for its occurrence.
Possible causes of the error
There are many reasons for this error to occur.
It usually occurs when hard failure disk, but can also be caused by a registry error, lack of random access memory, over-running or over-installation of programs, viruses, malware, and many other reasons. You can solve it by trying to restore the system, delete unnecessary files system, or update it.
Possible causes of hard drive failure:
Mechanical or logical error. It is very likely that it is caused by file system corruption, bad sectors, or a mechanical problem. The hard drive is responsible for storing data, and its failure will lead to data loss.
Virus. When a computer gets infected with a virus, it will no longer function as before, even if the antivirus software removed it. The antivirus does not repair the damage caused by the virus, but only removes it. In such cases, the message is due to data corruption by a virus.
Damage system files . Their damage can be caused by incomplete uninstallation of the program, deletion of important system information, improper shutdown of the computer, etc. A damaged file, in turn, will result in the absence of data required by the system for proper operation.
Human factor. Many users, trying to improve PC performance, may cause a system problem. For example, changing settings system registry, or the location and properties of system files. Because they have poor understanding of system components, they follow incorrect instructions or perform incorrect operations. Some of them may damage your system or hardware.
How to fix the error
It is difficult to determine the cause from the error message. This does not mean that the hard drive is damaged or there is a problem with the system. Listed below are a few solutions that may help in fixing it.
Solution 1: sfc /scannow command
Use standard tools to fix errors that are built into the OS. These tools can help fix many serious problems. Standard utility "System File Checker" will check and eliminate the error in their integrity. To launch it, open the menu "Start" and enter cmd in the search field. Then right-click and select "Run as administrator".

For more information on how to launch the command line, watch the video
At the command prompt, enter sfc / scannow and press the key Enter.

The process will quickly show the result. This command checks system files and replaces damaged ones with a backup copy. Do not close the window until the scan is completed.
Solution 2: chkdsk command
If the first method does not work, you can check with the command chkdsk. On the command line we write it with the drive letter that needs to be checked. If you want to test the default section, you don't need to write anything else.
Enter "chkdsk" and press "Enter".

If you need to perform a full scan of your hard drive from automatic correction system file errors and bad sectors must be added to the command chkdsk parameter /F.
Difficulties may arise with checking the disk on which the OS is installed; the system will prompt you to check it the next time you reboot, for which you need to enter confirmation "Y".
After checking, the problem should disappear. It is recommended that you back up your data before attempting this command. Since correcting errors may overwrite some data.
Solution 3: Find bad sectors
Check bad sectors. They will help with this Victoria programs or HDD Regenerator. The latter even has the function of physically restoring damaged sectors. This is achieved through “magnetization” faulty areas. For more information about how these programs work, see our channel:
If the disk has large capacity, the scanning process may take some time. After its completion, a report on bad sectors will be displayed.
During the repair process, the data stored on bad sectors may be erased, so it is recommended to make a backup copy before starting it.
Solution 4: Service Center
Contact service center for disk repair. Repairs require special equipment and spare parts, which we do not have. ordinary users. Some discs may still not be recoverable.
How to turn off error messages
The error appears when the system considers that the disk is damaged and reminds you to Reserve copy data. But there are times when everything is fine with it, but the OS throws an error. Which is very annoying when working on a computer, but it is possible to disable them.
To do this, press the key combination Win+R and in the window "Run" write a command gpedit.msc(not available in Windows versions Home).

In the window that opens, look for the folder "Disk diagnostics" / "Diagnosis of the disk. Set up custom alert text"


This will turn off notifications, but will not fix the disk problem. So before you do this, make sure that the HDD is not causing the problem.
Backup in case of error
As already mentioned, disk problems can cause the loss of important data. Therefore it is recommended to do backup copy, if such an error occurs. By copying it to another disk or media.
This can be done using standard Windows tools, more details in the video clips:
The cloning speed mainly depends on the disk speed, the selected mode and the amount of data.
How to recover files from "broken" disk can be found in the video of our channel