Windows 7 from disk to flash drive. Optimization of the “portable system”
That's what he told how to create a bootable USB flash drive with Windows 7 V Windows program 7 USB/DVD Download Tool. This official program from Microsoft and it seems to work quite well. But a comment appeared that it was impossible to create bootable USB flash drive this program. Maybe so, anything can happen, so I’ll write another way in which you can create a bootable USB flash drive with Windows 7. And this time we will use good program Ultra ISO, I have already written about her more than once on the blog, in various articles.
I think that there is no need to tell us why such a bootable flash drive will be useful to us; if you are reading this article, then most likely you are interested in the question of how to create it, and not why it is needed.
In this way you can create a flash drive not only with Windows 7, but also Windows XP and Windows 8. What’s up, you can burn any image, any boot disk, for example Dr.Web LiveCD. Well, if you have already changed your mind about creating such a flash drive, then the image can be written to disk without any problems, I wrote about this in the article.
How to create a bootable USB flash drive with Windows 7?
We will need:
- UltraISO program. You can download it on the Internet in a couple of minutes, just type in search engine request “Download UltraISO”. After downloading, you need to install it. Installation is the most common, but if you don’t know how, then read the article. The program is paid, but when starting just select “Trial mode”. And if you want, you can buy it.
- A disk image with Windows 7, or any other image that you want to burn to a flash drive. This image must be in the format .iso, I hope you have already downloaded it.
- Flash drive size minimum 4 GB(this is for Windows 7, if you want to burn a small image, then 1 GB is enough). The flash drive will have to be formatted, and this will destroy all the files on it, so you need either a clean flash drive, or copy all the information from it to your computer in advance.
If everything is ready, then let's begin.
Launch the program Ultra ISO(there should be a shortcut on the desktop and in the start menu). I will show the example of the English version, since I had a problem with the Russian one, all menu items are displayed in an incomprehensible font. But there’s nothing wrong with that, everything is clear and so.
The program has opened, now we need to select the .iso image of the boot disk, in our case with Windows 7. Click “File” and select “Open”.

Find our image, select it and click “Open”.

Now our image is open in the UltraISO program, all that remains is to write it to a flash drive. Click and select “Write Disk Image…” (Burn hard disk image…).

A window will open in which we need to specify some settings. Look what's opposite “Write Method:”, the value has been set to “USB-HDD+”. And on the contrary “ Disk Drive” the flash drive we needed was selected.
Now we still need to format the flash drive and we can start recording. Click the button “Format”. Don’t look at the fact that I have a 1 GB flash drive, I just don’t have a larger capacity at hand. You must have a flash drive of at least 4 GB.

A small window will appear in which we will format our flash drive.
Formatting a flash drive will destroy all files on it. So save them to your computer in advance.
Only needed at point “File system” select NTFS, and click “Start”.
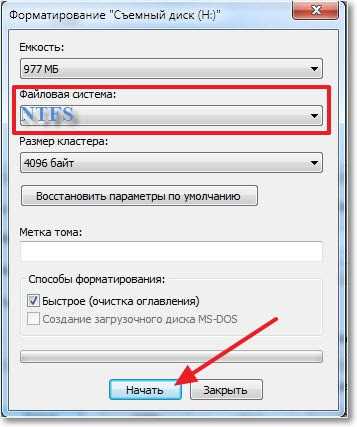
A warning will appear, click “Ok”.

 That's it, the flash drive is formatted. Closing the window “Format” by clicking on “Close”.
We invite you to find out about how to record bootloader Windows flash drive 7 so that it can later be used to install Windows 7 or, if necessary, restore Win systems 7.
In fact, the process of creating a bootable flash drive is not complicated and, moreover, it will not take much of your time, so you should resort to it if you have an unused USB drive that can save the situation at critical moments.
1. First, you need to download a licensed image of Win 7. We suggest downloading the iso image from our server, since this is where all versions of the “seven” are collected and you can choose for yourself exactly what you really need.
2. Now, you need to download the Ultraiso program and install it. The biggest advantage of this program is that it can be used completely free of charge!
If the image operating system has already been downloaded and the program is installed, then you need to proceed to the main process of creating the image.
3. To begin, you need to “run Ultraiso as administrator.” This is done by right-clicking on the program icon and selecting the appropriate item in context menu.
You can try to use the program in our situation without “administrator rights,” but in this case, there is a high chance that the operation may fail.
4. Open the Windows 7 iso image, which we are going to burn to a USB drive. To do this, in the Ultraiso program, click on: “File” -> “Open” -> in a new window, select the image that we are going to record, select it and click on “Open”:


5. Now, since the image to be recorded is open in the program, click on the “Boot” button -> “Burn image of Hard disk":

6. All that remains is to select the USB drive on which we will burn the image. We immediately select the recording method, in our case (for our flash drive) the “USB-HDD+ recording method” is suitable. If you have chosen everything, then it’s time to click on “Record”:

7. In a new window, you need to confirm the deletion of all existing information on the flash drive by clicking on the “Yes” button:

8. We are waiting for the process of writing data to the USB drive to complete. This process, often takes about 5-20 minutes.

9. Last step, which will confirm to you that the download was successful, will look like the message “Recording complete!”. Now, all you have to do is click on the “Back” button, and then close the program.

In this way, you can do it yourself burn bootable USB flash drive Windows 7, which you can always carry with your laptop and, if necessary, in a matter of minutes you can revive not only your PC or laptop, but also easily help a friend who finds himself in a very sensitive situation.
In this article I want to tell you how to burn Windows 7,8,10 to a USB drive. Two methods will be described. However, all operating versions Windows systems are written almost identically. For this I needed the following programs: Torrent UltraISO Image operating system USB flash drive
Three ways to burn Windows to a USB flash drive
To carry out this procedure, you need a USB flash drive with a capacity of at least four gigabytes. In my case, an 8 GB drive was used. So, first we needed to format the media in NTFS format. This format I chose by going to My Computer first. Seeing the flash drive in the list of connected drives, click on it right click mice. In the context menu, select “Format”
In the "Type" field file system"Select NTFS.

Burn Windows 7 to a USB flash drive using UltraISO
Having formatted the flash drive, download the desired Windows version(7,8,10) and program for UltraISO recordings. For the convenience of downloading the operating system, it is better to use a torrent; you can download it in any search engine.
Download UltraISO— http://ultraiso.ru.softonic.com/
First of all, install and run the UltraISO program. After full opening programs in top line menu, select the “File” command, then “Open”.

After opening the window with local disks, find the loaded Windows and double-click on it.

Before you start recording, make sure that the drive you want to record to is selected. To do this, look in the “Disk Drive” field. Also, in the “Recording method” field I set the value USB HDD.

After the actions taken, a recording began, and, as a result, the creation bootable media. After recording is complete, the flash drive can be used to install Windows on a PC.
This method is also quite simple and to perform it you will need the winToBootic program. When opening the program, the flash drive immediately appeared. Next, find the downloaded Windows image 8 and by dragging the mouse moved the shortcut to the window open program. Then check the “Quick Format” box and click “Do it!”
Download winToBootic— http://www.softportal.com/get-38790-wintobootic.html
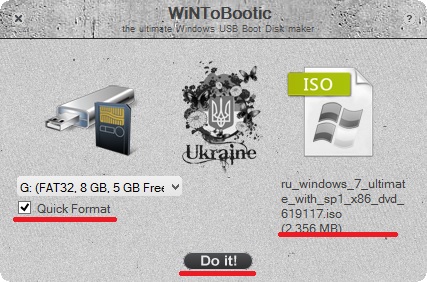
This program automatically formats the media after a preliminary warning. However, in my opinion, winToBootic is very easy to use and suitable for Windows entries 7,8 and 10 versions.
Burn Windows 10 to a USB flash drive using Windows USB/DVD Download Tool
I will burn Windows 10 to USB using a utility from Microsoft - Windows USB/DVD Download Tool. Download this utility can be found on the official Microsoft website.
Download Windows USB/DVD Download Tool— http://wudt.codeplex.com/
After launching the program, indicate the location where the downloaded ISO image Windows 10

Then select the media type (USB).

The third stage is choosing the desired flash drive.

After selecting, click “Copy”. The program reported that all data on the USB will be deleted.
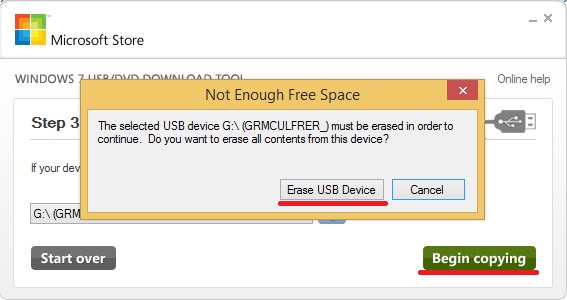
And finally, the fourth stage is the beginning of recording.

Burning Windows onto a flash drive is quite simple; you only need to have the most minimum set programs. The UltraISO method works for almost all versions of Windows OS except 10. But there won’t be many problems with this version either, since Microsoft utility very easy to use and does not require special skills!
Hello. I decided to write some more useful text today, before I lose my inspiration :). I'll tell you now about how to burn a Windows image to disk, this can be done in many ways and programs, but I will write how to burn an image with the UltraISO program, this is the coolest and easy programs I always use it for recording discs. Well, if you don’t want to install additional programs, then you can burn the image to disk using the standard Windows tool 7 (in Windows Vista There seems to be such a feature too).
I looked at the instructions that I wrote on and, and realized that in them, I gave a link to an article about that. This article describes a way to simply burn files to disk. Music, movies, etc., but we need to create a boot disk for further installation of Windows. And the process of recording an image is slightly different from simply writing files.
When we download an operating system image from the Internet, it looks like a single file with the extension .iso. For some reason, it seems to me that many people simply took and wrote this file to disk, and then complained why not loading from the boot disk when Windows installation, after all, it’s set up.
And to avoid such problems with installing the operating system, I will write about how to correctly burn an .iso Windows image to disk. And then install Windows from this disk; there is a link to detailed installation articles above.
I also forgot to write about the size of Windows images and the disks that will be needed for recording. Suitable for Windows XP CD-R disc, or RW it doesn't matter. The Windows XP image takes up approximately 700 MB and fits on a CD. Of course, if this is not an assembly with many programs and additional utilities, in this case it may not fit on a CD. For Windows Vista, Windows 7 and Eight you already need DVD disc. There are larger images, the seven takes about 3 GB.
Burning an .iso Windows image to disk using UltraISO
After installing the program, it is associated with the .iso extension and all files in this format will be opened through UltraISO.
In order to burn an .iso image, just open the image with Windows double click, if.iso looks like this:
 Will start UltraISO program, which will already have a bootable disk ready for recording. Paste required disk into the drive, press the burn button and then confirm the burn by pressing “Burn”. You just need to wait until the program burns the disc, and you can start installing the Windows operating system.
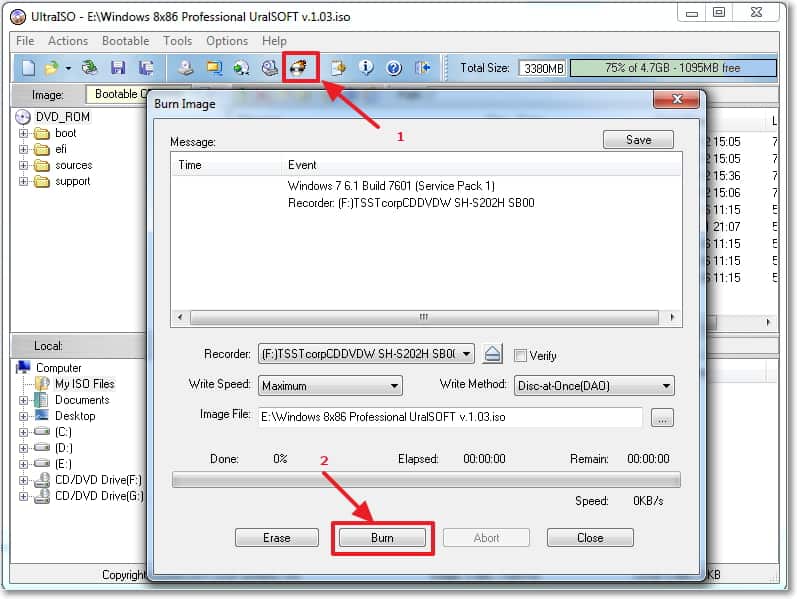
And one more thing, in the speed settings it is best to choose a lower speed, the recording quality will be better. If you burn a disc to high speed, then problems may occur during the installation of the operating system.
We create an installation disk with Windows using a standard tool
Burn image installation disk it is possible standard means. Such a utility seems to have appeared in Windows Vista, well, it definitely exists in Windows 7. With its help you can special problems burn .iso image. And the resulting disk will be bootable, from which you can install the operating system.
In Windows 7. iso file looks like this:
