How to extract bios file from exe. An alternative way to modify the AMI BIOS to support LGA771 processors
A universal program for removing firmware and BIOS backups from any models of laptops and personal computers.
A dump must always be done when we want to do a firmware update, update or rollback of the BIOS. Sometimes you are asked to make a copy of the BIOS of a laptop or motherboard of a personal computer in order to repair similar equipment.
What is BIOS and what does this abbreviation stand for?
BIOS is an abbreviation for the English words Base_Input_Output_System and is translated as basic_input_output_system
Making a BIOS dump of laptops and computers using this program is very easy and simple.
Brief instructions on how to use the Universal BIOS utility Backup ToolKit 2.0 program to create a bios damp, or in Russian, a backup copy.
Video instructions for working with this program.
Many antivirus programs identify this program as a virus, but it is not.
After downloading, you can check this archive on the website www.virustotal.com which will say that half of the antiviruses will find various viruses in it, and the other half will not.
My AVG also detects it as a virus. And on the beech, Casper says that everything is fine.
After checking this file, see if your antivirus finds a virus in it. If so, disable it while the program is running.
Then unpack the archive and run the resulting file named Universal BIOS Backup ToolKit 2.0.exe
If your system says that administrator rights are required. Then right-click on this file and click on Run as administrator.
After this, a program window opens in which we see information about the type, version, size, manufacturer and date of your BIOS.
After this, click the Read button and wait until the BIOS reading process is completed.
After this, a sign will appear indicating that reading the BIOS was completed successfully.
Click OK. Then click the Backup button.

We are asked to choose a location where we will save the BIOS dump. Select the desired folder and click the save button.

We all made a backup copy of the BIOS, you can update the version, flash a new or old stable version of the BIOS.
How to extract Dell BIOS files?
Copy the BIOS.exe file to drive C:
Run Command Prompt in Administrator mode and write this:
cd\
bios.exe /writeromfile
bios.exe /writebinfile
bios.exe /writehexfile
» bios.exe is a file downloaded from the Dell website. "
The unpacked bios file will be copied to drive C:!
Unpacking the new Dell BIOS.
- Download the Python 2.7 interpreter.
https://www.python.org/download/releases/2.7/ - Install Python 2.7 on your computer (exactly this version!).
- with Python script - DecompNewDell.py.
- Copy the DecompNewDell.py script extracted from the archive to the folder with the Python interpreter (usually C:\Python27).
- We also copy our downloaded bios from the dell website to the folder with the interpreter (usually C:\Python27). Rename it to biosupdate.exe. It should look like the photo below.
- Launch the Windows command line in administrator mode and write this:
cd\
cd Python27
python DecompNewDell.py biosupdate.exe
It should look like the photo below.

And in the folder with Python (usually C:\Python27), the file biosupdate.exe_decompressed.hdr will appear.
- with the PFSExtractor.exe program, extract the program to the same folder where we created the .hdr file (usually C:\Python27).
- On the Windows command line we write:
PFSExtractor biosupdate.exe_decompressed.hdr
It will turn out like in the photo below.

And the folder biosupdate.exe_decompressed.hdr.extracted will be created, inside which there are all extracted files from which you can collect a dump for flashing the firmware on the programmer. Ready!
Actually, the original method, equipment and microcodes can be found (directly the AMI instructions), and in most cases, using this method does not pose any problems and has no pitfalls, but in my practice I regularly encountered the following problem:
Those. there was a banal lack of free space inside the image. When you modify the BIOS for yourself for a specific processor, you can ignore this, because You can always load just one microcode specifically for your processor, or delete some old microcode to free up space, but when you modify with a thread, you need to look for another solution, a compromise.
As a compromise, I chose the following solution - we take the latest versions of microcodes for all processors of the CORE generation in all designs (Celeron E, Pentium E, Core 2 Duo, Core 2 Quad, Xeon *3xxx/*5xxx) and replace with them everything that was before . The set of microcodes turned out to be as follows:

The volume of this set is only 76 kilobytes. This file was obtained by combining these files:
cpu00010676_plat00000001_ver0000060f_date20100929.bin
cpu00010676_plat00000004_ver0000060f_date20100929.bin
cpu00010676_plat00000010_ver0000060f_date20100929.bin
cpu00010676_plat00000040_ver0000060f_date20100929.bin
cpu00010677_plat00000010_ver0000070a_date20100929.bin
cpu0001067a_plat00000011_ver00000a0b_date20100928.bin
cpu0001067a_plat00000044_ver00000a0b_date20100928.bin
cpu000006f2_plat00000001_ver0000005d_date20101002.bin
cpu000006f6_plat00000001_ver000000d0_date20100930.bin
cpu000006f6_plat00000004_ver000000d2_date20101001.bin
cpu000006f7_plat00000010_ver0000006a_date20101002.bin
cpu000006f7_plat00000040_ver0000006b_date20101002.bin
cpu000006fb_plat00000001_ver000000ba_date20101003.bin
cpu000006fb_plat00000004_ver000000bc_date20101003.bin
cpu000006fb_plat00000010_ver000000ba_date20101003.bin
cpu000006fb_plat00000040_ver000000bc_date20101003.bin
cpu000006fd_plat00000001_ver000000a4_date20101002.bin
The modification procedure itself has also changed a little and has become, if not easier, then faster:
Step 1— open the BIOS image in the MMTool program: 

Step 2— to check, go to the last tab (CPU PATCH) and look at the number of microcodes. Here, for example, there are 31 of them: 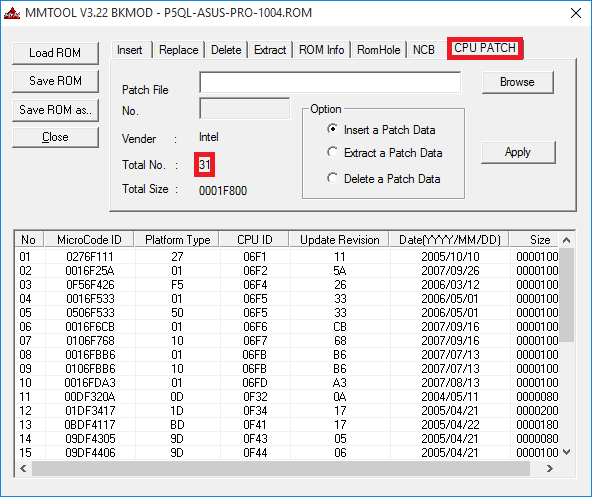
Step 3— go to the Replace tab and look for the “P6 Micro Code” item on it: 
Step 4— having selected the “P6 Micro Code” item, press the Ikshtsyu button, select the ncpucode.bin file described above and replace it with the Replace button: 


Step 5— to check, go to the last tab (CPU PATCH) and look at the number of microcodes. After replacing the microcodes, 17 remained, the latest version: 
There is no fundamental difference with the modification procedure described on delidded.com. In most cases, the output is certainly not the same, but the processor receives the necessary microcode. Of the subjective positive aspects, I would only like to draw attention to the fact that the microcodes for all current processors are guaranteed to be updated, be it “civilian” or “server”, and there is practically no risk of receiving a message about lack of space. Although, in my practice, even for such a set of microcodes there was not enough space a couple of times, this was with the BIOS for the ECS P4M900T-M and ECS P4M900T-M2 boards, which are generally compatible with the Xeon E5450.
By tradition, I publish a link to the archive with tools - (zip, 234KB). The archive contains an executable file MMTOL.exe(version 3.22 BKMOD), file with microcodes for all 45/65nm processors of the core/xeon generation ncpucode.bin, as well as two files 45nm.bin And 65nm.bin with microcodes only for 45nm processors and only for 65nm. The use of these files can be useful in cases where it is necessary to free up additional space in the BIOS, for example, for new firmware of some controller, network, disk, etc.
!NB: Neither the ncpucode.bin file nor the 45nm.bin/65nm.bin files support Pentium 4, Celeron (without letter suffixes), Pentium D, Celeron D and Xeon W processors (Xeon 5080 for example). These are NetBrust generation processors.