How to set up a remote scanner. How to make a network scanner
The Internet is replete with articles on the topic of setting up shared access to printers, but you can find good instructions on the topic “How to set up general access to a scanner on a local network" is quite difficult, because novice users encounter problems during independent decision Problems.
main feature in setting up shared access to the scanner lies in its drivers, which control the operation of the device. The user and the operating system interact with the scanner through drivers, therefore they must contain a mechanism to support shared access to the scanner for remote use them.
To make sure that interaction occurs at the driver level, try running a scan from third party application, whether the operating system's Fax and Scan tool or graphics editor. Be sure to get into proprietary utility from the scanner developers. Therefore, if at the writing stage software for the scanner, this point was not taken into account, which is important for older devices that are not supported by the manufacturer, then public access to such a scanner cannot be organized.
IN technical documentation the MFP must have everything necessary information concerning the use of a peripheral device, including over a local network. If there is no such data or it is difficult for the user to understand it, this instruction. It shows, using an example, how to connect and configure a scanner in the Windows operating system in order to scan documents over a network.
In our case, we used a PC with Windows 7 and an HP scanner. XnView and Blind Scanner were used as accompanying software to open public access to the scanner.
What is a network scanner?
Note that there are two methods to “share” the scanner on the network. The first is to connect the device to one of the computers on the network and configure it accordingly. The second is to connect the scanner to the network as an independent device and make the appropriate settings. The connection methods differ in that in the first case the device will not have its own identification number(IP addresses) by which other network users will access it. Requests will occur through the mediation of the computer to which the scanner is connected. We will focus on this switching method due to its prevalence and ease of implementation. The second case requires a special device that is equipped with an integrated network card for individual functioning in computer network, or a hybrid scanner. It can work either separately from a PC on a local network or connect to a computer via USB or Bluetooth.
The ability to use the scanner over a network requires that the computer controlling it be turned on and connected to the network.
Let's start setting up public access on the server
First of all, you should connect multifunction device or a scanner to a computer via USB and supply power to it, provided that the drivers are installed in the system. Otherwise, download them from the developer or device support website and install them. Then you should restart your computer and scanner.

Now you should install a utility with the option of scanning documents, if the system does not have one. You can use, for example, XnView.
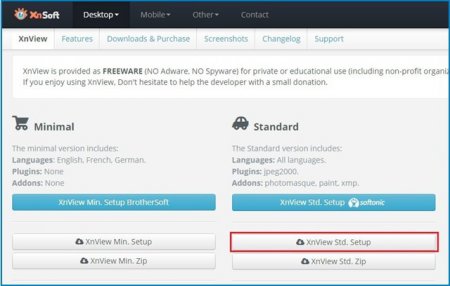
Installing the application is very simple, so any beginner can follow all the instructions.
Client machine configuration
Then we switch to the computer from which we will perform network scanning and install the BlindScanner program on it, taking one point into account: in the component selection window, move the checkbox to the “BlindScanner Pro TWAIN driver (Client)” position.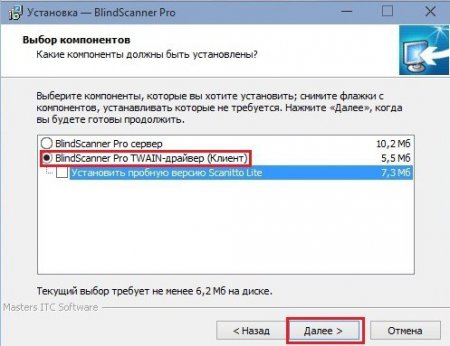
Using the scanner over a network

As a result, we will receive a digitized document.

Types of scanners and their compatibility with Windows
Consider setting up a regular scanner and using the WSD service. To do this, connect the equipment to networks, Make sure that scanner included. Click "Start" and go to the "Network" tab. Find the icon scanner and by clicking on it with the mouse ( right click) select “Install”. In the User Account Control dialog box, click Continue. Click on the line “Your device is ready to use”, check the settings and click “Close”.
Now click on “Start” again, find the “Control Panel” option, go to “Devices and Printers”. Make sure you have a network connection scanner A. Now perform a scan using the WSD service. Network name scanner and will be displayed on all computers participating in the local connection networks.
note
The WSD service is available in the systems Windows Vista.
The network scanner icon will be displayed with the name of the hardware being used.
Sources:
- connecting the scanner to the network
Tip 4: How to install and configure a local web server
Here we describe one of the ways to configure a local web server to create a test environment for web developers and web site testers. For of this server You don’t need an Internet connection and you can easily work with several projects at once. The web server works stably and does not require special knowledge when setting up system administration.

You will need
- An operating room will be required Windows system any version, free version installation package Endels_setup web server, which can be downloaded from the website of the developer of this product.
Instructions
Run the local web server installation program Endels_setup.exe. Click the "Next" button.

Specify the location where you want to place the local web server itself and the files of your future projects. It is best to choose a disk with the largest capacity free space.
Click the "Next" button.
Network printing works, but network scanning fails (Windows).
Maybe, network settings The scanner drivers are not installed correctly.
To resolve the issue, follow the instructions below:
NOTE: The illustrations below are representative of your product model and operating system and may differ from your Brother model and operating system.
Step 1: Make sure your Brother machine is turned on and there are no errors on the display.
- If nothing appears on the display, your Brother machine is turned off or in sleep mode. Press any key to see if the device wakes up from sleep mode. If your device does not wake from sleep mode, make sure it is plugged into a working outlet and that all power buttons (if present) are turned on.
- Check the display for error messages. For example, "Paper Jam" or "Out of Ink/Toner." If the display shows an error, correct it.
Step 2: Check your connection
To use the Network Scan feature, your Brother machine must be in a peer-to-peer network environment.
In a shared network environment, the scanning function is only available from the server computer and does not work on client computers.

Step 3: Check that your Brother machine can print

Step 4: Check your scanner driver
Open the list of scanners and check for the Brother machine scanner shortcut.
If you don't see a Brother machine shortcut in the list of scanners, you need to install the scanner driver.
Go to section Files on this website on the page of your device model and download Full package of drivers and software. Installation instructions are available on the download page.
Step 5: Check your Brother machine's IP address
You can check the device's IP address using the network configuration list.
Step 6: Set the IP address in the scanner driver
NOTE: Steps may vary depending on the operating system you are using.

- If you have problems with your IP address, please contact system administrator to obtain the correct IP address.
- Refer to the network configuration list printed earlier for how to set the device's IP address.
If Boot Method /IP Config is set to Auto, change it to Static. For getting detailed information look User guide or Network Guide.
Step 7: Check your firewall settings
Check your firewall settings on your computer. If your computer has a firewall enabled, it may block network connection required for proper operation programs network scanning. Disable the firewall on your computer and try network scanning again.
If the network scanning feature works correctly after you disable the firewall, then the firewall was previously blocking the required network connection. In this case, Brother recommends that you disable the firewall each time you scan over the network using the scan key, or leave the firewall enabled by changing its settings.
If your firewall is blocking your network connection, it is recommended to add the following internal/external ports to your firewall:
- UDP: 54925
- UDP: 137
- UDP: 161
Step 8: Uninstall and reinstall Brother drivers
- Uninstall and reinstall Brother drivers.
For Windows XP SP2 or higher and Windows Vista: If the firewall discovery screen appears, select Change firewall port settings to allow network connection and continue with the installation. (Recommended) (Change the Firewall port settings to enable network connection and continue with the installation (Recommended)). You may need to click a button to continue. Next.
If used Windows firewall is turned off or you are using a different firewall, you may receive a warning that the firewall has blocked the network connection. Add the following network ports according to the instructions provided in the documentation for the firewall you are using.
- To scan over a network: add UDP port 54925.
- If network connectivity issues persist, add UDP ports 137 and 161.
- Try scanning again to determine if the problem is resolved. If scanning fails:
- Make sure your computer is not running any security software or firewalls that might block your network connection.
- Try scanning from another computer connected to the network.
These steps will help determine whether the problem is related to specific computer. If other computers are scanning, contact your computer manufacturer or network administrator for help in troubleshooting this computer.
Hi all! Today I encountered this problem: how to make a scanner over a network in Windows? The printer is easy to add, because... Windows has a built-in print server, but no scanning.
How to set up a scanner over a local network?
After a little searching, I found a program that makes a scanning server and, accordingly, can share usb printer over the network!
 Now see how it works:
1. Install this program on the computer to which the scanner is connected. Install as a server.
2. Now on a computer that does not have a scanner, install the program in Client mode.
3. To scan a document, select RemoteScan as the device.
1. Install as a server
I won’t explain to you how to install, everything is simple further, further, but most importantly, install as is and when installing, check the server box.

When starting, select the scanner through which scanning will be performed. We select the scanner so that the program can share the scanner over the network.

All. The server is minimized to tray and will start when the computer starts. There is no need to turn it off. If necessary, you can change the scanner in the tray if you have several of them.
2. Install the scanner as a client
Now we install the scanner on the computer where you will scan.
The installation is similar, only during installation you need to select the Client checkbox.

After installation, if the firewall asks, again select which networks you will use it on.
All. Now how to scan.
3. How to scan over a network via USB
Now select the program to scan. If you don't have it, you can download it in my article about. I took the second one, which can scan several pdf pages into one file.
Select RemoveScan as scanner

And we scan as usual) This is how you can scan over the network via a USB scanner!
Many people may need to connect the printer to virtual machine, I am attaching a video based on this)
PS: If anyone has conflicts with this program on their computers, then try the BlindScanner program - it’s an analogue.
Instructions
Download RemoteScan 5 to share the scanner over the network in Windows. You can download it here http://www.remote-scan.com/. Install the server version of the program on the computer to which the scanner is connected. Install the client version of the program on other computers on the network. When installing latest version the program will display a message saying that the scanner is , don't worry, this is normal. After installing the server version, a program icon will appear in the tray. Right-click on it and go to “Settings” to connect the scanner to the network. Select the scanner and configure the ports. The scanner may not be able to detect it right away; it will take from one to three minutes.
Open your firewall/antivirus and allow access to port 6077, if you have NOD 32 antivirus, go to your personal firewall, go to interactive mode in the settings and create a separate rule for the RemoteScan program. After this, install the client versions on other computers. Network installation on Windows is complete.
Set up network scanner on Ubuntu OS. Go to the terminal, enter the command #apt-get install and enter the name the required package- sane-utils, then open the scanner configuration file, which can be located in the /etc/sane.d/ folder with the name saned.conf, add to the end of the file the address of the computer to which you want to share the scanner. Edit the file #nano /etc/inetd.conf, add the line sane-port stream tcp nowait saned:saned and specify the following path /usr/sbin/saned saned.
Create a Scanner group: #groupadd scanner. Add users to this group group with the following command: # #usermod -aG scanner “Username”; usermod -aG scanner saned. Edit the file 40-libsane.rules, located in the nano /lib/udev/rules.d/ folder, and find your scanner there. Make the line with the name of the scanner look something like this: # “Name of the scanner”; ATTRS(idVendor)=="03f0", ATTRS(idProduct)=="4305", ENV(libsane_matched)="yes", MODE="664", "Group name"="scanner".
Set up the client computer: install the sane-utils package using standard program install apt-get install packages, edit the net.conf file located in the nano /etc/sane.d/ folder, add the address of the computer with the scanner to the end of this file. The scanner's network connection is complete.
Sources:
- network scanner
In contrast to Windows, which is easy to install and configure, Linux has become a symbol of complexity and complexity of installation that can scare off anyone who does not consider themselves a virtuoso. command line and a highly qualified programmer capable of independently writing missing driver unknown device.
However, installing and setting up ubuntu is the most popular among beginners Linux distribution- no more difficult than any other operating system. This distribution is ready to run immediately after installation and includes everything necessary for work: a client for communicating via the ICQ protocol, a client Email, photo tool, audio and video player, office suite OpenOffice. In addition, it implements a mechanism for tracking software changes, eliminating the need to monitor the release of new versions.
3. In the menu that appears, select “Install ubuntu”
4. You will need to select the language for communication again during the installation process and specify the time zone.
1. Connect and configure the router. This process is quite simple and accessible to any user. Follow the instructions provided in the documentation for your model. We only note that if this is possible, then it is better to make the distribution of IP addresses automatic. This will simplify the procedure for logging into the network for new equipment.
2. Configure each computer to work in wireless network. Most have a built-in wi-fi adapter, but for a desktop computer you may need a network adapter, which will need to be purchased separately. Setting up a wireless network is not much different from setting up regular network. The only thing you need to do additionally is to enter a special secret code network generated by the router. The code will allow you not to worry about outside users will be able to connect to your wireless network.
3. To connect to the wireless network of your pocket computer, the easiest way is to use the built-in utility iPAQ Wireless or similar, depending on the model of your pocket computer or. Here you will also need to specify the network secret key.
After you have managed to set up Wi-Fi, you can not only access the Internet from each device on the wireless network, but also use the network: share folders, share a printer and scanner, etc.
Video on the topic
Related article
Surely you are familiar firsthand with the situation when there are two or more personal computers. Exchange information between them, use one printer or scanner, as well as others peripheral devices requires the existence of a network. But PC users require not only access to local resources, but also to open spaces global network. In view of this, you should figure out how to configure exit V Internet from general modem.

You will need
- Personal computers, modem.
Instructions
After restarting the PC, open the control panel, click on the item “ Network connections" and select the properties of "Local network".
Video on the topic
note
When assigning an IP address to each computer on the local network, check them carefully to avoid duplication, since the IP address matches electronic devices may cause their conflict and, as a result, the impossibility of working on the same network.
Helpful advice
On the “Main gateway”, that is, the modem, enter the first address (for example, 212.120.0.1), and the IP address for incoming local network for personal computers, choose from the range 212.120.0.2 - 212.120.0.255. The subnet mask for all devices will be the same.
Several PCs in an apartment or office does not mean that you need to connect to each of them scanner or the printer separately. To make scanning and printing devices available to everyone, connect office equipment via networks.

You will need
- - Several computers;
- - scanner;
- - driver;
- - the local network.