How to set your own screen resolution. Top Tips: How to Change Monitor Screen Resolution
On Windows 7. Honestly, this is a very broad question that covers almost every element of computer graphics. There are computer games, pictures and photographs, display of web pages, and system settings. In general, there are a lot of objects subject to scaling. And that is why we will discuss each moment with you separately.
Images
So, the first thing we can discuss with you regarding how to adjust the screen resolution on Windows 7 is changing the scale of the picture displayed on the monitor. Everything here is extremely clear and simple.
The first step is to open the graphic file. Now just roll the mouse wheel. In the direction “towards you” - the scale will decrease, “from yourself” - it will increase. In this case, the resolution in the system settings will not change.
In addition, you can increase the size of the picture. To do this, you will need to resort to the help of some third-party program. For example, "Picture Manager". Open the picture for her, select “edit” - “resize”. Set the required numbers and save the changes. That's all the problems. True, changing the screen resolution applies to Windows 7 in a slightly different sense. And now we will see with you what else we can talk about.

For games
For example, we can talk about displaying graphics in a game. After all, this is where many users wonder how to adjust the screen resolution on Windows 7, without affecting the system settings. It's very inconvenient. Especially when you have a lot of different shortcuts on your desktop.
Special game settings come to the rescue. They allow you to figure out how to create your own screen resolution in Windows 7 and set it only for the period of playing a particular application. Launch the program and then select "options" or "settings" there. Next you will have to visit the graphics settings. There you will find the item we need. That's what it's called - screen resolution. Set the appropriate values in it, and then save all changes. That's all.
However, there is one more trick regarding games. He will help answer how to adjust the screen resolution on Windows 7, and one that is not in the toy’s settings. Launch windowed mode, and then simply stretch our game “around the corners” of the window. When you achieve the desired result, simply go to game mode. Nothing difficult or special. But you can set the resolution that is convenient for you. But there are at least two more meanings that apply to the question: “How can I change the screen resolution in Windows 7?” And now we will get to know them.

Browser
Sometimes this question may be asked by users because they want to change the display scale of pages on the Internet. Sometimes this is very useful. So let's try to figure out how this is done.
There are several options for the development of events. To begin with, you can try to open it, find the “scale” there, and then set the desired display numbers. They will be indicated as percentages. 100% is the norm, values lower - reduce the scale, and higher - increase. Save the changes - and all problems are solved.
You can also press Ctrl and then “+” or “-” located on the right numeric pad of the keyboard. This combination serves to enlarge the image and reduce it, respectively. In addition, you can cope with the question posed using the mouse. To do this, hold down Ctrl and then roll the mouse wheel. “Toward” - decreases the resolution, “away” - increases. Nothing difficult, right? Only now we have reached the most important point for a computer. Namely, we’ll try to figure out how to adjust the screen resolution on Windows 7 relative to system settings.

For system
True, this question will not take up much of your time. After all, the operating system is simplified to the maximum. If you suddenly need to change the screen resolution of your monitor, then just click on the free space on your desktop. Do this using the right button.
You will see a long list of functions performed. Find “screen resolution” in it and select this item. In the window that appears, you should find the parameter of the same name, and then simply move the slider up or down, depending on the desired result. Want to reduce the size of your icons? Then you will have to move the slider up. Increase? A downward movement will do. Save the changes, confirm them - and all problems are solved. Now you know how the scale changes on Windows 7 in every sense.
Instructions
If you are working on a computer with Windows 7 installed, then most likely you need to change the resolution monitor you will not have to. The Windows 7 operating system is good, among other things, because it automatically installs the necessary drivers for the video card and monitor, and also selects the optimal one for your monitor screen resolution.
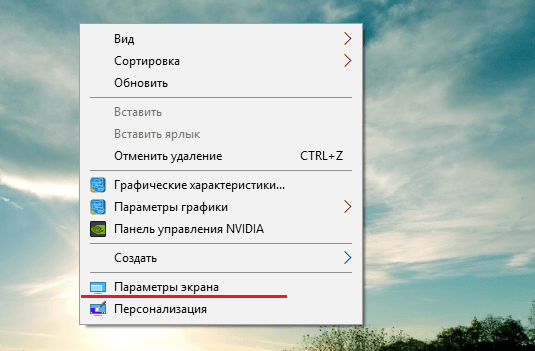
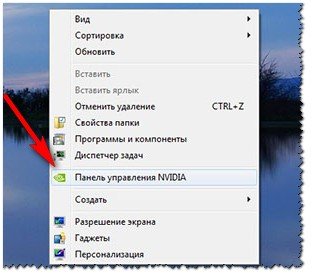
However, if the need to change the resolution still arises, go to the desktop and right-click on it. A drop-down menu will appear on the screen, from which select the line “ Permission screen" (you can also get to this menu item through "Start - Control Panel - Appearance - Adjust screen resolution").
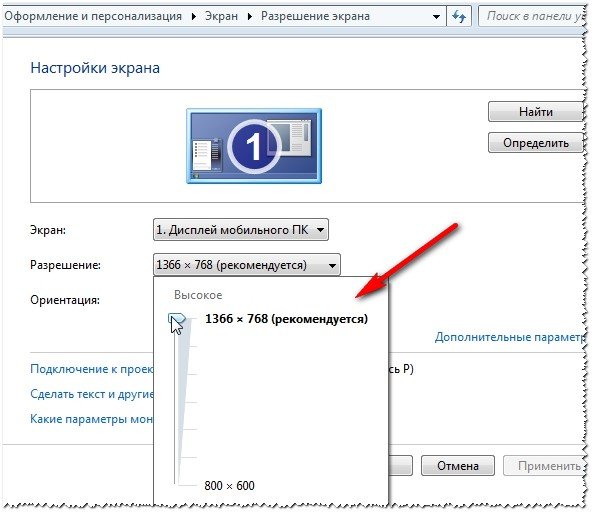
In the window that opens you will see your current settings. The “Screen” line must indicate the name monitor, which you are using, in the line " Permission" - the currently set screen resolution; in the "Orientation" line - the orientation of your screen ("landscape" or "portrait"). Typically, in the line " Permission"next to the current dimensions in brackets is indicated "recommended" - that is, this is the resolution that the system considers most suitable for your monitor. If you want to change it, click on this line and drag the slider with the mouse to the value you need.
Click the "Apply" button. The selected settings will take effect immediately and a window will appear asking “Save these screen settings?” You can choose "Save" or "Cancel". If you do nothing, the change will be canceled after a few seconds.
If the new resolution suits you, click “Save”, followed by the “OK” button.
When running on systems older than Windows 7, it may indeed be necessary to manually change the resolution monitor, since these systems do not always select the optimal option. To do this, right-click on the desktop on any empty space and select “Properties”.
In the window that opens, go to the “Options” tab. The type of your monitor, under which there is a section “ Permission screen." Here, use the slider to select the resolution you need, then click “Apply” and, if the selected resolution suits you, the “OK” button. After this, the selected resolution will take effect.
Sources:
- how to change monitor resolution
If permission screen monitor does not meet your requirements, you can change it in the settings of the computer’s operating system. With its change, the clarity of the display of texts will change and the number of elements that can be placed on the desktop space will change.
Instructions
In Windows XP, the resolution is selected in the properties window screen, to launch which you need to right-click on the workspace free from shortcuts and select the “Properties” line in the context menu. In the settings window screen go to the “Settings” tab. You can get to this tab in another way: press the WIN key and launch the control panel, and in it click the “Appearance and Themes” link. In the “Select a task” list there will be the line you need “Change screen».
Section "Resolution" screen" is located in the lower left part of the Settings tab. Move the slider with the left mouse button to select the desired value and click the “OK” (or “Apply”) button. The utility will change permission and will open a dialog box with a timer - if you don’t like the look of the desktop in the selected resolution screen, then you don’t need to press anything. Without receiving confirmation, the utility will return the previous value and you can try another option.
Sometimes permissions screen contains only a few values, none of which provide acceptable image quality. Typically this means that the OS is using
Modern systems, starting with Windows 7, can independently select the optimal value for the screen, so basically there is no need to worry about this. It turns out that there are people, most likely newbies, asking the question, how to change screen resolution, and it doesn’t matter what operating system it is or what computer it is. The instructions will be individual for everyone and, I hope, will help you.
There are a couple more points that I will touch on here. Let's say you have a monitor with a resolution of 1920 by 1080 or higher. It is known that setting the value 800×600 for it will not work. Why? But because you will see screen distortion as the values do not match the physical values for the screen.
Let's start from the depths, namely seven. Using this particular operating system, you do not have to worry that the value will not be selected accurately. Although sometimes the value is set lower than necessary, so the knowledge that can be gleaned from this manual comes to the rescue.
The article touched on points on the topic, and the article itself is quite useful. If interested, you can read it.
To manually adjust the screen resolution, you need to right-click on an empty space on the desktop. A menu will appear where we select the option "Screen resolution".
One of the subsections of the control panel called “Display Settings” opens. Here we see three parameters:
- Screen;
- Permission;
- Orientation;
Naturally, we are concerned about the second point. The first one is responsible for choosing an additional monitor, and the last one is already clear. Open the options tab "Permission" and select the maximum. In my case - 1366 by 768. Most likely, opposite the maximum resolution there will be a corresponding word - Recommended.

The note: It is worth paying attention to the moment when you cannot change the screen value. The fact is that you must install drivers for the graphics adapter. As a result, you can change the screen value not only from the control panel, but also in the video card settings. Below I will explain how to use these settings. (Drivers are usually installed automatically).
How to change screen resolution in Windows 10
The specified operating system has the same parameters from the control panel, but it still needs to be found. We won't bother, but let's see how to do this from the options menu.
As in the first case, we right-click on the desktop and select the option "Display Options".
A window opens with the “System” subsection. There are many tabs there, but we are interested in “Screen”. On the right side of the window we see several parameters:
- Night light mode – best suited for reading in the dark;
- Scale and layout– what we need;
- Multiple displays – we can connect additional monitors.
Finding the parameter "Permission" and change it to the maximum value, it will be marked “Recommended”.

In addition, you can specify the text size in applications. The standard value is 100%, but the value can be changed to 125%.
Unfortunately, this method is the only one in the top ten. The “Display” section has been removed from the control panel and the necessary settings can only be changed through the “Options” menu. That's how bad they are, these Microsoft people.
Using the graphics adapter utility
I’ll show you using an NVIDIA video card as an example, since I don’t have AMD.
When we click on the desktop with the mouse to call up the context menu, we can see the following items:
- Graphics characteristics (Intel HD Graphics);
- NVIDIA Control Panel.

Both of these sections have many settings, but only the first includes screen resolution settings. Let's look at the example of Intel HD. If you have this software, then launch it.
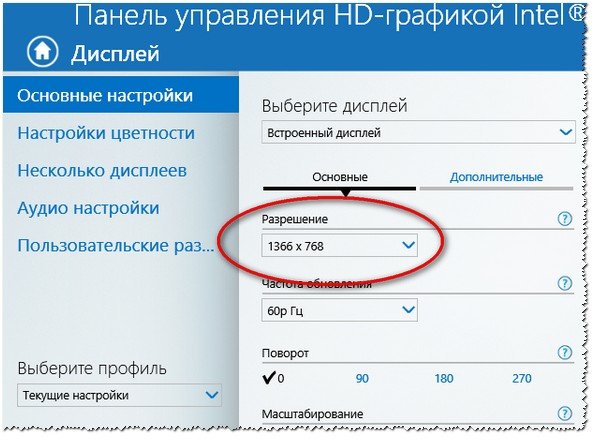
The HD graphics control panel opens. Go to the section "Display".
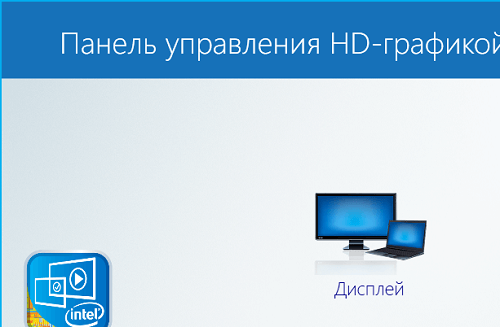
In the main settings of this miracle we see all the options that we need. Now you know how to change screen resolution using HD graphics.

Well, that's all, now you know everything. In the game, this procedure is done in the settings. But I won’t say anything about Windows 8, since the parameters are the same, why talk about the same thing a hundred times. I hope this little guide will help you.
Good day! Many users understand permission as anything, so before starting to talk about it, I want to write a few words of introduction...
Screen resolution- roughly speaking, this is the number of image pixels per certain area. The more dots, the clearer and better quality the image. So, each monitor has its own optimal resolution, in most cases, which needs to be set for a high-quality picture on the screen.
In this article I will consider the issue of changing resolution, and typical problems and their solutions to this action. So …
This is perhaps one of the most popular questions when changing resolution. I’ll give you one piece of advice: when setting this parameter, I primarily focus on ease of use.
As a rule, this convenience is achieved by setting the optimal resolution for a specific monitor (each has its own). Usually, the optimal resolution is indicated in the documentation for the monitor (I won’t dwell on this :)).
How to find out the optimal resolution?
2. Next, right-click anywhere on the desktop and select screen settings (screen resolution) in the context menu. Actually, in the screen settings, you will see the option to select a resolution, one of which will be marked as recommended (screenshot below).

You can also use various instructions for selecting the optimal resolution (and tables from them). Here, for example, is a clipping from one such instruction:
- - for 15-inch: 1024x768;
- - for 17-inch: 1280×768;
- - for 21-inch: 1600x1200;
- - for 24-inch: 1920x1200;
- 15.6-inch laptops: 1366x768.
Important! By the way, for older CRT monitors, it is important to choose not only the correct resolution, but also sweep frequency(roughly speaking, how many times the monitor blinks per second). This parameter is measured in Hz; most often monitors support modes of: 60, 75, 85, 100 Hz. To prevent your eyes from getting tired, set it to at least 85 Hz!
Changing the resolution
1) In video drivers (for example Nvidia, Ati Radeon, IntelHD)
One of the easiest ways to change the screen resolution (and in general, adjust brightness, contrast, picture quality and other parameters) is to use the video driver settings. In principle, they are all configured in the same way (I will show a few examples below).
IntelHD
Extremely popular video cards, especially recently. In almost half of budget laptops you can find a similar card.
After installing the drivers for it, simply click on the tray icon (next to the clock) to open the IntelHD settings (see screenshot below).

Actually, in this section you can set the required resolution (see screenshot below).
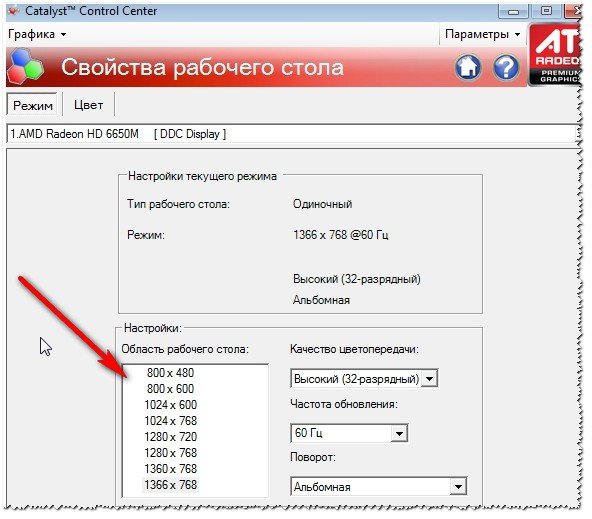
AMD (Ati Radeon)
You can also use the tray icon (but not every driver version has it), or simply right-click anywhere on the desktop. Next, in the pop-up context menu, open the line “Catalyst Control Center" (note: see photo below. By the way, the name of the setup center may vary slightly, depending on the software version).

Nvidia
1. First, right-click anywhere on the desktop.
2. In the pop-up context menu, select “ Nvidia Control Panel"(screenshot below).

2) On Windows 8, 10
It happens that there is no video driver icon. This can happen for several reasons:
- reinstalled Windows, and you have a universal driver installed (which comes with the OS). Those. there is no driver from the manufacturer...;
- There are some versions of video drivers that do not automatically put the icon in the tray. In this case, you can find a link to the driver settings in the Windows Control Panel.
Well, to change the resolution, you can also use control panel. In the search bar, type “Screen” (without quotes) and select the coveted link (screen below).


3) On Windows 7
Right-click on the desktop and select " Screen resolution"(this item can also be found in the control panel).

Next you will see a menu that will display all the possible modes available for your monitor. By the way, the native resolution will be marked as recommended (as I already wrote, in most cases it provides the best picture).
For example, for a 19-inch screen the native resolution is 1280 x 1024 pixels, for a 20-inch: 1600 x 1200 pixels, for a 22-inch: 1680 x 1050 pixels.
Older CRT-based monitors allow you to set the resolution much higher than recommended for them. True, they contain a very important quantity - frequency, measured in hertz. If it is below 85 Hz, your eyes begin to ripple, especially in light colors.
After changing the resolution, click "OK". You are given 10-15 seconds. time to confirm settings changes. If you do not confirm within this time, it will be restored to its previous value. This is done so that if your picture becomes distorted so that you cannot recognize anything, the computer will return to its working configuration.
4) On Windows XP
Almost no different from the settings in Windows 7. Right-click anywhere on the desktop and select “properties”.


Here you can select the screen resolution and color quality (16/32 bits).
By the way, the quality of color reproduction is typical for old CRT-based monitors. In modern ones the default is 16 bits. In general, this parameter is responsible for the number of colors displayed on the monitor screen. Only a person is practically unable to distinguish the difference between 32-bit color and 16-bit (perhaps experienced editors or gamers who work a lot and often with graphics). Whether it’s the butterfly’s business...
PS
For additions on the topic of the article, thank you in advance. I have everything for this, the topic is completely covered (I think :)). Good luck!
In the modern world, everything is changing rapidly. Cameras of all models, from the cheapest point-and-shoot cameras to professional DSLRs, can shoot HD quality videos. This video is also possible for expensive mobile phone models. DVD video standards are a thing of the past.
Film studios are making new spectacular films with previously unavailable effects. The requirements for video and television equipment standards are also growing. Viewers want movies shot in higher quality images - they want to view them on wide screens, not just on a computer monitor.
What is screen resolution TV 1920x1080
Screen resolution is what affects the clarity of the image. This is the quality of pictures and text messages. Unit of measurement of resolution - responsible for the formation of the image on the screen. Today, when purchasing a TV with a plasma or LCD screen, you will probably come across the term Full HD - 1920x1080, which the seller will definitely tell you about.
These TVs are now available in every major store, they are affordable, and these are what customers are now looking for. If you answer that you don't know this term, the seller will add that this mark is the best recommendation for a TV, and the 1920x1080 resolution is an indicator of high picture quality.
How to choose a TV
When you are choosing a TV, pay attention to the measurements measured in inches. One inch is about two and a half centimeters. But large screen monitors are demanding on the video card. That is, if you bought a modern twenty-four-inch diagonal monitor, then expect that your iron horse will slow down slightly.
Budget 18-19 inch monitors are only good for their price. And for those who love battle scenes on the big screen, monitors with 27 inches diagonal are suitable.
Some people are now wondering why modern monitors are so narrow and elongated. There is an explanation for this. For modern films there are standards for the shooting format. They are filmed like this, with an elongated and narrow image. If you watch a new movie or play a modern game on an old square-shaped monitor, the picture will be small, and not everyone will like it.
FullHD or HD Ready
On the packaging boxes of TVs, in addition to the FullHD inscriptions, you often find other inscriptions - HD Ready.
What's the difference?

In 2005, the European Association of Telecommunications Technologies and Information Systems adopted standards for new TV models that will display video with high quality parameters. They are divided into two categories: HD Ready and FullHD.
HD Ready supports the minimum resolution for this class - 720 lines, and FullHD, where the screen resolution is 1920x1080, is capable of handling video with 1080 lines.
This name was picked up by the Japanese company Sony when in 2007 it named a number of its products as the FullHD brand. Other companies in this market segment began to call their products the same way.

Therefore, most of the FullHD-class liquid crystal and plasma television receivers sold nowadays (translated from English as “full screen resolution 1920x1080”) have a screen aspect ratio of 16 by 9 and support videos with 1080 lines of image. Such images compare favorably in quality with a simple DVD, they are clearer and of higher quality.
So what is screen resolution, how do screen settings affect the picture we see on the monitor?
The TV screen, whatever it may be, plasma or liquid crystal, is a matrix that consists of pixels located horizontally and vertically of the screen. Their number is called matrix resolution. Screen resolution comes in many types, but the most famous ones are 1024x768, 1366x768, and many others.
Types of television signals
The highest resolution now is Full HD - 1920x1080.
Television signals also have a resolution that has not yet reached a common standard throughout the world. In the USA, for example, the type is called NTSC (with a resolution of 640 by 480 pixels). In European countries, PAL signals and SECAM signals with a resolution of 720 by 576 pixels are used.

The signal may also differ in frame rate: fifty or sixty hertz.
Every modern TV has a processor that converts incoming signals to the standard that the TV matrix corresponds to. If the incoming signal and the matrix had the same standard pixel resolution, then the image would immediately be clear and of high quality. But, since signal standards are different in types, parameters and matrices, the TV must independently convert the signal in order to show a clear image.
Progressive and interlace scanning
The range in which TV channels broadcast is small. There is not enough space for everyone. The image transmitted by the channel can be formed in two ways. Progressive, which displays all frames completely (where the lines - even and odd - follow one another), and interlaced.
To save space on air, a scan was invented that reduces the frame rate by half. It was called interlaced. First, the first half of the frame is transmitted in odd lines, then the second half in even lines. Interlaced scanning would look blurry if there was no way to restore image quality.
In order to explain the method that forms the image, after the number of lines the initial English is written: “p” or “i”. For example: a resolution of 1920 x 1080p indicates that the picture was generated in a progressive way. And the 720i marking will mean that the video has 720 lines. And the letter i stands for the interlaced method. In order to indicate the format, the per-second frame size is indicated. When they say 1080p30, this means that there are thirty frames in this video, running per second. The higher the number of frames, the better and more detailed the picture looks.
Full HD requirements
The latest generations of televisions display images of both types of scanning. Thus, a screen resolution of 1920x1080 and a 16:9 aspect ratio must be present on a Full HD TV. These are the standard requirements for this type to display the incoming video signal.
Therefore, a resolution of 1920x1080 would mean that the TV has 1920 horizontal dots and 1080 vertical dots. Such TVs will catch high quality signals accepted in the world (HDTV standards).
Tricolor TV, a commercial TV operator, has been offering a package since 2012 that includes twenty-five HD quality channels. Someday, such channels may be free for everyone.
If you have problems with your monitor, font or image is not clear, you need to understand that this changes due to the resolution value. For example, when the resolution is set to a high value, say 1920x1080, then objects will be clear. And a larger number of them will fit on the monitor. And with a low resolution, say 800 by 600, fewer objects will fit on the monitor, but they will look larger.
But this does not mean that you can set the screen resolution you like to 1920x1080. It may not be supported by your monitor or TV model. CRT monitors support a resolution of 1024 by 768 pixels or 800 by 600 and are suitable for all types. LCD monitors and laptop screens support high resolution. And they work with the look that is suitable only for their model.
A large monitor equals an equally large resolution. It improves clarity and reduces image size.
How to adjust monitor resolution in Windows 7
To do this, go to the "Start" menu, then go to the "Control Panel", and then go to "Appearance" and "Personalization". Then go to the “Resolution Settings” of the monitor. Now expand the list next to “Resolution”, use the slider to set the resolution you need, then click the “Apply screen settings” button.

Later models of monitors, based on liquid crystals, work with their own resolution. It does not need to be configured - it is already recommended for this type. Such monitors are divided into two types: with a ratio of 16:9 and 16:10 and standard with a ratio of 4:3. If you compare them, widescreen has a larger width and horizontal resolution.
If you don’t know the monitor resolution, you can find it out from the reference book, on the manufacturer’s website, or from the EDID.
What is EDID
There is a data standard that provides information about the monitor and its parameters, where it was made, its resolution, size, color quality characteristics, and so on.
If you can’t find out by EDID, then how to set the screen resolution
What should you do if, when you connect a TV receiver with a large screen, the image does not fit and looks cut off at the edges? To solve the problem, you need to update your computer's video card drivers. After this, specify your model in the computer settings as the base, or main monitor. Then you need to make sure that the TV is connected to the computer via a digital connection, and also that there are no restrictions on it.
Install the Moninfo EDID program (it is available on the Internet). After that, check the resolution of your TV in it. If it is supported, that's good. If not, then you will have to edit the EDID and set the resolution yourself.
If the image does not fit
To deal with this problem, you need to turn off the Overscan option on your television receiver.
If this is a computer, then after the mandatory video card, you need to right-click on the desktop. If you have a GeForce video card, then go to the NVIDIA program settings. If you have a Radeon video card, then go to the Catalyst Control Center program. Then adjust the parameters using the slider in the “desktop” settings to the required value.
How to adjust resolution

First you need to disable EDID.
Then set the resolution to 1920x1080 in the screen properties.
Reinstall the video card driver (remove the old driver).
If the previous measures did not help, try reinstalling Windows.

I would like to hope that after this information, questions about how to set the screen resolution to 1920x1080 will be easier to solve.