How to make a control panel on the right. How to move the taskbar down in different ways
The taskbar plays the role of the main panel in the Windows operating system. Displayed here running programs, clock and start button.
Default, this panel located at the bottom of the desktop. But, because software error or user inattention, the taskbar may move to a different position. For example, on the top of the desktop or to the side. For most users, this non-typical panel arrangement is not convenient. Therefore, they wonder how to lower the taskbar to the bottom of the desktop.
Lower the taskbar to the bottom of the desktop using the mouse
Perhaps the easiest way to lower the taskbar to the bottom of the desktop is to use the mouse. In order to use this method, you must first check whether the Taskbar is pinned or not. To do this, click right click mouse on the taskbar and look at the item “ Pin Taskbar" If there is a check mark next to it, it means that the Taskbar is docked. To unpin it, click on the menu item “Pin the taskbar” and uncheck it.
Once the Taskbar is undocked, you can move it down to the bottom of the desktop using the mouse. To do this, simply left-click on an empty space on the Taskbar and, without releasing the mouse button, move the Taskbar to the bottom of the desktop.
After the panel drops to its usual place at the bottom of the screen, it needs to be secured. To do this, right-click and select the “Pin taskbar” menu item.
Lowering the taskbar using settings
You can also lower the taskbar to the bottom of the desktop using the settings. To do this, right-click on the Taskbar and select “Properties” from the menu that opens.
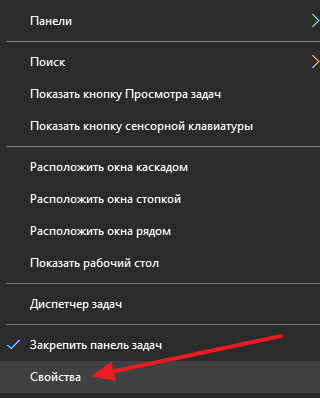
This will open a window with settings for the taskbar and Start button. Here, on the “Taskbar” tab, you can select the location where the Taskbar should be located. In order to lower the Taskbar to the bottom of the desktop, select the “bottom” option and save the settings using the “Ok” button.
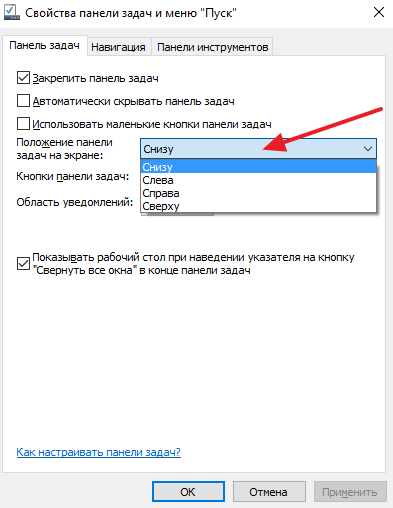
Please note that in order to change the location of the Taskbar using Settings, it is not necessary to unlock it.
Solving other problems with the Taskbar
In addition to the above, other problems occur with the Taskbar. We will look at the most common of them below.
- The taskbar disappears and appears. If your Taskbar keeps disappearing and appearing, then most likely you have the “Automatically hide the Taskbar” feature enabled. You can disable this feature in the taskbar settings. To do this, right-click on the taskbar, select “Properties” and on the “Taskbar” tab, disable the “Automatically hide the taskbar” function.
- The taskbar is too big. Another problem with the Taskbar is that it's too big size. In order to solve this problem, you need to unpin the Taskbar, move the mouse cursor over the edge of the Taskbar and drag it towards the edge of the screen. If you reduce the width of the taskbar using this method If it doesn’t work, then open its properties and activate the function “Use small buttons on the taskbar.
In the age of computer progress, almost every apartment already has such a necessary thing as desktop computer, and for many not even a single copy. Every PC owner loves something software tool which he uses was established in a manner convenient for him. But sometimes, an unpleasant situation can happen with the desktop settings: when you boot your computer, you notice that the location of some desktop elements is suddenly not in the place you are accustomed to, or is missing altogether.
Very often this happens with the working panel in programs windows family, and this article will help you figure out how to return it to its place if it suddenly moves to an unnecessary area or disappears completely.
The most efficient way
Switch to the desktop, hover your mouse over the free space in your taskbar, it should be free of various icons, tabs, and other elements located in your panel, then click right key manipulator and open list see if you have a bird next to the “Lock panel” column; if there is one, then you need to remove the checkmark, then hold down the right mouse button on a clean area of the panel, and with a simple movement move it to the bottom sector of the screen. To prevent the panel from moving around the desktop in the future, check the box next to the “Pin taskbar” item.
Restoring using Panel Properties
You can return the socket to its rightful place thanks to the “properties” menu, the function is located directly in the taskbar itself, to find it you need to go to the desktop, point the arrow at a blank area in your panel, then right-click and click in the proposed menu to the “Properties” element. A menu will pop up on your display with various settings taskbar, find in the window an item called “taskbar position”, click on the left button, and select the position from the bottom. It is worth noting that in this column you can also adjust the position on the top, left or right, depending on your personal preferences. Don’t forget to check the “Fix taskbar” box to prevent further movement of the location of your panel. In addition, in the “Properties” menu you can configure other various elements your panel.
Moving the panel using the Start menu
You can change the position of the panel through the tools of the “Start” button; to do this, click on the “Start” icon with the manipulator, find the search bar in the menu, and type the phrase “taskbar” from the keyboard. The computer should display a list of settings. In the drop-down list, select “taskbar settings”. A menu with settings will pop up on the display. working panel, find the column “location of the taskbar on the display” and select the “bottom position” setting.
Using main control
For this option You need to log into the control panel. Click on the start icon, in the drop-down list select the “control panel” item, you can also use the search bar by typing “control panel” on the keyboard, look for the required item and press the left key of the manipulator, in the window that appears, find the “view” properties and put a check mark in the “small icons” item, a large list of settings will open, look for “taskbar settings” in the list that appears, click on it. A menu will open with taskbar settings functions, select the submenu position at the bottom and do not forget to put the “pin the taskbar” checkbox.
What to do if the panel suddenly disappears
There are incidents when, when loading Windows, you suddenly cannot find the taskbar on the desktop, all the icons seem to be there, but the panel is nowhere to be found. Don’t panic, most likely you have the “always hide the taskbar” checkbox activated. Move the manipulator to the sector of the display where the panel was located. When you hover over an area, a panel should appear. You can also use special button on the keyboard, the key is located between the Ctrl and Alt commands on the right and left sides of the keyboard, has a proprietary windows sign. When pressed, the panel will appear on the screen, so that it does not disappear again, you need to remove the automatic hiding of the panel, to do this, go to the panel properties and in the submenu that appears and remove the “always hide the taskbar” checkbox.
In case of emergency
If suddenly all the described methods do not bring results and the panel does not want to move to the position you need or it is missing altogether, then it can help loading windows in security mode (when starting the computer, select the " Safe Mode") run an antivirus and check the system for infectious programs, system restore can also help, you can find it using the search tool, there is a line in the start panel. Enable system restore and follow the instructions in the recovery wizard.
The lesson will show how to move the taskbar to the bottom of the screen And return her to old place in Windows OS. There are situations when you or another user, through careless actions, accidentally moves it. Because of this, it may appear on the left, on the right (side) or even on top. And then the question immediately arises: how can I return the taskbar to its place?
Move using taskbar properties
Properties can be opened by the following actions:
1. Right-click on a free (empty) area of the taskbar and click “properties”.

2. Right-click on the “start” button and select “properties” from the menu.

3. Click “start”, enter “taskbar”, then select the line according to the picture.

When you complete 1 of 3 steps above, a window with properties will pop up in front of you. Refer to " taskbar position", below which you will see the current location (in my case, “on the right”). And when you click on it, a choice will appear from the following positions:
- From below
- Left
- On right
- Above
Select the "bottom" position, then click "apply" and "OK" to move the panel into place.
Note: Check the “pin the taskbar” checkbox to protect yourself from accidental movement in the future.

Moving with the mouse
Namely, careless mouse movements are common cause Move the taskbar sideways or up. Using the same actions, we will move it to the bottom of the screen and return it to its default place.
To begin, uncheck the “ pin the taskbar", either in the properties window, or in the menu, which is called up by right-clicking on an empty (free) space in the panel. If there is no pinning, you will see dotted stripes along the edges (the right one is shown in the screenshot).

Now press and hold on a free (empty) spot on the taskbar left button and drag it to the bottom edge of the display until it is at the bottom. Move your mouse around the inner perimeter of the display and observe. Wherever you release the button, that’s where it will end up.
How to return the taskbar to its place through the registry
You can move the taskbar to the bottom of the screen and in all directions through Windows registry. I will not explain what to change or create in the registry, since I have prepared ready-made options.
Otherwise, you would have to go to long way, create or edit a binary parameter “Settings” in the “StuckRects2” section, in which you need to enter a long numeric-character value.

Instructions
Try the easiest way to reduce the width - hover your mouse over the top edge of the panel, and when it changes (becomes a double-headed vertical arrow), press the left button and, without releasing it, drag the outer border of the panel inward to the desired width.
Try this sequence of operations if simply dragging the border does not work: first click on free space panels tasks right-click and make sure that in the drop-down context menu do not check the box next to “Pin” tasks" If the mark is there, remove it by clicking on this menu line with the mouse.
Hover your cursor over the left border (next to the Start button) of the second (bottom) row in the panel tasks. When the cursor changes to become a double-headed horizontal arrow, left-click and drag up and to the right—a level in the Quick Launch bar, but well to the right of them. As a result of this action in the panel tasks There should be only one line left. The Quick Launch panel will be located on the left, and the open shortcuts will be on the right. Panel width tasks in this form should be normally regulated in the manner described in the first step.

The taskbar, which first appeared in Windows 95, has become so familiar that most users cannot imagine working in the system without it. Therefore, the sudden disappearance of the taskbar will baffle anyone. However, the solution to the problem - how to return the taskbar to its previous usual place - depends on the reason for which it suddenly disappeared.
- The simplest case is when hiding the taskbar was accidentally or intentionally enabled. This feature is provided in the system and allows you to save space occupied by the panel: the panel automatically collapses into a thin strip and reappears when the mouse cursor hovers over it. However, also taking into account the fact that it cannot necessarily be placed in the usual place - at the bottom edge of the screen - it can be quite difficult for an inexperienced user to find it. It's very easy to return panels to more predictable behavior. If you manage to find it, then you need to right-click on the panel and open its properties. If you couldn't find it - Control Panel - Taskbar and Start menu. In any case, in the settings window that opens, check the “automatically hide the taskbar” checkbox. The taskbar will help.
- The taskbar can be resized if it is not "docked". In particular, the taskbar can be minimized to a very narrow strip, which is difficult to notice on. To return it to its previous size, simply grab the edge of this strip with your mouse and pull out the taskbar.
- If the taskbar is “stuck” to the side or even the top edge of the screen, then returning it to its original place is also easy. Just grab with your mouse and drag down. If this does not work, right-click on the taskbar and uncheck the “pin taskbar” checkbox, then try dragging it with the mouse again.
- Most difficult case when the taskbar is “hidden” by a virus that has settled in the system. In this case, you can return the taskbar only after cleaning the system from malware. To launch antiviruses, use hot ones: Win+R will show a command command that allows you to run any application on its own Win key will bring up the Start menu. As a last resort, use the combination Ctrl+Alt+Del and launch the Task Manager. It allows you not only to complete tasks and processes, but also to start new ones.
By default, all Windows desktop panels are located at the bottom of the screen on the taskbar. For convenience, it can be placed on the side or on top. Read below for information on how to do this.

Instructions
Video on the topic
note
If the taskbar is not visible on the screen, it may be hidden. In order for it to appear, move the mouse cursor down the screen, the taskbar should appear. Right-click on it and select “Properties”. In it, uncheck “Automatically hide the taskbar” and click the “Ok” button.
You can also change the size of the taskbar by moving the mouse pointer over its edge and, holding down the left mouse button, drag the border up or down.
Sources:
- How to make the taskbar on your desktop smaller in 2019
At work Windows desktop The most necessary programs and tools for the user are collected. One such tool is Panel tasks- a long horizontal bar at the bottom of the screen. Panel tasks almost always remains visible, unlike the desktop, which can be blocked by windows lying on it. You can make the panel convenient for your work different ways.

Instructions
The reason is that the panel tasks, which should be located at the very bottom of the screen, is not visible to the user, there may be one of the following reasons: - panel tasks reduced to very small size and not pinned; - auto-hide panel is enabled. It will be displayed only when you hover the cursor over it. To Panel tasks appeared, move the cursor to the location of the panel tasks. When it turns into a double-headed vertical arrow, drag the border of the panel up. To define auto-hide, move the cursor to the location on the screen where you want the panel to be located tasks. If you don't know its previous location, move the cursor to the bottom of the screen, and then, if necessary, to the top and sides. Maybe to display a panel tasks you will need to move the cursor to the edge of the screen.
To customize the Panel tasks Right-click on the free space of the panel and select the “Properties” line. A window will open in which you need to click on the tab at the top “ Panel tasks" Then, in the window that opens, select the necessary panel design items tasks by placing a “checkbox” in the box in front of them.
For example, if you do not want the operating room Windows system automatically hidden Panel tasks, when it is not in use, uncheck the box in front of the line “Automatically hide panel tasks"Select "Show Quick Launch Toolbar" and it will immediately appear on the Panel tasks next to the Start menu button. On the Quick Launch Panel you can place the most necessary shortcuts so that they are always available without windows open documents or other programs. In the same window in the “ Panel tasks» you can configure the necessary options of the Notification Area located on the right side of the Panel tasks.
Having configured Panel tasks as required, check the box in front of the line “Lock panel tasks" in the aforementioned Properties menu. Later, if you want to move Panel tasks, you will need to uncheck the “checkbox” before this line. Once unpinned, the panel can be moved to any vertical or horizontal border of the desktop. To do this, click on an empty space in the Panel tasks left mouse button and, without releasing the button, drag Panel to any border. Install the panel in Right place and release the button.
Performing a shrink operation panels tasks in the operating system Windows Vista can be implemented standard methods system and does not require additional software third party developers.

You will need
- - Windows Vista;
- - Windows 7.
Instructions
tasks» right-click on any free place taskbar and go to “Properties” to perform the size reduction operation panels tasks.
Drag the double-sided pointer that appears while holding down the mouse button to enlarge the taskbar.
Drag the two-way pointer that appears down to reduce the size panels tasks.
Perform a mouse click on panels tasks and drag the taskbar to the left or right area of the computer monitor screen to position it vertically.
Call the context menu of the "Panel" utility tasks» right-click on any free space in the taskbar and go to “Properties” to perform the operation of reducing the size of the vertical panels tasks up to one label.
Uncheck the "Lock panel" boxes tasks" and "Auto-hide" and check the "Use small icons" checkbox.
Check the Always Group box under Buttons panels tasks» and press the Ok button to confirm the application of the selected changes.
Execute simultaneous pressing keys Ctrl+Alt+Escape to launch the Manager tool tasks" and terminate the dwm.exe process.
Return to the context menu of the "Panel" utility tasks» right-click and go to “Properties”.
Check the "Lock panel" checkbox tasks" This action saves minimal dimensions panels tasks before rebooting the computer.
Panel tasks contains essential elements graphic Windows interface- operating system main menu button, notification area and icons open windows applications. The user can change the position, size and some aspects of its behavior. Sometimes this leads to not the most convenient options panel placement tasks and she has to be returned to initial position.

Instructions
Before manipulating the panel tasks make sure it is not anchored in its current position. To do this, right-click on the free space on it. In the pop-up menu there should not be a checkmark in the line “Lock panel” tasks", and if it is there, remove the checkmark by clicking on this inscription.
If the panel tasks placed along the left, right or top edges of the screen, you can move it back down simple drag and drop. Do this using the left mouse button, hovering over the free space of the panel.
IN latest versions operating system - for example, Windows 7 - it is possible to place drag and drop to select the desired position in the drop-down list. It is placed in separate window with panel properties settings tasks and the "Start" menu - open this window by selecting "Properties" in the context menu of the panel tasks. Specify one of four placement options in the list under “Panel Position” tasks on the screen" and press the OK button.
Instructions
Right-click the free space on the taskbar. Make sure that the checkbox next to “Pin the taskbar” in the context menu that pops up is not selected. If it is there, click this item. This will unlock the panel and make it possible to move it.
Click again on the empty space of this panel with the mouse, but this time use the left button. Without releasing the button, drag the panel to the desired edge of the screen. You won’t see the actual movement until the cursor is close enough to the edge, and then the panel, along with everything placed on it, “jumps” to a new location. After this, release the left mouse button.
Adjust the width of the panel according to its new - placed on vertical stripe elements look different than on a horizontal strip. For example, the inscriptions on narrow and tall program buttons are not as convenient to read as on horizontally elongated ones, but more of them fit. To change the width of the taskbar, move the mouse cursor over its border and, when the cursor icon changes from an arrow pointer to a double-headed arrow, press the left button. Without releasing the button, move the border to the desired width of the panel.
Use the option to automatically hide the taskbar if, after adjusting the width, its size turns out to be too large. If you use this mechanism, the panel will appear only when you move the cursor to the edge of the screen, and the rest of the time it will be invisible. To enable this mechanism, right-click the free space of the panel again and select “Properties” from the context menu. In the window that opens, check the “Automatically hide the taskbar” box and click the “OK” button.
Lock the new panel position after all settings have been made appearance will be done - by clicking the edits with the mouse button on the panel, open the context menu and select “Lock the taskbar” from it.
The Quick Launch bar is one of the components of the taskbar - long horizontal stripe at the bottom of the screen. It is located on the right side of the Start button and is used to place the most frequently used program shortcuts.
Instructions
Press the "Start" button to open the main menu of the system and go to the "Start Menu" item.
Call the application context menu by right-clicking.
An alternative method is to right-click on an empty space in the taskbar area to launch service menu.
Go to "Properties" and check the "Show Quick Launch Toolbar" checkbox.
Right-click on an empty space in the taskbar area to open the service menu and uncheck the “Pin the taskbar” box to perform the operation of expanding the Quick Launch panel.
Drag the rightmost separator that appears in the Quick Launch panel to right side until reaching the right size display all selected shortcuts.
Right-click on an empty space in the taskbar area to bring up the context menu and restore the checkbox to the “Dock the taskbar” field.
Add a shortcut to the selected program to the Quick Launch bar by dragging and dropping desired shortcut to the panel area.
An alternative way to perform this operation is to return to the main Start menu and call the context menu of the selected program by right-clicking on its field. Specify the "Add to Quick Launch" command and click the "Yes" button to confirm that the selected changes will be applied.
Right-click on the field of the shortcut to be deleted to open the context menu and select “Delete”.
Confirm the operation of deleting the selected shortcut by clicking the “Yes” button.
Click the Minimize All Windows button to temporarily hide all open windows and show your desktop.
Click the Switch Window button to switch between open windows using the ergonomic Windows swipe.
Video on the topic
Helpful advice
In addition to the quick launch panel, the taskbar includes: the “Start” button, which opens the main menu of the system, the middle part, which displays open source software both documents and notification area.
Sources:
- How to Customize the Quick Launch Bar in Windows XP in 2019
- how to setup quick start in 2019
Variety of display formats laptop computers much more than stationary monitors. Depending on how you position your laptop while working, it may be more convenient to see the image on it rotated 90° in one direction or another. For different modifications Depending on the OS installed on your laptop, the way to rotate the display orientation will vary.

Instructions
If the operating system is Windows Vista or Windows 7, then by right-clicking on the desktop space free from open windows and shortcuts, you can open a context menu that contains the “Screen Resolution” item. By selecting this item, the dialog box for changing display settings appears.
Required option screen rotation is placed in the drop-down list next to the inscription “Orientation” - open it and select the orientation that suits you from four possible options rotate the image on the display. Then click the "OK" button.
In these operating systems There is an even shorter way to rotate the image on the screen. To use it in the same context menu, opened by right-clicking on the desktop, you need to hover over the “Graphics options” section. Among the subsections that will become visible is “Rotate” - hover your cursor over it. This will give you access to four options for changing the screen orientation on . Select the option you need.
If you have Windows XP installed, the way you rotate the image on the screen depends on the type of installed video card. For example, if this is one of the modifications of the NVIDIA family, then in the menu that opens by right-clicking on the free space of the desktop there will be a “Panel NVIDIA management" Having selected it and thus opening the panel, click on “Rotate display” in the task list on the left. This will give you access to a list of four standard orientation options - check the box you need and close the NVIDIA panel window.
And in Windows XP too Alternative option- in the desktop tray you need to find the video card icon and right-click. If this NVIDIA video card then in the context menu there will be a section called “Rotation Options”. When you hover your cursor over it, a list of the same four options for rotating the image on the monitor screen appears - select the item you need.
Video on the topic
Sources:
- rotate the computer screen
To clear the desktop taskbar item on a computer running Microsoft Windows can be done in several ways related to standard tools OS.
