Windows 7 performance parameters.
Any thing in the world is perishable. Everything wears out over time and loses its original properties. But the computer seems to wear out much faster than it should. And this is not always due to the gradual obsolescence of computer parts; incorrect optimization of Windows also plays a role. Temporary or unnecessary files are not deleted and litter the computer; the cache memory becomes full and is not cleared. Processes do not delete the results of their activities in the registry. Therefore, within a year after purchase, the computer begins to slow down. Let's figure out how to speed up the system.
What affects computer performance?
Computer performance primarily depends on the power of the central and graphics processors. RAM also affects, but to a lesser extent. Due to its features, only photo and video editors seriously depend on it. The number of running programs, aging equipment, and cluttered operating system greatly affect performance.
So, let's divide the article into two parts. In the first, we’ll talk about what to do if the computer starts to slow down, how to fix accumulated errors and problems. In the second: how to speed up any computer, even a new one.
Windows 7 started to slow down: reasons and solutions
Temperature
Overheating is extremely harmful to your computer. It indicates excessive load on the processor, which is why performance decreases. If the computer restarts or turns off during operation, this also indicates an excessively high temperature inside the system unit.
First we need to check how hot our device is and whether it is actually overheating. Temperature sensors are located inside the system unit for this purpose. And there are programs that perfectly read information from them.
Let's take a closer look using the AIDA64 program as an example. Download and install it on your computer. Then go to the “Computer” -> “Sensors” menu.
The list under the “Temperature” section shows the degree of heating of each component. From the central processor to removable hard drives. A temperature of 40–60 degrees Celsius is considered normal. More than 60 - it’s already worth thinking about. 75–80 - serious overheating.
In case of overheating, it is worth changing the thermal paste on the processor and checking the operation of the coolers. Look to see if the system unit is very dirty: the temperature may be high due to dust burning there. If you don’t understand this yourself, entrust the matter to professionals. Digging into a computer with inexperienced hands is quite dangerous.
Cluttered registry and hard drive
When programs are installed and during their operation, various entries and parameters are entered into the Windows registry. But not every program then deletes unnecessary entries. Moreover, after deleting program files, registry entries about them are not automatically cleared. A clogged registry affects performance. The same goes for the hard drive. In Windows 7, it’s not for nothing that the blue bar of free space on your hard drive turns red. The user must clean and free up free space in time, otherwise the computer will not work as expected.
If your hard drive is full, delete unnecessary files. The more space you can squeeze out, the better. Special programs will help you clean the registry. For example, CCleaner.
Install and download the program from the official website: http://ccleaner.org.ua/download/. For our needs, its free version will be enough, so downloading a pirated version makes no sense.
In the program window, look at the left menu with sections. Open Registry. On the page, check all the boxes in the list and click “Search for problems.”
After some time, you will see a list of problems found. Among them there will be empty registry entries; records leading to nowhere; erroneous entries and the like. You couldn't have dug it all out on your own.
Click "Fix problems" and wait for it to finish. Repeat the procedure until there are either no problems at all or a minimal number of them.
Now let's look at the hard drive. You can use the same CCleaner program or clear temporary files yourself. Temporary files are stored in folders named Temp or Templates. All files in these folders are garbage. Except those that are in use right now. Windows does not clean these files, the garbage accumulates. Not only does this reduce productivity, it also takes up a lot of space. Temporary files can accumulate several gigabytes.
The first way is to use CCleaner. The advantage of this method is its simplicity. We need to open the CCleaner program and select the “Cleaning” section. In the left window there will be a list of problems that need to be looked for (it is better not to mark items written in gray, as system errors are possible). After checking everything you need, click “Analyze”. When the list of problems appears, click "Cleaning" and wait until the procedure is completed.
The second method is to manually delete temporary files. More labor intensive, but also more reliable. CCleaner and similar programs do not always remove everything they need.
- Open Computer. Open the properties of the hard drive on which the system is installed.
In “Properties”, in the “General” tab, a diagram shows the amount of free and used disk space. And next to it is the “Disk Cleanup” button.
Wait while Windows checks the files and finds unnecessary ones. When a window listing problems opens, check the boxes next to all the items and click “OK.”
And confirm your choice by clicking “Delete data”.
Now let's clean up the Temp folders by deleting temporary files. Open the folder “C:\Windows\Temp” (drive C is taken as an example, if Windows is installed on another drive, you need to open it). Delete the contents of the folder. The error “The file is in use by a program” may appear. This means that this file is still needed. Click Skip to avoid deleting this file but continue deleting others.
Now let's clean out another folder with temporary files. Press the Win + R key combination. In the window, type “%TEMP%” and press Enter. A folder with a long and difficult to remember address will open.
Remove all content.
Cleaning temporary files yourself: instructions
Windows developers did not take care of automatically cleaning temporary files. But the user can do it himself:
- First you need to make sure that all temporary files accumulate in one folder. For comfort. Open Control Panel -> System -> Advanced system settings -> Environment Variables. Now enter the folder address in the TEMP and TMP fields. You can choose any one, but “C:\Windows\Temp” is better.
- Apply and close the window.
- Now let's set up auto-cleaning. Create a text file, open it and save it in .cmd format.
- Now use Notepad again and write there: “pushd %TEMP% && rd /s /q . > nul 2>&1",
"pushd %WinDir%\TEMP && rd /s /q . > nul 2>&1".
- Remember the address of the folder where you saved the file.
- Now open a program called Group Policy Editor (shortcut Win+R, type gpedit.msc and click OK). In it, open “Computer Configuration” -> “Windows Configuration” -> “Scripts (startup/shutdown)”. From the list, open the Shut Down option. Let's add a script for clearing the Temp folder to it. Click “Add” and in the “Script name” field, enter the address to the .cmd file that we created in the previous paragraph. Click OK and apply the changes.
- The same must be done for “User Configuration”. Open “User Configuration” -> “Windows Configuration” -> “Scripts (startup/shutdown)”. We repeat the steps described in the previous paragraph.
- Try restarting your computer. If the files in the C:\Windows\Temp folder are deleted, then automatic cleaning is configured correctly.
RAM
While the system is running, programs use RAM, temporary memory. It stores current processes. And while there is space there, processes are launched one after another. But as soon as the space in RAM runs out, the next process waits for space to become free for it. So, if the computer has little RAM installed, it will take a very long time to think and slow down. However, keep in mind that 2 GB of RAM is more than enough for simple use.. Even for modern video games. Mainly RAM is used by programs for video and photo processing (for example, Adobe Photoshop or Sony Vegas).
If the RAM in your computer is less than 2 GB, then you should think about upgrading. RAM modules are inexpensive, and connecting them is easy: just insert another part into the motherboard.
You can also improve the properties of RAM using software by increasing the size of the paging file. The bottom line is that the size of the RAM will increase at the expense of the hard drive memory. The option, in fact, is not very good, and productivity will not increase very much, but still.
- So, open “System Properties” (right-click on the computer, select “Properties” from the list).
In the left menu, click on “Advanced system settings”.
Here we need the “Advanced” tab, the “Performance” section. Open Settings.
In a new window we again open the “Advanced” tab. There is a “Virtual Memory” section here, which will contain a description of the paging file and its current size. Click "Change". The paging file may not be configured at all. Or some specific value is specified. Check "Set paging file size" and enter values higher than the current ones. Don't take too much; doubling the size will be enough. Your computer's performance will increase, although not much.
Set the paging file size and click OK.
Too many programs in startup
Windows has a Startup feature. The bottom line is that programs added to the startup list are included along with the operating system. Many programs a la Skype, email client, etc. are added to the list automatically during installation. Frankly “spam” programs are also recorded there: [email protected], Yandex.Defender and the like. Naturally, all these programs run simultaneously. Sometimes, invisible to you. And they all eat up system resources, which affects performance.
Windows has a special menu where you can add and remove programs from the startup list. To open it, press the magic combination Win+R and enter msconfig. A small window will appear with several tabs.
The “Startup” tab contains a list of all programs that start with the system. Read it carefully: if unnecessary programs are checked, remove them from there. Just be careful to find out exactly what program you are removing. Since this list contains both important system applications and antiviruses. Naturally, you cannot simply disable either antivirus programs or system functions - Windows is not so fragile, but nevertheless it is worth handling this more carefully. You never know.
After unchecking unnecessary programs, restart your computer.
You can also look at what programs are running right now and decide whether the load from the included processes is heavy. To do this, open the task manager (Ctrl + Alt + Del). Here you can see all running programs, and the load on the processor, RAM, and so on. There are Performance tabs for this.
Incorrect update
Windows is constantly updated. In rare cases, the installation of a new version goes wrong. Because of this, errors may appear in system processes, which will lead to deterioration in computer performance. An incorrect update can also be indicated by constantly appearing error messages in some system files.
If your computer starts to slow down after some update, then it’s worth restoring the last known good Windows configuration. Open the Start menu and type “System Restore” into the search. Press Enter.
A window will open with a list of system states before the update. The installation date of the latest version will be indicated. You can select any of them and click “Next”. Then "Done". And “OK” again to confirm system recovery. Windows will remove the new system files and return to the state before the last update. The next installation of the new version will go smoothly. Two update errors in a row rarely happen.
Mechanical damage
The system unit contains a complex structure of microcircuits and thin boards with coolers protruding from them, stretched wires and cables, connectors, noisy hard drives and a plump power supply. As you know, the more complex the machine, the easier it is to break. Although computer parts do not fail very often, they are worth checking. Usually, if something is damaged there, the computer simply will not turn on. But sometimes this also manifests itself in the form of system freezes and brakes.
First you need to find out which of the components is damaged. The AIDA64 program is suitable for diagnostics.
Download it from the manufacturer's website and install it on your computer. The left menu contains information about each component of your computer. Any of them can be considered in detail. To check the performance of all parts, you need to carry out diagnostics at critical loads. AIDA64 can do just that.
In the top menu, open the “Service” tab, then “System Stability Test”.
Now check the box next to all the parts you would like to test. Click Start. AIDA64 will create a powerful load for each part for some time.
Why is this necessary? During severe overloads, any deviations from the normal behavior of devices become brighter and more noticeable. During “stress”, AIDA64 will compare the performance of components with other results of the same types of processors and conclude whether all systems are working correctly. And then it will show you the result.
If, for example, the processor, RAM or anything else showed too weak results, then to improve performance you will have to replace them with new ones. In this case, there is no point in skimping, because in the near future they will completely fail anyway.
Software corruption
If the system unit is a complex system, then the software architecture is generally a jungle. An error may appear in important Windows system files, some minor bug that will not completely destroy the system, but will interfere with its operation. Because of this, the computer will slow down and become dull.
It's good if you have an installation disk or Windows installation flash drive. Then you can very easily restore the system. To do this, you must first run the Windows installation and select “System Restore.” Everything else will be done automatically. The program will check all system files for compliance with those on the installation disk and correct incorrect data. You can try and completely reinstall the system.
How to run a Windows installation from an installation disk or flash drive?
- First, insert the disk into the drive or flash drive into the USB port. And reboot the computer.
- Now, when the computer starts to turn on, you need to open the BOOT menu (boot menu). This is done differently on all computers. Basically - by pressing the F11, F12 or F1 keys. This will be indicated exactly on the boot screen before the operating system boots. Look for the inscription “BOOT Menu - F12” in the corners of the screen (usually the bottom).
So that you understand what is happening: every computer has such a system - BIOS. The computer may not have any operating system installed, but the BIOS is always there. A kind of software core of a computer. So, first, when turned on, this BIOS starts, and it already launches beautiful, convenient and visualized Windows, Linux or osX in its software environment. BOOT menu is a BIOS program that distributes the queue. Namely: what to launch first, what second, and what third. In the BOOT menu we need to configure it so that first it starts not the system, but the data from the installation disk/flash drive.
- And now more specifically. After opening the BOOT menu, look for the Boot tab. The loading order will be located here. Put CD/DVD-ROM first if you are installing from a disk, and USB-flash if you are installing from a flash drive.
- The Windows Setup program opens. Follow the instructions and select "Repair" or "Install" the system, depending on what you need.
If you don't have the installation disk, but you are sure that the problem is corrupted system files, contact Microsoft technical support. They will send you detailed instructions on how to restore your system.
Viruses
And, of course, viruses. Malware is designed to spy on or harm a computer, and hackers usually don't think about optimizing their programs. So they always eat a lot of resources, RAM and leave behind fatty traces. Sometimes this is done on purpose to prevent the user from getting rid of viruses.
It’s worth mentioning about antiviruses. They are also resource intensive, but for a different reason: they have to scan for possible threats every second. So poor performance may be related to this as well. In this case, you can try installing a more optimized and lighter antivirus program. And one more thing: if you have two or more antiviruses installed, remove all but one. First of all, it doesn't make the computer one penny safer. Secondly, it hits the processor very, very hard.
You need to download and install a good antivirus. If you don’t feel like spending money on full-fledged Kaspersky and ESET Nod 32, use free similar ones like Avast, Avira, McAfee. They are good enough to rid your computer of most malware. Just keep in mind that it is recommended to download anti-virus software only from the official websites of manufacturers, since you can often pump up diseases instead of medicine.
After installing an antivirus, conduct a deep scan of your computer files. It will take a long time, but it will thoroughly check all folders and sections. Remove any viruses found and restart your computer.
How to speed up Windows 7?
Enable hardware acceleration
Hardware acceleration distributes the load between the CPU and GPU. For example, the second one copes much better with playing video and three-dimensional models, so it makes sense to load it with more of a graphical component than a computational one. This is the essence of hardware acceleration. Unlike overclocking, hardware acceleration, by definition, cannot harm the computer..
To enable hardware acceleration, go to Control Panel -> Appearance and Personalization -> Display -> Customize Display Settings. On the page, click on “Advanced options”. The GPU properties window will open. Open the “Diagnostics” tab and click on the “Change settings” button. A window will open in which you need to move the slider to the right. Apply the changes and restart your computer.
Overclocking the processor via BIOS
There is such a term - processor overclocking. When overclocking, the clock speed and cache memory of the central processor and video card processor are increased. Iron manufacturers accelerate their products only to a certain level in order to leave room for critical loads and increase service life. However, this can be sacrificed to increase computer performance.
No need to worry that the processor will burn out. If you increase the frequency too much, the BIOS will reset it to factory settings.
So, first, let's open the BIOS. To do this, when you turn on the computer, you need to press the F2, F11, F12 or some other button, depending on the computer itself. In the BIOS, find the CPU Locker item. There is no point in describing the path in detail - it varies too much for different BIOS versions.
In the CPU Locker item you will be asked to set the minimum and maximum values. Now it’s worth talking about what values should be entered there.
The processor clock speed is measured in Hertz. For example, 1.8 GHz. Manufacturers usually leave around 60% of the possible clock speed. That is, at a frequency of 1.8 GHz, the maximum will be about 3 GHz.
The processor clock speed is calculated as the product of the FSB system bus frequency and a multiplication factor. For example, FSB = 200 MHz and a factor of 10 will give a 2.0 GHz processor. In CPU Locker you can change the frequency of the system bus. The multiplication coefficient will be written in “x14” format. Calculate how many gigahertz you need, divide by the coefficient and get the number that you need to enter in the Max field.
Video: how to overclock any processor in BIOS
Speed up copying and moving Windows files
In the Windows operating system, you can speed up the process of copying and moving files. To do this you need to install a special program. For example, TeraCopy. It replaces the standard copy/move function in Windows. It is somewhat more convenient, since it allows you to continue copying even if one of the files is damaged. It also indicates a specific copy speed, which is useful for calculating time and diagnosing the condition of the hard drive.
Such programs do speed up recording, but not by much. Not a single method will help to significantly increase the copying speed, since the capabilities of writing to disk are limited by the capabilities of the computer components.
But if you don’t mind the money, refurbish your computer: install an SSD hard drive, USB 3.0 ports, eSata and other latest developments. This way you can achieve a threefold increase in the speed of copying and writing to disk. A nice bonus: if you install Windows 7 on an SSD hard drive, it will start almost instantly. And it will work much faster.
SSD capacities greater than 256 GB are still prohibitively expensive.
Windows ReadyBoost
Windows ReadyBoost is a technology that allows you to speed up the Windows OS using flash drive memory. The essence is the same as the swap file. The more memory there is on the flash card and the faster it works, the more Windows will speed up. You shouldn't expect too much, but the results may well be noticeable.
To enable the ReadyBoost function, simply insert the USB flash drive into the computer and select “Speed up the system” in the autorun menu. Everything else will be configured automatically.
Disk Defragmenter
The term “disk defragmentation” means updating the structure of the hard drive.
A hard drive can be thought of as a warehouse. Products (information) are processed, packed into boxes and sent to the warehouse, where loaders place them in the nearest available space. They don’t think about sorting, so two boxes of peppers can stand in different corners of the warehouse, and boxes with pineapples and eggplants can be next to each other. Then comes the need to use the products. The buyer gives an order to bring him boxes of cinnamon. And the warehouse workers search for and collect them throughout the warehouse.
Finally, the warehouse manager gets tired of the slowness, and he orders everything to be sorted. For the same purpose, we, users, defragment the computer disk.
Defragmentation gives a noticeable increase in speed.
So, for defragmentation you can use a standard Windows utility or third-party software. The Windows defragmenter is in no way inferior to third-party ones, so we’ll use it.
Open “Control Panel” -> “System and Security” -> “Administration” -> “Disk Optimization”.
In the window, select the desired drive and click “Optimize”.
Video: 5 ways to make the system work at maximum speed
Programs you can use to increase your productivity
CCleaner
Cleaner program. Cleans up temporary and damaged files, clears the registry of empty entries and errors, and can defragment disks. Has a powerful free version.
You can download from the site: http://ccleaner.org.ua/download.
Advanced System Care for PC
Organizes automatic removal of viruses, cleaning the registry, protecting users’ personal data, and cleaning the system of temporary and unnecessary files. There are modules that protect the browser, but it cannot replace a full-fledged antivirus. However, it is quite suitable for improving the condition of the PC.
You can download from the site: http://ru.iobit.com.
So, we have looked at all the known ways to increase computer performance. The main advice is to treat and care for your device: clean system and registry garbage, remove viruses, defragment the disk. You should not forget about external care: the computer must be clean and tidy.
The Windows 7 operating system is still one of the best operating systems developed by Microsoft. It supports all currently existing programs designed for the Windows platform, has high performance, is not demanding on resources and has a user-friendly interface.
Despite its low demands on resources, sometimes there is a slowdown when working under its control. This happens especially often after using it for a long time without carrying out preventive maintenance.
Sometimes cause of slow performance there may be an attempt to launch a program that is too resource-demanding, for example, a modern game that requires a powerful video accelerator, or launching a large number of tabs in Photoshop, which requires a lot of RAM. In this case, software optimization of a Windows 7 computer can slightly increase performance, but to seriously increase it, it is better to upgrade the hardware.
How to speed up your Windows 7 computer using hardware
To increase performance, you can add RAM, use a solid-state drive, or install a more powerful processor.
Problems with already installed hardware can also lead to slowdowns. This may be caused such reasons:
- Availability bad sectors on the hard drive or in RAM cells.
- Malfunction cooling of the processor and the entire computer, leading to overheating of the equipment and triggering of the thermal protection of the processor, which significantly reduces its performance. Overheating can be caused by simple dust.
- Lost contact at one of the memory cells. The memory stick can simply not be fully inserted into the slot, and the computer will work with less memory.
- Hard drive wear and a significant increase in access time.
You can try to eliminate these malfunctions without replacing components, by cleaning and purging, checking contacts on connectors, running programs to check and restore sectors on the hard drive, and periodically defragmenting the disk.
Speed up Windows 7 by making better use of available resources
In most cases, you can achieve a significant increase in computer performance by optimizing the use of computing resources. For this it is necessary reduce the load on the processor, memory and reduce the frequency of access to the hard drive to a minimum.
Main reasons Low performance of a computer or laptop running Windows 7 at the software level are:
- Infection viruses, including hidden cryptocurrency miners.
- Autostart programs unnecessary for everyday use.
- Job unnecessary services.
- Usage visual effects and other decorations that unnecessarily load resources.
Virus cleaning
In order to be sure that there are no viruses, it is best to reinstall the operating system. If this is not possible, you need to use a good antivirus to scan and clean it. This can be done completely free of charge by downloading a trial version of the antivirus. The best of them are Norton Antivirus and Kaspersky Antivirus. After downloading the antivirus, you need to update its database and run a full scan. After scanning, you can find a huge number of viruses, especially if most of the programs are pirated. For everyday use, you can use a free Czech antivirus Avast Free Antivirus. It consumes few resources and also has many built-in components.
CPU and memory load can be viewed in the task manager. But you need to understand that the most advanced viruses are able to hide and camouflage themselves in such a way that they are very difficult to detect. They may even stop working when the user views the task manager. Therefore, regularly reinstalling the system and using a good antivirus should become the norm. Reinstallation is conveniently done using images created by programs such as Acronis. After installing the new system and optimizing it, you can create an image and use it if necessary. This will not take much time and will ensure that you are using a clean and optimized system.
Disabling unnecessary decorations
To significantly increase system performance, you can disable unnecessary decorations. First of all, visual effects are disabled by right-clicking on my computer, where the properties are activated:
In the tab that appears, select the menu additionally and press options:
In the parameters click on visual effects and activate provisioning best performance:
Disabling Remote Assistance
In the system properties window on the tab remote access You need to disable the ability to connect to remote assistance. This is a useless option that only takes resources and reduces the level of security. 
Disabling widgets and unnecessary programs
Further must be deactivated available widgets (if any). In addition to consuming resources, they create a gap in protection. To completely remove them, the easiest way is to go to the menu enable and disable components systems and deactivate them, as well as other unnecessary components. To do this, click on start and enter the control panel: 
On the control panel find the tab programs and components.
When you go to the programs and components section, you will be able to remove installed programs, as well as turn system components on and off. To remove unnecessary programs double-click with the left mouse button on the unnecessary program and uninstall it according to the standard procedure. 
Cleaning up unnecessary Windows components
To clean up unnecessary Windows components, you need to enter this menu in the same section and in the tab that appears deactivate unnecessary components. You need to disable Remote Differential Compression, Windows Search, Gadget Platform, Tablet PC Components, Indexing Service and other unnecessary components: 
Troubleshooting disk drive errors
Often the cause of slow performance is the presence of disk errors. To check and eliminate them, you need to right-click on the disk and in the window that appears select service and performing the check: 
Next, activate the options in the drop-down window check and recovery and start checking. 
If the system drive is selected, a reboot may be required to check. In this case, click the disk check schedule and reboot: 
Before the operating system boots, an image of the progress of the disk check will appear. Full check and correction may take a long time. 
Removing unnecessary programs from startup
An important element in clearing unnecessary junk is checking the startup menu. To use standard tools, press start, enter msconfig in the search bar and press enter: 
As a result, the system configuration menu appears. Here you need: 
Unnecessary startup items are turned off and the changes made are applied: 
Using as many cores as possible at boot
Using the system configuration, you must also set the number of cores used at boot to speed up your computer or laptop. This will help speed up loading times a bit. To do this, go through the tabs - Extra options. 
And in the line " number of processors» select how many cores will be used at boot. It's better to set the maximum possible number: 
After this, you will need to reboot for the changes to take effect: 
Turn off unused services
The number of simultaneously running services greatly affects performance. To disable useless services, go to control Panel:
In the control panel window go to the window systems and security:
After this, activate the tab administration:
In the administration window run services shortcut:
In the services menu, carefully check what starts automatically. Useless for the computer, used for surfing the Internet and used for home purposes, are the following services:
- WindowsSearch;
- computer browser;
- server;
- work station;
- session manager
- desktop window manager;
- diagnostic policy service;
- Client for tracking changed connections;
- IP auxiliary service (if IPv6 support is not required);
- secondary login;
- error logging service;
- offline files;
- portable device enumerator service;
- print manager (if there is no printer);
- secure storage;
- remote registry;
- security center;
- Tablet PC input service;
- NetBIOS support module over TCP/IP;
- Topics;
- WindowsMediaCenter service launcher.
You can also deactivate Automatic Update Center And background intelligent transfer service. They are needed to receive updates from Microsoft, and you can run them manually from time to time.
To turn off double-click on an unnecessary service: 
Then install startup type– disabled, changes are applied. After stopping the service, its window will look like this: 
If the sidebar is enabled, you also need to disable it using services. For this purpose, disable the sidebar.exe process in the manager.
Checking RAM for failures
If your computer has a faulty memory stick, it may experience glitches and slowdowns for some time. To check it is necessary to administration window run the memory checker: 
In a pop-up window agree to reboot and check: 
After the reboot, the diagnostic utilities will appear: 
In this window by pressing F1 you can change the verification parameters by changing the number of passes and the test set: 
As a rule, the basic set is completely sufficient for testing. If there are faults in the RAM, they usually immediately manifest themselves as errors in the test. If there are errors in the RAM, it must be changed.
Adjust power options and disable hybrid sleep mode
An important parameter in the work is the choice of the required power supply circuit. If you need maximum performance, then choose the appropriate power supply circuit. To do this, go through the tabs in the control panel system and safety – power supply and open the closed line of additional plans, where they activate the high performance scheme: 
By clicking on the settings of this scheme, you can adjust optimal parameters screen dimming, screen off, sleep mode and brightness: 
In addition, you can further customize the circuit by changing additional parameters: 
In these values needed Turn off hybrid sleep mode, as it takes up a lot of disk space and slows down the computer. To disable it completely, you need to go to the search bar when you press the start button. dial command powercfghibernate off and press enter.
This will reduce the amount of used disk space by the amount of installed RAM: 
Disabling Windows Aero and using the classic look
It is also worth disabling an option such as Windows Aero. It decorates the interface, but consumes a lot of resources. To do this, in the control panel follow the path personalization – selection of topics and choose the classic option: 
In this window, you select the base theme and color of the classic system window.
Enabling ReadyBoost Technology
If you have a slow hard drive and little RAM, speeding things up a little will help. ReadyBoost technology. It works by connecting a USB flash drive and using part of its space for this technology. To use it, you must be SuperFetch service enabled. Right-click on the icon of the connected USB flash drive and activate the function. In the properties, select the ReadyBoost submenu, activate the use of this option and use the slider to select how much memory will be allocated to this technology. System she will offer optimal size. Next, the changes made are applied. 
If a solid-state drive is used, which already has good performance, this technology is useless. The system will display a message about the impossibility of use: 
Disabling system sounds
You can make a small contribution to speedup by disabling system sounds. Select the menu in the control panel equipment and sound, and then the line for changing system sounds: 
In the pop-up window, open the list of sound schemes and select a scheme without sound. This change is then applied. 
Disabling disk indexing
In operating systems of the Windows family, disk indexing is always enabled by default, which does not bring any benefit, but slows down the work. To disable it you need on every section carry out the same actions one by one: right-click to call up the context menu and deactivate the content indexing permission line and apply the changes: 
An error may appear in applying attributes, while simply pressing the button skip everything.
Disabling software protection
To free up processor resources, software protection is disabled.
For this purpose, in the search bar type regedit and press enter: 
Then they move along the path HKLM\SYSTEM\CurrentControlSet\Services\sppsvc, where the value should be set Start 4. This will significantly reduce CPU usage: 
Change is made double click on the required line and selecting the option to change: 
Disabling User Account Control
The useless User Account Control (UAC) takes up quite a lot of resources. To disable it in the search field are recruitingUAC and press enter: 
In the window that appears, move the notification slider down: 
Setting up the swap file
With a small amount of RAM, the computer will inevitably slow down. In this case, increasing the size and virtual memory transfer to the fastest disk, preferably to a specially allocated partition. To set the optimal size and space for swapping, go to the system properties by right-clicking my computer and selecting its properties: 
Next, select the parameters: 
Then select the advanced menu and the option to change virtual memory: 
Further deactivate the option automatic volume selection and indicate the exact size. It is better to set a stable virtual memory size no less than the amount of installed RAM, or better yet, twice as much: 
Then click the Set button, OK and reboot.
Switch to classic cursor view
Switching to the classic cursor view can give a small increase in performance. To select it, call up the mouse parameters, for which you click key combinationWin+R and type the team in there control mouse, and then press enter. In the mouse properties, select the pointers and select either the standard scheme or the absence of any scheme (the word no) and apply the changes. 
Cleaning up unnecessary files
The operating system accumulates a lot of unnecessary data over time. To get rid of them, you need to right-click on the volume that you are going to clean and on the general tab select disk cleanup. In the window that appears, information about the existing excess data and its size will appear. You must activate the appropriate options and click OK. The same should be done with the system files tab in the same window: 
In addition, you can manually go to the system folder Windows, then to the directory SoftwareDistrbution and delete everything in the folder Download and file DataStore.
edb in the Data Store folder. All these files are service files and after installing the updates they are no longer needed. 
A lot of unnecessary data is saved in the downloads folder and in the user's temporary folder.
Easily accessible in the left column of the explorer: 
Everything that is in it can be deleted.
Temporary user folder is on the way C:\Users\1\AppData\Local\Temp, where C is the system drive, and 1 is the folder with the name of the username.
To see this folder you need to enable showing hidden files. For this purpose, select on the control panel design and personalization and then showing hidden folders: 
In the window that appears, select the option to show hidden files: 
You can delete everything in the user's temporary folder: 
Using third-party programs for cleaning and optimization
You can use a lot of third-party programs to clean up useless junk. The best of them are CCleaner And Auslogics BoostSpeed. They are intuitively simple and effective to use. The latest free version of CCleaner looks like this: 
The program works quickly and efficiently: 
Data defragmentation
Hard drives need to be defragmented periodically. To do this, right-click on the volume that you want to defragment and activate defragmentation button:
Then select the desired partition and begin defragmentation: 
The progress of the process can be monitored here. For large volumes defragmentation takes several hours: 
After completing all the above steps, your computer will run much faster. It is guaranteed to free up a lot of computing resources, which will allow you to work with greater convenience and without failures. It is advisable to take a snapshot of a well-tuned system using Acronis True Image, so that in case of the slightest failure, you can restore the computer to its ideal state in a few minutes.
Despite Windows 10 rapidly gaining fans, occupying an increasing percentage of the market every month, many PC and laptop users continue to prefer the stable and proven Seven.
This system has long shown its versatility and flexibility in configuration. Even users of very outdated configurations will be able to work effectively with it if they get an idea of how to speed up the computer.
If you are interested in optimizing and speeding up the Windows 10 system, check out our article “How to speed up your computer on Windows 10”
1. Optimal system requirements for Windows 7
Before you begin optimization, it is recommended that you first check your computer to ensure it meets the minimum system requirements. Considering the fact that Seven was released nine years ago, by modern standards they are quite democratic:
- x86-x64 processor with a frequency of 1 gigahertz
- 1-2 gigabytes of RAM (depending on the system capacity)
- 20 gigabytes of free space for the system + a couple of GB of reserve for the swap file, temporary program files and browser
- Video card supporting DirectX0 or higher
These are the requirements officially stated by the developers and are only an approximate recommendation.
If you disable unused services, graphic effects, and reduce the screen resolution, it is quite possible to run on 512 megabytes of RAM with a processor of a more modest frequency.
The opposite situation also happens - when operating resource-intensive applications and using the system’s potential to the maximum, many people experience slowdowns on 2GB of RAM and a processor with 2+ cores. From this we can conclude that optimization is recommended for everyone.
2. How to speed up your computer on Windows 7
Below we will list a number of effective configuration and optimization measures that will allow you to add up to a 25-30% increase in performance to the system without spending a penny on upgrading components. They should be used all together.
2.1 Remove programs from autorun.
This is one of the main methods that helps to really speed up Windows 7, because on any actively used computer, over time, a large number of programs that run along with the operating system accumulate.
Users simply forget to uncheck the corresponding item during the installation process, or the installer does not even ask them, offering this option by default.
As a result, the system’s operation slows down when turned on, and during operation, background processes take up some of the power of the computer hardware. The problem is solved in several ways:
2.2 Disabling search indexing
To speed up Windows 7 on a weak computer with insufficient RAM for normal functioning, disabling the search indexing service will help.
Additional ways to speed up the operating system are described in our article
It is also recommended for all those who care about the health of their flash drives. Indexing reduces the number of rewrite cycles, which negatively affects the lifespan of devices
To disable the function, just enter the word in the search bar of the Start menu "Services" and run the file from the drop-down list as administrator. 
We look for a service in the displayed list "Windows Search", then change “On” to “Off”.
2.3 Disabling Windows Aero
When first introduced in Windows Vista, the Aero interface impressed millions of users with its style and beauty.
Only the owners of low-power systems who were faced with a significant drop in performance were dissatisfied. This is not surprising, because now the recommended minimum is 1 gigabyte of RAM and 128 megabytes of video memory.
And the more different gadgets (clock, calendar and similar extensions) the user installs, the higher the resource consumption.
This is done as follows:

2.4 Disable visual effects/animation
Manipulating effects and animations included by developers to create a more beautiful working environment, but which do not have any practical value, will also help speed up Windows 7.
On modern powerful systems the increase will be insignificant, so you shouldn’t even bother.
But owners of weak PCs with outdated hardware will be able to feel the effect - windows will open faster, long loading times will disappear.
All you need to do is right-click on the shortcut "My computer", go to section "Advanced system settings" and there open the tab responsible for performance.
By unchecking the boxes from the list that appears, you can find the optimal balance between picture quality and performance.
2.5 Accelerating system boot
Even users of fairly powerful systems encounter unpleasant freezes in the first minute after turning on the PC, and for many the startup itself is a long process.
As mentioned earlier, cleaning startup and simplifying the graphical interface can help reduce waiting time, but there are other effective measures:

2.6 Turn off the swap file
Anyone interested in the question of how to speed up a computer on Windows 7 maximum should pay attention to the page file.
This term refers to the area on the hard drive into which unused information from RAM is dumped. And two shortcomings immediately emerge:
- First.
The page file can consume gigabytes of free space on your hard drive, which could be spent on something useful for yourself.
- Second.
When the system accesses the hard drive, it is much slower than directly accessing RAM.
Accordingly, if you have enough RAM (4 gigabytes or more), it is better to disable the page file altogether.
We go along the following path:

As a last resort, if there is not enough RAM, at least reduce the size of the FP to a comfortable minimum and be sure to disable automatic volume detection by system choice.
2.7 Cleaning the registry
No matter how carefully the user handles the computer, no matter how much he cleans his system, the remnants of deleted programs and other debris will still accumulate in the registry, which negatively affects performance.
To clear all this, you need to find the file in the search bar "regedit", run it and remove unnecessary things. 
But be careful - careless editing of the system registry can lead to the most disastrous consequences, even to the point where the computer stops turning on altogether.
If you don’t know the purpose of a particular line, it’s better to avoid it.
3. Useful programs for system optimization
Below are three of the most effective utilities that allow you to do the above-mentioned steps to speed up and customize Windows, even for complete beginners in computer science.
A couple of clicks and your system will become noticeably faster.

Now you have an idea of effective ways to speed up PCs and laptops running Windows 7.
Be sure to use the above measures comprehensively to eliminate the need to periodically reinstall the system.
And don’t forget to criticize the material in the comments, suggesting your own solutions to the problem.
It has long been no secret that performance in Windows 7 has been sacrificed for beautiful animation. In your article Speeding up Windows 7, as I understand it, there was an attempt to solve the problem from the technical side, that is, by changing the system settings of the operating system. It seems to me that you need to optimize Windows 7 first of all by disabling visual effects, and only then experimenting with the page file, the registry, and so on. Sergey.
Optimizing Windows 7
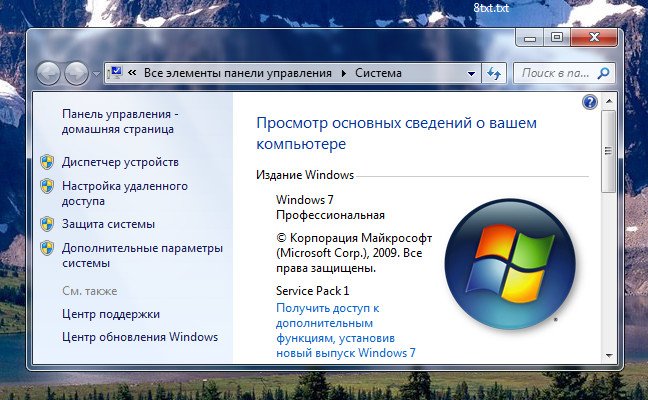
Optimization is the process of modifying a system to improve its efficiency. Wikipedia.
Without a doubt, the Aero interface places a large load on the performance of Windows 7, and disabling some settings that directly affect animation usually immediately results in a significant increase in speed in Windows 7. And of course optimization of Windows 7 you need to start by turning off some visual effects. But which ones? Personally, at my work, in Performance Options->Visual Effects, there is a checkmark in the Ensure the best best performance, why do I need beautiful animation and smooth fading in my workplace? Now, if only you could smoothly disappear from work without anyone noticing, but unfortunately there is no such setting in Windows 7. But at home my friends didn’t allow me to turn off the Aero interface in Windows 7: “It’s beautiful, Dad.”
Well, we've talked a little, let's get down to business. What I propose, personally, I have long found a golden mean for myself in the settings of visual effects, which our readers have repeatedly asked me about, and now I am sharing my experience.
I am sure that when you read the article to the end, you will turn off one third of the visual effects and be surprised, “Wow, I didn’t even know that all this was managed here.”
Start->Control Panel->System and Security->System->Advanced system settings->Performance->Options. Any visual effect can be disabled by unchecking it and clicking Apply.

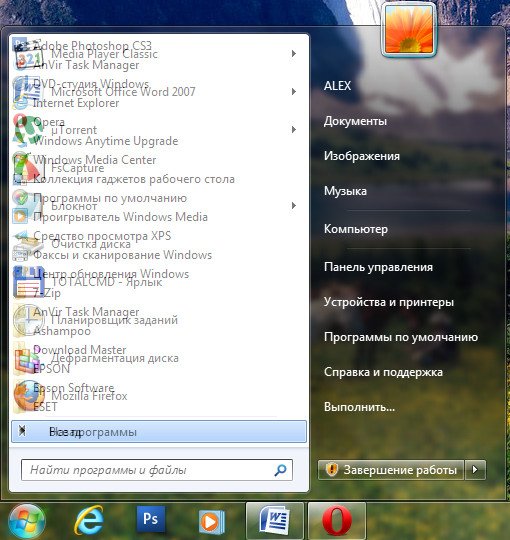
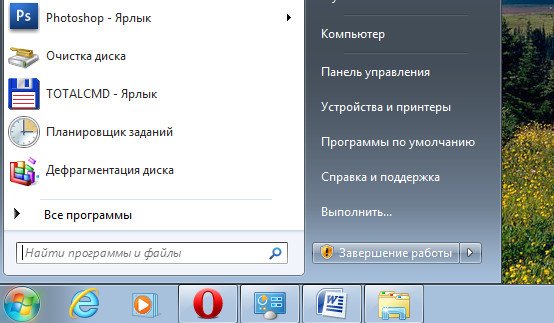
1)Animation in the Start menu and pane whether tasks. This setting is responsible for the smooth appearance and fading of lists in the Start menu, as well as drop-down buttons on the Taskbar, for example, right-click on the Start menu and point it at the All Programs menu, then we can notice the effect of a smooth drop-out of the list of programs. Let's uncheck the item "Animation in the Start menu and taskbar" and do the same, as you can see in the illustration, the list of programs now does not appear smoothly, but quickly, it's up to you to put the checkbox back or not.

2)Animation of windows when minimizing and maximizing. The name speaks for itself. When opened, the window smoothly appears, and when closed, it seems to collapse. Let's open, for example, the window of the Computer system folder in the Control Panel, the effect is clearly noticeable, but now let's disable this setting and open it again, without a doubt the difference in the speed of the window's appearance will be noticeable.


3)Animated controls and elements inside the window. Responsible for the effect of smooth highlighting on buttons and scroll arrows in dialog boxes. For example, let’s open the Computer system folder again and move the mouse over the scroll arrow, we noticed the highlighting effect, now turn off this setting and do the same. It seems to me that this can be abandoned.


4) Enable Desktop Composition. Responsible for the transparency effect of each open window in Windows 7, as well as the Taskbar. Windows 7 has to store information about open windows in memory and show us their silhouette when we hover the mouse over a button in the lower right corner of the desktop called Minimize all windows. Many people believe that Windows 7 optimization, you need to start by disabling this effect and the performance increase will not go unnoticed.


5) Enable Aero Peek. In the lower right corner of the desktop, there is a button Collapse all windows; when you hover the mouse over it, we will observe this effect.


6) Enable eff transparency ect. If you disable this effect, the Windows 7 interface will lose a lot, the transparency effect will disappear in the windows, experiment, maybe your video card will pass this test, it’s worth it.
7) Smooth scrolling of lists. You can safely uncheck the box, the effect is not particularly noticeable.
8) Menu fades out after calling a command. Disable it, as it is quite difficult to notice the difference.
9) Using Display Stylestions for buttons and windows. If you disable this option, no one will distinguish the design of your operating system from Windows XP - with all visual effects disabled. If you, like me, can’t forget XP, you can also choose the classic theme. Right-click on the desktop, select personalization, then Basic Simplified Classic.


10) Casting shadows on desktop icons. Personally, I don’t see much difference whether there is a shadow behind the icons or not, you can turn it off
11) Show window contents when dragging, it seems to me that it’s better to display it, it won’t take up a lot of resources from you, as you can see in the second illustration, if you don’t display it, it won’t be very convenient.
 12) Show shadows cast by windows. The screenshot shows a shadow with an arrow; if you are not happy with it, disable the setting.

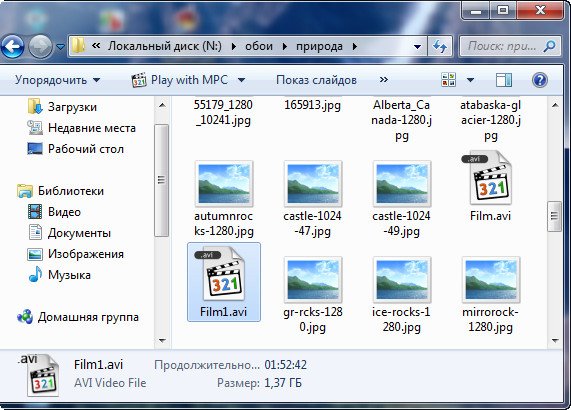
13) Show thumbnails instead of icons. This visual effect consumes quite a lot of Windows 7 resources; if you disable it, folders will open noticeably faster. It displays all image files in Windows 7 Explorer in miniature, as well as video files and others. If you often deal with images, then using this effect is quite convenient, you can immediately notice the photo and drawing you need, but many people who work with video complained to me, the fact is that Windows 7 generates all the thumbnails of video files in File Explorer. It varies and sometimes a video file simply cannot be found in a folder with other types of files, it takes such bizarre forms. By the way, everything is visible in our illustrations. The black rectangles in the folder are our films, next to them are graphic images, and this is what they look like when the effect is turned off.

14) Display transparent selection rectangle. When selecting several files with the mouse, you can notice a rectangular area moving after it, which does not particularly affect performance.


15) Displaying a shadow under the mouse pointer. It consumes virtually no computer resources.
16) Smooth out jagged screen fonts. The text on the screen with this visual effect turned off does not look very nice, let's leave it.

 17) Sliding when expanding lists. The effect of smooth drop-out of lists is not particularly noticeable, but can be turned off.
18) Save taskbar thumbnail view. You can experiment, if you need to, you can leave it.
19) when accessing the menu. It consumes a lot of resources and our time too, it’s better to turn it off.
20)Fade or glide effects when prompts appear. What's better for you, a hint with an effect or just a quick hint? Turn it off.
Many existing features in Windows that affect the speed and performance of a PC are not used by ordinary users. Most people use the default settings, and they are not the best for PC performance. Below are the top speed boosting methods to improve your Windows 7 PC experience.
Optimizing visual effects
Task
Windows 7 has a lot of beautiful visual effects, which increases the load on components and reduces PC performance. This reduces the performance of the computer, especially if the hardware is not up-to-date.
Answer
It is necessary to turn off visual effects, leaving only standard ones. This will immediately increase the speed and performance of your computer. In Windows 7, you need to type in the Start window in the search "Visual effects".
- Increase the clarity of font display;
- Using types of displaying windows and buttons;
- Connect desktop composition;
- Show thumbnails instead of labels.
 Then click “Ok” and reboot.
Check and debug the hard drive in Windows 7
Task
Data is transferred to the hard drive in parts to optimize disk space. As a result, the PC, when opening files, spends a significant amount of time searching for them, and if there are a large number of junk files, the process slows down even more.
Answer
It is necessary to periodically check for and delete unnecessary files, . At the first stage, you need to manually delete unnecessary data from the computer’s memory, for example, unused programs, old movies, music, etc. In order to delete applications, you must enter through “Start” in "Control Panel" and further in .
 Next you need to perform defragmentation. You need to enter “My Computer”, in the context menu of the disk, select sequentially: “Properties” - “Service” - "Run defragmentation". Click on .
Cleaning the Startup directory
Task
Often, computer boot speed can be increased by simply getting rid of unnecessary programs in startup, for example, social network messaging services, updates for various programs, antivirus, etc. In fact, everything except the antivirus can be removed.
Answer
It is recommended to use the CCleaner application. It will help clean the registry and optimize startup speed. The application requires you to enter a bookmark. By clicking on “Turn off”, go through all the applications that you do not use regularly. 
Cleaning the registry and RAM
Task
When you uninstall programs, “garbage” accumulates on your computer (program settings, links, unnecessary shortcuts, erroneous extensions). The optimal operation of RAM is affected by possible defects in its manufacture, incorrect operation of the power supply and changes in network voltage.
Solution
Cleaning the registry is very easy using the CCleaner application. Analysis of RAM operation is performed using the built-in functions of Windows 7. In order to perform RAM analysis, you need to use the search bar through “Start”, where to type “Diagnostics of computer RAM problems”.
 After this, a menu will be displayed where you need to click on the 1st diagnostic method.
 The PC will reboot and begin analyzing the RAM. The process takes considerable time. After completing the process, the PC will reboot again and the user will have access to information about the analysis performed.
Connecting all processor cores
Task
To effectively increase computer performance, it is necessary to optimize Windows for multi-core processors.
Answer
You need to tell the OS to boot using the resources of all cores. Through “Start” - “All Programs” - “Accessories” - “Run” you need to type “msconfig” and click on “OK”.
 In the menu that appears, enter - "Extra options…". Check mark "Number of processors"(to improve PC performance and speed, it is recommended to mark the maximum possible number). Click on "OK".
Disabling unused gadgets
Gadgets reduce PC performance. For maximum effect, it is recommended to disable them all.
Conclusion
The article discusses only the basic methods of increasing the speed and performance of a computer.
This topic is very extensive and it is impossible to cover it entirely in one publication, therefore additional methods are described in a separate section.