How to make a flash drive native memory for Android. How to replace internal Android memory with a memory card
Good afternoon, our dear readers and at the same time users of modern devices. Today we will talk about a problem that is so familiar to many of us.
It happens that you install a new application, but the download does not turn on, and a window pops up asking you to delete old applications to free up memory on the device. When Android does not save to the memory card, what to do about it?
Danger of the problem
Tablets and smartphones today have different sizes of built-in memory. True, given the abundance of applications and the ability to connect different gadgets, the main memory may not be enough.
Of course, in our age, everyone understands that the elementary solution here is to connect an SD card, because today phones store not only contacts, but also a lot of useful and entertaining things.
So modern microSD can add up to 8 GB of memory, microSDHC - up to 32 GB, microSDXC - optimally offer 64 or 128 GB, but the most expensive of them can accommodate 2 TB of information.
For comparison, music downloaded to a phone usually weighs 3-10 MB, a photograph on a smartphone takes 1-5 MB, and a movie of the poorest quality starts from 700 MB. Not to mention games for smartphones. In general, when purchasing a card, you will, of course, be guided not only by the capabilities of your device, but also by your needs.
It just happens that the card is finally inserted, the problem should get better, but here it is again: you download the application from the Play Market, and it again goes to the smartphone’s memory.
Clearing the cache is only a temporary measure. So why doesn't Android want to save to the card? The issue of forcing files to be moved to an external card directly depends on the OS version.
Find out the Android version
How to find out the Android version? To do this you need:
- go to “Settings”;
- in the list of items, find “About phone”;
- Now click “Version Information” and here you will see the version of the operating system.
Solution for Android versions 4.0 - 6.0

The sequence for solving this issue is different for certain operating systems. So today, a large number of mid-segment smartphones run on Android from version 4, as well as Android 5.1 and 6.0.
Android 4.0, 4.1 and 4.2 allow you to configure saving files to an SD card without having a . You just need to go to “Settings”, enter the “Memory” submenu and specify there the installed memory card as the default resource for saving data.
From now on, the new application from the Play Market will be saved there. True, old applications will have to be moved manually, and if that doesn’t work, install them again.
To carry out the task, go to “Applications”, select the one you need and indicate the path each time - “Transfer to SD”. But not all applications, especially system ones, will “listen” to you, because to transfer data to Android from 4.4 and higher you will need to obtain Root rights.
Obtaining superuser rights occurs through special utilities.

The most famous of them are Framaroot and Kingo Android Root. But with full access to your files, you suffer some costs when obtaining Root rights: you lose your rights to warranty service for the device, updates do not come by themselves over the air, and unknowingly you can damage the system by accidentally deleting important files.
Using Third Party Applications
You can force your smartphone to transfer applications faster through AppMgr Pro III.
Download the application from the Google Market, clear the application cache automatically and perform other manipulations. The program divides applications into three characteristics: those stored on the SD card, those stored on the phone, and those that are moved. The latter can be broadcast to an external card. You can even click “transfer everything” right away - quickly and conveniently.
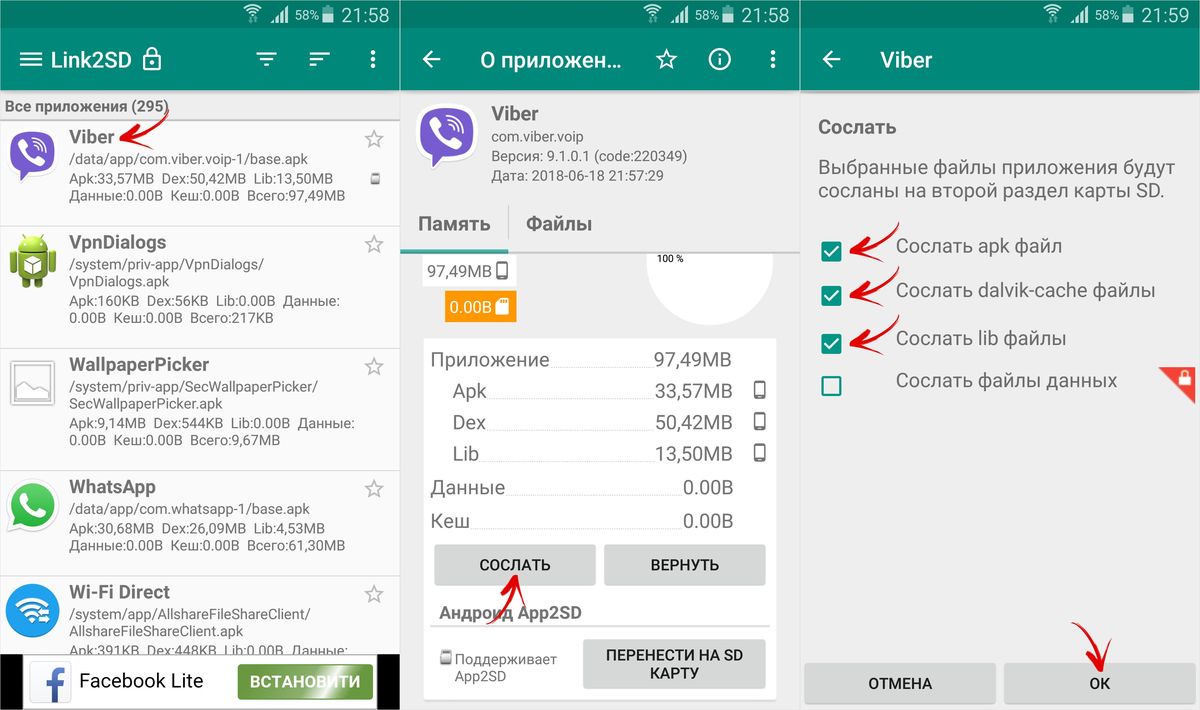
An alternative is the Link2SD program, which works with OS from 4.4. It creates separate libraries on the card, transferring applications partially. But be careful here too - do not touch system files.
Telephone does not see the memory card
There are several reasons why the phone does not recognize the card:
- Lost contacts is the first reason. Simply remove and reinsert the SD card.
- Sectors are damaged. What to do in this case? Format the memory card.
- The reason is a block in the phone's security system. The service center can help you remove it.
- The service center will tell you if something inside the phone is not going well, and will help you fix this element, returning the device to a responsive “dialogue” with the memory card.
- Incompatible card. All you have to do is replace the card, carefully reading the instructions about the compatibility of your device.
When the device detects the presence of the card, you can try to transfer programs to it according to the instructions above. And the unloaded system memory will serve you uninterruptedly, save applications, videos and photos to your smartphone and will not bother you with unpleasant notifications when downloading new applications from the Google Store.
I hope we have provided you with real help and are happy to continue to talk about the intricacies of modern devices. Also visit us with your friends in the VK group, on Facebook, on Twitter, as well as on YouTube channel.
There was a site with you

Almost all phones and tablets released in 2018 have a large amount of built-in memory, which is expandable using a microSD card of 32 GB or more (in mid-range and flagship models). But among owners of old and inexpensive devices with internal storage of 4 GB or less, the issue of lack of free space on a smartphone is especially acute. In this article, we will look in detail at all the ways to transfer applications to an SD memory card in Android.
The instructions are intended for both beginners and experienced users, so it talks about transferring applications not only using standard means, but also using special programs that require root rights.
You can also free up space in the internal memory by deleting system applications.
How to transfer applications to a memory card using accessible means
Since the earliest versions of Android, the system has had the ability to transfer most installed applications to an SD card. Instead, in Android 6.0 Marshmallow it became possible to use a memory card as an internal drive (this method is also described in the article).
Let's look at the function using the example of a Samsung phone running Android 5.0:
Go to Settings and select Apps. Depending on the manufacturer and firmware, the item may be called “Application Manager”, “All Applications”.

Select the downloaded game or program. If the application can be moved, the “Move to SD card” button will be active. Click on it.

If the button does not work, the developer has prohibited installation of the application on the memory card and you will not be able to move it using standard means.
AppMgr III (App 2 SD) for transferring applications
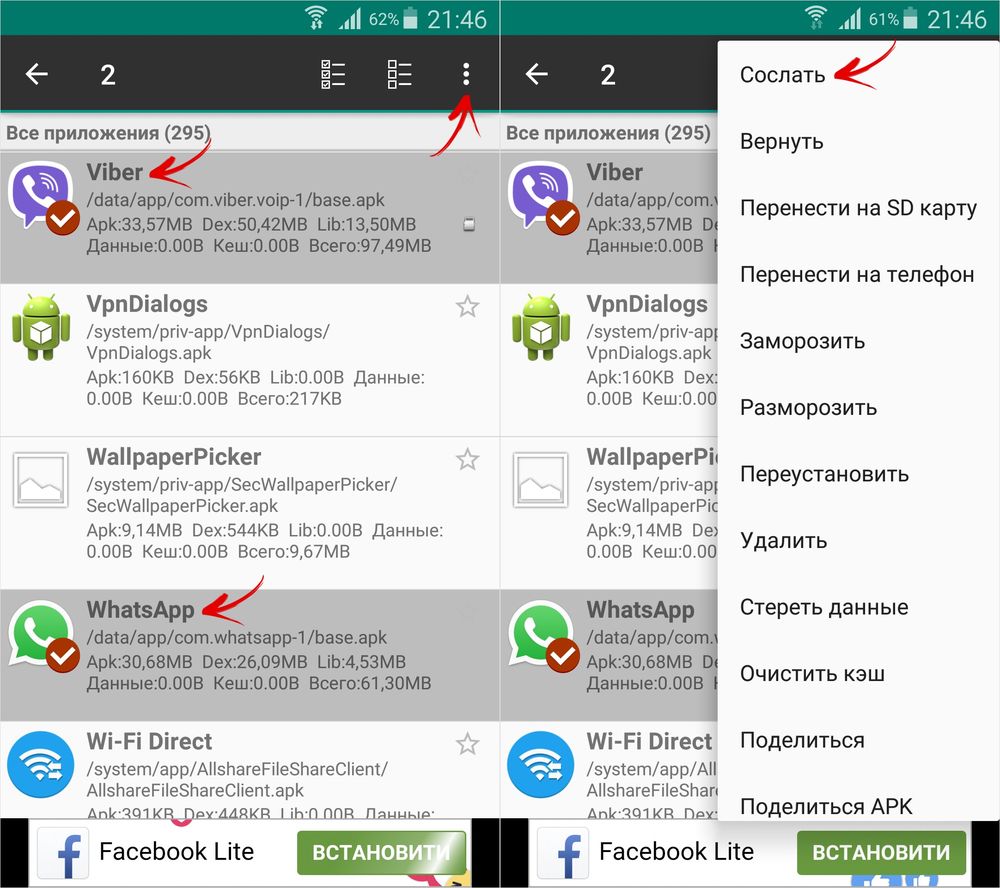
In order not to open the settings of each game or program and not see whether they can be transferred or not, use the AppMgr III (App 2 SD) utility - in it, the moved applications are collected in a separate tab.

Hold your finger on app cards to mark them. Select the ones you need and click on the folder icon at the top. In the new window, click on the red arrow, which will take you to the application details page. To go to the settings of the next selected program or game, press the Back button.

AppMgr III will also tell you which applications should not be installed in external memory so that all their functions work correctly.
Using an SD card as internal memory
This feature was introduced in Android 6.0 and works in Android 7 Nougat, Android 8 Oreo and Android 9 Pie. It allows you to use a memory card as a built-in storage device. Since SD replaces internal storage, it makes sense for the flash card to be larger than the internal memory. And for applications to work quickly, the SD card must have a high write speed.
Data from a memory card formatted as an internal drive will not be read if you install the SD card in another smartphone or tablet. To use the card in a new device, you will have to format it as portable storage.
After connecting, a message will appear in the notification shade that a new memory card has been detected. Just click “Configure”, select “Internal memory” in the window that opens and follow further instructions. Don't forget to transfer files from the SD card to another storage device, as they will be deleted during the formatting process.

Detailed instructions for setting up the card:
1. Go to “Settings” → “Storage” (may be called “Storage and USB drives” or “Memory”).

2. Click on "SD Card".

3. In the upper right corner, open the menu, select “Settings” (in some firmware “Memory”).

4. Click Internal Storage.

5. A warning will appear on the screen that all data saved on the SD card will be deleted during the formatting process. So first copy them, and then click “Clean and Format”.

6. If your smartphone uses low-class SD (for example, microSD Class 6), a message will appear on the screen that the memory card is slow.

7. Before completing the formatting process, you will be prompted to transfer some files and applications to the SD card. Select the option you want, click Next and then Transfer.

8. Finally, click “Done” and manually restart your phone.

Now open “Settings” → “Applications” → “Application details” (if this item is not there, proceed to the next step) and select the installed program or game.

Click "Storage" (may be called "Memory"), then click on the "Change" button and select the SD card.
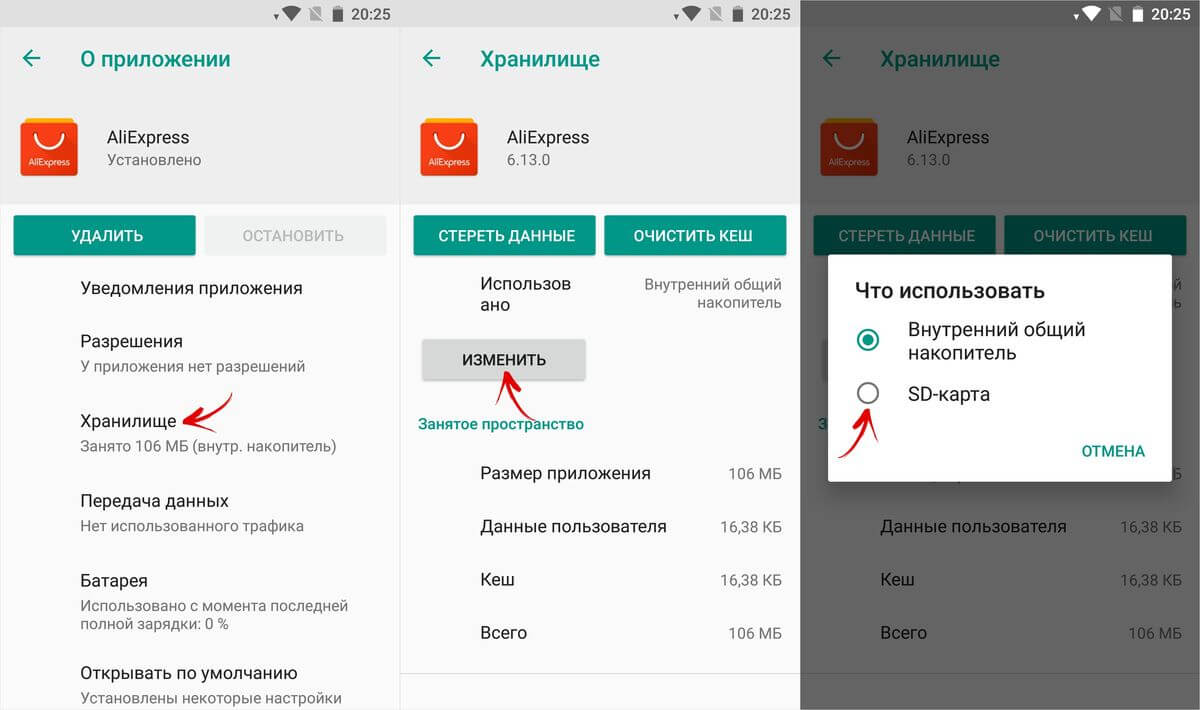
In the window that appears, click “Move” and wait for the transfer to complete.

Formatting a memory card as an internal drive using ADB
If your smartphone has Android 6, 7, 8 or 9 installed, and there is no option to format the SD card as internal storage in the settings menu, the manufacturer has not added such an option to the firmware. But users can format the memory card themselves using the utility.
To do this, activate on Android, connect your mobile device to your PC and run ADB from the command line or from Windows PowerShell if one of the latest builds of Windows 10 is installed on your computer. Enter the following command and press Enter (in Windows PowerShell, add ./ before the command).

The console will launch and the “$” sign will appear in it. Type the command and click Enter:

The line below will display the view's SD card ID disk:NNN,NN. Replace NNN,NN to the value of the received identifier and run the command:

Wait for the command to complete. Then go to Settings → Storage and select SD card. Expand the list of options by clicking on the three dots at the top and click “Transfer Data.”

Select "Transfer" and wait for the process to complete. Finally, click “Done.”

How to move multiple apps to SD card in Android 8 Oreo and 9 Pie
To avoid performing the same steps to transfer applications separately, use the AppMgr III (App 2 SD) program, which was described at the beginning of the article. Only on Android 8 Oreo and Android 9 Pie you will have to give AppMgr III a couple of permissions.
Launch the application. A notification will appear that the program needs access to your usage history. Click Allow, select AppMgr III from the list of applications, activate the switch and return to the program. You can also configure access to your usage history by going to “Settings” → “Applications and notifications” → “Advanced settings” → “Special access” → “Access to usage history”.

Select the games and programs that you want to move to the flash card and click on the image of the folder with the arrow inside. In the "Move to Map" window, click on the red button below.

A message will pop up saying that AppMgr III needs permission to change system settings. Click on the switch and you will be taken to settings. Activate the toggle switch and return to the application. The options for this permission are located under Settings → Apps & notifications → Advanced settings → Special access → Change system settings.

You will then be prompted to allow AppMgr III to automatically perform actions without manual confirmation for each application. Click "YES", go to the "Accessibility" section, select "AppMgr III", switch the toggle switch to the "ON" position and confirm by clicking "OK". Then return to the program.


Application transfer will begin immediately. Just wait for it to complete.

At the end it will show that the applications have been moved to the memory card.
Transfer games to SD card in Android
Most of the user memory is occupied by the cache of installed games. To move it, we will use the FolderMount program, which can mount directories from internal memory to external memory. It requires .
Download FolderMount from Google Play, launch it and provide Superuser rights.

In the “List of Pairs” tab at the top, click on “+”.

Come up with and enter the name of the folder pair in the first line.

Click on the second one, after which the built-in file manager will open. The game cache is located in the “Android/obb” directory, and the application cache in “Android/data”. Go to the folder you want to mount and click on the checkmark.

The screen will ask if you want to create the destination folder automatically. Click "YES" if you agree. In this case, FolderMount will copy the path from the internal storage and create the same on the external drive. Click "NO" if you want to manually set the mount end point and select the folder where to move the files.

To start copying, click on the checkmark and confirm the transfer by selecting “YES” in the next window.

The process will be displayed in the notification panel.

Once copying is complete, switch the toggle switch in the “List of Pairs” tab to mount.

At the bottom there is a button with a pin image, clicking on which will mount all directories at once.

To move files back from the destination folder to the source folder, first unmount the pairs: to do this, turn off the toggle switch or click on the crossed out pin, then hold your finger on the pair and click on the trash can icon.
How to move apps using Link2SD
Link2SD is a program that can mount application data onto a memory card. In order for it to work, it is necessary to create an additional partition on the SD in the ext3/ext4 file system on the mobile device. Partitioning a memory card into sections is done in one of the following ways.
(!) Before creating a new partition, copy all the files located on the SD, as they will be deleted after partitioning the memory card.
Memory card partitioning on Android via TWRP
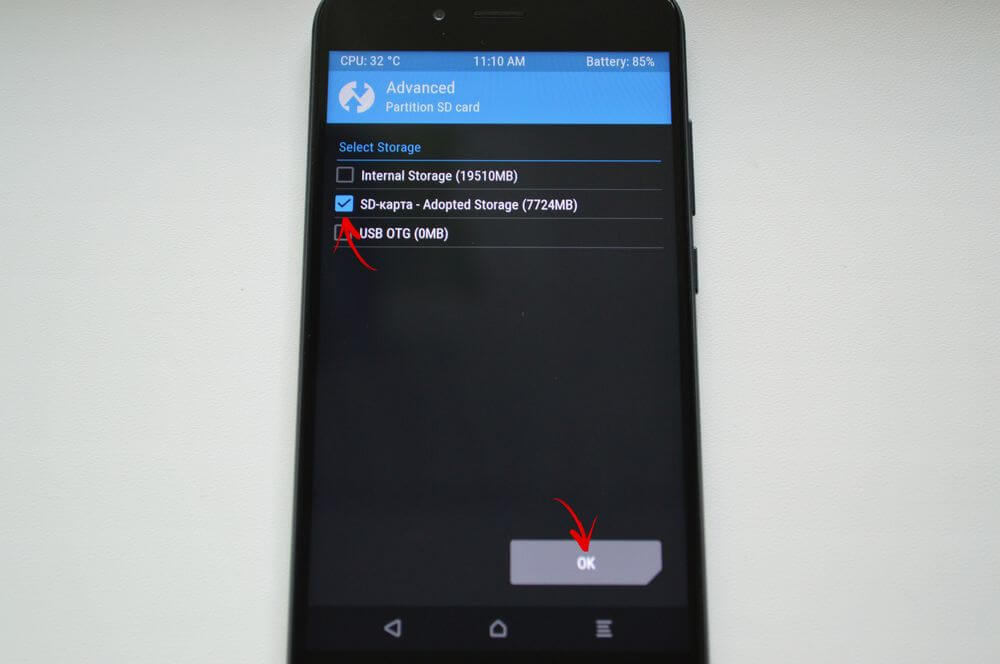
If installed on your smartphone, partition the SD card through it. To do this, click “Advanced”.

Select "Partition SD card".

Check "Micro SD card" and click "OK".
Select the file system of the ext-partition to be created and specify its size. For example, 2048 MB - this memory will become available for transferring applications and the volume of the SD card will be reduced by that amount. Leave the Swap partition size (paging file) equal to 0.
Drag the slider to begin SD marking.

At the end, click “Reboot System” and “Do Not Install” if you do not want to download the official TWRP application.


The device will reboot. If you go to “Settings” → “Memory” (or “Storage” in the latest versions of Android), you will see that the SD size has decreased. The second section “sees” only Link2SD, App 2 SD and similar applications.
Create a hidden partition on SD using AParted
The second way to split a memory card into 2 partitions if you have Superuser rights, but no TWRP:
Go to “Settings” → “Memory”, click “Disconnect memory card” and confirm the action.

Launch AParted and grant root access.

There are 2 bars in the Create tab: the top one will display the new partition, and the bottom one shows the current SD size and its file system.

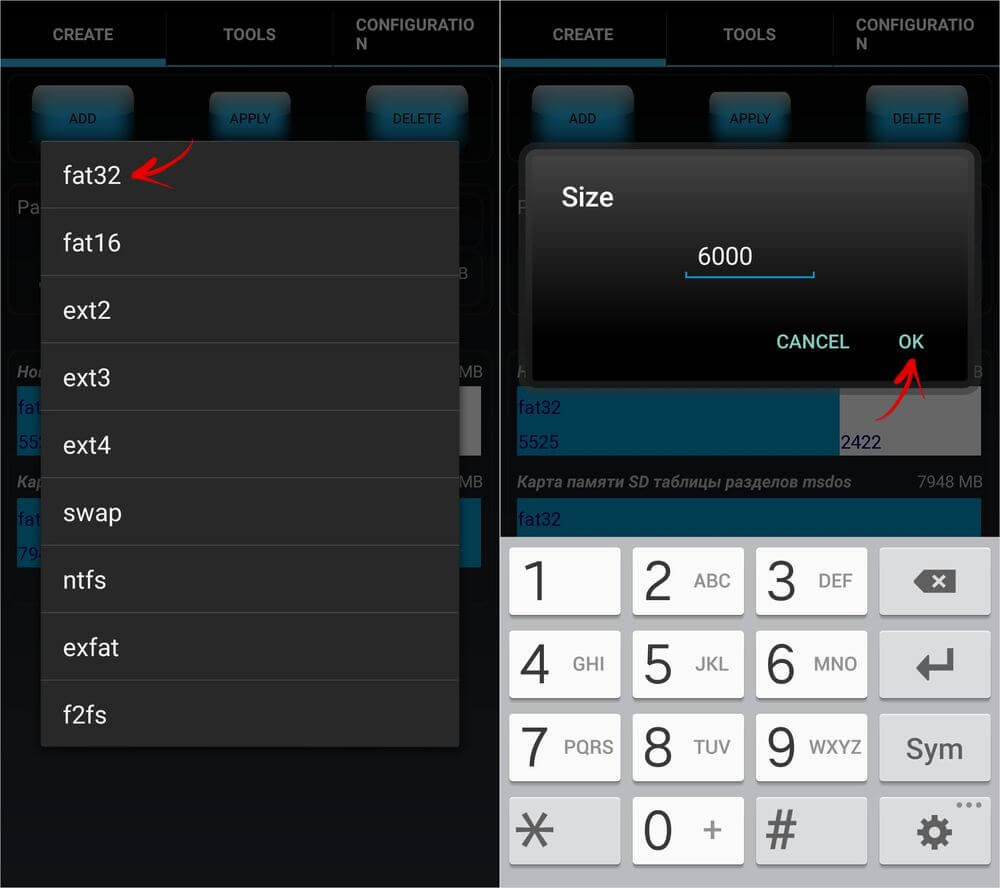
Click "ADD" to create the first partition. This will be the new size of the memory card where you can save photos, music, videos and other files. Leave the checkbox next to “Format”, the fat32 file system and select the size with the slider. To set it more precisely, click on the number next to MB, enter the desired value and click OK.

Click “ADD” again and create a second hidden partition to which games and applications will be transferred. Pull the slider all the way, leave “Format” checked and select the ext file system.

Click “APPLY” and select “OK” in the warning window that appears.

The SD partitioning process will start.

When completed, the second line will display 2 sections.

Now connect the memory card through “Settings” if this did not happen automatically. The new SD size should be displayed there.
Working with Link2SD
Open Link2SD and grant the program Superuser rights.

A window will immediately appear asking you to select the file system of the hidden partition of the SD card. Check the appropriate ext version and click OK. If the window does not appear, expand the menu on the left and click “Recreate mount script.”


Then click "Restart device" to mount the second partition of the memory card. The device will reboot.

Once Android is launched, go to Link2SD, click on the 3 dots in the top right corner and select "Multiple".

Select the applications you want and open the menu again. Click "Send".

There's also a "Move to SD Card" feature that moves apps using the standard Android method that isn't available to users without a Link2SD.

If you need to move one game or program, find it in the list, click on it and select “Send” or “Move to SD card”.

If your device does not have enough internal memory, can use SD card as internal storage for your Android phone. This feature, called Adoptable Storage, allows the Android OS to format external storage media as permanent internal storage. The information on the installed SD card is encrypted and cannot be subsequently used on another device.
SD Card is a very convenient option for storing photos, songs and videos. Even if you have a large amount of internal memory on your Android smartphone, you may always need a large chunk of memory to store long videos captured by your phone's high-definition camera.
Important to know
There is one drawback, the SD chip can lag when recording high-definition video.
Android by default in the internal memory and only occasionally uploads data to the SD card. This way, you are prevented from installing any additional applications if your phone is running low on internal storage space, for example, in the case of budget Android One devices.
What is storage storage?
Storage storage is the main memory of your smartphone, but if necessary, it can be expanded using an SD card. This on Android it is called Adoptable Storage. This will allow you to use the removable microSD card installed on your Android phone as your primary storage. This way, you can easily solve the problem of how to make an SD card the main memory on Android and overcome the lack of space if the phone has a small internal volume.
Features of using the card as the main storage
There are a number of important features that should be taken into account during this procedure.
Will be useful
When using a storage device, be it an SD flash drive or a USB drive, it is important to remember what format the device is in and whether the Android operating system supports it, and there are four main file formats: FAT32 or exFAT, ext4 or f2fs.
How to change phone memory to android memory card? The question is not entirely correct, it is impossible to completely replace it, you can only “increase” additional volume.
Using your SD card as your main storage can be a great solution for music lovers and those who like to watch TV shows on the way to work or on a long trip. But, as often happens, memory expansion always depends on the cost of the required device, after all, they differ both in speed and in volume, as well as in the adaptable information storage function. Here are some nuances that can be viewed from different angles - both negative and positive:
How to use SD card as internal memory on Android?
How to replace the phone's internal memory with an external SD card on Android? Configuring your SD card to act as internal storage on Android is essentially a fairly simple process. There is nothing complicated about this and you will see for yourself later.
It is possible that the Adoptable Storage function is not supported by your device, even if the smartphone runs Android 6.0 or higher (this can happen, it all depends on the model and brand of the smartphone). The device manufacturer may have disabled this feature. However, there are command line methods that allow you to force the use of a flash drive to store data.
Below are the basic formatting steps.

On the next screen you have one last chance to decide for yourself if you want to change your mind

Important to know
Don't forget to back up your data; after formatting, the information will disappear without a trace!

Once the formatting process is complete, you can use the removable SD card as a “temporary” or “removable” permanent location. But keep in mind that hot swapping and ejecting will no longer be available as you may have previously done. That's why Do not remove the flash drive without using the Eject parameter. In addition, you can practically delete the place accepted by the operating system, which, accordingly, is not recommended, since this can cause certain errors in the operation of the device. Now you know how to make a memory card the main memory on Android.
The internal memory on smartphones is not endless, and photos, videos, documents and applications take up quite a lot of space. This is why most devices have an SD card slot - this allows you to significantly expand your memory reserves.
And yet, users are faced with the following problem: the phone has external storage installed, but all applications are automatically downloaded to the internal memory. Because of this, a notification constantly appears that there is not enough space. On Android, this problem can be solved in several ways.
How to download games and applications to an SD memory card
There are several ways to use an external card to download applications and games to it. So, you can set the SD card as the default memory, move applications using standard settings or memory consolidation.
Setting the default external SD drive
You can set the SD card as the default memory, and then the smartphone will determine it as a priority for storing data.
To do this:
Some applications will still be saved in the internal memory, this is determined by their settings.
Using Settings to Move Apps
Unfortunately, in the settings there is no option to select automatic installation of applications on external media. But you can manually move some of them (not all applications support such a transfer).
To do this:

There is another option: you can transfer applications not separately, but all together. To do this:

Combining internal and external memory
This method is available for smartphones with Android version 6.0 and higher installed.

Video: how to set up downloading games and applications to an SD card
Video: Moving games to an external drive using Apps2SD
Using an SD card and the methods described will help significantly relieve the internal memory of your smartphone. They are quite simple, so any user can handle them, even if he is not very well versed in technology.
Many owners of Android devices sooner or later, especially if the user is not experienced in computer technology, are faced with a similar situation. By manually or automatically installing applications on the gadget's internal memory, we gradually reduce its volume. Over time, the device begins to work slower and slower. Those programs that used to start in a matter of moments now start slowly. And then it’s generally impossible to send SMS or listen to the song normally. In addition, I get a message that there is not enough space in the memory of the Android device. So we've arrived. It's time to start optimizing the internal memory of the device. There is no other way. The main way to solve this problem in Android is to install applications on a memory card. But first you need to understand what types of memory your device has.
Types of Android memory
RAM is memory that is used by various processes and applications while the device is running. When the power is turned off, all data contained in it is erased. The larger its volume, the more application instances can be launched at the same time. That is, the more operational, the more you can afford right away. For example, listen to music and surf the Internet through a browser.
At this stage, the gold standard is considered to be 1 GB of RAM. In budget models, this figure averages 512 MB. To some extent, a large amount of RAM allows you to go longer without transferring an Android application to a memory card. Moreover, starting from version 2.2 of this operating system, it has built-in support for selective launch of processes. Now the device itself knows which application data to leave active. In earlier versions, when the entire amount of RAM was filled, the user received a message about its fullness and the impossibility of launching the application.
ROM is the internal memory of the device, onto which the data of the operating system itself is written during firmware. Unlike operational data, this data is saved after recording without changes, even after the device is turned off or rebooted. They are not modifiable and you will not be able to move applications to your Android memory card.
Internal memory of the device - user information and data of installed programs are recorded here. All information is available for change. How much free space is left in the internal memory is displayed in the settings. If the entire volume is almost full, then you can move applications to the android memory card.
Memory cards
An expansion card, or flash drive, is used to increase the amount of internal memory. It comes in different types and sizes depending on the slot supported. All information recorded on it is available for modification and is saved when the power is turned off. You can also find out about the degree of filling in the “settings” section of the gadget menu. The main purpose of expansion cards is to free up resources of the device's internal memory.
The essence of the problem
After purchasing a new device, the owner, who understands the controls, begins to customize the gadget “for himself.” Personalize by installing all new applications and gradually filling the internal memory. In the end, in addition to filling the RAM with many running processes, the internal volume is also filled to capacity. In this case, the system issues messages about this. Removing unnecessary programs and data solves the problem for a short time due to the constant influx of information and automatic installation of updates. Optimizing the system and deleting temporary files is also a temporary solution to the issue. There is nothing else left to do but transfer applications to the android memory card.
Let's start solving the problem
An inexperienced user would do this by first copying all the data to the computer and then moving it to a flash drive. Another solution could be online data storage. To do this, you need to download all the necessary “extra” information from your phone to the server of some specialized Internet resource for further storage and use at the right time. This is where the problem of accessing this data via the Internet arises. Unlike foreign countries, access to the network via wi-fi is still too poorly developed. And downloading through Edge will not only take a long time, but also be expensive.
Everything is much simpler. Transferring data to an expansion card is possible through the built-in operating system tools using a file manager. You just need to mark those that should be transferred. What if you need to move Android applications to the memory card? To do this, in this operating system, starting from version 2.2, this feature is implemented at the software level.
Open the gadget menu. Go to the “Settings” item. Next, go to the “Applications” sub-item and from there to “Application Management”. A list of installed programs opens in front of you. By clicking on the name of the desired application, we will see all the information about it. On the right there is a button that says "move to SD". If it is active (displayed in white), then this application can be transferred to the Android sd from the internal memory of the device.
Programs for transferring applications
Of course, a new version of the operating system is good. But what should those whose devices run on versions lower than 2.2 and their system do not know how to install Android applications on a flash drive?
The first option that immediately comes to mind is flashing the gadget. But this matter is so troublesome and time-consuming that first it is better to look for other ways to solve the problem.
All-knowing programmers have already thought for us and written a number of special programs for Android to transfer applications to SD.
App 2 SD program.
It contains all the necessary tools for transferring applications not only from external memory to an expansion card, but also vice versa. Having launched the program, a table with icons of available functions appears in front of us. At the top there are three keys for selecting the desired operation option: with roaming applications located on the memory card and located in the internal memory of the device. Before transferring applications to the memory card on Android, click on the icon of the program being moved. All information about it and possible options for action are displayed in front of us: transferring, erasing data.
Using the menu that appears after pressing the device's function keys, you can transfer all installed programs, update the list, configure, clear the cache, or upgrade to the professional version of App 2 SD. Moreover, the price of switching to the pro version is only $2.
Program Move2SDEnablerv0. 96.
It will be useful not only for those whose gadget runs on Android below version 2. 2. In devices with a later version of the operating system Move2SD Enabler v0. 96 allows you to move to a flash drive even those applications that are marked as “unportable” in the standard file manager (the transfer button is inactive). Before saving applications to your Android memory card, familiarize yourself with the space occupied by this program.
Link2SD program.
Unlike others, it allows you to export applications not only completely, but also in parts. That is, you can move individual libraries. Another advantage of Link2SD is that it is installed immediately in one package without copying files or running scripts.
After transferring the application with this program in devices running versions of the operating system up to 2.2, it begins to be displayed only after the device is rebooted.
To export, 2 partitions must be created on the expansion card. One is based on the FAT 32 file system, and the other is ext2 (the limitation is not relevant for new versions).
Of course, these programs completely solve the problem. But in Android, how to install applications on a flash drive right away?
Install immediately
Of course, the memory of devices, especially phones, is not infinite. And constantly transferring programs using specialized applications or the built-in Android file manager is tedious.
And I would like to know how to install applications on a memory card on Android.
Unfortunately, by default, all applications are installed in any version of Android on the internal memory. The solution to this problem can be considered to be flashing the gadget with a third-party version of the OS. But this is a very troublesome matter. In addition, you need to have decent skills and knowledge in handling this kind of software.
After installing the application, if possible, immediately move it to the memory card. Following this simple rule will help you save built-in memory resources.
Install one of the cleaning utilities on your gadget. For example, Android Assistant. After a while, systematically launch it, and clean the system and clear the cache. Using this program allows you to clear the internal memory of temporary and unnecessary files (“system junk”), and thus save space.

Comfortable work
Make it a rule to uninstall applications as soon as they are no longer needed.
When downloading various multimedia information via a browser on the Internet, immediately specify the folder on the expansion card in the saving path.
By following these tips, you can ensure comfortable work on your device, even if its internal memory resources are small. And the developers will definitely answer us about how to ensure that applications are installed on the Android memory card with the release of one of the next versions of this wonderful operating system.