How to find out which Windows is on your computer. How to find out what Windows is on your computer? Instructions for action! Returning the standard Start menu
Greetings to everyone who doesn’t know the answer to the simplest question - how to find out what Windows is on the computer... it looks like a simple question, but at work it quite often confuses people, and it is absolutely necessary to find out this point. Actually, after these awkward situations, I decided to quickly write a note with the easiest ways to find out the version of the operating system that is currently in use.
I will not use such points as - what icon does you see when you boot or what does the start menu look like? Yes, you can understand from the interface which operating system you are using, but such leading questions can confuse you even more (and if various system modifications and third-party themes were used, then turn out the lights altogether)
Working on a computer and not knowing the version of Windows installed is not exactly a crime, but it can throw you into a couple of unpleasant moments. For example, you forcibly installed drivers that are not intended for your version of the system and you will receive, sign - ... Any application has system requirements and most new games may not work on Windows 7, perhaps you just need it and everything will work for you.
I have prepared for you several ways to find out what version of Windows is installed on your computer (those who read me know that I like to describe in as much detail as possible any aspect of using a computer)
Find out the version of Windows installed on your computer through system properties
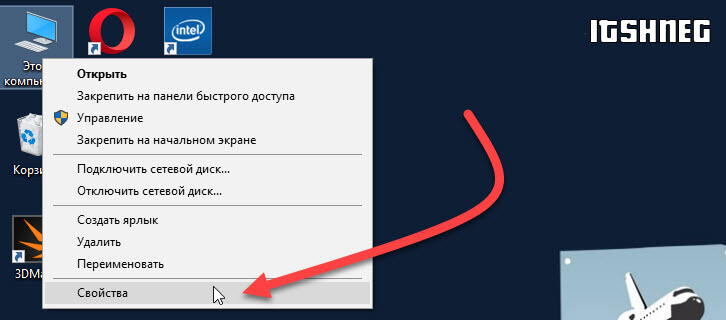
Probably the easiest way to answer our question is to go to the computer properties, for this you should have the “This PC” icon or similar (note that it is an icon, not a shortcut). Right-click on it and select “Properties”...
At the top of the “System” window that opens, we see what Windows is installed on our computer and its edition (in my case it's Windows 10 Enterprise 2016 with Long Term Servicing), and just below we can find the bit depth (system type), but this is a topic for a whole separate note.

As you can see, everything is elementary, but some users display the “My Computer” shortcut on the desktop; there will be properties of the shortcut, not your system. For such cases, there are alternative options.
Determine which Windows is installed using the winver command
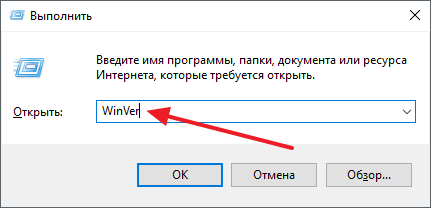
Let's move on to the next way to find out which Windows is on your computer. In this case, the winver command will help us, which must be entered into the Run application window. You can open this window by pressing the Win + R keys on your keyboard.

The “Windows: Details” window will open, where you can find out what Windows is installed on your computer (similarly, the build of your operating system is displayed here, which is very helpful when searching for errors on the Internet)

In my opinion, this method provides more complete information about the version of Windows installed on a computer or laptop... but not all that is possible - let’s move on to more interesting methods.
Determining Windows using the systeminfo command
Probably, this method can be called the most comprehensive... this option will not only allow you to find out what Windows is installed on your computer, but will also tell you about the build, installation date and other useful things. To use the systeminfo command we need to open the Windows command line (for those who don’t know how to do this, there is an excellent note “” - there you will certainly find an option that you like).
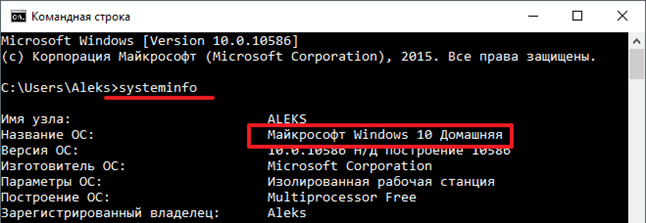
Once you have opened the command line, enter the command there systeminfo and wait until the end of collecting information about your computer. The second line in the report will indicate the version of Windows installed on the computer.

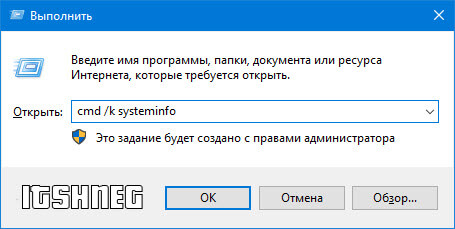
Or you can get confused and make a kind of sandwich of commands for the “Run” window. Enter the command cmd /k systeminfo and click OK. In this version, cmd launches the Windows command line, the /k key says that you need to execute the command when you start cmd, and systeminfo is the same command that will show the information that interests us.
These three ways to find out which Windows is installed on the computer are enough for any user, but as a bonus I’ll tell you one more option
Bonus. Find out your version of Windows through “System Information”
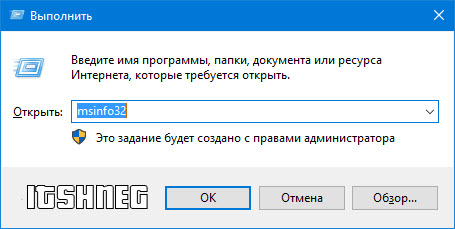
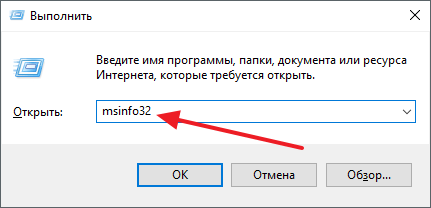
Well, the last method for today, everything is as usual, only the command is different - msinfo32. It is entered, as you already understood, into the “Run” command window.
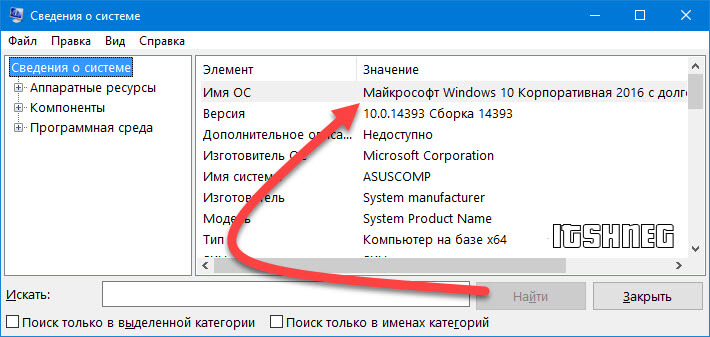
The “System Information” window will open, where you can find out what Windows is installed on the computer (in the “OS Name” line)
I did not focus on this option, since it almost completely repeats the ones described above - for general development it is simply useful to know them all.
Everything you need to know about which Windows is installed on your computer
As you can see, it won’t be difficult to find out which Windows is on the computer, but this is only if the system starts and works. I did not use the opportunity to find out the version of the killed system in this note. (for example, when you need to run recovery, but you don’t know the version) since this is not necessary for an untrained user, but a pro already knows how to do it. I'm not even talking about such indirect signs as the folder on the C:\ drive - “Document and Settings” is found only in Windows XP; there are dozens of such differences. Agree that entering a command and finding out the answer to your question is much easier than looking for signs of a particular operating system from Microsoft.
P.S. If the first method to find out which Windows is installed on your computer cannot be used due to the fact that instead of an icon you have a shortcut, this window can be opened with the combination Win + Pause/Break. Good mood to you all…
The design of Windows 10 contains elements of both versions 7 and 8 of the operating system. For example, the Start menu returned again, but in a slightly modified form. On the left side are recently opened programs, and on the right side there are live tiles instead of a list of applications.
Despite the fact that the developers listened to users and made the design more familiar - they changed the start screen, returned the Start menu, and so on, not everyone is satisfied with the existing system design. Therefore, there are several ways to make Windows 10 look like Windows 7.
Appearance
When the user first logs in to the desktop, they will see nothing but the Recycle Bin. In version 7 of the system, in addition to it, there were shortcuts to the desktop, network environment and user folders on the screen.
In the new version of the system, the design themes and icons have changed. This parameter is the easiest to change. The Internet is full of topics, among which there is Aero 7 - the standard design of the seven. It changes in the same place as the shortcuts - in the “Personalization” section.
Taskbar Settings
In Windows 10, the taskbar contains some elements that were not there in version 7 - the search bar and task view. These functions are more convenient for tablets than for the desktop version and therefore they can be hidden.
The search bar takes up a significant amount of space on the panel. To save space, and to make the Windows 10 desktop more similar in design to the 7, you can do two things: either remove the search bar completely, or make it in the form of a small icon that will be pinned to the taskbar.
For the first option, you need to right-click on the panel, click on “Search” and check the box next to “Hidden”. If necessary, you can call it with the Win button. To leave the search on the panel as an icon, instead of “Hidden”, select “Show search icon”.
The task view button shows all open processes and allows you to create a virtual desktop. You can remove it by right-clicking on the taskbar and unchecking the box next to “Show task view button”. You can see open programs and windows using the standard Alt+Win command.
Returning the standard Start menu
You can make the Start menu like Windows 7 either using system tools or using third-party programs. You can return the Start menu using system tools or using additional utilities. In the first case, you just need to remove all the extra tiles from the right side of Start.
Open Start and right-click on the icons, selecting “Unpin from Start Screen”. The tiles will disappear and the menu will become more similar to version 7 of the operating system. You can also resize the menu so that the empty tile space doesn't take up too much space.

For quick access to programs, you can pin them to the left side. Right-click on any empty space in the menu and select Properties. In the window that appears, go to the “Start Menu” and select “Settings”. Next, another window will appear with a list of applications that can be placed in the menu. This could be the Control Panel, Documents, and so on.
If this method is not suitable and you want a standard Start menu, then only special programs will help. For example, you can use Classic Shell - this is the most popular utility.
Download any of the above programs, run the installation file and follow the program instructions. Many of them have flexible Start settings. 
Windows 10 provides more opportunities to return to a familiar look than Windows 8. Users may like some innovations and decide to leave everything as is, some decide to completely redo the appearance.
Video
Very often at work I come across a situation where many users do not know basic things about their computer, namely, what version of the Windows operating system is installed. Therefore, in this article I want to tell you in detail how to find out which Windows is on your computer. You need to know this information in the following cases:
- When installing drivers on equipment;
- When installing a game or program, you need to know whether it is compatible with your version of the operating system;
- If, you need to know the version of Windows in order to insert the required boot disk in the future and restore work.
In general, you can give many examples, and if you have landed on this page, then most likely you need this information now. By the way, it is also important to know whether your system is 32 or 64 bit, because if you need to install drivers for the equipment, then when downloading you need to select the driver depending on the bitness of Windows.
Find out the version of Windows in the computer properties.
Probably the very first thing that comes to mind where to look at the version of Windows is the system properties. There are several ways to enter system properties:
- Via the control panel;
- Through the “My Computer” icon;
In order to enter system properties through the control panel, follow the steps:
In order to open “System Properties” using the “My Computer” icon, perform the following steps. On the desktop, right-click on the “Computer” icon and select properties from the drop-down list. This will open the System Properties window.
This is one of the options for finding out which Windows is on your computer. Let's look at other examples to have a complete understanding of this issue.
Find out the version of the operating system using the “WinVer” command.
The next option for finding out the system version is to use the Winver utility utility, which is designed specifically to provide the user with information about the system.
To find out the information we need, follow these steps:

This method is also quite simple, but not all of you probably know about it, so I consider it my duty to enlighten you.
How to find out which Windows is on your computer using the command line.
It is possible to view the Windows version via the command line, how to do this, read below:

Note! There is a slightly different way to run the systeminfo command.
Open the “Run” window, in the “Open” field enter the command cmd /k systeminfo 
In this case, the command line will first start and the systeminfo command will be executed in it.
In this option, information about the installed system is obtained in a couple of clicks.
Let's look at another way to find out which Windows is installed on your computer using the "System Information" utility. To open it, you need to launch the “Run” line with the keyboard shortcut “Win + R”. Enter the command “msinfo32” and click the “Ok” button. 
A new window will open in which you will get all the information about your installed operating system. 
If for some reason the msinfo32 command does not work for you, you can open the “Start” menu and enter “System Information” in the search bar. After the search finds matches, launch the utility.
If you don’t have enough information about Windows that you can view through the system, you can use various utilities. I use the AIDA64 program (old version of Everest) for these purposes. You can download it on the official website – www.aida64.com/downloads
The program is paid, but has a 30-day trial period, this will be enough for you and me. Therefore, download and install the program. After you launch it, go to the “Operating system” item. The program will provide you with all the information that was collected. 
Also in this section there is an interesting tab “Opening hours”. There the program shows information about failures, “ ”, as well as the percentage of system operability. I don’t know how objective this information is, but pay attention to it. The AIDA program provides the user with more detailed information about the system than the built-in Windows utilities.
Brief conclusions.
As you can see, it is not very difficult to find out which Windows is installed on your computer using system tools, as well as using third-party utilities. In fact, this information is available to the user in a couple of mouse clicks, but not everyone knows about it and faces difficulties when searching. I hope the information in this article was more than useful to you.
Which is installed on the computer, can arise in a variety of situations. For example, in most cases, in order to download, you must first specify your version of Windows.
If you find yourself in a similar situation and don’t know your version of Windows, then this article should help you. We offer you several ways to find out which Windows is on your computer.
Method number 1. Computer properties.
If there is one on your desktop (namely an icon, not a shortcut), then you can find out which Windows is on your computer using it. To do this, right-click on this icon and select the “Properties” menu item.
After this, a window will open with information about your computer. The Windows version will be indicated here, as well as basic information about the computer (processor name, amount of RAM).

There is also information about the bitness of your operating system. Almost at the very bottom of the window, opposite the “System type” item.

It should be noted that if you do not have a computer icon on your desktop, then you can call up this window using the Windows key combination + Pause/Break.
Method number 2. WinVer command.
The second way to find out which Windows is on your computer is the WinVer command. Press the Windows + R key combination and enter the WinVer command in the menu that appears.
After this, a window will appear on the screen with basic information about your operating system. Here you can find out which Windows is installed on your computer, as well as its version and build number.

Method number 3. Systeminfo command.
Another useful command that will allow you to find out which Windows is installed on your computer is the systeminfo command. To use this command, type systeminfo and press enter. After this, basic information about your computer will appear on the screen. Among this information you will be able to find your Windows version.
You can also execute this command in another way. To do this, press the Windows + R key combination and enter cmd /k systeminfo in the window that opens.

In this case, the Command Prompt will be launched first, and only then the systeminfo command will be executed in it.
Method number 4. System Information window.
The last method we'll look at is the System Information window. To open this window, press the Windows + R key combination and enter the command msinfo32 in the window that appears.
After this, the “System Information” window will open in front of you, in which you can find out which Windows is installed on your computer. Finding this information will be easy because it will immediately appear before your eyes.

If you have any difficulties executing the msinfo32 command, you can open this window by searching in the Start menu. To do this, simply enter “System information” into the search and open the found program.