How to check your computer disk - Victoria
Good day, dear readers, admirers and all other individuals!
Today we will talk about diagnostics program Victoria(in the text below we will simply call her Victoria or Vika :)). The whole process is divided into 2 parts and 4 stage, and in general it is extremely simple if you follow the instructions.
This diagnosis is needed in order to search and identify his current health.
Unlike the once mentioned utility Chkdsk(“How to check a disk for errors” or “Chkdsk utility”), described below Victoria, is a representative of a class of programs that work with the equipment under test directly through the ports, that is, at the lowest level, which makes it possible to obtain the highest possible performance qualities (that is, to achieve higher quality, extensive and intelligible diagnostics), although it complicates the process of creating and using such BY.
Here we go?
We will consider two options for working with the program:
- Part 1: version 3.35 from external media.
- Part 2: version 4.46 from under Windows.
Stage I: installation and preparation for launching Victoria from external media
First, download Victoria (here is the version 3.5 , which is best suited for diagnostics outside the system).
After launching the program, you need to select our flash drive, specify the file system format and select the image we downloaded, approximately as shown in the screenshot below:
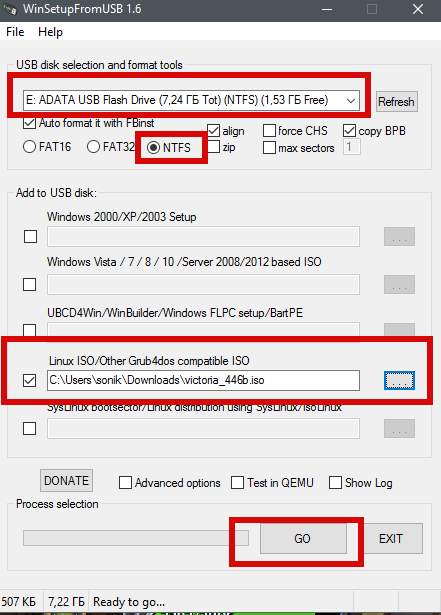
Attention!
All data on the flash drive will be deleted after clicking the " button Go", so it is recommended to first transfer everything from there.
Next, we need to boot from the disk/flash drive where we recorded the image. To do this, insert the disk into the computer, reboot, go to (button DEL or F2 at the earliest stage of booting the computer) and there we set boot from disk in the manner described below (depending on what your BIOS).
Option 1. If your BIOS looks like this, then go first to Advanced Features
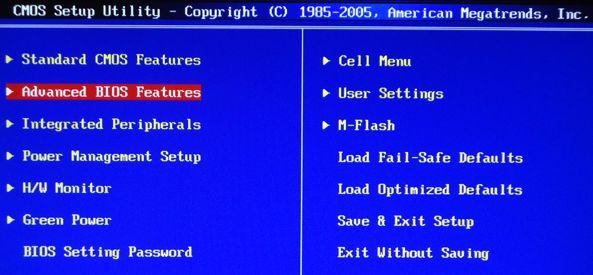
Where should you prioritize loading from CD/DVD drive just like in the picture.
Then exit BIOS through " Save and exit setup" and, if you did everything correctly, then wait until this program loads instead of the operating system.
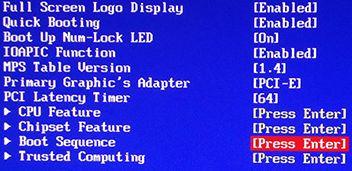
Option 2. If your BIOS looks like this:
![]()
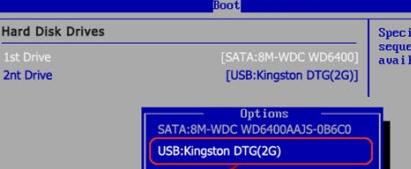
Then you just go to the tab Boot, and then set everything in the same way as in the pictures above (that is, as the first one, select boot from disk).
and you made not a disk, but a flash drive, then in BIOS You will need to select approximately the following option: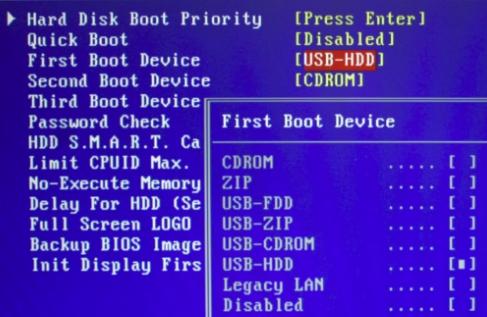
Or, let's say, like this:
If you want to know more, want to learn this professionally and understand what is happening, then.
That is, the name of the flash drive itself and its volume or something like that may be indicated. In general, it’s not difficult to figure it out.
Having decided on this, save the changes and exit BIOS, starting to download Victoria from the media.
Stage II: download Victoria program and prepare for scanning
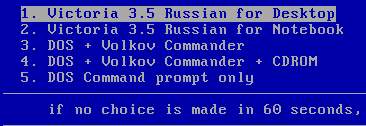
When downloading you will need to select one of the options Victoria. For a desktop computer it would be Victoria for Desktop, for laptop Notebook, the remaining items load the shell DOS and file manager Volkov Commander, i.e. in normal cases they are not needed.
Program selection options:
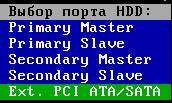
Perhaps, when you first start, you will need to select exactly the hard drive that you want to test (and not the one that is registered in the vcr.ini file - Secondary Master is indicated there in the distribution). To do this, press the key P.
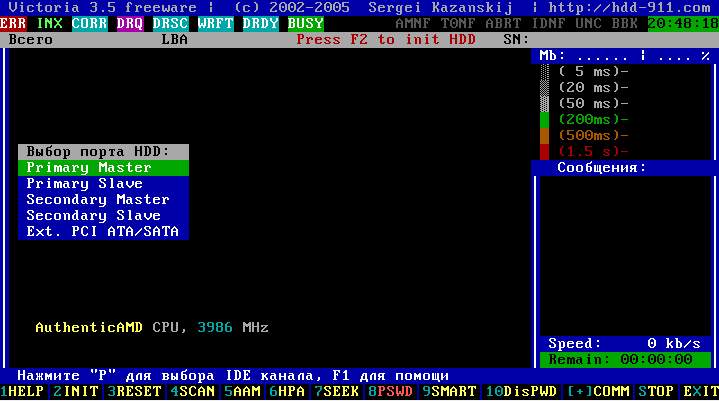
A menu with channel names will appear. The selection is made using the cursor keys " up" And " down". When you move the cursor, an indication (light bulbs) is displayed in real time, which allows you to judge the readiness HDD.
A working hard drive will always have 2 lights on: DRSC And DRDY(some may also INX). The error registers may have a red light on. AMNF, and the rest must be repaid. For more information on the purpose of indicators, see the end of the article. After placing the cursor on the desired item, you must click ENTER.
The last item of this menu is responsible for selecting the hard drive on the external (additional) PCI/ATA/SATA/ controller. After clicking ENTER The search for external controllers and hard drives on them will begin. Only actually present and serviceable hard drives in position will be detected MASTER, the system “will not notice” the rest. When each additional port is found, the table will display:
- Name of the ATA controller manufacturer (or its Vendor Code)
- Controller name (or its ID Code)
- Class: EXT / INT / RAID (external, internal, RAID)
- Port address (or a dash if it could not be determined)
- Name of the connected hard drive, if it is on the channel and is working
All found ports will be numbered. All you have to do is select the one you need by pressing the appropriate key and confirm Enter"ohm.
Note:
The program may not find hard drives on some controller models Promise. Next click F2 to “give” your passport.Passport HDD- this is information hard-wired at the manufacturer’s factory that characterizes the hard drive family and its individual characteristics.
Scanning works closely with the passport, receiving all the necessary parameters from it.
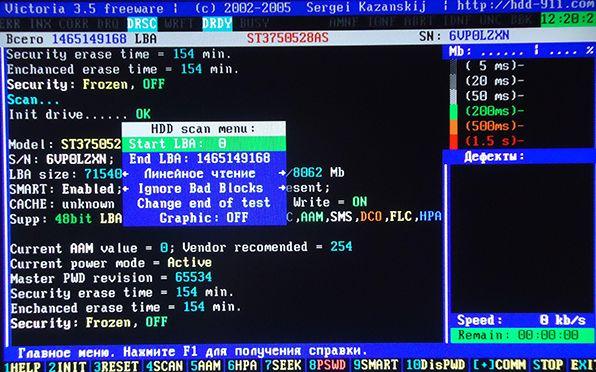
Stage III: Scan the disk for errors and problems
Now the most important thing.
To test the surface of the hard drive, press the key F4. Next, a menu will open where you need to set “Linear reading” and below “Ignore Bad Blocks”(Ignore bad sectors). The selection is made with the key "Space" or arrow keys “Right” And “Left”. The scanning window looks like this:
Attention!
In the third menu item from the top, actions such as “Record (erase)”, “Write from file” and in the fourth menu item “BB = Erase 256 sect” erase the information on the disk!
Now press again F4 to start scanning. All that remains is to wait for it to end.
At the end of the test, if you had no errors, you will see something like this:
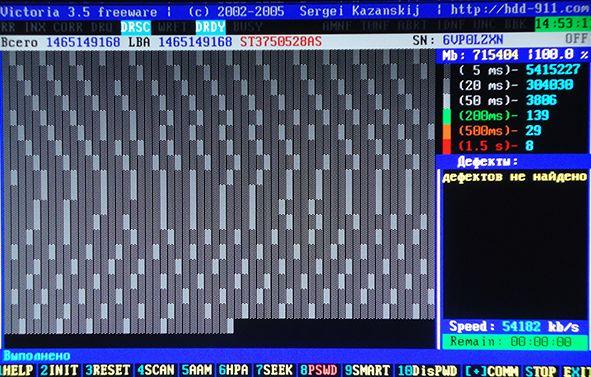
What should we focus on here? On the right there is a gradation of sectors from dark gray to red. The more orange and red, the worse it is. If the value of the red ones is especially high, then it’s probably high time to throw away the disc, especially if the list of defects is full (and not empty, as in the screenshot above).
What else is important to understand here:
- If the hard drive freezes due to a malfunction during scanning, the program waits about 16 seconds, after which it moves on to the next block, displaying the icon T(Timeout) in the scanning field;
- Continuous delays indicate that the hard drive is not responding to commands. In this case, you can try sending a reset command to its controller by pressing F3(Reset) directly during scanning, sometimes this helps;
- All possible defects and other problems will be described in the block " Defects" or " Messages" on right;
- You can also check the interface. Its check is selected in the third menu item from the top, when you press the key F4"Scan", i.e. where you chose linear reading.
The purpose of the commands is described in sufficient detail in the help system. So put pressure on F1 whenever you are experiencing difficulties.
Stage IV: Interface Check
Interface checking cyclically writes a data pattern to the hard drive's buffer memory, then reads from there and compares what was read with what was written. In this case, the reading time from the buffer is measured in the range from 64 before 500 mks.
This test clearly shows what multitasking is like in the firmware built into the hard drive - the reading time for different cycles is different and depends on the hard drive model and its operating mode. If there is a discrepancy between what was written and what was read, a message is displayed indicating the time by the clock. The presence of such errors indicates a malfunction of the interface or buffer memory of the hard drive, and such a drive is considered potentially dangerous, since it can distort the information stored on it.
To obtain high reliability, you need to run this test for a long time, similar to computer tests. It is recommended to move during testing IDE cable to diagnose bad contacts, which will be immediately detected by the program.
Note:
Exit the program, button - X.
Leaving Victoria, you find yourself in " Volkov Commander", from which you can exit by pressing the key F10 and choosing " YES" accordingly. Then you get into DOS
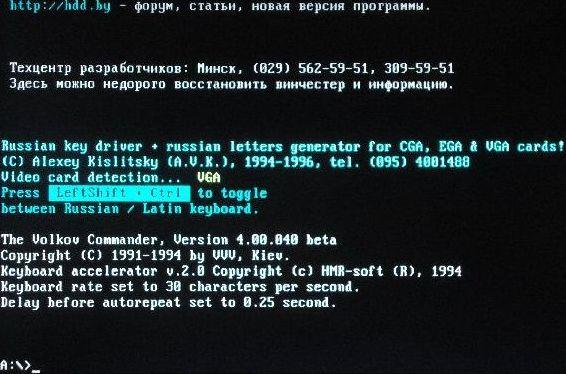
Where you can exit by clicking Control+Alt+Del. The computer will restart. Don't forget to remove the disk from the drive and return booting from the HDD.
Useful information on checking and diagnosing a disk through Victoria
Operating mode indication HDD and error codes based on indicator lights.
(Primary source - ATA/ATAPI standard)
- BUSY(Busy), - the disk is busy processing a command or is frozen. While this light is on, all other indicators are considered invalid and the hard drive can only respond to the “Reset” (F3) command;
- DRDY(Drive Ready), - the disk is ready to receive a command;
- DRSC(Drive Seek Complete), - the drive has successfully completed installing the head on the track. Outdated. On new hard drives, the assignment depends on the previous command;
- INX(Index), - lights up with each revolution of the disk. On some hard drives it is no longer used or may produce incorrect results;
- WRFT(Write Fault), - write error. Outdated. According to the new standard and, therefore, on new HDDs: “Device Fault” - device malfunction;
- DRQ(Data Request), - the disk is ready to exchange data via the interface;
- ERR(Error), - an error has occurred (you can find the error code in the error register).
Error registers:
- AMNF(Address Mark Not Found), - it is impossible to read the sector, usually as a result of a serious hardware problem (for example, on Toshiba and Maxtor HDDs it indicates a malfunction of the magnetic heads);
- BBK(Bad Block Detected), - a bad block was found;
- UNC(Uncorrectable Data Error), - it was not possible to correct the data with redundant code, the block was declared unreadable. It can be either a consequence of a data checksum violation or a consequence of physical damage to the HDD;
- IDNF(ID Not Found), - the sector is not identified. Usually it indicates the destruction of the microcode or lower-level format of the HDD. On working hard drives, this error occurs when trying to access a non-existent address;
- ABRT(Aborted Command), - the hard drive (disk) rejected the command as a result of a malfunction or the command is not supported by this HDD (password, outdated or too new model, etc.);
- T0NF(Track 0 Not Found), - it is impossible to recalibrate to the starting cylinder of the working area. On modern HDDs it indicates a malfunction of the microcode or magnetic heads.
This is the bare minimum that is worth knowing and understanding. For everything else you need to use your brain, and questions can be asked in the comments or on ours.
Using Victoria 4.46b under Windows. Instructions for checking disks
Now let's talk about using the latest official version of the program under Windows, namely 4.46 .
Having carefully studied SMART and the parameters in it, go to the tab Tests. Its functionality is generally similar to what we did in the first part of the article:

To run these same tests you will need to press the button Passp to get information about the disk that we will test (you can select it on the tab Standard, if you need another), and then Start.
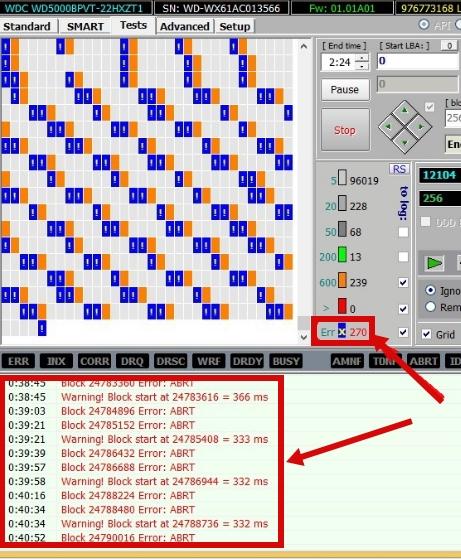
During the check, normal, faulty, problematic and other sectors will be identified, the number of which you can see both in the column on the right and in the log below (in particular, there will be more detailed information about the sectors at the beginning of a particular block, etc.). All that remains is to analyze all this and decide what to do with the disk next.
In a nutshell about working with the program from under Windows, perhaps that's all. If something is not clear, then first read the entire article, then look at the comments to it, and if something is still not clear, then, as mentioned above, contact us, for example, on the forum or in the same comments .
We move on to the afterword.
Afterword
This is how the pies are made.
Often such diagnostics are needed in the event of the appearance of tapping sounds on the hard drive or any other suspicion that the problem of incorrect operation (in particular, say, partial loss of data) lies precisely in the HDD.
Stay tuned and all that stuff. You are always welcome here, including helping;)
PS: For the existence of this article, special thanks to our BSOD-to the master under the nickname “DJON0316”.