A program for quickly testing a hard drive. How to check your hard drive for errors and what to do with bad sectors
Or removable hard drives are almost the most important for ensuring the functionality of the entire computer system and proper storage of information without loss of data in unexpected situations. Monitoring HDD operation needs to be done regularly. Let's look at what diagnostic programs hard drive exist today and what they are capable of.
What is hard drive diagnostics?
First, let's look at some of the most important aspects. Control and diagnosis of hard disks include several main processes. The most significant here are the following: preliminary collection of information about the state of the hard drive (monitoring), checking the hard drive (scanning), error correction and data recovery (if errors cannot be corrected using software).
In principle, the utility programs themselves for diagnosing a hard drive should be divided according to their direct functions (informants, scanners, “doctors” and restorers). They will be discussed in more detail a little later, although today there are many software packages that combine all these functions.
The most common HDD problems
When considering the question of what the best programs for diagnosing a hard drive are, it is worth dwelling on the most common problems and errors that they can correct.
First of all, the most common are considered system errors, which may occur due to malfunctions in the Windows OS itself, incorrect shutdown of applications, incorrect copying or moving of HDD files and folders to other areas, sudden shutdown power supply, etc. In principle, most of these problems are identified and fixed by programs for diagnosing the hard drive.

It's another matter when the user is faced with a situation of physical damage to the surface of the hard drive. Here the problem is much more complicated. Programmatically It is sometimes possible to transfer information to another area or section, but, alas, damaged areas cannot be restored. If there are too many of them, in the worst case you will have to change the hard drive. Of course, you can try to restore some of the information yourself, but in especially serious cases, say, after a temperature jump when the hard drive melted, such a procedure without the intervention of specialists will simply be impossible.
Information Preview
Now let's look at specialized utilities that allow you to collect and view complete information about the status, operation and main characteristics of the hard drive. According to experts and users, the most popular utilities are Everest, CPU-Z, CrystalDiscInfo, etc.

Any diagnostic program hard drives this focus allows you to view the full report, and it will indicate much more information than in standard Windows OS reports, although using such tools you can still see something.
By the way, it is wrong to believe that monitoring applications fix any errors or problems. They were initially created only to view all equipment parameters, and not to influence their settings in any way. In this regard, manage some HDD parameters maybe the CrystalDiscInfo utility.

However, some parameters can be viewed and adjusted even when accessing the BIOS before directly starting the system. But even there the information is far from complete, and changing the parameters will affect, say, a fan or something else. But sometimes you will have to apply some settings of hard drive controllers.
Checking HDD using Windows OS
As for the operating systems Windows family, there is minimum set to check the hard drive for errors, as well as to correct them. But this only applies to system errors.
In the monitoring plan, information can be viewed by calling the “Properties” menu from context menu by right clicking on the “My Computer” icon. More full information contained in the DirectX dialog box, which is called up from the Run menu by entering the dxdiag command. In any case, the information contained in these reports cannot be compared with what is offered free utilities.

In Windows OS, the “native” program for diagnosing hard drives is called very simply. To do this, in the standard “Explorer”, right-click on the drive or partition letter, and again select the “Properties” line from the drop-down menu. On the “General” (or “Service”) tab there is special button"Run check."
In the menu that appears, you can check the box next to the automatic line. If this is not done, the system will simply display a message stating that errors have been detected and need to be corrected. In some cases, it will not be possible to fix problems even with automatic error correction, and with each subsequent boot of the OS, an intrusive message will appear stating that one of the disks requires checking. Agree, it’s quite inconvenient, especially since even a specified hard drive surface test takes a lot of time. It's better to use here special programs for diagnosing a hard drive with advanced capabilities. By the way, the effect of their use will be felt immediately. Any user will be able to see the result even, so to speak, with an inexperienced eye.
Hard drive diagnostics: programs for testing HDDs for bad sectors

Naturally, among software To monitor the operation or basic parameters of hard drives of any type, you can find a lot of paid, shareware or completely free utilities. What is most interesting, as practice shows, free apps are often not inferior to licensed software and cope with the functions assigned to them quite effectively.
Among all the variety, it is worth highlighting utilities such as Norton Disc Doctor, HDD Scan, Hard Disc Sentinel, the same CrystalDiscInfo application, as well as CheckDisc or something else like that. Perfect for Western Digital hard drives special utility called Data Lifeguard Diagnostics, designed specifically for WD hard drives.

Interestingly, some utilities even come in portable versions and take up only a few megabytes of space.
All utilities of this type have a fairly simple interface that is understandable to any user, in which you just need to select the desired drive and set several scanning and error correction parameters. In principle, the same Disc Doctor of “grandfather” Norton allows you to specify a disk or partition, as well as use the parameters for checking the hard drive for bad sectors And automatic correction errors. Separately, in the advanced settings, you can set the Surface of the HDD).
Checking the HDD for physical damage
Unfortunately, physical damage to the surface of the HDD or removable hard drive is very common problem. This may be due to dust, overheating, short circuit electrical diagrams etc.
Checking the physical condition of the hard drive is quite simple. You just need to seek help from the appropriate programs and applications, which will detect problems, if any, within a few minutes.
Principles of correcting HDD errors in physically damaged sectors
In principle, testing the surface of disks can be done by any standard utility for HDD or diagnostic program external hard disk. That's not the point. The main thing is that such utilities can overwrite information ( checksums) from damaged sectors to spare areas of the disk. Thus, an interesting effect is achieved. In fact, the logical address of the sector does not change, although in fact the physical location on the hard drive is completely different. In general, almost all applications of this type use this principle. In addition, for the most part they are designed for completely different file systems and partition table formats.
Victoria: hard drive diagnostic program
It is worth mentioning the Victoria program, which is unique in its kind. It truly has the most powerful capabilities in its field. True, some experts recommend using the version that runs on DOS. Well, in some cases this is a justifiable step.

The application itself was developed by the Belarusian programmer S. O. Kazantsev and has proven itself in computer world very high level. It is not surprising that in the West it is now used very often. It must be said that this utility is a multifunctional package that combines the ability to monitor and test hard drives of any type and any manufacturer, the ability to automatically correct errors and restore data even in the event of very significant damage to hard drives.
Although for the uninitiated user this software package and may seem somewhat overloaded with capabilities and settings, but professionals appreciate it. Perhaps nothing better has been created today, since the program itself can be classified as All-In-One (“all-in-one”).
Data recovery from damaged HDDs
Of course, you can restore data using the Victoria utility, but few ordinary users will understand it. IN in this case I should recommend something simpler.
For example, the best recovery programs hard data disks include many powerful utilities. You can use applications like HDD Regenerator.

As the developers of this package themselves state, they found unique way the use of certain signal sequence algorithms that allow one to literally restore physically bad sectors hard drives not simply by copying information to other sections, but using the magnetization reversal technique for this. This achieves the effect when information from the damaged area does not disappear anywhere, but is read after restoration.
Naturally, if the read heads or spindle on the hard drive are damaged, not even the most modern programs won't help. However, in most cases, software and, as we see, even physical problems can be fixed.
Advanced BIOS Settings
Regarding additional settings, many programs for diagnosing hard drives can sometimes produce errors during the analysis of the hard drive or simply not see it.
In this case, you need to change the SATA controller parameter in the BIOS, most often just change from AHCI to IDE. This should help.

The most common myths and misconceptions
Very often, inexperienced users using diagnostic programs or viewing the parameters of a hard drive or fan in the BIOS for the first time panic, saying that the temperature is too high (for example, 40 degrees), the hard drive will “fly” in this operating mode. Nothing of the kind! For almost all hard drives, the optimal operating temperature range is from 35 to 45 degrees Celsius. Even a value of 50 degrees is not critical for many hard drives. It’s worse when the temperature drops below 25 degrees, which is when the likelihood of hard drive failure is much higher. However, this is extremely rare, except when working in the cold (I think hardly anyone is smart enough to do this).
Hard drive diagnostics. Which program is better?
So, although briefly, we looked at the question of what hard drive diagnostics are. The program (which is better is up to the user) designed for analysis, testing and error correction, in principle, can be anything. What to use - a specialized or highly targeted product? The answer to this question depends on what exactly the application needs to be able to do. Some people prefer separate programs, while others tend to use packages that combine all the features for working with HDDs.
For inexperienced users, simple free utilities are suitable, especially since even portable versions do not “weigh” that much and have “smart” S.M.A.R.T scanning functions. without damage to the system. But for professionals, the best in its field, of course, is the Victoria program. This is not discussed.
Conclusion
In general, if you understand testing hard drives and monitoring their condition, you can finally add only one thing: in order to prevent catastrophic situations from occurring, at least some kind of hard drive diagnostic program should be used regularly. In some cases, even simply removing dust using a regular vacuum cleaner will help (of course, without fanaticism). As statistics show, for those who check the hard drive at least once a month and monitor the general condition of the computer or laptop, the percentage of HDD failure is much lower than for users who never think about it, but try to correct the situation when everything will go almost to the extreme.
– one of the most unreliable computer components. At active use Modern hard drives last an average of 3 years. Therefore, in order not to lose your data, it is very important to regularly check the status of the drive (and do not forget to backups). In this article we will look at several ways to check hard drive for performance.
Checking the health of the hard drive using S.M.A.R.T.
If you want to check your hard drive for performance, then you should start with data from the S.M.A.R.T. system, which can be viewed in the CrystalDiskInfo program. This program is completely free and you can .
The CrystalDiskInfo program receives hard drive data from the S.M.A.R.T. system and provides an assessment of its technical condition. If the hard drive is in good condition, then you will see the rating " Good condition e". If there are any problems with the device, you will receive a rating of " Anxiety ". Well, in case of serious problems you will receive an assessment technical condition"Bad."
If you wish, you can independently analyze the information from the “S.M.A.R.T.” system. To do this, examine the list of options that is located at the bottom of the CrystalDiskInfo window. As a cheat sheet on the parameters “S.M.A.R.T.” can be used .
Checking the performance of the hard drive under load
If "S.M.A.R.T." does not show any problems, then the hard drive needs to be checked under load. To do this, just try to copy to it large number small files (weighing 2-5 megabytes). For example, you might try to save a large folder of photos to your hard drive. If it is faulty, the following symptoms should appear when copying files:
- A sharp decrease in copying speed;
- Intermittent copying speed;
- The copying process freezes;
- Computer or Windows Explorer freezes;
- Unpleasant sounds (crackling, grinding, squeaking);
- Disabling the drive;
If so manual check did not reveal any obvious problems, then you can resort to more serious methods of testing the drive.
Checking your hard drive using HD Tune
The next option is to check the disk's performance using HD Tune. This program is free and you can use it. Just don’t confuse it with the paid HD Tune Pro, a link to which is on the same page.
Launch the HD Tune program on your computer and go to the “Error Scan” tab. On this tab you need to start the test using the “Start” button and wait for it to finish.
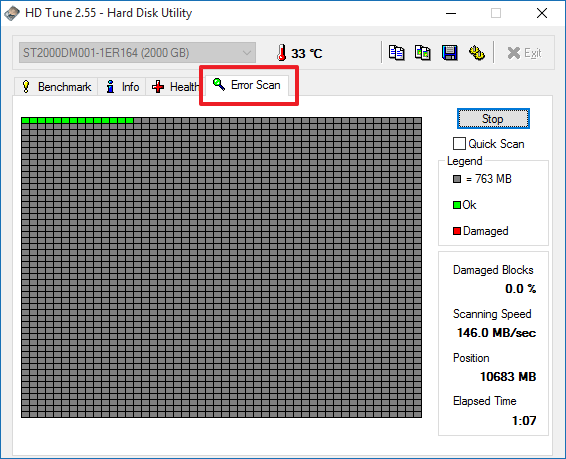
If a large number of errors were found during the scanning process, this means that your hard drive is in poor condition. Perhaps it will fail soon.
Checking the hard drive in Victoria 3.5
For the most accurate check, you need to use the program, it can be downloaded as an iso file, for example, (here is version 3.5, it is optimal for HDD checks outside operating system). The resulting iso file must be written to a CD (or flash drive) and the computer booted from it. After loading from the CD, you will need to select one of the options for launching the Victoria program. If you have a desktop PC, then select “Victoria for Desktop”, for a laptop “Victoria for Notebook” is suitable, the remaining items launch DOS and the Volkov Commander program.

To run a scan of the entire HDD surface, press the F4 key. As a result, a menu will open in which you need to select “Ignore Bad Blocks” and « Linear reading» . Please note that you do not need to use the “Write (erase)”, “Write from file”, or “BB = Erase 256 sect” options, since they delete information from the drive.
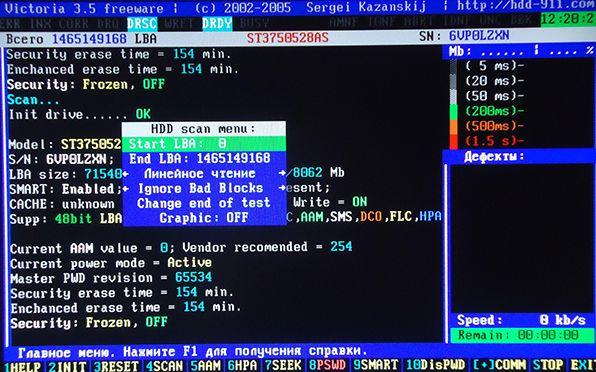
In order for scanning to begin, you need to press the F4 key again. After this, you need to wait until the program finishes checking the hard drive. At the end of testing, if the HDD does not have any problems, then you will see this result.

If the drive has any problem areas, orange and red spots will appear in the scanning window. The more such spots, the worse condition drive. If the number of red spots is especially large, then most likely the hard drive is inoperative and it’s time to throw it away. Detailed information problems will be displayed in the “Defects” block on the right side of the window.
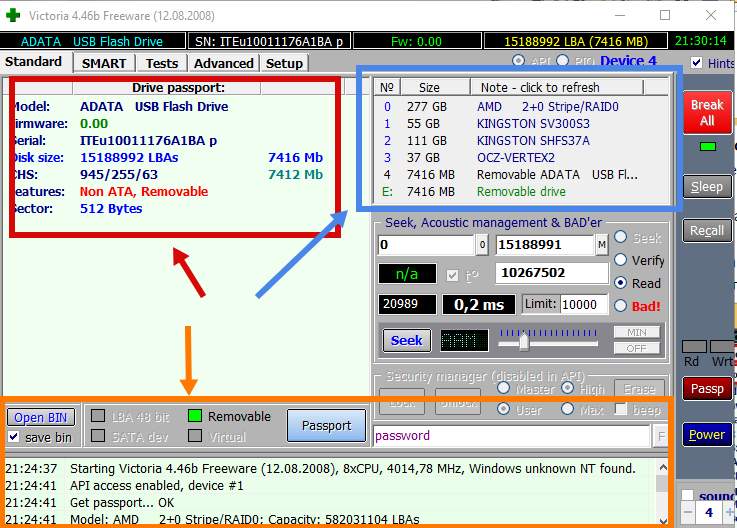
Checking the hard drive in Victoria 4.46 (for Windows)
You can also check the hard drive for functionality using the Victoria 4.46 program from the operating room Windows systems. In this case, you do not need to burn iso images and you do not need to boot from them. Everything is done right in the Windows environment.
You can download Victoria 4.46 for Windows OS, for example. The downloaded archive will need to be unpacked into any folder and run the program vcr446f.exe. After launch, the main Victoria program window will appear, which looks something like the screenshot below.
First, let's look at the "Standard" tab. Here on the right side of the window are all the drives that Victoria was able to identify, at the top left is information about the currently selected drive (if necessary, you can select another), and at the bottom is a record of all actions, errors and other information.
To test your hard drive, go to the “Tests” tab. Here you first need to click on the “ Passp” button (this will allow you to obtain information about the selected drive), after which you need to start the test using the “ Start” button.

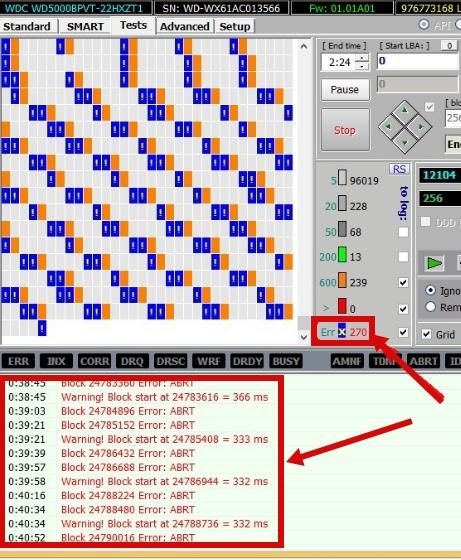
During the scanning process, the program will detect faulty and problematic sectors, the number of which can be seen in the column on the right, as well as at the bottom of the screen.
The hard drive is an important, but far from perfect, component personal computer. For some users it does not work reliably, it crashes, data from it is lost or is significantly damaged. One of the most common problems with a hard drive is the appearance of so-called “broken” (bad) sectors on it, which become a “headache” for many users. In this article, I will talk about the reasons for the appearance of bad sectors on a hard drive, list a number of programs that allow you to recognize them, and also explain how to check a hard drive for bad sectors on your PC.

What are “bad sectors”?
As you know, a traditional hard drive consists of several rotating magnetic disks over which they move magnetic heads, magnetizing any part of the disk and thus writing information onto it (in the form of zeros and ones).
The disk itself is divided into tracks, and the latter, in turn, are divided into sectors on which recording needed by the user information.
Because of certain reasons(I will list them below), information from a number of sectors cannot be read by the hard drive. Such sectors receive the status of “bad sectors”, and the system tries to either restore the functionality of such a sector (restore), or reassign the address of such a bad sector reserve sector(remap), or carry it out total cleaning bad sector (erase). In the case of remapping, spare workable sectors are usually located at the end of the hard drive, and the hard drive wastes extra time on access to them, which inevitably affects the speed of the hard drive, loading various applications and programs. Next, I will tell you how you can check your computer’s hard drive for bad sectors.

Reasons for bad sectors
What are the reasons for the appearance of bad sectors on HDD disk? Usually they are as follows:
- Gradual “shedding” of the surface of the hard drive due to its wear, due to which there are more and more bad sectors on the disk;
- Physical impact on the hard drive due to various types of external shocks;
- Power surges in the network, which directly affect the violation of data integrity on the hard drive and lead to the appearance of bad sectors;
- Incorrect shutdown of the computer (improper operation), as a result of which bad sectors appear on the hard drive.
Symptoms of bad sectors
Due to the reasons described, there are more and more bad sectors on the hard drive, which begins to directly affect the operation of the operating system. In particular, you may notice the following:
- The system boots slowly;
- The system slows down (freezes) when reading and writing data from the hard drive;
- The system refuses to boot at all (quite often in the middle of the process);
- The computer sometimes restarts for no reason;
- Various errors regularly occur while the OS is running.
After we have described the symptoms and reasons for the appearance of bad sectors, let’s move on to a description of how to check a hard drive for bad sectors.
The best ways to check your hard drive for bad sectors
So how to check bad sectors (and fix them)? Below I will describe a number of methods that have proven their effectiveness in working with various hard drives.
Method 1. Use the CHKDSK system utility
The simplest and convenient way to find and fix bad sectors on an HHD hard drive - this is to use the functionality system utility CHKDSK.
- To take advantage of its capabilities, launch Explorer, click right key mouse on an inactive volume (on which there is no operating system installed), select “Properties” from the menu that appears.
- In the window that opens, go to the “Service” tab, there click on the “Run check” button.
- Check the boxes next to the two verification options, click on “Run”, and wait for the process to complete.

The same can be done for the system volume (on which the OS is installed). The only thing is that this may require a system reboot, but after the system reboots, it will begin checking the disk for bad sectors.
You can also run CHKDSK through the console. To do this, run command line on behalf of the administrator, and enter in it:
chkdsk c: /f /r - (instead of: if necessary, specify a different letter of the problem drive) press enter and wait for the process to complete.

Method 2. Use the Victoria HDD program to analyze and treat the disk
Victoria HDD- probably the most popular program to check the hard drive for bad sectors (and to restore the latter). It effectively checks and repairs bad sectors, has good reviews from specialists, and can be used as in classical graphic mode, and in DOS mode.
One of the Wiki bonuses is the ability to read the SMART indicator of your hard drive, which allows you to monitor in sufficient detail the degree of its performance (the “SMART” tab of the program). In addition, the Victoria program performs “remapping” (reassignment of damaged sectors), resets bad sectors, conducts a detailed test of the hard drive surface, ranking sectors into different groups depending on the speed of reading information from them.
- To use this program, download and run it.
- Then go to the “Test” tab, select “Ignore” there and check the surface for bad sectors.
- If such are found, you should select the “Remap” mode in the same tab, this will allow you to reassign addresses from bad sectors to backup ones.
- If, after remapping, bad sectors remain, you can try to restore them using the “Restore” function, while the “Erase” function completely erases data in bad sectors, writing zeros there.
In general, the functionality of “Victoria” is quite extensive, and to get a full description of it, you need to go to the material specifically about using the program.
Method 3. Use the HDD Scan program to check the hard drive for bad sectors
Another program that can check a hard drive for bad sectors is HDD Scan. This is a fairly popular utility that offers several different tests (Surface Test, Smart Offline Tests, etc.). Select Surface Test, check the “Read” box on the right and run a disk surface test.
The program will analyze the response time of the available sectors and give us the result in graphical mode.

Method 4. Check your hard drive with HDD Regenerator
The HDD Regenerator program allows you to check and restore data on your hard drive, the same applies to bad sectors. I note that the program is paid, but those interested can search for free options online.
- To take advantage of the program’s capabilities, you need to launch it, select the disk to work with, decide on the scanning mode (I recommend Normal Scan), and then select the “Scan and repair” option.
- Then it will be necessary to specify the scanning boundaries (starting from sector 0) and monitor the scanning process itself.
- Depending on the response speed, sectors will be marked in different letters and color.

Method 5. Scan the disk with HDD Health for damaged sectors
Another program for checking the disk surface for damaged sectors. HDD Health analyzes the general condition of the disk, provides detailed statistics according to available sections (using SMART technologies, including the general condition of the structure, the temperature of disk rotation, the presence of bad sectors, and so on).
Icon running program is located in the system tray, and the program itself notifies the user as necessary about any problems in the operation of the hard drive.

Recovering a hard drive, removing BAD (bad) sectors [video]
Typically, checking a hard drive for bad sectors is carried out using special software tools, Victoria HDD or HDD Regenerator level. The most effective of all the programs listed in the article, Victoria HDD, allows you not only to check the surface of the hard drive for bad sectors, but also to restore them, remap them and clean them. If bad sectors begin to appear on your hard drive, then I recommend using the functionality of the above programs; they have proven their effectiveness in working with the hard drives of many users.
A computer's hard drive works hard every day, processing huge amounts of data, constantly writing and erasing it. Over several years of service, the condition of the drives may leave much to be desired: bad sectors are likely to appear, overheating, common mistakes. To protect your data from sudden problems, as well as check your “health”, there are a number of useful programs to evaluate HDD performance.
Most special software can work with data from the S.M.A.R.T self-diagnosis system. Some programs make this easier, some cause difficulties for beginners, but are invaluable for specialists.

A small program to check the status of the hard drive. Despite its modest size, functionality of this product impressive. In addition to displaying temperature and health, you can get comprehensive information about your hard drive and everything available functions devices. In addition, you can set up various types of important alerts.
It’s a pity that HDD Health doesn’t support the Russian language, and on x64 systems there may be glitches in the interface.
Victoria

Veteran in his field, great program to diagnose the drive. Unlike its analogues, it can perform a very detailed reading test, without missing a single sector. As a result of scanning, you can get not only S.M.A.R.T. data, but also a graph of the disk state by area, as well as statistics on the speed of individual sectors. So this is ideal program to check the speed of the hard drive.
The long release date makes itself felt, frightening the unprepared user with sudden errors and an archaic interface.
HDDlife Pro

The most convenient program for checking HDD, with a hint of professionalism. Conducts both general analysis of drives and monitoring during operation, notifying about problems in a whole range of ways.
Most will appreciate the support for the Russian language and the clarity of the data display. This program will do everything quickly, efficiently, and most importantly – independently.
HDDlife Pro is not pleasing except for its availability - in free use Only 14 days are given, and then you will have to pay for constant monitoring.
It's not difficult to thoroughly check your hard drive. The developers have prepared for us many tools that allow us to save our data in a timely manner and predict failures in the operation of the drive. Which program did you prefer?
The PC records user information and system data on the hard drive. Over time, the drive becomes littered and wears out. Logical errors appear related to OS failures, indexing, file table, and physical errors - bad sectors. A program for checking your hard drive for all kinds of errors and bad sectors will help you find and fix all problems. Let's talk about such programs and the features of their work.
Checking your disk for errors is necessary if your computer:
- freezes when opening and saving files;
- reboots itself;
- The OS began to load more slowly;
- When accessing the disk, specific sounds appear.
The drive can be damaged by power surges, incorrect shutdown of the PC, shock and shaking. As a result, some sectors are no longer readable - they are called “broken”. Single problem sectors do not make work difficult, but if their number grows, try to correct the errors as soon as possible.
Applications for testing
When choosing a program to test a disk, consider its type - HDD or SSD. The former are still more common, but the latter are often used as primary or additional storage. Some applications are universal and can test any type, others are tailored only for one type.
Windows built-in tools
Quickly checking the disk for errors in Windows 7 and 10 is possible with a built-in utility. In Explorer, click on to the desired disk right click, in the submenu go to “Properties”. In the window that opens, go to the “Service” tab.

Click on “Check”. In the settings, select whether you need to immediately correct system errors and restore bad sectors. At the end a detailed report will be displayed.
There is also an option to check the hard drive through the command line for serviceability. Press Win+R and enter cmd, in the black window paste chkdskC: /f /r. The “C:” parameter means that drive C will be checked; to test other drives, enter the corresponding letter in the command.
Victoria HDD
Victoria HDD perfectly understands how to check a hard drive for errors and performance:
- in the “Standard” tab, select the desired drive;
- go to “SMART” and look at the result of the background test - good or bad;
- in the “Tests” section, check the “Ignore” option to start simple testing;
- the utility will start the test, bad sectors will be colored blue– unreadable, green, orange or red – slow;
- To correct errors, run the test again with the “Remap” option enabled.

The application can also restore and reassign broken areas, scan more than 1 TB, and conduct surface flaw detection.
HDDScan
Able to identify various problems drives. How to check a hard drive in HDDScan for bad sectors:
- select the verification source from the list;
- Click “SMART” and view the results of the background scan;
- on the round button on the right select “Surface test”;
- check the "read" option and run testing.

At the end, the results will be displayed in the form of graphs, color schemes blocks and text report.
HDD Health
The HDD Health application implements a background disk scan in Windows. It analyzes the state of the surface, displays statistics on sections and rotation temperature. The program hangs in the tray and issues notifications if there are problems.
SSD Life
Simple check SSD drive. Conducts diagnostics, displaying drive health indicators as a percentage. The program has portable version, free and extended paid. When installed on your computer, you will be able to run SSD Life in the background to constantly monitor status changes. It will monitor the temperature of the SSD drive; for some manufacturers, you can change the operating speed and noise level.

Conclusion
We figured out how to check your hard drive for all errors. Select a testing program according to the drive type and run the test. If many errors are found as a result, monitor the status regularly so as not to lose all the data.